Peculiarities
The simplest garden furniture is outdoor benches used in parks and squares. However, gardeners and vegetable gardeners often make chairs, benches, and benches designed for use in the garden, and not just on the veranda or gazebo.
Handmade, rustic furniture is much more durable than what you buy in furniture stores. In order to save money, furniture is often made from chipboard, somehow protected from moisture by an adhesive layer of film.
Sometimes wood dust is used together with plastic - scraps from other products, such as lumber. Both materials are diluted with epoxy resin or glue: for example, interior doors are cast. Establishing the production of such furniture for a summer house is not a problem: the slats and boards merged in this way have longitudinal voids inside and a box-shaped profile in cross-section.
However, natural wood, well dried and impregnated with a bioprotective composition (against microbes, fungi, mold), coated with a waterproof varnish that can last for years even in heat, frost and humidity, will last at least several decades.
An example is the same Soviet stores installed in city parks in the 70s of the last century, which in some places have survived to this day. There are no special secrets to their durability. These stores were painted with street paint every two years. Resistant to fading under conditions of annual changes in temperature, humidity and ultraviolet radiation.
Finally, making garden furniture is a test of the skills of a true owner. If you are a handyman, you can make a chair, for example, by having a dozen large pieces of wood after replacing the floors in the rooms.
Almost classic furniture
The proposed chair-bed is such a simple piece of furniture that drawings for it are simply not needed. Such furniture can always be offered to a sleeping guest. Traditional materials - wood, plywood, polyurethane, textiles - make it a reliable assistant for many years.
Materials and tools
- High-quality plywood boards and boards will be used to make the frame (backrest, railing, seat base).
- Glazing beads.
- He saw.
- Furniture hinges.
- Self-tapping screws.
- Screws with nuts.
- Electric drill, drills.
- Wood glue.
- Grinding machine with attachments of different granulometric compositions.
- Varnish or paint for finishing.
You can choose the dimensions of the parts yourself, depending on personal preferences and capabilities.
Description of work
- First of all, we assemble the sides of the chair. The frame consists of:
- vertical racks, the lower part of which will serve as legs;
- three intermediate bars;
- bottom rail;
- railing
Before assembly, the components must be processed: remove roughness, smooth out corners. Drill holes in the bottom of the railing, bottom rail, posts. Connect the structure with glazing bead and glue. The main thing is to prepare the same parts for the right and left parts so that they are identical to the mirror.
- Glue the decorative strip onto the railing, moving it 2-3 cm forward.
- Attach the beams with self-tapping screws to the bottom rail inside the railing. This is where the seat base will be mounted.
- The back of the chair can be made in a similar way, but completely symmetrical and without legs. That is, the lower crossbar is installed at the ends of the side. The back of the chair will not be installed on the ground, but higher, so the height of the parts cannot be increased.
- Measure the length of your lower back. This size is the side of 3 identical squares that make up the base and folding bed. The side parts are made of bars, the bottom is made of plywood. For additional structural rigidity, we installed additional rods in the middle of each drawer. All connections are made with self-tapping screws.
- We install hinges on the drawers, 2 for each joint, so that when unfolding, we get a smooth surface.
- We place the folding parts between the side walls. We fasten the bottom drawer with 4 screws to the side walls, as can be seen in the photo.
- Install the backrest of a folding chair. The bottom edge of the backing should be slightly higher than the edge of the top box. So this part will not unfold/fold and will not interfere with the transformation.
What kind of chairs can you make with your own hands?
Before you start working, you need to clearly understand what types of wooden chairs can really be made at home:
- soft. Convenient option for home. For manufacturing, you will need to assemble a frame on which the soft upholstery will be attached;
- sliding An excellent option for saving space in the house. Their design is somewhat more complex than that of an ordinary wooden chair;
- folding. Just right for going out into nature. The complexity of manufacturing is compensated by its functionality;
- Kentucky. A simple construction of materials will require only bars. Wire or pins act as fasteners;
- on wheels - an option convenient for the elderly and disabled. The most critical stage in manufacturing will be the correct installation of the wheels, because such a chair should move effortlessly.
You can slightly modify an ordinary chair by attaching a high back to it. Both hard and soft models are made, it all depends on the imagination and skills of the master.
Sometimes you want to make a rocking chair with your own hands. The main difficulty here is preparing the arched base. But this problem can also be solved.
Main material
The reliability of the future chair, its stability, and ability to cope with loads and various climatic conditions will depend on the choice of wood and the method of final processing. You can use an old chair or armchair as a base, having previously disassembled it into its components, or, conversely, modify existing furniture.
- A material such as chipboard, which is used to make furniture, is not suitable for chairs, especially garden chairs. The reason for this is limited moisture resistance. In addition, chipboard is significantly inferior in strength to laminated and solid wood.
- Natural wood is an absolutely harmless, environmentally friendly material, although not the cheapest. Wood is best suited for making a chair with your own hands. Before starting work, the bars and boards must be inspected for cracks, knots and other defects. Next, the material is sanded, a protective coating is applied, and after that, assembly can begin.
Note! Among all types of wood, preference should be given to alder, ash, birch or oak.
The reason is simple - the unusual pattern of the fibers is combined with the durability and wear resistance of products made from them. It should be added that chairs made of such wood, when properly processed, do not crack over time and do not creak.
Wood is popular in furniture production not only because of its beauty and naturalness. It easily tolerates loads and shocks and is practically resistant to plastic deformation. The only disadvantages are flammability and deformation under the influence of moisture. The last problem is again solved by competent final processing.
DIY simple swing from an old chair
This model of a hanging chair or swing chair is good because it uses that part of the old chair that usually remains from it, namely the seat with a back, because chair legs, as a rule, are the first to deteriorate and break; restoring them is quite problematic
Of course, we sand the old part of the chair, and for aesthetics and durability we cover it with paint or stain. The most “difficult” part of making this swing chair is to make two boards with two holes in each to place our chair on and tie ropes to below. It is important immediately before attaching to center the boards under the chair so that your fifth point is in the center of gravity when sitting on the chair in a suspended state
Simple chair for the garden
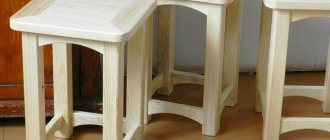
Having decided to make a chair for the dacha with your own hands from wood, having selected the drawings, you should not immediately take on complex projects. The first pancake is often lumpy, and to get the hang of it, you can try to implement the simplest options.
The simplest chair for a summer house consists of curved sides, bases, drawers and slats for the seat. Moreover, the only difficulty lies in cutting out the sidewalls. For production, plywood and wooden planks are used.
The sequence of actions is as follows:
- The sidewalls are cut out with a jigsaw from 30 mm thick euro plywood. Next, the parts are chamfered with an ordinary grinder or a manual milling cutter, after which the future spars are processed with emery cloth;
- the drawers (crossbars holding the sides together) are cut from the same plywood. The result should be 3 parts with dimensions 1200 x 100 mm. Sandpaper comes into play again;
- for a seat that smoothly flows into the back, you need to cut 35 identical strips 1200 mm long. The material will be timber with a section of 50 x 25 mm. The parts are chamfered and the surface is sanded with sandpaper;
- Next, you need to tie the sidewalls together with drawstrings. To do this, points are marked on one of them in three places, which are transferred to the second sidewall. Using an 8 mm drill, drill through holes at the designated points. Using a 5 mm drill, counter holes are drilled at the ends of all frames. Confirmats are used to connect elements;
- It's time to attach the bars that will form the seat. To do this, drill 2 holes on each side of all the blocks, and use self-tapping screws for fastening. To recess the fastener heads into the wood, the holes are pre-countersinked;
- All that remains is to treat the surface of the chair. To remove all cracks and dents, the wood is sanded. Next, the surfaces are treated with fine sandpaper, after which the wood is coated with a primer. The final stage is 3 thin layers of varnish.
Such a homemade chair for a summer house does not require much effort or complex measurements and calculations to make. However, the end result will be a truly chic piece of garden furniture. Experienced craftsmen can try making a more complex garden chair from bent plywood.
This is where both experience working with wood and a truly creative approach to the process will come in handy.
How to do it at home?
Making a rocking chair with your own hands will still be possible for those people who have basic carpentry or welding skills, depending on the chosen master class.
On skids
The easiest way to make a homemade chair on runners is from an ordinary old armchair or chair. In fact, all that remains is to add the runners themselves, securely fasten them to the legs and, possibly, sew a cover. In addition to the chair itself on legs, you will need runners, a screwdriver, screws, a drill and sandpaper. To give the rocking chair an aesthetic appearance, paint and a brush will be useful. The runners themselves are cut out independently into shape using a pattern, or they are ordered from a craftsman.
It is important that the gap between the legs is 20-30 centimeters less than the length of the runners. At those points where the chair is fixed on the legs, holes are drilled, after which the runners are “fitted on.” If the result is positive, the latter can be sanded with sandpaper and painted in several layers.
The finished “skis” are put on the legs and fixed with screws in the already prepared holes
If the result is positive, the latter can be sanded with sandpaper and painted in several layers. The finished “skis” are put on the legs and fixed with screws in the already prepared holes.
Pendulum
An excellent pendulum rocking chair is made on the basis of bearings. Compact and durable design creates even swing and is ideal for outdoor use. For manufacturing, it is necessary to prepare two steel strips with dimensions of 40 by 4 millimeters and 60 by 6 millimeters, as well as profile pipes with dimensions of 20 by 20 millimeters and with a wall thickness of two millimeters. The movement of the rocking chair can be ensured by 8 bearings, the outer diameter of which is 32 millimeters, and the internal diameter is 12 millimeters, as well as 8 bearing cages. They are created by hand on a lathe, or cut from a tube. Finally, you can’t do without a pair of garage hinges and bolts with nuts size M12.
In order to minimize welding, profile pipes can simply be bent using a homemade jig. To avoid making mistakes, it is better to first apply markings every 100 millimeters. The entire frame of the rocking chair is made from a profile pipe, that is, the support part, two sidewalls, the seat and the back. As a rule, for a standard size of outdoor furniture it takes about 20 meters. From the strip and profile, parts are created that regulate how much the back of the chair tilts, in the amount of 2 pieces.
A steel strip measuring 6 by 60 millimeters is cut into two equal parts. From it, as well as bearings and bolts with nuts, pendulums are created in the amount of 4 pieces.
On springs
It is not recommended to make a spring rocking chair with your own hands, since this mechanism is very complicated to implement. The design has a powerful and motionless base, above which there is a large spring. It is she who is responsible for rocking the soft seat mounted on top. It is much easier to make a hanging rocking chair, which will decorate both the summer cottage and the children's room.
The easiest way to make a homemade swing is from a hoop with a diameter of 90 centimeters, a piece of thick fabric with dimensions of 3 by 1.5 meters, non-woven fabric, 4 metal buckles, 8 slings and a metal ring, from which the chair itself will be suspended.
The hoop is either created independently or formed from a metal-plastic tube or bendable wood. First of all, a pair of equal squares with sides of 1.5 meters are formed from 3 meters of fabric. Each of them is folded 4 times, after which a circle with a radius of 65 centimeters is cut out of the workpiece. The blanks are marked with an internal contour and holes for slings.
At the next stage, both blanks are ground together, leaving a hole for the frame. The remaining free allowance is cut with teeth, after which the finished cover is turned inside out and ironed again. The hoop itself is covered with the selected filler, cut into strips with a width of 6 to 8 centimeters. The frame is inserted into the case, both parts are connected to each other. The cover is filled with strips of padding polyester sewn to the fabric with a hidden seam. The sling is cut into 4 two-meter pieces, the edges of which are melted on both sides. The slings are pulled through the patterns and stitched several times. Buckles on the free ends allow you to adjust the height and inclination of the rocking chair. All slings are assembled and fixed on a metal ring.
How to make a hammock chair from a metal hoop is described below.
Features of a shell-type chair
When making a shell, you will need skill in using a jigsaw, the ability to transfer the dimensions of parts from drawings to the material, and experience in deforming plywood in order to bend it in the correct shapes and directions.
Note! When cutting out parts, it is important to achieve smooth movements of the jigsaw, which is quite difficult for an untrained person.
When making a shell chair without experience working with bent plywood, you can use pieces of scrap wood to train your hand for practice. To fasten the parts of such a chair, wood glue is mainly used, and clamps are used for fixation. You can use self-tapping screws as fasteners, but in this case you will have to drown their heads in the wood fibers.
Once the bent plywood shell chair is fully assembled, all bumps and chips are sanded, after which the surface is cleaned of dirt and dust. To give the product an aesthetic appearance, it is coated with several layers of varnish.
Selection of materials and tools
To make a chair-bed you will need:
- strong beams, plywood with a thickness of 10 mm, slabs of wood materials;
- soft filler: foam rubber, latex, synthetic winterizer or their analogues;
- furniture textiles for covering the body, ideally the rough covering is combined with external removable covers made of tapestry, flock, velor or matting;
- transformation mechanism, hinges, screws for fastening individual elements;
- metal legs or attachments for timber (if necessary), additional fittings;
- standard set of marking devices (tape measure, level, pencil);
- tools for cutting and fastening parts (jigsaw, screwdriver);
- scissors for cutting textiles, furniture stapler with staples;
- carpenter's glue for coating joints, PVA for foam rubber.
The amount of materials for a chair-bed can be calculated using special programs. Due to high loads and frequent unfolding of the structure, it is not recommended to save on them. External covers should be made removable. Additional investments in zippers or textiles pay off in the ability to quickly clean the covers.
Application of pallets
To make some chairs, there is no need to look for drawings or practice wood processing. It is enough to take wooden products as a basis, which almost no one pays attention to. One of them is a pallet, or pallet, a rigid wooden container for transporting goods. A chair made from pallets will really look unusual and creative.
Another advantage of using this product is the high quality and strength of the wood from which it is made.
- The pallets are dismantled and all the nails are taken out. The elements of the future chair must be sanded, and then the tray must be assembled in the reverse order.
- The seat of the chair is formed by stacking pallets on top of each other to the desired height (usually 2 pieces are enough). The backrest also serves as a pallet, fixed perpendicular to the seat. By sawing the pallet crosswise into 2 parts, you can use it as armrests.
Before assembly, the parts are varnished in several layers. To ensure that the back and seat are not hard and look really chic, foam pillows in some unusual covers are placed on them.
Decor options
It should be said that even for such chairs, appearance is an extremely important aspect. At the same time, it is not necessary to buy any accessories for this at an exorbitant price. To do this, you can use some old unnecessary things. For example, the same pillows and bedspreads to make the chair not only beautiful, but also soft. For example, you can cover the seat and back with padding polyester, and simply stretch decorative fabric over this material.
It is better to fasten such upholstery using the simplest furniture stapler.
Cutting and primary assembly
The first and most complex element of the Adirondack is the side supports, two in number. When marking and cutting them, it is necessary to pay special attention to all sizes. It is clear that it is enough to carefully mark only the first support, and simply mirror the second.
We cut exactly 980mm, the cut should be clean, not requiring significant processing of the ends.
Next, we plan one side of the board and the lower edge with a plane to make the markings better (the upper edge will be cut off).
We apply markings on the board according to the project.
All dimensions and angles shown in the drawing have been fully tested and correspond to the assigned tasks. All points marked in red must be placed exactly as shown. The only doubt I have is the 75 degree angle at point “D”; I didn’t need it at all to apply the markings correctly, and I didn’t check it.
First I marked the left side to point “A”.
Then to the right from point “E”, an angle of 162 degrees - this is the angle of inclination of the support relative to the surface of the floor or platform.
Then I marked the cutout for the lower support of the chair back. Why, first, measure 380 mm from the right edge of the board and oh, measure another 92 mm and oh. From point “B” we draw an angle of 12 degrees, measure 90 mm on the ray of the angle, and o. We connect points “C” and “D” with a segment.
On the left side of the cutout, a curved cut is made on the support, forming a seat. The easiest way to make such markings is to mark three points and, using a metal ruler and the third hand of an assistant, draw an arc.
On the right side of the cutout there is an arc formed by part of a circle with a radius of 116 mm. If you don’t have a compass, then it’s enough to make 5-6 marks using a ruler and then connect them by hand with a curved line.
Next, we begin cutting out the first support.
It’s better to have a good jigsaw that keeps the cut vertical, but I wasn’t lucky with mine - it cut complex areas at random. Knowing this feature, I retreated 1-2 mm from the marking line, which I then removed with a grinder.
For convenience, when cutting the boards, I secured them with clamps to my improvised workbench.
Then we carefully grind the support blank and transfer its size to a second board prepared in a similar way.
The next stage is making the armrests. For some reason, the authors of the project made their width not corresponding to standard lumber. After the fact, I can say that this part could also be made from an inch, limiting the width to 150mm. Although I won’t lie, this armrest is very comfortable; a bowl of watermelon, a dish of shish kebab fit perfectly on it, and there is still room for your elbows.
After almost an hour of marking the support, working on the armrest took literally 5 minutes. Smooth contours (the right side in the drawing) were made using a pencil and a glass without any precise radii. Just like the support, the second armrest was mirrored.
Next came the smaller parts: the upper backrest crossbar, the lower crossbar and the armrest supports. In the drawing of the top crossbar there are two red arcs showing the new cutting line - my personal optimization of this part, it will be clear later why I made it.
The next step is “making the legs”, in the sense that we cut out the front and back legs. After the figurative tricks of the previous parts, these ones are done right.
The drawing of the rear leg also has a red line - the cutting line. This is also my optimization, the need for which arose after the initial assembly.
At this point, the preparation of the frame parts was completed, and I decided to assemble it to make sure that it was manufactured correctly. Assembly begins by screwing the front legs to the Adirondack legs. To do this, I simply laid them on the floor and aligned them strictly with the edge of the floorboard.
If the front legs are screwed from the outside, then the rear legs are screwed from the inside and strictly at a distance of 575 mm from the front ones. We are assembling without bolts for now, but only with self-tapping screws.
Next, we fasten the upper and lower crossbars of the backrest and the armrests with supports.
Only after this do you begin to understand exactly how each angle works and what comes out of what. All that remains is to make the seat and backrest strips and the chair is ready! The project required 7 backrest slats and 8 straight seat slats with the following parameters. The bottom (in the drawing) irregularly shaped strip was not intended at all.
However, during the assembly process, it turned out that 7 backrest slats simply did not fit into the space allotted to them; I didn’t want to remove a few more millimeters from each of them, and I was content with 6 pieces. But for sitting, it turned out that 10 straight slats are needed instead of 8 and 1 figured one.
To make the planks, I cut one board lengthwise with a circular saw and sawed it to size. I gave the back slats a wedge shape with a plane. After which I planed, chamfered and assembled the chair into a rough one.
In addition to the fact that the back of the classic “Adirondack” chair has a slightly rounded shape at the top, which without proper experience can only be drawn on the assembled chair, and then disassembled and cut out, three more small inconsistencies emerged, which I mentioned above.
1. The back leg of the upper part turned out to be wider than necessary and protruded unsightly beyond the edge of the top crossbar. Therefore, I cut off the protruding part with a wedge, as shown in the project.
2. The top crossbar turned out to be wider than necessary and protruded from both sides of the back. At the same time, the armrests did not allow the armrests to expand the backrest slats into a wider fan to eliminate this drawback. So I rounded these protruding parts as shown in the project.
3. The last seat bar did not provide an aesthetic connection to the back of the chair, so I replaced it with a curly one.
Before disassembly, I also drilled out the places for future bolted connections.
In principle, the chair is already ready and can be used, but I wanted, firstly, to correct what the eye was clinging to, secondly, to polish the parts again, and thirdly, to paint, and paint such a thing when assembled form and for it to turn out well - this is a disastrous idea.
Recommendations
- Here are some useful tips that will make it even easier to make a chair from wood with your own hands. To begin with, let's say that before creating any structure made of wood, you should carefully think about how it will roughly look and what you want to see it as. This will allow you to at least approximately determine how much of a particular material you need.
- Another important aspect is that you should not neglect such a thing as drawings. For some reason, many people do not pay enough attention to them, which is why they end up with crooked chairs and armchairs. In this matter, everything should be thought through to the smallest detail and the parameters of each detail should be checked. It would not be superfluous to say that it would be better to use a circular saw for cutting longitudinal parts, and a jigsaw for transverse parts.
- Another important issue concerns the connection of the chair elements. Everything is quite simple here. In connections where the main load occurs, it is better to use self-tapping screws or self-tapping screws. But in other cases, you can use adhesive or chopsticks made of wood. Choppers can also be used to secure the upper parts.
- An important point will be the selection of materials for processing. But here everything will depend on how high-quality the wood is used. If it is “clean” and has no defects, then it will be enough to treat it with stain and apply varnish. But if there are stains on it and there are some defects, then you should putty them, then cover them with a primer and only then paint. Another important point is that you should not paint the wood right away. It must be pre-treated with drying oil. Otherwise, it will quickly be absorbed into the surface. Then there will be bald spots, which will ruin the appearance of the chair.
DIY rocking chair
During the manufacturing process the following will be required:
- plywood sheets;
- cardboard;
- putty;
- dye;
- pencil;
- ruler;
- tape measure;
- sandpaper
- jigsaw;
- fasteners;
- drill.
Step-by-step instruction
Step one: prepare the details. The entire structure of the chair consists of two side parts, three horizontal connecting strips and 35 crossbars (needed to create the seat).
In this design, the most labor-intensive stage is the creation of the sidewalls, so it is recommended to mark them on cardboard, then cut them out, and only then transfer them to the wood.
Step two: to make the side parts you need to take multi-layer plywood 3 centimeters thick. Then you should transfer the part from the cardboard to a plywood sheet and carefully cut it out with an electric jigsaw.
Step three: after which the side parts must be thoroughly sanded with sandpaper and their edges trimmed using a grinder or milling equipment.
Step four: from plywood of the same thickness you will need to make horizontal connecting strips 120 centimeters long and 10 centimeters wide. After which they need to be sanded with sandpaper, but you should not process the edges with a router.
Step five: you need to take a block of wood 5×2.5 centimeters and cut it into 35 pieces, 120 centimeters each. After which they should be sanded and the edges removed.
Step six: in the middle part of the outer arc of the sidewalls, at the back and near the legs, we mark the places where the horizontal strips are fixed. After which these marks should be duplicated on the other side. Then you can make holes for the fasteners.
Step seven: we make through holes on the end parts of the sidewalls, and then we connect the frame with horizontal strips using screws.
Step eight: next you need to take the bars that we prepared earlier and attach them one by one to the seat with self-tapping screws.
Step Nine: The last step will be thorough surface treatment. To do this, you must first fill all the holes and go over the wood with sandpaper. Then the surface is coated with a primer and several layers of varnish.
Soft chair with armrests
First you need to plan the dimensions of the chair and perform the necessary calculations in order to obtain the desired bend of the transverse slats, as well as the angle of inclination and dimensions.
You can choose the height of the seat - forty-four centimeters, then the total width of the product will be seventy-five centimeters, and the height - ninety-three. The depth of the chair should be eighty-seven centimeters.
Now you can start making templates from cardboard, then transfer them to plywood and then cut them out. Wood elements must be sanded.
- To strengthen the ends you will need metal rims. The sides need to be painted.
- The glue will help attach the foam cushions to both the seat and the back.
- A stapler is used to secure the material. The rims are fastened with screws into pre-made holes.
- First, the back of the back is trimmed with fabric, and only then all the remaining parts. The individual parts are connected using self-tapping screws.
Solid wood chair
Making any furniture from solid wood at home will require a lot of time and effort from the craftsman, as well as the availability of special tools and equipment. In fact, the array can be used by beginners in their work, but the same chairs without the use of finishing techniques will look, to put it mildly, boring.
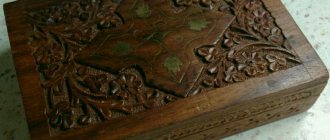
But if you decorate the products with various cuts and use wood carving skills, you can achieve a good look.
To fasten parts made from solid wood, one of two main methods is used.
- Bonding - gluing elements together with edges pre-processed on a jointer. This option is the simplest. To connect two parts, you need to form a ridge on one of them, and a groove on the other. As an option, two grooves are made into which the strip is inserted.
- The second method is docking. Wood glue and wooden dowels are used.
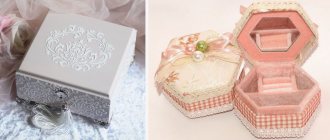
Decorating a bed chair
Various techniques can be used as design decor. A good option would be to use original fabrics for upholstery (tapestry, velvet, faux fur). Alternatively, gluing or sewing on appliques is a great solution for a child seat. The legs of the product can be decorated with rhinestones, mosaics or semi-precious stones. You can cover the furniture with a cape, or prepare several covers of different colors and textures.
At the request of the owners, the chair-bed is decorated with an additional removable cover, made upon completion of the remaining work.
Folding design
Together with classic folding chairs, you can independently make a Kentucky-type folding chair that is simpler in design, but with an unusual appearance. It will require bars of the same cross-section, which must be cut in accordance with the selected drawing. 4 long pins are used as fasteners, connecting all the bars together in different places. The rigidity of the structure is adjusted by tightening the nuts on these studs.
In fact, the different Kentucky models are as similar as possible to each other, and most importantly, when assembled they take up minimal space.
Making furniture on your own is a real creative process. With the right amount of imagination, you can turn even old, unwanted chairs into works of art.
This exciting process also saves a lot of money. There is nothing better than combining business with pleasure.
Materials for making a wooden chair
To make a wooden chair with your own hands, you need to select high-quality raw materials.
Main requirements for wood composition:
- the humidity level should be no more than 9-12%;
- cracks, deformations, branches, fungus on the surface are unacceptable;
- strength, dense structure, ease of processing are important;
- The amount of resin should be small.
It is recommended to buy raw materials with a small reserve, because During the furniture manufacturing process, chips and waste are possible when defects are detected.
- To create a solid wood structure, the grade is important. When creating chairs for the street (gazebo, recreation area), varieties with a dense structure are recommended. An array of elm, pine, oak, walnut, ash, larch, and rowan is suitable.
- For furniture intended for heavy loads, linden and alder wood is needed. Furniture made of yew looks impressive due to its red hue and texture with an original pattern. The dense structure of the array is difficult to process, but is more durable and resistant to mechanical damage.
- Country furniture is made from willow, alder, and rattan. To use the chair in warm climates, grape vines are used, complemented by rattan. Beginning craftsmen are recommended to use bird cherry, because... The material is plastic, easy to bend, durable.
- When preparing furniture for rooms with high humidity or installation near a pond, it is recommended to choose wood with a fine-pored structure. Oak, larch, and solid pine are optimal.
- Spruce chairs are lightweight, easy to process, but have low resistance to mechanical damage and are not resistant to chips and deformations.
Features of working with wood
Wood has long been considered the most popular material used in the manufacture of furniture to this day. This is due to a large number of positive qualities: wood is quite easy to process, even a beginner can handle this process. To prepare products, you can use simple tools; it is not necessary to purchase high-tech equipment.
You can even cut parts with a bow saw
You can purchase lumber at an affordable price in almost a hardware store, while ready-made furniture structures made from solid wood have a fairly high cost. That is why it is recommended to make such simple products as a chair with your own hands.
The main advantages of natural wood are:
- Environmental Safety. This material is non-toxic, therefore any harm to human health is excluded.
- Wood has good strength; it rarely deforms due to impacts and other mechanical influences.
- A structure of any configuration can be made from wood. In addition, such products will harmoniously fit into any room with any interior design.
In order to buy high-quality wood, you should consider the following features of the material:
- the humidity level should be no more than 12-13%;
- there should be no cracks, other damage or traces of mold on the surface;
- there must be a minimum amount of resin.
It is necessary to choose only high-quality lumber
You should pay attention to such points when purchasing ready-to-use lumber. In some cases, it becomes necessary to dry the wood yourself, after which it will need to be treated with a special compound to protect against fungus.
Important point! It is better to purchase material taking into account the stock, because not in all cases it is possible to accurately calculate the required quantity. In addition, during the work there is a risk of damaging any part.
An equally important criterion is the type of wood. When making outdoor furniture, only varieties with the most durable texture are suitable. These include pine, rowan, larch, and oak.
Linden has good durability
If a heavy load is expected to be placed on the product, then it is better to choose linden or alder. Material of this structure is a little more difficult to process, but it will last for many years.
If the chair will be installed near any pond or swimming pool, then it is advisable to purchase fine-pored wood for manufacturing - this will avoid problems with deformation of the structure.
Video - How to choose boards?
Recommendations for choosing wood
The choice of lumber is a matter of taste, provided that the product has a protective coating. Otherwise, the wood for garden furniture must be resistant to the external environment. In this case, both broad-leaved (chestnut, acacia, oak) and coniferous (false beetle, pine) are optimal.
To make a chair, you can use wooden pallets and pallet elements.
It is better to choose wood based on the available tools. Working with hard rocks without a finger knife, band saw and grinder will be much more difficult - cutting and processing of parts will be delayed and will not be of high quality. Don't forget that garden furniture has to be moved frequently, so the weight of the material is also an important factor when choosing wood.
How to choose material
Creative garden furniture
In order for pieces of furniture to blend harmoniously into the landscape, it is worth choosing natural wood. To do this, you can use branches, trunks or tree roots, which will help create unique works.
Natural wood has a variety of shapes, which makes it possible to produce original furniture items with minimal processing. When choosing materials, you should be creative and try to see the unusual in ordinary things.
If you want to decorate your garden with not only fashionable, but also reliable items, take a closer look at a table with a base made of concrete blocks, bonded with cement mortar and then tiled. To make a tabletop, you will need 5*10 cm bars, fixed with glue in a frame. The strips forming the surface of the table are attached to the resulting holes.
Exquisite wicker garden furniture
Stylish and economical products can be obtained from branches of flexible tree varieties. Nothing can compare in beauty to wicker garden furniture. If you do not have experience in this process, stop at bird cherry branches, which are easy to process and pliable.
Decorating wooden furniture
An equally important stage in furniture manufacturing is decor. At the same time, it is not necessary to purchase expensive accessories for such purposes, because you can even use old, unnecessary things, pillows.
You can cover the back and seat with padding polyester, and stretch decorative fabric on top. Fasten the upholstery to a wooden structure using a furniture stapler. In addition, the back is sometimes decorated with buttons, which are covered with the same fabric. You can hide the marks from the staples with decorative edging or various laces.
At this stage you will have to show your imagination. You can decorate the surface using paint of different colors - this will allow you to get a unique product that suits your interior specifically.
Country bench made from a chair
You shouldn’t use old country chairs for firewood! There is an interesting idea on how to transform them with your own hands and get an unusual bench for your garden. You will need the following list of accessories:
- three old chairs;
- a piece of plywood 1.5-2 m long;
- wood hacksaw;
- drill with drills;
- sandpaper;
- aerosol paint;
- screwdriver and screws;
- furniture stapler and staples;
- upholstery fabric;
- The foam is thick.
The seats from the chairs are completely removed - they will no longer be needed. The chairs themselves are placed in one row and their total width is measured, after which 10 cm is added to the figure. The surface of the chairs is sanded with sandpaper and painted with paint in any color. Afterwards they are again placed in a row, but a distance of 5 cm is left between them.
A sheet of plywood is placed on the seats, and places for future screw fastening are marked. Drill holes. Beautiful smooth bevels are drawn at the corners of the plywood sheet and cut out according to the given shape.
Using a furniture stapler, the foam rubber is attached to the plywood, then the upholstery fabric is folded inward, 10 cm on each side. To complete the work, screw screws into the holes and get an excellent upholstered bench.
Even the oldest and most unnecessary things can be turned into useful and functional devices. The main thing is to use all your imagination and creativity.
Frequently asked questions from beginning furniture makers
Before you start making this or that design, you should familiarize yourself with the list of questions that beginners in this business often have.
How to cut parts?
When cutting longitudinal parts, it is better to use a circular saw, and for transverse parts, an electric jigsaw.
How to connect parts of the structure?
For connections that carry the main load, you will need to use euroscrews or self-tapping screws. In other cases, the parts are assembled using wooden choppers and glue.
Paint or varnish?
The choice of materials for processing depends on the quality of the wood itself. If the material does not have any defects, it can be treated with stain and then a layer of varnish can be applied. If stains appear on the surface, the wood must first be puttied, coated with a primer, and only then painted.
How to reduce the consumption of paints and varnishes?
Quite often, during final finishing, the paint is quickly absorbed into the surface, which is why bald spots remain on it. This happens because natural wood has a porous structure. That is why professionals recommend pre-treating it with drying oil.
Adviсe
- When choosing materials, do not immediately run to the hardware store. Take a closer look at what you have available. Perhaps you or your friend have had beams and boards lying around for several years that you would hate to throw away. Stumps and snags that interfere with the site can also become a unique item or part of it. Do you remember if you have any hunting trophies lying around on your mezzanines? Antlers, skins and other paraphernalia will fit very harmoniously into the interior of your recreation area.
- Pallets (pallets) can be bought for little money at construction sites, in stores or online. You'll save significant time on cutting and assembly with these versatile designs.