You too can take part in our club of fans of “Experienced Advice”. The authors of all published tips receive valuable prizes - for example, daytime running lights, a set of car cosmetics, and a can of good motor oil.
Each reader can send their tips by email. Don't forget to include illustrations. Be sure to indicate your postal address with a six-digit code, last name, first name and patronymic (in full), as well as a telephone number for quick communication. This will speed up the sending of your well-deserved prizes.
ADJUSTABLE IS BETTER
A. Filippov, Moscow region
On VAZ cars of the tenth family, the fan-type windshield washer nozzles are not adjustable, which, in my opinion, impairs cleaning and leads to excess fluid consumption. I decided to install “classic” injectors with two nozzles sold in every store (price - no more than one hundred rubles per pair). To do this, I removed the wiper arms and marked and drilled holes for new ones in the plastic frill. I connected the injectors to the factory pipes. I fiddled with it for no more than an hour, but for five years now I have not noticed any shortcomings in the washer’s operation.
Necessary tool
You will need two keys in total:
- 10 for tightening the clamp connectors.
- 13 or 14 (depending on the design of the car) - to tighten the battery fastening.
It is better to use not open-end wrenches, but ring or tubular ("heads") . With conventional wrenches, the force on the nut or bolt head is transmitted along only two surfaces. If it is difficult to loosen or tighten (and this is possible, since hardware is used in humid and hot conditions), there is a risk of damaging the nut or bolt. This will result in a certain problem.
You should also keep in mind that with the European method of fixing the battery, you will need a long tubular wrench, since the fastening is done by the “skirt” in the lower part of the battery, where you still need to reach.
Attaching the battery to the bottom protrusion.
TREASURE IN THE GARAGE
V. Krivosheev, Samara
The reason for sending advice was a story about resource tests of editorial Largus. It mentioned that the front stabilizer mounting bolts were badly damaged by corrosion. For about thirty years now, I have been using a proven product - Movil - to protect threaded connections, including when repairing suspension. Fasteners treated with it can be unscrewed freely even after many years. The shelf life of this drug is almost unlimited. Even slightly thickened, it also reliably protects the fasteners. There is only one drawback: if it gets on your hands, you cannot remove it without a solvent.
Battery preparation
Before connecting, make sure that the battery is fully charged. There is no point in hoping that the battery will be recharged while driving, especially if you have to travel around the city. If the idle voltage is below 12.6 volts, you need to charge the battery. It also doesn’t hurt to check the level and density of the electrolyte after charging.
Multimeter in battery voltage measurement mode.
If the battery is not new, it will not be superfluous to carry out a control and training cycle. The CTC is needed to know exactly the condition of the battery and to be sure that it will not fail at the most unexpected moment.
If everything is in order, before installation you need to inspect the battery for damage to the case and its cleanliness. Contaminants must be washed off, as they can cause current leakage. To do this, the battery must be wiped with a dry napkin or cloth, and the remaining residue must be washed off using detergents and the battery must be allowed to dry completely. Plaque on the terminals is removed mechanically or chemically (using a paste of water and baking soda).
Cleaning the terminal chemically.
ONE SCREWDRIVER
P. Chistoprudov, Armavir
I read the advice on lengthening the battery mounting bolt (ZR, No. 3, 2017). I've done this for a long time. And I went further. To make the battery easier to service, all the fasteners—both the elongated bolt and two tall nuts—were made with a slot. Now, to connect the battery to the charger or remove it from the car, just one powerful screwdriver is enough - you can loosen the battery terminal clamps and release the clamping bar and plugs.
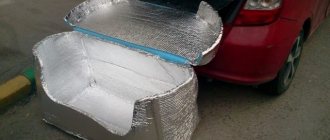
Self-production of battery thermal packaging
A large selection of materials for battery packaging offers an equally solid selection of designs. The manufacturing algorithm will be something like this:
- Remove the battery from the car;
- To make a pattern, a comprehensive measurement of the battery is carried out;
- Next, you need to make a pattern for the insulation cover, taking into account the fact that the product will be stitched. This means that you need to leave a 1 cm seam allowance everywhere;
- Now you need to cut pieces from isolon or other insulation according to the size of the battery walls, three pieces for each wall;
- After this, the cut pieces are folded so that two belong to the outer layer, and one falls on the inside of the box being made. This arrangement will reliably block the access of cold air to the battery, and the internal part will be able to retain heat for a long time;
- The next step is to cover the pieces of isolon with acid-resistant fabric. It must reliably protect the box from possible contact with aggressive materials;
- Adhesive tape or Velcro is attached to the top parts of the box using any available method;
- A lid for the case drawer is cut out of the remaining piece of insulating material;
- It also needs to be sheathed with acid-resistant material;
- After attaching the mating part of the adhesive tape, the insulation box is ready for use.
GOD SAVES MAN, WHO SAVE HIMSELF
D. Korovin, Krasnodar
Drivers usually place their bags on the front passenger seat, and this attracts the attention of unscrupulous people. To save property, I suggest that before the trip, fasten the bag with the driver’s seat belt, passing it through the shoulder strap - a simple manipulation will add trouble to the netters. One note: do this before you start driving so you don't have to take your eyes off the road later.
Design and types of batteries
The rapid development of technology has also affected the field of car batteries. Gone are the days when only serviceable antimony batteries were available. Today, if a battery needs to be replaced, drivers have plenty to choose from:
- Lead-acid power supplies. The classic type of battery, consisting of a housing in which lead electrodes are installed and electrochemical fluid is filled. The electrolyte reacts with the electrodes when current is supplied to the terminals from an external power source and when a load is connected. The average service life of this type of battery is about 5 years.
- AGM batteries are an improved version of lead-acid batteries. The main difference is the presence of fiberglass wrapping of the electrodes, which prevents them from falling off. They are manufactured using maintenance-free technology and are installed mainly in electric vehicles.
- Gel batteries use a jelly-like electrolyte instead of a liquid electrolyte, which has an order of magnitude less fluidity. This allows you to operate the battery in an inclined position, up to vertical, without the risk of electrolytic fluid leaking.
- Traction batteries differ from the listed analogues in their greater power (currents up to 1000 A and voltage up to 96 V), which allows them to be used as a long-term power source for vehicles.
Power Terminal Locations
On different vehicles, the arrangement of the terminals can be either right-hand or left-hand, or it can be called forward and reverse polarity.
What was more clear, look at how the battery terminals are shown in the photo.
When purchasing a battery, be sure to pay attention to this, since the wires at the terminals are very short and the left-hand one will not fit into the right-hand one.
There is also a European and Asian arrangement of terminals, as in the photo.
Protection
UZ for a battery is like armor for a tank, so let's start with it. It is advisable to make the ultrasound for a homemade battery charger, of course, simpler. Further, it is also advisable to build the battery autonomously, so that through it you can connect the battery to any charger whose circuit you like, or which you already have. And lastly, the ultrasound must operate as clearly and quickly as possible in order to be able to use it in charging circuits for modern batteries with sealed banks.
Ineffective car battery protection schemes
The simplest protection against polarity reversal using Schottky diodes (on the left in the figure) will not save you from overcharging extra current or from incorrectly connecting a serviceable undercharged battery. Unless by burning an expensive diode assembly. If the battery is “new, good”, then until your hands reach the “new, good” charger, the integrated protection according to the diagram on the right can help out; it can be built into an existing homemade laboratory IP.
This circuit uses the slow response of the battery to a voltage surge and the hysteresis of the relay: their release current (and voltage) is 2.5-4 times less than the operating current/voltage. Any battery charger is turned on only with a connected battery. The relay is an alternating current one with an operating voltage of 24 V and a current through the contacts of 6 (9, 12) A. When the charger is turned on, the relay is activated, its contacts close, and the charge begins. The voltage at the output of the transformer drops below 24 V, but at the output of the charger there remains 14.4 V, set in advance under load R3 in the voltage stabilization circuit. The relay is still holding, but suddenly there is an extra current, the primary voltage will drop more, the relay will release and the charging circuit will break.
This memory has serious disadvantages. Firstly, there is no protection against a voltage surge at the output due to polarity reversal of a depleted battery. Secondly, there is no self-locking: from the extra current the relay will clap and clap until the contacts burn out. Thirdly, unclear operation: any relay due to undervoltage on the winding releases with contact chatter. Therefore, trying to introduce control of the operating current into this circuit is pointless. And finally, the relay and transformer T1 must be matched to each other, i.e. The repeatability of this device is close to zero.
The ultrasound scheme, which fully complies with the above requirements, is shown in Fig.:
A simple scheme for protecting a car battery from overcharging, overvoltage and reverse polarity
The charging current flows through the normally closed contacts of relay K1, which greatly reduces the likelihood of them burning. Winding K1 is connected via a diode “or” logic circuit to the overcurrent protection module (R1, VT1, VD1), the overvoltage protection module (R2, R3, R4, VT2, VD2) and the self-locking circuit K1.2, VD3; the overvoltage response threshold K1 is set by R3. This ultrasound has only one drawback; it needs to be adjusted using a ballast load and a multimeter:
- Solder (or not yet solder) K1, VD2 and VD3.
- Instead of winding K1, turn on a multimeter set to measure a voltage of 20 V.
- Instead of a battery, connect a resistor of at least 25 W with a resistance of 2.4 Ohms for a charge current of 6 A, 1.6 Ohms for a charge current of 9 A and 1.2 Ohms for a current of 12 A; it can be wound from the same wire as R1.
- A voltage of 15.6 V from the charger is supplied to the input. The multimeter will show the voltage (current protection has tripped), because resistance R1 is selected with a slight excess.
- Reduce the charger voltage slightly until the multimeter shows 0. Record the resulting value of the charger output voltage. The alternative is a constant memory voltage and labor-intensive adjustment of R1.
- VT1 is unsoldered, K1 and VD2 are soldered in place, the R3 engine is placed in the lowest position according to the diagram.
- The charger voltage is increased until the load reaches 15.6 V.
- Smoothly rotate the engine R3 until K1 is activated.
- Reduce the voltage of the charger to the previously recorded value.
- VT1 and VD3 are soldered into place - the circuit is ready for final tests.
- A serviceable, undercharged battery is connected through an ammeter; next to it is a multimeter set to voltage.
- The test charge is carried out with continuous monitoring. When the multimeter shows 14.4 V on the battery, the content current is detected. Most likely it will be normal for this battery (see above); preferably closer to the lower limit.
- If the content current is too high, reduce the voltage of the charger a little more.
Note: in order not to cut nichrome many times for R1 - its resistivity is 1 Ohm*m/sq. mm. That is, 1 m of nichrome wire with a cross section of 1 square. mm has a resistance of 1 ohm.
Is it possible to disconnect one terminal when storing the battery?
When parking the car for a long time, which does not involve completely removing the battery, it is recommended to disconnect both terminals of the battery. If you leave them in the electrical circuit, the battery will discharge due to operating energy consumers (alarms, individual sensors, radars, etc.). It is not recommended to remove only one terminal due to the following reasons.
- If you leave the negative terminal connected, leakage currents will remain in the electrical network, and the battery will discharge faster.
- If you leave the positive terminal connected, a short circuit may occur, which can result in damage to wiring and devices and even fire in the car.
Recycling an old car battery
Failed units are not installed in the car. They must be disposed of because toxic and harmful materials were used for their preparation.
Full or partial disposal is carried out by special organizations. They operate according to a proven scheme:
- Draining and neutralization of spent electrolyte.
- Crushing the body on special machines.
- Removing debris and metal residues from the lead-acid mixture.
- Lead separation and purification.
- Re-preparation of purified lead products.
PI or UPS?
These days, a computer switching power supply (UPS) may be more affordable than a hardware transformer; suddenly he’s just lying around in the trash. UPSs are often converted into laboratory power supplies, but, generally speaking, this is a bad option. The output voltage via the +12 V channel can be raised to a maximum of 16-17 V, which is not enough for design and research purposes. And the level of impulse noise at the output is then, to put it mildly, too high. How to set up an UMZCH with its own noise of -66 dB (which is still very modest), if the power supply is “rushing” at -44 dB or worse? But charging a 60 A/h car battery from a UPS is excellent, and there is no need to install separate protection, everything is already there. They convert the UPS into an auto charger, as a whole, the following. way:
- Remove the output wires except yellow (+12 V), black (common, ground, GND) and the green PC ON logic wire;
- The PC ON wire is short-circuited to ground (connected to any of the black ones);
- Install a mechanical power switch if there is no standard one at the back;
- Using the diagram or guided by your own experience, look for a +12 V resistor in the feedback circuit Rcs in the stabilizer harness;
- Replace it with a 10 kOhm Rn potentiometer;
- By rotating the Rн slider, set the voltage in the +12 V channel to +14.4 V;
- The resulting value of Rн is measured and instead of Rcs, a constant resistor of the nearest value from the standard series is soldered in, the tolerance for variation is up to 2%;
- If possible, a universal voltage and current indicator (see below) is built into the UPS to control the charge; it is powered from the charge circuit or +5 V (red wire);
- Connect the yellow and black wires into separate bundles, securely attach current hoses with clamps for connecting to the battery to them - charging is ready!
Note: you can see two detailed options for converting a UPS into a battery charger in the video below.
Video: examples of converting computer power supplies into battery chargers
Which one to shoot first?
Before starting work, you need to turn off the power to the machine. To do this, turn off the ignition and disconnect the battery.
Experienced drivers can confidently say which terminal needs to be removed first. But for some reason, even they do not always follow this rule.
And failure to follow the order poses a potential threat. If you accidentally short it to ground, then all the electronics will burn out and the electrics will be damaged. The car could even catch fire. Therefore, you need to remember this once, and for the rest of your life.
The negative terminal is always removed first. After it, you can disconnect the positive one.
If everything is clear with this, then you can get to work.
Battery and running engine
The car battery can only be removed with the engine turned off. It is prohibited to dismantle the battery while the engine is running. And it is important to take this into account when we are talking about modern cars equipped with on-board computers.
Basic moments:
- When the engine is turned on, a charge is constantly supplied from the generator. When dismantling, the positive terminal hits the body, resulting in a short circuit. This can harm not only the generator, but also the entire wiring and on-board network.
- If the battery is disconnected without permission, a voltage surge occurs. Increased voltage affects the performance of the relay regulator, alarm system, and other components.
- The power source is turned off when the ignition is turned off.
- Dismantling is carried out in accordance with the requirements and standards that are recorded in the technical documentation.
Heating elements
Now many can - but where can they get these elements and how much energy do they take? Everything is also simple here - usually if you buy a thermal case, you will definitely be offered a heating system for it - YOU NEED TO TAKE IT!
These are plates - which are made either of plastic or of very thin textolite, with built-in heating elements. Usually there are only two of them and they are installed on the larger sides of the battery. Energy consumption is very low, from 20 to 40 W.
The consumption of the heating plates is very small, on average for two plates, which are located on the sides of the battery - 30 W.
You can compare it with heating the rear window of a car , so about 20 - 30 W, of course, they will not heat your battery “red hot”, but they will not allow you to cool down to minus values, the battery will be warm, which is “just right” for it.
What are the disadvantages:
- As a rule, the elements are powered directly from the battery, but you can turn them on only when needed, for example before starting or after starting the car engine.
- If left overnight, it can drain your battery.
- Many motorists carry with them additional small batteries, precisely to warm up the main battery, for example from “uninterruptible” batteries - this is complicated by the fact that you need to carry a battery with you, even if it’s small, but it’s still inconvenient. At home after starting it is necessary to recharge, otherwise it will run out.
The right thermal case
Now I want to protect these “miracle fur coats” a little, but there is still a point in this. But you need to do everything right. Now they sell in two directions:
- Just a thermal cover
- Heated thermal case - low-voltage plates are built into it, which, in principle, provide heat inside, which this thermal case holds like a thermos.
It is the second type that exists in winter, and it is this that you need to use on your cars. Here, the heating elements heat up the battery, it becomes warm and accepts a charge perfectly after starting the engine. This is the ONLY way a battery case should be .
Tips from the professionals
- Work on replacing batteries must be carried out in an open space where the accumulation of harmful gases is impossible.
- Before removing the battery, the ignition key must be turned to the zero position or removed from the lock.
- An old battery may be damaged, and inside it there is nothing more than diluted sulfuric acid, so special dielectric gloves and safety glasses must be used.
- It is advisable to remove rings and bracelets from your hands.
- The wires should be located as far as possible from the battery.
- Do not tilt or turn the battery over.
- Do not damage the filler plugs or neck.
- Do not add acid and store a discharged battery, as this can cause complete failure of the equipment, especially at low temperatures.
Advice! After the battery is connected, you will need to check the operation of the lights. To do this, without starting the engine, you will need to alternately turn on the low and high beam headlights, and also check the alarm system and the operation of the windshield wipers. All these devices must work properly.
What happens to a thief if he steals a car battery?
Important to remember!
You should definitely know that a person can be brought to criminal liability only if the amount of damage is at least 2,500 rubles. If your battery costs more than this amount, you can be sure that the thief will be brought to justice.
When the damage is less than 2500, then law enforcement agencies may refuse to initiate a criminal case (instead they will initiate an administrative one). But it is still worth reporting the theft; this will be important information for the police, because this may not be the first case in your area.
If the theft of the battery was committed, and the attacker was caught, then at a minimum he will be fined 80 thousand rubles. In other cases, the fine may be equal to the amount that the defendant would have earned in six months. Theft of a car worth less than 250 rubles. or its details - this is a criminal article, you can find detailed information on the Internet or in the Criminal Code - Article 158 of the Criminal Code of the Russian Federation, part 1.
Battery care to increase service life
For long-term and uninterrupted operation of the battery, proper care is required. It consists of cleaning the battery and terminals from dust and moisture, and removing dirt from the ventilation holes. Treatment of fasteners with anti-corrosion agents.
With proper care and proper use, the battery will last a long time and will not require replacement. The main thing is to monitor the condition of the equipment and be especially careful when replacing and installing it.
Learn how to double your battery life in this video:
After you adhere to all these rules and recommendations, choosing and replacing a battery will not be difficult for you. You should not try to avoid this procedure, as it may make further operation of the vehicle easier. After all, failure to comply with the requirements can lead to incorrect operation of your car, and any malfunction during its operation can cause an emergency situation.