On the hub, various interesting posts are increasingly appearing about how someone assembled another steam engine, or some kind of device powered by steam. This is understandable, at some point everyone gets tired of being hypnotized by the monitor, and the soul asks for the sea, adventure and romance, but with an engineering approach. What could be more romantic than a steam engine, and even one installed on a ship? Since there is no way to develop a full-fledged shipyard in the asphalt jungle, you can have some fun on the table. Here I’ll tell you about some of my experiments, as well as what I managed to dig up on the Internet.
Steam engines of modern times
At the beginning of the 20th century, the relevance of steam engines began to decline. One of the few companies that continued to produce decorative mini-engines was the British company Mamod, which allows you to purchase a sample of such equipment even today. But the cost of such steam engines easily exceeds two hundred pounds sterling, which is not so little for a trinket for a couple of evenings. Moreover, for those who like to assemble all sorts of mechanisms on their own, it is much more interesting to create a simple steam engine with their own hands.
The engine design is very simple. The fire heats a pot of water. Under the influence of temperature, water turns into steam, which pushes the piston. As long as there is water in the container, the flywheel connected to the piston will rotate. This is a standard diagram of the structure of a steam engine. But you can assemble a model with a completely different configuration.
Well, let's move on from the theoretical part to more exciting things. If you are interested in doing something with your own hands, and you are surprised by such exotic machines, then this article is just for you, in which we will be happy to talk about various ways of how to assemble a steam engine with your own hands. At the same time, the process of creating a mechanism itself gives joy no less than its launch.
DIY FRIEND
Dear visitors to the SAMODELKINDRUG website, in the article presented to your attention we will talk about a steam-powered vehicle. We will go “Back to the Future”, and the Craftsman from the Sovetsky District and his channel on YouTube will help us with this. Namely, what the guy managed to do was that he and his friends made a “PAROTRIK”, that is, a trike with a steam engine. All spare parts, components and assemblies were taken from scrap metal; only a pressure gauge and half-turn valves were purchased. The basis was taken from the developments of the last century, when steam engines were the “engine of progress”. The principle of operation of a steam engine is quite simple) The basis is a boiler with water, when heated, water vapor is released, excess pressure is created, which enters the cylinder through a steam line and pushes the piston, and he, in turn, pushes the flywheel or the wheel at once, then the piston reaches a certain point where the relief valve is located and through it the steam escapes to the outside, thereby freeing the cylinder chamber for the next portion of steam. For clarity, let's look at a simple diagram (of a steam locomotive). Here's also another diagram for greater clarity, although it's the same here. As you can see from the drawing, everything is quite simple, only the author made his boiler in comparison with a steam locomotive, as if miniature, for which he needed waste gas cylinders for domestic use, with a wall thickness of 4 mm, the operating pressure at which the trike could easily move and develop speed 3-4 bar
Again, let's go back a little to history, at the very beginning of the development of steam engines, engineers tried to create self-propelled crews and this is what they did.
Gradually, this direction gained support among the public and development began. And now a more modern steam-powered carriage, more or less similar to a car.
And so the basis is naturally a steam boiler, in which water acquires a vapor state and then flows through pipes to the pistons. The heated steam then enters the cylinders and pushes the piston. The piston in turn moves the flywheel or wheel. Everything is very clear with the operation of the steam engine and the design of the boiler, now let’s look at how the author created his “STEAM TRIKE”. To begin with, a frame was made, designed for three wheels (trike). The wheels were used from the Ural motorcycle, as well as the limbers. The steering is from a VAZ. One piston with a sleeve is used from a diesel tractor with a volume of more than 2.5 liters, and the second is bored out from a Minsk motorcycle. Next, a boiler is installed on the resulting frame and connected by tubes to the cylinders. This is the trip “Back to the Future”
Method 1: DIY Mini Steam Engine
So, let's begin. Let's assemble the simplest steam engine with our own hands. Drawings, complex tools and special knowledge are not needed.
To begin with, take an aluminum can from any drink. Cut off the lower third from it. Since the result will be sharp edges, they must be bent inward with pliers. We do this carefully so as not to cut ourselves. Since most aluminum cans have a concave bottom, it is necessary to level it. It is enough to press it tightly with your finger to some hard surface.
At a distance of 1.5 cm from the top edge of the resulting “glass”, you need to make two holes opposite each other. It is advisable to use a hole punch for this, since it is necessary for them to be at least 3 mm in diameter. Place a decorative candle at the bottom of the jar. Now we take regular table foil, crumple it, and then wrap our mini-burner on all sides.
Steam conquers the world
Newcomen's steam engine, first installed in 1712.
It was a real breakthrough. Rotational motion could find a much wider range of applications. From the crankshaft, drive belts can be used to transmit motion to weaving and other machines. Now steam could make the wheels of self-propelled carriages spin.
The first attempts to use steam to create new means of transportation were made in the 70s of the 18th century. These machines moved on roads, but it would not be long before people found another use for the steam engine—railroads. Watt lived until 1819 and could see the beginning of the Industrial Revolution that his invention spurred, but he did not live six years before the dawn of the railroad era.
Mini nozzles
Next, you need to take a piece of copper tube 15-20 cm long. It is important that it is hollow inside, since this will be our main mechanism for setting the structure in motion. The central part of the tube is wrapped around the pencil 2 or 3 times to form a small spiral.
Now you need to place this element so that the curved place is placed directly above the candle wick. To do this, we give the tube the shape of the letter “M”. At the same time, we bring out the areas that go down through the holes made in the jar. Thus, the copper tube is rigidly fixed above the wick, and its edges act as a kind of nozzle. In order for the structure to rotate, it is necessary to bend the opposite ends of the “M-element” 90 degrees in different directions. The design of the steam engine is ready.
Engine starting
The jar is placed in a container with water. In this case, it is necessary that the edges of the tube are under its surface. If the nozzles are not long enough, you can add a small weight to the bottom of the jar. But be careful not to drown the entire engine.
Now you need to fill the tube with water. To do this, you can lower one end into the water, and draw in air with the other as if through a straw. We lower the jar into the water. Light the candle wick. After some time, the water in the spiral will turn into steam, which, under pressure, will fly out of the opposite ends of the nozzles. The jar will begin to rotate in the container quite quickly. This is how we made our own steam engine. As you can see, everything is simple.
Steam engine model for adults
Now let's complicate the task. Let's assemble a more serious steam engine with our own hands. First you need to take a paint can. You should make sure that it is absolutely clean. On the wall, 2-3 cm from the bottom, cut out a rectangle with dimensions of 15 x 5 cm. The long side is placed parallel to the bottom of the jar. We cut out a piece of metal mesh with an area of 12 x 24 cm. We measure 6 cm from both ends of the long side. We bend these sections at an angle of 90 degrees. We get a small “platform table” with an area of 12 x 12 cm with 6 cm legs. We install the resulting structure on the bottom of the jar.
It is necessary to make several holes around the perimeter of the lid and place them in the shape of a semicircle along one half of the lid. It is advisable that the holes have a diameter of about 1 cm. This is necessary in order to ensure proper ventilation of the internal space. A steam engine cannot operate well unless sufficient air is supplied to the fire source.
What was the first exhibit of the Kunstkamera in St. Petersburg
The Kunstkamera was founded in St. Petersburg on the initiative of Peter the Great in 1714, and opened to the public in 1719. Initially, it united mainly Peter’s personal collections, acquired during his travels in Western Europe. The first exhibit of the Kunstkamera was the huge so-called Great Gottorp Globe (3.11 meters in diameter), created in 1650-1664 in Holstein (Northern Germany). Inside the globe there was a planetarium. In addition, with the help of a hydraulic drive, the globe could make one full revolution during the day and, therefore, could also serve as a clock. In 1713, Peter learned about the outlandish globe and ordered the commander of the Russian troops in Pomerania, A.D. Menshikov, to “beg” for it.
Where is the oldest aqueduct currently in use?
An aqueduct is a water conduit for supplying water to populated areas, irrigation and hydropower systems from sources located above them. The oldest (built by the Romans in the 1st century AD) of the aqueducts currently in use is located in Spain. It supplies water from the Frio River to the city of Segovia (a distance of 16 kilometers).
Who coined the term “robot” and what are the basic laws of robotics?
The term "robot" was coined by the Czech writer Karel Capek (1890-1938) and first appeared in his 1920 play RUR (Rossel's Universal Robots) about a robot uprising. To ensure that there were no robot uprisings and that a robot could never harm a person, the American writer Isaac Asimov (1920-1992) formulated three basic laws of robotics:
1. A robot cannot cause harm to a person or, through inaction, allow a person to be harmed. 2. A robot is obliged to carry out human orders if these orders do not contradict the first law. 3. A robot must take care of its own safety - but only as long as this does not contradict the first or second law.
Who, when and why invented barbed wire
American inventor Joseph F. Glidden received a patent for barbed wire on November 24, 1874. This invention is associated with the beginning of the struggle for land plots in the American West - dopinfo.ru. Livestock owners demanded respect for the right to free grazing, which was contrary to the interests of farmers. Barbed wire fences helped the latter protect their plots of land from foreign herds. Disputes resulted in bloody clashes. Barbed wire meant the end of the cowboy era.
Main element
We make a spiral from a copper tube. You need to take about 6 meters of soft copper tubing with a diameter of 1/4-inch (0.64 cm). We measure 30 cm from one end. Starting from this point, it is necessary to make five turns of the spiral with a diameter of 12 cm each. The rest of the pipe is bent into 15 rings with a diameter of 8 cm. Thus, at the other end there should be 20 cm of free tube.
Both leads pass through vent holes in the lid of the jar. If it turns out that the length of the straight section is not enough for this, then you can unbend one turn of the spiral. Coal is placed on a pre-installed platform. In this case, the spiral should be placed just above this platform. The coal is carefully laid out between its turns. Now the jar can be closed. As a result, we got a firebox that will power the engine. The steam engine is almost made with your own hands. Left a little.
Water container
Now you need to take another paint can, but of a smaller size. A hole with a diameter of 1 cm is drilled in the center of its lid. Two more holes are made on the side of the jar - one almost at the bottom, the second above, near the lid itself.
Take two crusts, in the center of which a hole is made with the diameter of a copper tube. 25 cm of plastic pipe is inserted into one cork, 10 cm into the other, so that their edge barely peeks out from the plugs. A korok with a long tube is inserted into the lower hole of a small jar, and a shorter tube into the upper hole. We place the smaller can on the larger can of paint so that the hole in the bottom is on the opposite side from the ventilation passages of the large can.
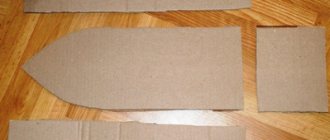
The easiest machine to make
Paper crafts are in no way inferior to ready-made factory models. You can also play with them, they also look believable, any boy can paint it at his own discretion.
For the product you will need:
- A4 paper sheet;
- scissors;
- colored markers.
The process of assembling a simple machine
- cut out a square from the sheet;
- bend in the center;
- turn the edges over and bend them towards the center;
- bend the extreme sides in the reverse order; bend the figure in half;
- on the resulting figure we draw lines reminiscent of a car, after tucking the upper corners into the center;
- fold the small corner into a large one;
- we bend the lower corners back and cut them in a semicircle to create wheels;
- We bend the corners in the area of the headlights and complete the missing elements.
In a short time, the easiest version of the machine is obtained.
Result
The result should be the following design. Water is poured into a small jar, which flows through a hole in the bottom into a copper tube. A fire is lit under the spiral, which heats the copper container. Hot steam rises up the tube.
In order for the mechanism to be completed, it is necessary to attach a piston and flywheel to the upper end of the copper tube. As a result, the thermal energy of combustion will be converted into mechanical forces of rotation of the wheel. There are a huge number of different schemes for creating such an external combustion engine, but in all of them two elements are always involved - fire and water.
In addition to this design, you can assemble a Stirling steam engine with your own hands, but this is material for a completely separate article.