The robe is a comfortable and cozy home garment that reflects the style of the housewife.
There are many styles and varieties for sewing it (with a wrap, with buttons, with a zipper, without seams), created on the basis of the general principles of pattern construction and sewing technology.
Even a housewife with no skills can sew a robe with her own hands in one day. To do this, just choose the right style, fabric and necessary accessories. Imagination and the desire to be unique will help you sew a dressing gown that emphasizes the attractiveness of the hostess.
Mandatory measurements
Before you start cutting fabric, you need to take basic measurements.
1. Circumference:
- breasts—OG,
- waist—OT,
- hips—OB,
- neck—OSH.
2. Length:
- products—DI,
- from shoulder to waist—DT,
- sleeves—DR.
3. Back width—ShS.
Progress
- Lay out the patterns on the previously prepared fabric, outline them with chalk, not forgetting to add allowances. Separately, open out the pieces for sewing the pockets.
- Cut out the pieces.
- Sew the necessary darts.
- Sew the shoulder seams using a backstitch.
- Sew along the side seams of the sleeves.
- Sew the sleeves into the open armhole.
- Sew the burlap pockets to the details of the shelves.
- Sew the side seams.
- Sew a separate part (collar) to a one-piece collar, pre-processing its sections with tape.
- Also treat all cuts with tape.
- Fold the bottom of the robe, stitch it at a distance of about 3 cm.
- Sew a belt piece if desired.
- Produce WTO products.
Ready!
Are you convinced that you can sew a traditional and cozy robe with your own hands even without particularly deep knowledge and skills in sewing? A simple step-by-step design and a “sorted-out” sewing technology make it possible for even beginners in needlework to make a product from high-quality fabric that can be used as comfortable clothing for the home.
And now we invite you to familiarize yourself with current and unusual products based on the robe pattern. Beautiful products made of satin, chintz, silk, a flannel or lace satin robe, a product for summer or beach use, with a shawl collar - the choice is yours! It can be short or long, absolutely anything. Want to sew one of these yourself? Get inspired and create!
How to sew a robe without a pattern
In this case, the product is modeled on fabric. If the fabric width is 150 cm, you will need a fabric whose length is equal to the length of the robe plus 6-8 cm. Otherwise, you will need twice as much fabric.
Cutting order
Fold the wide fabric in half lengthwise, and the narrow fabric crosswise with the wrong sides inward. One of the edge sides of the narrow fabric will be the middle of the back. Therefore, you need to set aside 1.5 cm from it for the seam and draw a line. When cutting on a wide canvas, the back of the robe will be without a seam.
Calculations of the dimensions of the details of the robe are carried out based on the taken measures.
Robe width
It is determined by hip circumference (HC), dividing the value (HC) by 2+20 cm into loose fit and smell. For example, with OB=100 cm, the width should be 100/2 +20 = 70 cm.
To the right of the middle of the back, set aside the width (70 cm) and draw a straight front. A model of this width will fit well on any figure.
Length marking
It's good when the length of the fabric matches the DI. Otherwise, it must be applied to the fabric. If desired, the product can be made shorter.
Neck marking
To create a neckline you need:
- on a narrow fabric from the edge of the back, put 1.5 cm on the seam and draw a straight line;
- on a straight line, set aside 3.5 cm (1.5 cm for the seam, 2 cm for the neck);
- From left to right, set aside neck width - 9 cm;
- Connect the resulting points with a smooth line, which will determine the shape of the neckline.
Shelf marking
Mark the shelf on the fabric as follows:
- on the right, from top to bottom, set aside 1.5 cm for the shoulder seam allowance;
- From the resulting point, set down the length from the shoulder to the waist (DT). This may be the maximum depth of the cut. If desired, it can be reduced by moving the required number of centimeters up from the point;
- from right to left, from the top of the fabric from the straight front (smell), set aside 9 cm for the width of the neck;
- Connect the resulting points with a straight line. In this case, the cutout will be in the form of a triangle.
Draw the armhole
The armhole should be positioned strictly in the center of the fabric:
- from top to bottom, draw a vertical line of 25.5 cm, where at the seam it is 1.5 cm, at the armhole it is 24 cm;
- cut through the fabric in a straight line. The neckline can be oval. Then the armhole will be wider. The shoulder will drop slightly if the armhole line remains straight.
If the fabric is voluminous, then the depth of the armhole and the width of the sleeves should be increased.
Sleeve design
A hand-sewn robe can be with or without sleeves. To create a sleeve pattern you need:
- Measure the length of your arm from the shoulder to the desired length. It can be just below the shoulder, to the elbow, 3/4 or to the wrist;
- cut a square of standard size (48 cm) or with sides of specified length;
- make an allowance for the hem of 1.5 cm.
Rectangular sleeves are sewn into the straight armhole.
Assembly of parts
After cutting the robe, its parts must be assembled and tried on. If necessary, adjust the details and then sew on a sewing machine.
All seams must be finished with a zigzag or overlock. If the fabric is thin, you can turn the edges of the seams under and sew with a straight stitch.
It is good to trim the edges of the seams of a winter robe made of dense, non-flowing fabric with scissors—zigzag.
Such a robe will be beautiful and neat not only from the front side, but also from the back.
Do not forget to sew two halves of the belt, make and process a hole for it on the right side at the waist line.
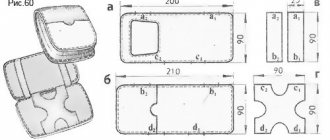
We build the simplest possible pattern ourselves
To create a pattern for a robe and some other things of a non-fitting cut, you can take as a basis a drawing of a shirt or a simple dress (sketch below). To do this, take all the measurements noted in the drawing, carefully repeat the outline of the shirt on a sheet of whatman paper/wallpaper or paper you use for cutting. It's clear even for beginners, quick and easy!
After the outline of the shirt is drawn on paper, we move on to the next task: modifying the pattern to fit the product we need. For this:
- Move the shoulder line and the lower side of the shoulder down 1-2 cm.
- Adjust the sleeve length to the required length.
- Shift the neck line of the shelf by 3 cm.
- Increase the width of the shelf for a “wrap” cut.
- Draw a pocket of the required shape.
! Please note! On the back side we only add sleeve changes. Otherwise, the back line remains the same.
As a result, we get the following parts for a one-piece robe : two front parts, one back part with a fold, two pocket parts.
You can sew according to this pattern or use another one - a loose wrap robe can be easily sewn in different ways.
Robe models for beginners
The role of dressing gowns is multifaceted. This is not just casual wear. There are styles in which unexpected guests are greeted, and hostesses look impressive.
Below are several models of dressing gowns that a novice needlewoman can sew with her own hands.
Robe-kimono
This is a simple model with one-piece sleeves. For sewing, you need cotton fabric 150 cm wide, and the length of the cut should be equal to the length of the robe, multiplied by 2 plus 6-8 cm for the hem. For example, the length of the robe will be 100 cm. Then the length of the fabric should be 100 x 2 + 6 cm = 206 cm.
Cutting rules
Fold the fabric along the length of the product (DI) in half with the wrong side inward. You will get a rectangle 150 by 103 cm. To correctly apply markings and cutting, you need to draw a straight line in the middle of the canvas.
Apply parts to the canvas in the following sequence:
- for the neckline, apply 9 cm in both directions from the drawn line. For the front, the depth of the cutout can be arbitrary. The maximum depth is equal to the length from shoulder to waist (WT);
- on both sides of the fabric from top to bottom, set aside 20-30 cm for the armhole;
- To draw a sleeve line, you should take into account the width of the robe. If its width is 100 cm, then the remaining 50 cm is divided by 2 and the sleeve length is 25 cm (150 cm width of the fabric minus 100 cm width of the robe = 50 cm/2 = 25 cm);
- From the height of the armhole towards the center of the fabric on both sides, set aside the calculated length of the sleeve (25 cm);
- At the bottom of the fabric from the center line, set aside half the width of the robe. In this example, 50 cm in both directions (100/2=50 cm);
- Connect the resulting points with straight lines. If desired, the length of the sleeve can be increased with the remaining parts of the fabric.
When cutting, do not forget about seam allowances of 1.5-2 cm.
Before sewing the side seams, the robe must be fitted, tried on, if necessary, adjusted. Then you can start sewing on a machine. All seams must be finished. Fold the sleeves and bottom of the robe and stitch with a closed cut. You can also process the neck and front shelves, or make a trim with a strip. At the end of the work, all that remains is to sew the belt and you can demonstrate your work to your household.
Robe without seams
Every novice needlewoman can quickly sew this robe model without a pattern.
To do this, you need to cut it right onto the fabric, then trim the edges with tape or a closed-cut seam, sew on the drawstrings, sew on a belt, and the robe is ready. The model without seams can be used as an apron.
Cutting rules
Choose fabric. The length of the narrow fabric should be equal to twice the length of the robe, plus 2-3 cm for the hem. Fold the fabric in half widthwise, connecting the edges, and draw a line in the middle of the length of the fabric (middle of the front and back), from which you need to mark the neckline and waist. To do this, do:
- from the middle of the back and front (shoulder line), set aside 7 cm of the edge for the neckline;
- on the front part put 18-20 cm down, and on the back 2 cm. Connect the resulting points with a straight line in front and a smooth line on the back;
- measure the length from shoulder to waist and draw lines for the drawstring on both parts of the product. Repeat the line after 2 cm;
- Make cuts along the shoulder line from the edges to the neckline for free movement of the arms. The length of the cuts is arbitrary.
A light robe, sewn by yourself, will become a comfortable outfit before going to bed or while doing your morning makeup. A correctly selected style will decorate the figure of the craftswoman.
Experts recommend choosing a loose cut for your dressing gown so that you feel comfortable in it. Home clothes should not restrict movement.
From the history of the robe
Today we perceive the robe primarily as a piece of home clothing (with the exception of kimono jackets, which have come into fashion not so long ago). Now it is primarily the personification of elegant and comfortable underwear, especially in demand after water procedures.
But many people know that the history of the robe dates back to the dawn of centuries, in the depths of Eastern civilization. Even the name “robe” has Turkic or Arabic roots, and translated simply means “clothes.” In a dusty, arid climate, but prone to sudden changes in air temperature, it was difficult to do without this type of protective clothing. Robes protected not only women, but also men from heat, cold and wind; they were sewn from thick fabric.
Having appeared in Europe and Russia, dressing gowns almost immediately began to occupy an “intermediate” position between underwear, in which it was impossible to be seen outside the bedroom, and weekend clothes. That is, having breakfast surrounded by family members in a dressing gown was considered acceptable for nobles.
Fabric selection
You can use different types of fabric for a robe:
- Synthetics look beautiful, are durable and have a longer service life, while being electrified and poorly breathable.
- Sometimes Yorkie fabrics are used.
- Bamboo fiber works well, but is an expensive material.
- Cotton is also often used to make robes.
- Silk robes are beautiful and practical, but are not suitable for everyday wear.
Terry cloth robes are widely popular.
DIY blanket with sleeves + Pattern
Still an amazing and incomprehensible nature. Yesterday there were still drifts of snow and there were snow drifts, such that we even had to rescue cars on the roads. People couldn't get to work in the morning. This happens often when there is a snowstorm.
And this morning there is no snow anymore! The rain is drizzling. I was even surprised how he melted so quickly.
Be that as it may, the house can be cool at this time and sometimes you just want to wrap yourself in a cozy blanket. Today I suggest you sew a blanket with sleeves with your own hands and I also give you the pattern.
How to sew a blanket with sleeves with your own hands
Just a year ago I often saw advertisements for the sale of blankets with sleeves. This is such an amazingly interesting idea! After all, it’s true that, wrapped in an ordinary blanket, your hands are hidden under it and it’s not very convenient to hold a cup of tea, much less sit at the computer, since the blanket tends to fall off all the time.
A blanket with sleeves will solve this problem. Your hands will be free to move, and the blanket will not go anywhere, you can even walk in it like in a robe.
I saw that people were interested in how to sew a blanket with sleeves with their own hands and asked each other for patterns. This also interested me and I began to think about how to make such a thing a reality.
Time passed, only now I returned to this topic and found several patterns on the Internet.
But I decided to test them in practice and even risked ruining my old robe.
As a result of experiments, I created my own pattern for a blanket with sleeves, somewhat modernizing and simplifying the ones I found, and at the same time tell you how to cut and sew a blanket with sleeves.
Only my diagrams will be schematic. You understand that a robe, especially a cut-off one, cannot make a full-fledged blanket, so I had nothing to photograph, I just felt when cutting and sewing how everything should turn out.
So, let's start with choosing fabric.
I noticed that ready-made blankets with fleece sleeves are most often made of fleece: a very warm soft fabric, quite suitable.
I once suggested to you the idea of a baby fleece blanket crocheted. Look who hasn't seen it yet.
Now fleece with a pattern is on sale, so beautiful and unusual. This would make a really cool DIY blanket with sleeves!
In addition, a blanket with microplush sleeves can be sewn; thick wool fabric will also work. In general, look what is on sale.
You can also repurpose old children's blankets or make a blanket with sleeves from old sweaters.
Male
To create a men's work robe with buttons, you will need the following materials:
- simple pattern;
- mixed or cotton fabric;
- matching threads;
- interlining;
- 6 flat buttons;
- tools and sewing machine.
Procedure:
- For the pattern, you can take an old men's shirt as a basis, rip it open or attach it to the fabric. The main thing is to choose the right size - the width of the front and back halves at the hip line should be 4-5 cm larger than your own half-circumference of the hips, and the shoulder section should be 1.5 cm longer.
- In addition, you need to lengthen the robe to the desired size.
- Fold the material in half with the front surface inward, lay out the pattern pieces on top, taking into account that the grain thread runs along the blanks, with the exception of the collar. Secure the paper with pins, trace and cut, having previously marked the seam allowances.
- As a result, you need to prepare the following details:
| Name | Quantity, children |
| Back | 1 |
| Shelf | 2 |
| Cuff | |
| patch pocket | |
| Half belt | 1 |
| Collar | 2 |
| Sleeve | |
| Pick-up |
Further:
- Turn all sides of the pocket inside out and stitch the top line.
- Process the half-belt and collar, pre-glued with non-woven fabric.
- Sew pockets to the front halves, and baste the tab to the back along the waist line.
- Stitch the shoulder sections, sew the collar and sleeve into the armhole. Next, sew the sleeve with a continuous seam, as well as the side lines connecting the back and front panels.
- Finish the cuff and sew it to the bottom edge of the sleeve.
- Sew the hems to the shelves, turn them to the wrong side and sweep them away.
- Iron all seams and finish with an overlocker.
- On the left front and cuffs, mark the loops and overcast them, then attach the fittings.
- Finally, sew the item on a typewriter.
Calculating the width of the robe
To get the width you need to take measurements. You will need your hip circumference. Divide it by 2 and add 20 cm to the result. The increase is needed for freedom of the product and smell. For example, with a hip width of 90 cm, you will get 90/2 +20 = 65 cm. Measure the resulting distance from the back line and mark. There is usually no need to measure the width of the chest, since the hips are the widest part of a woman's figure. But even if your figure type is “apple” or “letter T”, thanks to the smell, the robe will “sit” on it without flaws.
Sewing the product
The simplest version of a robe is sewing without using sleeves. You need to make the top seams between the back and front. Instead of buttons, you can sew a regular knitted belt.
The base of the product is a simple rectangle. The width will be equal to the circumference of the hips plus 9 cm. For the smell you need to leave 20 cm, the length of the robe can be different.
The height of the barrel will be approximately 18 cm. This value is selected at will, as well as the depth of the neck. Step-by-step sewing process:
Tools for work
- Process the sleeve armholes using an overlocker;
- sew the front and back of the product;
- process the edges of the product manually;
- if it is necessary to make an invisible fastener, then it should be located at the waist line;
- Treat the front and neck with finishing fabric;
- fold the hem and iron it.
You can also make a robe from a plaid without sewing, in which case you don’t even have to buy material. You can take some old bedspread with an interesting pattern.
DIY blanket with sleeves - patterns
Today, multifunctional, comfortable, soft blankets with sleeves are in incredible demand among men and women. Essentially, this product is something like a cape that is worn in front. The whole body is under a warm blanket, while the arms are pushed out through the sleeves. Thanks to this unique tailoring, you can type on the keyboard, do any other business, and even read without freezing. With a little effort, you can sew a blanket with sleeves yourself. We will provide patterns and sewing options in this article.
Advantages of blankets with sleeves
Such products have many advantages over ordinary bedspreads and blankets.
These include the following:
- They are much thinner than blankets, less dirty and accumulate dust. Even if you get such a blanket dirty, you can easily wash it, even in a washing machine - it will take a minimum of time.
- Mobility. Such things can not only be easily carried around the house, but also taken with you on trips by car, on a plane, on a train.
- Compactness. It can easily be folded into a backpack or small suitcase.
- Practicality and convenience. Since your hands always remain free under such a blanket, you can read books or work on the computer. The most important thing is that you can simultaneously ventilate the room and warm yourself under a warm blanket, and you definitely won’t get sick.
- Huge selection of colors. As a rule, when buying such things in stores, we agree to any color and print option. But if you take on the task yourself, you can sew it from any material you like, with an extraordinary pattern and texture.
Varieties of blankets with sleeves
Naturally, before you sew a plaid robe with your own hands, you need to understand what they are like and what features their varieties have.
Types of bedspreads with sleeves:
- Plaid robe. They are made according to a rather interesting design, that is, the robe is worn not from the back, as usual, but from the front. That is, you get a comfortable blanket. If, due to the cut, this cannot be done with ordinary dressing gowns, then with a blanket robe it will work without any problems.
- Family plaid with sleeves. These products are designed for two people at once. That is, you and your significant other will be under the same blanket, but you will be able to put your hands through individual holes to hold a cup, a book, or just hug your loved one.
- Regular plaid with sleeves. You cannot use it as a robe, but, nevertheless, it is an excellent and useful thing in any home.
Like Japanese beauties
Let's sew a kimono robe .
The kimono robe is sewn loose with wide sode sleeves, always with a belt, the width closer to the Japanese obi is 10-15 cm. The pattern is very simple, consisting of 6 parts:
- One-piece back.
- Left and right shelves.
- Rectangular sleeves.
- Two belt parts.
It is better to sew from silk, then you will look like a real oriental beauty.
The sewing procedure is the same as above, you just need to sew on the sleeves. Sew a rectangle, then sew it to the armhole.
Dear craftswomen, you will definitely learn to sew like a real professional if you open the video where Irina Paukshte gives lessons.
Advantages of a robe without darts
A product made using this technology does not have darts or buttons. This is its main advantage. Even a novice craftswoman can handle the job. The winter style of the robe is made according to this pattern. It is advisable to choose a dense material for the robe. Terry is perfect. More material will be needed because sleeves are added for the winter style.
Thin robe for sleeping
The width of the sleeve is calculated by the armhole on the side; you also need to sew in a belt. For comfort, you can sew small ribbons along the waistline so that the product does not open to the neckline. There is no need to be afraid to experiment, this style is very easy.
It must be remembered that chintz visually increases volume and has almost no stretch, so discomfort may occur while using the robe. Viscose or delicate knitwear is great. It is advisable to choose fabric with a low elastane content.