According to its main characteristics, innovative water cooling for PCs is much more effective than air systems using conventional coolers. The liquid absorbs thermal energy better, helping to ensure stable operation of the electronic device under severe loads, even in the heat.
What is computer water cooling?
Any electronic device requires protection against overheating. Older devices initially used fans, but gradually the power of processors increased to such limits that coolers in many cases no longer cope with the problem. The water cooling system uses liquid as a coolant to remove heat from the CPU to the outside. Due to better thermal conductivity, liquid installations solve the problem relatively better.
What does water cooling consist of?
In terms of the set of components, this installation resembles the systems that are installed on car engines. Liquid cooling consists of the following main components:
- Block with air fans.
- Water radiator.
- Water pump.
- Expansion tank.
- A set of water blocks - designed to transfer thermal energy from a heated PC component to the coolant.
- Hoses.
- Pipes.
How does computer water cooling work?
Liquid coolers remove heat according to a slightly different principle than conventional air coolers. Understanding how they work is relatively simple. Let's look at a brief description of how a water cooling system for a processor functions:
- The pump ensures continuous circulation of the coolant.
- Through a system of tubes, the liquid flows to the hot PC units, onto which the water blocks are screwed, where thermal energy is continuously extracted.
- Next, the heated coolant enters the radiator.
- With the help of fans, the radiator fins are blown through, and the liquid cooling system releases heat to the environment.
Air conditioner chiller.
How to make a chiller from an air conditioner? — the question is actually the title of this thread.
The idea is quite simple. In our business, water is usually used to cool all kinds of moonshine iron. If the cooling system is closed (autonomous), then the water, after passing through the reflux condenser (distiller), is heated. You can cool it, for example, by passing it through a radiator blown with air. What if the air in the room is hot? Or you want to get the water colder, say 5-10 degrees, but in the room it’s still 25.
So I think the scheme is something like this. A storage tank, where there is a reserve volume of water, a supply pump, a heat exchanger-chiller, where freon cools the water by evaporation, our cooled piece of hardware, return with an additional air cooling radiator (optional) and back to the storage tank.
The question is the following: how to make a chiller (freon-liquid) from an air conditioner evaporator (freon-air)? I just don’t want to stick a standard evaporator into a jar of water. Maybe someone has experience of this kind or at least a link to the Internet with practical recommendations?
Last ed. 12 Apr. 10, 13:36 from igor223
Last ed. 12 Apr. 10, 14:04 from master24rus
master24rus
, there is an even simpler option - a coil in a container of water, from which the autonomous system pumps. The expansion valve (capillary) is placed at the inlet of this copper coil, which is the evaporator. Only this container needs to be thermally insulated from the external environment. I decided to do this in the morning, but suddenly there is a more elegant method.
What you are proposing is a flow-through heat exchanger. It’s also vital, although the “jar of water” you offer can, in principle, be reduced to zero. BUT - both here and there require small thermal and dimensional calculations. Which I'm too lazy to do myself. So I ask the collective mind. and he is still silent. almost silent))))
Okay, let's move on. The schematic diagram and operation of the window, which I am going to gut, is shown on this page
My window is different, but it doesn’t matter - they are all made according to almost the same design.
We bite off the evaporator, it turns out (most likely it will turn out) an air cooling radiator for return water.
The air temperature sensor, if it adjusts by 5-10C degrees, we put it in a barrel of water - if it cools below, the compressor turns off. If not, you will have to replace it.
My question is - what will happen if the water in the barrel cools down decently and the freon stops completely evaporating - then the compressor will fail. Who knows the answer, citizens?
Or am I again alone in the sandbox, playing with myself? )))
If the water in the barrel cools down decently and the freon stops completely evaporating, then the compressor will fail. Who knows the answer, citizens? igor223, 12 Apr. 10, 18:17
Last ed. 12 Apr. 10, 18:39 by SpankyHam
Well, here's a rough diagram.
Autonomous cooling with additional cooling of water to below room temperature.
For example, I use cold water to cool the product receiver during vacuum distillation and the vacuum distiller-shell-and-tube itself. This gives me the ability to work in a deeper vacuum (lower temperature). Yeast will live forever, gee-s-s.
Freon runs along its own contour, and water follows its own. Well, they change their temperatures. SpankyHam, 12 Apr. 10, 18:37
Great, quite satisfied. True - the compressor will rattle all the time - there is no cold storage tank - but to hell with it. We place it after the barrel of water; we do not insulate the barrel.
Freon needs to take two and a half kilos of heat from the water. (Nine air conditioners, and even then you don’t need that many - you just have it at hand)
How to calculate a heat exchanger made of two copper pipes - what is the diameter, what is the length?
The condenser coil is completely frozen with ice and nothing works anyway Master24rus, Apr 12. 10, 19:02
Water cooling for PC - pros and cons
Disputes about the advisability of purchasing liquid-based installations do not subside. First, let's look at the benefits of water cooling for PCs:
- A water-cooled computer makes less noise.
- Water coolers are much more efficient.
- Water cooling takes up relatively little space.
- The water cooling system can be used simultaneously to remove heat from several critical components of the device (video card, CPU, hard drive).
Disadvantages of PC water cooling:
- The device is relatively more complex; installation requires your own special skills or the involvement of a specialist.
- There is a potential risk of coolant fluid leaking onto PC components.
- A special liquid is used to operate the system.
- High price.
- Water cooling for PCs periodically requires preventative maintenance - cleaning microchannels and replacing the coolant.
Which cooling is better, water or air?
It is advisable to consider all options in specific conditions, based on the power of your own computer. For simple tasks, several standard coolers are enough, but relatively powerful devices require effective heat removal. Let's try to study whether water or air cooling of the processor is better, based on the following criteria:
- Ease of installation – air coolers are easier and faster to install.
- Cost – installation of the SVO will cost the user more.
- The use of liquid coolers allows for more fine-tuning, including many additional components in the circuit.
- Dimensions – more space is required in the computer case to install the radiator and pipes.
- Noise level – A water-cooled computer is quieter due to lower fan speeds.
- Efficiency - coolant fluid moves heat better, allowing you to increase the power of appliances.
Operating principle of an industrial refrigeration plant
In order to be able to regulate and maintain a certain level of water temperature, installations with the following characteristics are used: power and performance directly depend on the volume of water in the container/reservoir. Often these small devices are installed in a specially designated office room. The cooling unit for the font is mounted in the water mass circulation circuit, connecting it to the power supply.
The peculiarity of chillers is their silent operation, absence of vibration and minimal energy consumption. Such characteristics allow you to effectively use the device at minimal cost. It is noted that the systems are easy to maintain and reliable in operation.
Types of water cooling
There are many models of liquid coolers for CPUs, differing in power and size. Depending on the design features, the following types of these installations are distinguished:
- Water cooling of the processor is of an external type
- the water blocks are located in the PC case, but the installation itself is moved outside, representing a separate module. The advantages of this choice are that there is no need for large-scale modifications and the purchase of a new, more spacious case. The disadvantages of an external SVO are low computer mobility. - Internal SVO
- most system components are mounted inside system units. The advantages of this option are the high mobility of the computer, the appearance does not suffer. The disadvantages of this option are that installation requires mandatory modification of the PC case.
Cooling unit for aquarium, swimming pool, hot tub
The second option seems more effective, because it involves the use of specialized equipment. Chillers for cooling water in a swimming pool, vat of water and other structures are quite popular. By the way, you can make such a design for an aquarium with your own hands. It is not difficult. And besides, it’s cheaper than purchasing an expensive factory model, which most aquarists definitely cannot afford.
If everything is clear with a household chiller, then what about a swimming pool or plunge pool? To cool large volumes of water, only a special cooling unit is suitable, which costs a lot of money.
How to choose water cooling?
The existence of different SVO models allows you to purchase an installation in accordance with the specified parameters, which is optimal for a specific computer. It is advisable to select water cooling for the processor taking into account the following nuances:
- More fans help increase system efficiency and reduce rotation speed.
- The case should have enough space for the radiator, hoses and coolers.
- The length of the hoses must correspond to the dimensions of the housing.
- Select the power of the cooling system in accordance with the requirements for heat dissipation (TDP value of the computer).
- It is better to purchase a water block made of copper.
- It is desirable to have adjustable cooler rotation speed.
- Fans and water pumps that produce noise of more than 40 dB will cause discomfort.
- Design - lighting, coolant with fluorescent components and transparent tubes are important only if there is a transparent housing cover.
Water cooling fluid
Using plain water as a coolant is impractical and dangerous. The tubes quickly become contaminated with impurities, and in case of leaks there is an extremely high risk of short circuiting. Antifreeze is toxic and conducts electricity. The cheapest option is to fill the PC water cooling with distilled water. Experts advise not to experiment, but to switch to using ready-made coolant from trusted brands.
Examples of high-quality coolant for water cooling on PCs:
- Fluid XP+ Ultra
. - Feser One
. - Mayhems Pastel Coolant
.
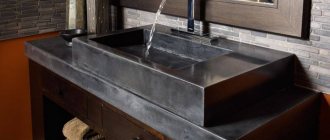
Water-cooled case
The largest component of the air cooler is the radiator. When taking it outside, the user loses mobility, so it is advisable to carefully select a water-cooled PC case. The best option is models with seats in the top cover for radiator sizes of 360-420 mm. It is desirable that there is enough free space under the top panel to install a 3-section heat exchanger with a thickness of 45 mm or more.
Manufacturing process
A small homemade chiller will require about 10-15 m. Create turns. To do this, you can use a strong stick or other suitable object. The tube is bent to obtain the required number of spirals so that the overall size allows the structure to be placed in a container.
A hose is attached to one end of the tube. We connect one end of the hose to a faucet or pump, and lower the other end into a sink or other available drainage device. Chiller is ready.
Using a copper chiller when brewing beer
The principle of operation of a do-it-yourself chiller:
- The device is immersed in the container.
- The hose is connected to the tap. The second end is lowered into the sink.
- Cold water turns on.
- Hot liquid is placed in the container.
- There will be a rapid loss of temperature in the liquid.
TOP CPU water cooling
Purchasing budget SVO models from an unknown brand is a risky undertaking. Low-quality components lead to leaks, oxidation of parts and PC breakdowns. We offer a selection of good cooling systems from trusted manufacturers:
- Water cooling NZXT Kraken X62
– multi-color backlight, black body, aluminum radiator, copper water block, 140x140 mm fans, noise level up to 38 dB. - Thermaltake Water 3.0 120 ARGB Sync
– multi-color backlight, one fan 120x120 mm, copper water block, aluminum radiator, noise level 25.8 dB. - Corsair Hydro H60
– white backlight, TDP power 95 W, aluminum radiator, copper water block, noise level 28.3 dB, 120x120 mm fans. - Deepcool Gammaxx L240
– multi-color backlight, 120x120 mm fans, TDP 240 W, 2-section aluminum radiator, copper water block, noise level up to 30 dB. - Deepcool Maelstrom 240T
– blue backlight, 120x120 mm fans, TDP 150 W, noise level 34.1 dB, aluminum radiator, copper water block.
How to build your own cooler
Take a simple plywood box without a lid, you won't need one. Fill two two-liter plastic bottles with water and place in the refrigerator/freezer for a couple of hours until the water is completely frozen. While the water is cooling, let's return to the box. It will become the basis of a chiller for cooling water in an aquarium.
Place the box horizontally and cut two round holes in the top that match the diameter of the bottle cap. And now the question is: what are these holes for? If your imagination works at an A+, then you will immediately understand everything. Or look for the answer further in the article.
At the next stage of preparing the structural elements, take care of shielding the inside of the “cooler” (box). Use ordinary food foil for this; it can be purchased at any supermarket by visiting the hardware department. Cover all the inner surfaces of the box with it, trim where necessary. As a result, you will receive a thermal box, that is, an improvised chiller for cooling water, which is what is needed for a home aquarium with small fish.
As the final step in preparing your chiller, take the frozen water bottles, insert them into the holes in the box, and push them toward the water reservoir. After just 30 minutes, the water temperature level will noticeably drop.
How to install water cooling on a processor?
Independent installation of a ready-made SVO on a household computer is a real task for the average user. The installation process follows the following procedure:
- Unpack the water cooling.
- Check components for defects.
- It is advisable to first connect the pump and check the SVO for leaks before installing it in the housing.
- Try on the hoses and water block in place.
- The hoses must be fastened without kinks, and the fittings must be installed with a gap from the PC components,
- It is better to place the radiator on the top or front panel.
- Prepare fasteners in accordance with the instructions.
- Mount the fans on the CBO radiator.
- The direction of the air flow must correspond to the marking.
- Install the radiator.
- Apply thermal paste and attach the water block.
- Connect the pump and lighting in accordance with the diagram, taking into account the variety of available connectors.
- Connect fans.
- Pump models with a USB connection have software that helps fine-tune the operation of the unit. In simple models, control is carried out by changing the voltage at the connectors.
- Fans can be configured using the utility or through the BIOS.
- Test the operation of the SVO and eliminate any defects that may arise.
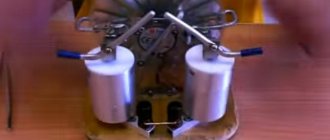
Making water blocks for CPU, HDD and NB with your own hands
Preface
Well... it's winter. It's cold outside, the best time for acceleration! Just place the SVO radiator on the balcony, and you can reach negative temperatures and extreme frequencies. But the problem is that the radiator is part of a liquid cooling system, which requires water blocks. I came up with the idea of assembling an independent SVO a year and a half ago, immediately after purchasing the Thermaltake Xaser III case, in which, after some minor modifications, we worked 14
fans of different sizes. The noise of the computer ceased to satisfy me quickly enough (despite all my loyal attitude towards noise).
There were no alternatives to the SVO, there were only questions. Some of them, such as the radiator, pump, hoses, fluid, were solved in a trivial way: car stove - grundfos/aquarium (there is also a homemade centrifugal pump of good power, but it makes quite a noticeable noise - silicone hoses - antifreeze.) The second part of the questions was much more difficult solvable. The questions related to heat exchangers and water blocks. I didn’t want to buy it on principle... And if you don’t buy it, then you have to do it yourself... First, I decided on their number: CPU, GPU, NB and, possibly, mosfets and memory... All the “E”s were also dotted in terms of the priorities for their production... after a long debate (with myself) it was decided to make water blocks based on their effectiveness.
I'll say right away:
- All materials were purchased immediately before use, so there should be no problems with others finding them
- I don’t know any “Uncle Vasya” turners, so I relied solely on my own strengths.
- No professional tools or special training were used.
- Here and further, unsuccessful attempts will be considered. I do this on purpose so that others don’t run into my rake.
Waterblock for CPU
I started by making a water block for the processor. For this purpose, I purchased a low-profile radiator Evercool CUW4-610CA for server processors.
It is made entirely of copper. The ribs are attached to the base by soldering, they are soldered with the most ordinary! (melting temperature 190'C) solder. I naively believed that they were soldered with a special copper refractory solder, or, as a last resort, welded... Immediately after purchasing and measuring it, a drawing was created (using Corel Draw)
It was decided to start by removing the ribs located on the sides. After a detailed analysis of their method of attachment, a decision was made to remove them by sawing them off (I did not yet know how they were attached). Having cut down one side, I realized that nothing good would come of it, the surface turned out to be too uneven and I spent too long sawing the whole thing. But it was necessary to do something with the other side... After deliberation, the decision was made to break off the unnecessary ribs. This was an absolutely ingenious method, because after 2 minutes all the unnecessary ribs were already lying around... leaving behind a relatively flat (the lower part of the ribs remained on the base) and neat surface.
The ribs on the right are sawed off and the ribs on the left are broken. Feel the difference... Since it is by definition impossible to break ribs in another plane, two cuts were made, and then the side parts were successfully broken off according to the already approved scenario:
Rough surface treatment was carried out with sandpaper and an emery wheel:
On the same day, 4 bushings with 1/4 threads were purchased.
The next step was to solder the jumpers (pieces of copper of the required length were obtained from the remains of the ribs). The radiator was heated with a hair dryer (maximum temperature, according to the manufacturer, 590'C).
But nothing came of this idea... I was very surprised to discover that the fins were soldered with the most ordinary solder and fell off when the radiator was heated... but I had 3 types of solders available, with different melting temperatures: 190, 270 and 95 (Rose alloy) degrees.
My hopes were not destined to come true: having tried all three fluxes that I had available, I came to the conclusion that I wouldn’t really succeed, and I had no desire to leave the whole thing “in the dust.” Therefore, I decided to glue these jumpers using cold welding (two-component epoxy glue, epoxy). Here's what I got:
You can also see that in the last photo the radiator is already devoid of “unnecessary” edges. Let me explain: it was decided to make it so that it fits into the socket (in my case 939). The fact is that with the edges cut off, it (the radiator) fits there very well and at the same time there is no need to center it there (in the socket) and make any special fasteners (one removed from a boxed cooler will do).
...And the edges were sawed off... with an ordinary hacksaw. The photo also shows that the holes for the standard cooler mount are filled with epoxy. This is done to prevent water from spilling onto the processor.
And now it’s the turn of the lid. And it and the side walls were made of 6 mm plexiglass. Four sides and one cover were cut out. I recommend cutting the sides as shown in the drawing. If you follow the drawing, you get four identical pieces (which has been proven in practice). It's just more convenient. Cut four identical ones at once... Having cut out and processed the whole thing with a file, I got the following: (green - protective film, the glass itself is transparent)
In accordance with my plan, 4 holes were drilled in the lid (a “12” drill was used). The marks in the lid were pressed with an awl according to a template first cut out of paper and applied to the plexiglass.
Four bushings were screwed into the resulting holes, with a terrible squeak, onto the sealant using an adjustable wrench. They were screwed in using ordinary transparent silicone sealant, used for plumbing work... To seal the cracks in the bathroom, and so on... (the white sealant was just not dry yet).
After the sealant had dried (as it seemed to me), a frame from the sidewalls was glued together, and then a lid with fittings was glued to it...
All this was assembled (glued together) using the same cold welding. The second photo shows the unevenness of the lower edge of the lid (they have not yet been processed). In addition, there is a small margin of height so that after the epoxy has dried, the entire lid can be “rubbed” on a piece of coarse sandpaper glued to the table for ease of grinding the lid against it. As a result, after all the work carried out on grinding the radiator and processing the edges of the cover, it was glued to the radiator using the same silicone sealant. For greater reliability, the lid is secured with small screws.
A day later, this entire structure was subjected to leakage tests. And I must say that during these days, the sealant strongly oxidized the copper, so that it turned black and green. (and it took me so long to clean it!)
So there you go! Having pulled the hoses onto the fittings and opening the tap, I was sad to discover that it was leaking from all the holes. Without really understanding what was leaking from where, I disassembled the entire structure and, to my surprise, discovered that the sealant had not dried! More precisely, it has dried up, but only along the contour... that's the trick! This means that without air access, it does not dry out for more than a certain layer... The next morning, DoneDeal silicone sealant was purchased
...After disassembling the water block, the bushings (fittings) were cold welded (to solve the problem of leaks in this place once and for all). Before this, I washed each fitting of the old sealant and oxide for about 15 minutes each. Then the cap itself was attached to the radiator using a new sealant (which turned out to be simply excellent: it dries anywhere, anyhow and becomes very durable once dry! turns into something similar (in consistency) to an eraser, while having amazing adhesion to all materials ).
Overall, I was pleased! So. I assembled the whole thing, let it dry, connect it, turn on the water (all checks were carried out with a pressure of about 1 atmosphere) and... I can’t believe my eyes! It's flowing! Moreover, it leaks at the fittings (let me remind you, they are glued in by cold welding)... After the shock wore off and all the bad words were said about the epoxy, it turned out that it was not to blame... But I was to blame... Water flowed through the channels on the bushings ( there are threads there)... and the hoses naturally did not fit there... After another 5 minutes of anger at everyone and everything, the water block (or rather its cover) was smashed to smithereens with a hammer and sawed with a hacksaw, after which it was sent to places not so remote (garbage) .
Of course, it was possible to be perverted and cover the threads with the same epoxy... but I didn’t want to... I wanted to use the base for the same water block (just make a different cover). But all my plans were spoiled by the sealant... it stuck to the radiator so well that it was not possible to tear it off completely... The radiator was also recycled... it turned into a wonderful copper plate (maybe it will come in handy). And it was as follows: All the ribs were fused with the same construction hairdryer (now I already knew what they were soldered with).
And the remaining base was processed using sandpaper... (the photo below shows a very “cunning” device for processing a copper plate, consisting of an inverted vice and sandpaper glued to the table with double-sided tape).
This is how my first experience of making a water block sadly ended... Although no, not the first time before (somewhere in the spring) I made my first water block... But now it does not suit me, since it is made of aluminum. In the original it was intended for the north bridge:
Water block for north bridge
At the time of its manufacture, I did not yet own the camera, so I’ll tell you briefly about it now...
The cooler from the first stump (or from the second) is taken as a basis; the fittings are made from casings from capacitors; a metal plate from a tin can is placed on top. All this is filled with epoxy... the internal channel is organized with a snake, by grinding the corners of the ribs in pairs. The base was cleaned and polished with GOI paste.
Water block for the processor. Attempt No. 2
And so, 2 days later, after looking at reviews online 179 times, I came across testing a very interesting, in my opinion, cooler Spire RackSper III. Having examined it in detail, I realized that this is what I need... Having arrived at the store where, according to price.ru, it should have been, I received the answer that it was not there)))) Luckily for me, it was sold in the same store an even better cooler: Spire RackSper IV...having paid the required amount, I became its owner...
The advantages of this cooler are undeniable:
- Thick base
- All copper
- The ribs are one whole with the base! (not glued or soldered)
- Frequent arrangement of ribs
Having turned it in his hands, a plan of action was outlined... First of all, just like with Evercool, seven ribs were broken off on each side (for plexiglass), the distance from edge to edge is 1 mm... (including the thickness of one edge).
All operations with the radiator were completed... Now it was the turn of the cover, here it was also made of plexi... all its parts were marked on a pile of plexiglass and then carefully, using a jigsaw and a hacksaw for metal, sawed out from a large piece of six-millimeter (the only one available ) plexiglass.
And carefully processed...
In accordance with my plan, the cover should have looked like this:
Initially, it was assumed that all the plexiglass parts would be assembled together and then, just like in the previous (failed) water block, attached to the base using sealant. But after fitting the entire upper part to the base, it became clear that sealing a kind of protrusion on the side of the radiator would be problematic, so it was decided to glue the side walls with epoxy to the base, and glue the internal liquid distribution module to the lid... The lid, in turn, can be glued “plant” on the sealant to the side walls. I started with the lid. Using transparent epoxy I glued the necessary parts.
Here you need to act very carefully... Firstly, there is a risk of staining the surface, and, secondly, you need to wash the parts well before gluing, since all three adhesive joints must be transparent. The epoxy should be applied in a drop to the center to avoid the possibility of air bubbles getting in, and then pressed very firmly while the composition sets. The adhesive layer should be very thin.
After the composition had completely dried, holes were drilled in accordance with the template. Pieces of copper pipe with an internal diameter of 10 mm were inserted into two of them (the central ones), and copper corners were inserted into the outermost ones.
Pieces of pipe and corners (for a 10 mm pipe) were inserted into holes drilled with 12 and 14 drills... Another photo:
Next I took on the radiator. The side walls were glued to it with the same epoxy (of course, it was probably possible to cut off the side protrusions on the radiator and glue the side walls to the lid, but I found this event unreasonably difficult).
All discrepancies in the side walls were successfully ground off with sandpaper (already when they (the side walls) were attached to the radiator) for a better fit of the top cover. When trying to install the top cover, the whole thing looked like this:
From this angle it should be clear that I miscalculated the dimensions of the internal block for distributing water flows, so the distance between the rectangular stops was filled with a “nozzle”, or rather a hot-melt glue gun.
When everything was ready, I connected the top cover to the base with DoneDeal sealant and screwed it on top with two screws for reliability (although this does not have to be done, there will be no tearing loads, on the contrary, there will be clamping force from the fastening).
During testing, this water block (unlike its predecessor) did not leak and was found suitable... For which I congratulate myself.
Water block for the north bridge. Version two
At a certain point in the construction of the second water block for the processor, I purchased exactly the same radiator as the one I had previously damaged, intending to make a water block from it for a video card.
The water block for the video card was supposed to be made in the same way as the first water block for the processor, with the exception that the fittings should be routed along the plane. Since I already knew that the solder was the most common one, the extra ribs were removed with a hairdryer. Let me explain: the fact is that the radiator is treated with a very thin layer of some kind of varnish, and therefore, if you heat the radiator to the melting point of solder, the ribs fall off on their own, they must be “torn off” with tweezers... Due to the varnish, it becomes possible to remove the ribs in this way . But if the fin was accidentally touched, then it will definitely disappear... Radiator with sealed side fins:
Since the ribs were completely sealed off, I was able to sand the base almost to a shine without any problems. I was going to remove the pieces of ribs from the sides in exactly the same way as last time (make a cut and then break them off), except that then I didn’t break them off, but unsoldered them. And everything would have been fine, if not for the fact that I had not finished cutting some of the ribs to the base... And, naturally, when I once again heated the radiator and began to remove the ribs, I accidentally moved the central part (since I had not finished sawing to the base and they somehow connected with each other) and then, with a hand trembling with anger, he also touched the neighboring couple...
Thus, I became the owner of another slanted (and therefore damaged) radiator. By the way, when I accidentally moved two pairs of ribs, I stopped blowing the radiator with hot air from a hairdryer) and, without waiting even a minute, began to bend the ribs and break them off, just like the last time. And to my great happiness, they began to break off quite easily... armed with pliers and maintaining the temperature of the radiator close to the melting point of the solder, I easily removed the remaining ribs. But the radiator was damaged... But then, while drinking tea, I came up with a brilliant idea to convert a seemingly damaged water block for the GPU into a water block for the north bridge. The tea was immediately forgotten and 5 hours later I had an excellent water block for the north bridge on my table. And this is how it went:
On the back of the radiator there were marked lines along which it was necessary to cut off the excess. After completing the sawing work, the radiator began to look like...
...looks like the symbol of the Red Cross association (for example). But I’m not writing about him here. So, a hacksaw was “drawn” along the remaining lines so that the thickness of the copper in a given place became half as large (it was necessary to cut not across, but “alongwise”, as if on top). Following the outlined lines, using a vice, a piece of copper was turned into a very good semblance of a water block. One side:
And two sides:
It should be noted that despite all my abuse, the copper did not break, but left a very neat bend, which I was incredibly happy about. Although if you think about it, copper is a soft and very viscous metal, so there is nothing surprising in this... After processing the whole thing with a file and bringing it into divine shape, I got the following...
Again, finishing of the upper part was carried out using sandpaper mounted on the table. Next, on the copper plate left over from the first unsuccessful water block, I drew a cover for the water block...
After cutting and processing, I ended up with quite a wonderful cap))))
Which, on the very base of the water block, looked simply wonderful... the only thing missing was holes for the fittings... and they didn’t take long to come
After marking the holes on the template...
The holes themselves were ready... drilled with the same 12 mm drill...
The tubes are the same, cut from a 10 mm copper pipe. At this point the question arose, how to secure this whole thing? The answer was soldering; everything went smoothly with the lid. The connections were coated with flux, lined with pieces of solder and stuck in the oven. After 15 minutes there was a burning smell... The solder was with rosin... After cooling everything was ready...
But there were problems with the main unit and its connection with the lid...
- Firstly, the block still contains ribs, which are still soldered with the most common solder.
- Secondly, there were cracks there (even though the lid was rubbing against the base), but solder could still penetrate there absolutely unhindered.
- Thirdly, there are a large number of soldering points and it is difficult to solder everything at once.
- Fourthly, I’m doing this for the first time (no, I’ve soldered a lot, I just haven’t soldered the water blocks yet).
- Fifthly, I could only solder with Rose alloy (melting point 95'C).
But still, it was decided to try... and it’s no wonder that nothing worked out for me... Therefore, as a result, the lid was attached to the base... by cold welding... there was nothing else left...
This water block also passed all tests perfectly...
Water block for hard drive. The only attempt and successful
Next in line was a water block for the hard drive. There were problems finding a radiator for it. The fact is that I initially didn’t understand what the water block for this device should have looked like. And accordingly, I did not understand how it should have been structured. In the end, I decided that I would definitely adapt the large aluminum plate somehow. For these reasons, a hard drive cooler was purchased:
After disassembly, the device began to look like this:
The plate, which in this design is blown by two 40mm fans, can quite cope with the task of cooling the hard drive using water. But how? My first idea for “waterproofing” this piece of aluminum was as follows: a copper tube with an internal cross-section of 8 mm was bent using paraffin. The essence of this method is as follows: the tube is filled with paraffin and bent (without kinks) until it acquires the desired shape. In my case, I needed a U-shape. Next, the bent tube is formed with a hammer and inserted into the rectangular holes of the radiator using KPT 8 heat-conducting paste. The whole trick was that it was very difficult to mold such a long section of the tube to the desired shape (rectangle), it took me almost an hour and a half to mold just one channel... And it meant only 4 channels (two letters U)... This method did not suit me. It had only one advantage: lightness and reliability of sealing (the tube is one, inseparable).
After pondering over the problem for one night, I came up with a good idea. After all, it is not at all necessary to place the tube inside the channels. After all, they themselves are sealed, which means you just need to attach a fitting at both ends of the channels and connect the edges with ordinary silicone tubes... No sooner said than done... 8 pieces of 4 cm long were cut from the same copper tube into 8.
Not all eight are in the photo... The cut places were processed, and the pipes themselves were half-molded using a hammer and anvil to the desired section.
After all the abuse, the pipe cuttings were stuffed halfway into the radiator.
Here I made a big mistake... in order to later put them there with epoxy, I had to get them out first... I was just “trying them on” there... I had to get sophisticated and knock them out of there with a metal rod... After this undertaking, I, having smeared the future fittings diluted with epoxy, hammered them back into the radiator... It turned out VERY reliable. It must be said that you can drive in the fittings by resting them on the same anvil, tapping with a hammer on the back side of the radiator. (of course, this does not apply to the case when one side of the fittings is already glued in. In this case, hitting the side with the glued fittings is extremely inconvenient) well, so... what happened:
In the photo, the epoxy has not yet hardened and the fittings have not been driven in. After doing similar actions with the remaining four fittings and additionally coating the connections with another layer of epoxy, I got a finished water block:
This design is very versatile. Water channels can be connected in a variety of ways: Snake (1*1) (one input, one output), in pairs (2*2), through (4*4). If you use tees, then the number of combinations is absolutely countless... There are also several ways to attach the hard drive itself. You can cut off the fastening edges and attach the remaining part of the radiator directly to the HDD cover using hot-melt adhesive, or you can screw on the original fasteners (for a 5'25 compartment) and use this radiator as an effective 4-channel cooler input (antifreeze, water, alcohol) in system unit for further connection to other water blocks. If you plan in advance to use this water block for such purposes, then you can reconsider the number of fittings. For example, there can be 5 of them if you add another one in the middle, or 3 if you use only 3 central channels.
Here's another photo:
All leak tests were passed with 5+
There is only one water block left in the plan for the video card, but more on that another time...
Now let’s combine “Debit with credit”
- Cooler Evercool CUW4-610CA – Savelovsky market pavilion B-38 – 400 rub.
- Cooler Evercool CUW4-610CA – Savyolovsky market pavilion B-38 – 390 RUR
- Cooler Spare RackSper IV – Microset company (www.microset.ru) – 620 rub.
- Construction hair dryer CT BRAND model 3A – Chip and Dip (pavilion on Savelovsky) – 800 rub.
- GOI paste – Shop QUARTZ – 20 rub.
- Epoxy DoneDeal 5min transparent DD6561 – Autoworld Store – 80 RUR
- DoneDeal transparent sealant DD6705 – Autoworld Store – 74 RUR
- Plexiglas 6mm – Construction market – 700 rub. / sq. m
- Emery wheel + mount for drill – construction market – 70r + 40r
- ¼ bushings - 4 pieces - construction market - 20 rubles each
- Copper corners 2 pieces for a pipe for 10 - construction market - 20 rubles each
- Copper pipe for 10 – construction market – 80r/meter
- Copper pipe for 8 – construction market – 60r/meter
- Hard drive cooler Gembird Hard Disk Drive Cooler HD-A5 – Savyolovsky market pavilion D-15 — 400rub
- Cooler Avia Cool – Savelovsky market pavilion A-46 – 200 rub.
Drills, jigsaws, drills, straight arms and other commonly available tools were available.
For this I bow out.
I will gladly accept all your suggestions, comments and questions at alex-and (a) mail.ru and ICQ 305-402-846.
Anything to add? We discuss the articles in the “do-it-yourself” series in a special forum thread.
Azhimov Alexey aka -Lexa- alex-and (a) mail.ru 02/13/2006
Tags
DIY water cooling for PC
If they want to experiment a little and save money, many people try to create homemade liquid coolers from improvised materials. Let's look at an example of how to assemble an SVO at home:
- It is better to purchase a factory-made water block; homemade ones leak more often and dissipate heat worse.
- Hoses can use clear vinyl or oxygen tubing.
- It is advisable to take a pump with a capacity of 600 l/h or more.
- The radiator is suitable for a car or another old model of suitable sizes.
- Additionally, purchase a pair of fans with dimensions of 120 mm or 140 mm.
- To ensure that the water cooling system operates without leaks, select the clamps according to the size of the hose and clamp them as tightly as possible.
- After assembly, fill the PC water cooling with water and turn on the pump for several hours to detect leaks.
- Install the SVO on your computer and check its performance in test mode.
Do-it-yourself homemade chiller for a brewery - step-by-step instructions
If you are brewing homemade beer or want to do it, then you simply cannot do without a cooling system. Today I will show you how to make a very simple but quite effective chiller that can cool your wort from 83 to 25 degrees in just 10 minutes!
To make a chiller we will need:
- Flexible bellows-type gas connection, preferably made of stainless steel, 1/2 inch. In the store I found a maximum of 5 meters, but this is quite enough. To connect water, you will need 2 bronze fittings with external threads.
- Plastic ties and stainless wire, specifically stainless steel, or plain metal should never be used. Otherwise, the wire will instantly oxidize and when cooling you will spoil the wort!
Chiller manufacturing
Armed with plastic ties, we begin to tie the hose every 7-10 centimeters. We twist the hose carefully, loop on loop...
As soon as the hose ends, bend its end as in the photo below. The twist of the hose should lie at the bottom of the pan, and the bend should cling to its upper edge.
The beginning of the hose must be bent in the same way as the end, but the bend must be inside the ring.
Now we take the wire, always made of stainless steel, and repeat the same thing as with the ties. To put it simply, we replace the plastic ties with wire.
After completing the work, we cut off the plastic ties and we have a finished chiller!
All that remains is to screw on the fittings and you can move on to testing!
Chiller test
I heated the water to a temperature of 83 degrees and placed the chiller in a container of water. I tightened the fittings and connected the water.
Initial temperature 83 degrees.
I turn on the water and the stopwatch. The water pressure was not strong, the liquid cooled to 27 degrees in just 13 seconds. There were other numbers in the headline - having made small, approximate calculations, and if you open the water harder, the results will be exactly the same and, even better!
The result, in my opinion, is quite good, I would say simply excellent! Therefore, if you want an inexpensive and powerful chiller, then I advise you to pay attention to this option, you definitely won’t go wrong!
That's all, I hope the information was useful! Don’t forget to share the article on social networks, it’s very important to me! :))
My channel also has information on
how to make a simple home brewer , as well as step-by-step instructions for making delicious homemade beer.
Easy to make water block and accompanying surroundings using improvised means
This work was submitted to our “unlimited” article competition and the author received an incentive prize - a baseball cap from ATI.
Progress takes its course, the frequency of processors increases, and with it the watts allocated by processors also increase. What my good old igloo 2510 powered by 7 volts, namely the Athlon 1800+, was enough for, migrated to someone else’s car along with the old motherboard, and I, entering a “new stage of progress,” purchased an Athlon XP 2500+ (Barton) and a new motherboard. Having assembled everything as before, I start the computer and first of all go into the BIOS to see what’s new there, compared to the previous motherboard; I’m especially interested in the ability to control the temperature of the processor using the thermal diode built into it. And what do I see? The core temperature is 55C and this is without overclocking. After setting the voltage to 12 volts on the fan, overclocking [email protected] + ( [email protected] on the bus) and setting the core voltage to 1.75, the temperature dropped slightly and amounted to 50C when monitored from the BIOS. You can imagine how much the temperature will rise under heavy load on the processor. When running “prime” the fears were confirmed; the temperature began to rise and after 10 minutes exceeded 75C. Hmmm. Something needs to be done.
The first step is to study cooling articles and select a system layout
.
On forums.overclockers.ru I found and studied material on cooling that interested me. The inconsistency between the hands.dll version and phase change systems prompted me to immediately abandon them. The increased noise from increasing voltage on the processor fan and a child snoring in his sleep in the other corner of the room were also incompatible, this told me: “Air is not our method.”
Maybe try some Zalman with 1 kg of copper and lower speed? It would be nice! But, alas! Having compared the items of income and expenses of the family budget, I understand that this is also not an option. Another reason is the same progress, which, as we know, does not stand still and it is unknown how many watts the average processor will allocate in a year and a half.
I am starting to work on options for the layout of a water cooling system, the main indicator of efficiency of which would be the optimal ratio of noise and cost. The following arrangement best met the requirements:
- Pump – submersible (low price, vibration noise dampening with water)
- Expansion tank - plastic jar for food (low price, easy to find);
- Hoses - whichever ones I can find.
- Radiator - from a car heater (from a car shop)
- Water block – ?
Source
Expert advice on chiller design
If you decide to install according to the example above, then select a box for the thermal box according to the size of the aquarium.
When installing a “cooler,” pay attention to the distance from the chiller to the water tank: the bottles should not be close to the glass, and to enhance the effect, it is recommended to cover the bottles with foil or cloth.
A chiller for cooling water in an aquarium from an ordinary box is a budget option for an aquarium cooler. The result is noticeable immediately - just look at the thermometer readings in the aquarium.
Now you know how to design the simplest chiller for cooling water with your own hands and you can easily turn the example described above into reality. A cooling unit for an aquarium is simply an irreplaceable thing that allows you to easily and simply create natural living conditions for your pets.