Preparing for work
To get an excellent result when working on even the simplest product, you should not neglect the preparatory stage.
First of all, you need to decide what exactly will be made of burlap and think through the smallest details. This will allow you to prepare all the necessary material and decorative details in advance so as not to be distracted during the work process.
Ideas can be gleaned from numerous photographs on our website dnevnikmastera.ru. Wooden decorative elements, jute, and coffee beans are in perfect harmony with burlap.
It is easy to paint the material, add embroidery or glue any decor onto it. This gives wide scope for imagination.
An equally important step is preparing the material. Burlap and decor are easy to purchase in specialized craft stores. The assortment includes not only burlap in its usual natural form, but also bleached.
When planning to use material available in your home storage bins, it is recommended to pre-wash it. This will prevent shrinkage of the finished product.
At home, it is easy to dye burlap into a more saturated color using a strong infusion of tea leaves.
Depending on the idea, additional materials will be required:
- floss threads;
- jute;
- braid;
- beads or beads;
- coffee beans;
- lace;
- ribbons;
- glue;
- acrylic paints.
The list of required tools includes:
- scissors;
- sewing needle;
- ruler;
- pencil (crayon or piece of dry soap);
- brushes
It is recommended to start working on crafts made from jute and burlap with your own hands with simple products. The practical experience gained will help you create complex and original interior items in the future.
Burlap is an inexhaustible source of creativity
The composition includes fibers of hemp, flaxseed, jute, which are expressively and roughly woven. The shade varies from light brown to strong coffee.
This is an ideal foundation, the advantage of which is the following qualities:
- standing;
- economic value;
- ecological cleaning
- long service;
- versatility;
- force;
- wear resistance;
The canvas is filled with a certain ancient peace and warmth. Positively affects the human nervous system and improves mood. The only thing is that before starting manipulations it must be washed and dried to prevent shrinkage. When cutting, it is necessary to leave a decent margin due to the resulting crumbling and take into account the negative reaction to moisture.
Decorative vases
Using burlap and jute to transform an old vase or an unusually shaped bottle is not at all difficult. This is an excellent craft option for beginner craftsmen.
To work you will need:
- vase (bottle or jar of unusual shape);
- PVA glue;
- clear varnish;
- burlap, jute;
- additional decoration (beads, lace, buttons, ribbons).
In addition, you need to prepare a convenient container for soaking the fabric.
Operating procedure
- First of all, you need to wash the vase or bottle and then dry it thoroughly.
- Pour PVA glue into a container and soak a piece of burlap in it. The fabric should be well saturated with glue.
- Wrap a vase or bottle in burlap at your discretion.
- The fabric is straightened, folds are formed, and fixed to the base using jute.
- The workpiece is left for a day so that it dries completely.
- For reliability, the dried workpiece is coated with colorless varnish. This will preserve the appearance of the product longer and protect the material from dust and moisture.
After the varnish has dried, you can begin decorating. It’s easy to use beads, satin ribbon, and openwork lace as decoration.
Such vases look harmonious in any interior, have an original appearance, and add coziness to the room.
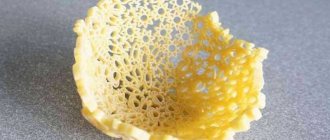
Lace flowers
To make a vintage rose, it is recommended to prepare the following materials:
- burlap;
- lace;
- beads and seed beads;
- felt;
- pin, needle and scissors.
Step-by-step instructions for creating a rose in Vintage style:
- Prepare a rectangular piece of burlap and fold it in half.
- Roll the material into a tube and secure it with a pin.
- To form a flower, make a bend in the opposite direction. This will be the core of the whitewash.
- Cover the core with fabric until you reach the desired size of the product. At the same time, periodically make creases on all sides.
- Secure the edge of the craft with a pin.
- Separately cut another strip of fabric, slightly wider than the previous piece. It can be unraveled from one edge. This will make the rose unique. Gather the fabric from one edge to create a wavy base.
- Separately, prepare the same base, but only with lace. The diameter of this part should be larger.
- All that remains is to put everything together, and the rose is ready. The bottom layer is lace, then burlap and the bud itself.
- If desired, the product can be embroidered with beads and seed beads. It will look good.
- Attach a felt circle to the back side. You can glue a pin to it and it will make a great brooch.
Do-it-yourself lace flowers, the master class of which we reviewed, can become the basis for creating a beautiful topiary.
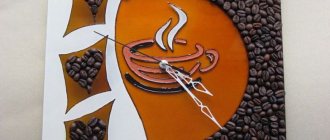
Panel with coffee beans
It's easy to freshen up your kitchen with crafts made from burlap and coffee beans. A small hand-made wall panel will help give the room individuality.
To work you need to prepare:
- a piece of burlap;
- coffee beans;
- a candy box (as a base);
- PVA glue.
Operating procedure
- The first step is to glue the burlap onto the base—a candy box. The fabric is impregnated with PVA glue, carefully pressed to the base, smoothed or, conversely, formed into a spectacular drapery.
- After the workpiece has dried, coffee beans are glued onto it. It is easy to apply the image to the fabric in advance using a stencil and a piece of dry soap.
Additionally, you can use small sections of wood, twigs, beads, beads, ribbons and braid.
The theme of the craft can be very different, and it’s easy to use a piece of cardboard or a wooden frame as a base.
Holiday ideas
Thick fabric is suitable for original Christmas and New Year decorations. The products are presented:
- wreaths for entrance doors;
- boots;
- garlands;
- hearts;
- Easter baskets.
There is no limit to the scope of choice in this topic. There are a lot of variations with accessories for the Christmas tree, which can be not only balls, but have any configuration, adjacent to natural cones. It’s interesting that they became interested in material for modeling wedding decor.
We create a panel
In addition to the fact that the material fits perfectly under embroidery, both satin stitch, cross stitch, and ribbons, having a convenient free structure, against its background various paintings are born from natural components. Usually, residents have a lot of shells, pebbles, and corals brought from the coast. You can use them to lay out a seascape.
Having cut the desired piece, we fix it on a board or cardboard, gluing it on the back side. We lay out and attach small components according to our vision, using green moss as seaweed, twine and jute as waves. Wonderful lively works on any theme are made from multi-colored dried flowers in combination with stone.
Table sets
When setting the table on a special day, sets of burlap in the form of napkins and covers for forks and spoons, individually located near each person, make an indelible impression on guests. They look stylish and noble, and making them won’t be too difficult.
If you are going to a celebration with a bottle of champagne, it would be a good idea to dress it up in elegant “clothes” made of universal fabric, with a minimum of effort and maximum imagination, the effect will be unforgettable.
As you can see, such cute little things, made with your own hands, will come in handy in different situations; they are warm, soulful and give the space a certain charm. If you create with joy and a positive attitude, a magical power will be transferred to the craft, bringing prosperity and happiness to your home.
Gift bags
For novice craftsmen, making a gift bag will be a useful experience. To create it you will need a rectangular piece of burlap and a needle and thread. You can use lace, wooden beads or jute cord as decoration.
The fabric blank will need to be sewn along the seams. Then the product is turned inside out and decorated.
You can tie the bag with braid, ribbon, or use a needle to pass a linen or jute cord, departing 3-5 cm from the top edge.
More than just jeans
Old jeans can be turned into shorts or a skirt by cutting the legs and adding decorative fabric or lace elements. What to do with the trimmings? Turn them into attractive things that will decorate your home.
Original crafts made from denim:
- sofa cushions made from... jeans pockets, sewn together in a chaotic manner;
- organizers for convenient storage of tools;
- bags and cases;
- rugs and cushions for chairs;
- coasters for hot dishes (cut areas with seams are used, which are twisted in a spiral and sewn with thread);
On the Internet you can find various photos of fabric crafts, but you don’t have to repeat them exactly: take note of original ideas and create your own handmade masterpieces.
Burlap toys
After practicing on simple crafts, it is not difficult to move on to more complex products.
A detailed master class will help you make craft toys from burlap with your own hands.
Brownie
People have long used fabric dolls as home amulet. Nowadays, this function can be performed by a funny brownie sewn from a piece of burlap.
To work you need to prepare:
- square flap 50 by 50 cm;
- sewing needle;
- cord or twine;
- acrylic paints;
- padding polyester
Operating procedure
- On a square piece of paper you need to draw a circle, the diameter of which should be about 20 cm.
- Large stitches must be made along the circle line.
- A padding polyester is placed in the center of the workpiece, and the edge is pulled together with a thread. If there is not enough stuffing, you can add more and then secure the thread.
- The remaining edges of the burlap on top will need to be slightly torn. This will be the brownie's hair.
- Having passed the twine through the workpiece, its edges are tied with large knots. This is how the arms and legs of the toy are made.
- To decorate the face, you can use paints, ready-made parts, small buttons or hand embroidery.
Hare
There are many options for making a bunny. It’s easy to combine burlap and felt as a base.
You can draw the pattern yourself or find a ready-made template.
The fabric is cut out and the parts are joined at the seams. The toy can be filled with padding polyester or coffee beans.
The decor of the craft depends on the imagination of the master. You can look at ready-made samples on dnevnikmastera.ru and take them as a basis.
Correct use of the material
The canvas has found widespread use, imitating wooden houses, when all the main items are made from it, starting with curtains. Sometimes only some details are shown:
- decorated pillows;
- lampshades;
- accessories for flower pots.
The kitchen especially welcomes craftsmanship, offering potholders, unusual aprons, extravagant bouquets, and bags for storing aromatic herbs.
The simple transparent texture allows it to be used in almost any style direction, except high-tech. Adding sophistication to the finished samples, they are decorated using:
- Braid, satin ribbons, airy nylon, beads, hand embroidery.
- Glass, wood, forged metal.
- The fabric is in gorgeous vibrant colors in shades of turquoise, lilac and crimson.
Burlap combined with lace is a stunning duo, as are coffee beans, which will still give you a delicious aroma. Weightless butterflies on curtains or hairpins will fill the room, reminiscent of the natural world. The appearance of the floor lamp, updated with a continuous relief coating, is unusual. The creative process itself is a fun and exciting pastime.
New Year's crafts
The New Year holiday is a special theme for home creativity.
Using burlap, it’s easy to decorate gifts and decorate your home in an original way for the holiday.
Using a cardboard cone as a base, it’s easy to make an interesting Christmas tree. The cone will need to be covered with burlap and then decorated with glass beads, shiny buttons, lace or braid.
Additionally, it is not difficult to cut out butterflies, flowers, figures of snowmen or any animals from scraps of material.
It is not difficult to make angels from bleached burlap using the technology of making motanka dolls.
By being creative, it is easy to use burlap to create various crafts or interior items. An important advantage of this material is its environmental safety and original texture.
Burlap, vintage textile
A coarse and durable fabric made by weaving of hard fibers (jute, kenaf and others), burlap has long been used by peasants as packaging for carrying heavy and rough things, grain, meat carcasses, parts and other things.
The name of the fabric suggests the direction of use. Bags made from it are strong and durable. This ancient natural canvas has many advantages:
- environmentally friendly, natural composition;
- excellent air permeability;
- hygroscopicity;
- strength;
- does not attract insects;
- low price.
All these properties made it possible to use burlap as a material for children's creativity.
Photos of new useful and beautiful burlap crafts
Patchwork style in creating potholders
You need to prepare:
- pieces of fabric of several colors (synthetics are not recommended);
- various fillers;
- bias binding trim;
- sewing supplies.
Step-by-step work:
- You should start by creating a template. The simplest option is a square.
- Cut a hole in the square, leaving a 1 cm frame.
- Cut out squares according to the template, not forgetting the allowance.
- Fold the squares right side out and stitch; in this case, you don’t have to cut the threads.
- By analogy, prepare three strips of squares of different colors (one side of the potholder).
- Iron the workpieces thoroughly.
- Then perform the second side of the product identically.
- The two parts need to be folded facing each other and stitched on three sides. If desired, you can arrange the corners.
- The resulting fabric square is turned inside out and batting or padding polyester is inserted into the remaining hole (it is better to use two layers).
- Use bias tape as a loop by inserting it into the corner of the potholder and stitching the remaining side.
- The tack can be made by quilting it on a machine, or you can sew the seam by hand.
Bird of paradise made of jute
This bird looks very cute. In general, burlap is a very interesting material for creativity. With a certain approach, it can sparkle with completely new and unexpected colors.
For example, imagine how such a bird has its chest, head and wings painted with gold and brown paint. It will be very rich and beautiful. The main thing here is not to overdo it. Burlap requires simplicity.
Required materials and tools:
- Sample. Paper cut out outline of a future bird of paradise.
- A piece of burlap with a large structure.
- Glue that can be used to glue fabrics.
- Filler. Sintepon, cotton wool or other similar material
- Black bead – two pieces.
- Acrylic paint.
- Thin brushes.
- Glue gun or instant glue.
- Copper, not too thin wire.
- Jute cord or coarse linen thread (must match the burlap in color and appearance)
- Needle and thread.
Cut out two halves of the figure according to the template. To cut according to the template, burlap is used along with the lining. The lining is needed so that the filler does not stick out between the sparse threads of jute. Flannel is used as lining. Flannel enhances the decorative effect of burlap.
- Glue jute and flannel with glue.
- Cut out two contours of the bird according to the template, leaving allowances for sewing. Sew them together, remembering to leave a hole at the bottom for the filling.
- Fill the sewn form tightly with filler. The hole is carefully sewn with an invisible seam.
- Take three pieces of wire and bend them in half to form the tail feathers. Two are identical and one is longer.
- Wrap the wire with a thin cord, leaving the tip. Glue the cord in several places so that it does not unwind.
- Attach the tail feathers to the bird's body.
- The wings are made the same way. Only the wings have two feathers, and not three, as on the tail.
- We fix the wings on both sides.
- Now we glue a thin twisted thread along the body and head of the bird, separating the area of the back and chest of the bird. You can add some new elements with threads, such as a tuft, or add legs at your own discretion and artistic imagination.
- Glue these decorative ornaments onto the wings, body and head of the bird.
- Glue eye beads
- Now paint the beak black with acrylic paint.
- In order for the bird to be hung, you need to attach a loop to it.
This is the bird we end up with. She is ready and very sweet in her naive country style. In some places, on the chest and wings, the figurine may be slightly golden or coffee colored.
When making crafts with his own hands, the master always finds new ideas for using this universal material. Jute, cheap and affordable, ornamental material. It does not require special processing or tools. Adults and children, men and women can enjoy jute handicrafts.
Jute lampshade
You can also use natural cord to create a new lampshade for home lighting fixtures.
The first step is to carefully consider the design of the product, the theme of the ornament and select additional decorative details.
You can come up with patterns yourself. It’s easy to look for topics for inspiration on the Internet by studying DIY jute crafts and their new items.
After drying, the ball must be pierced, and the product must be additionally decorated with pebbles or other decor.
The basis for making a lampshade will be a glass jar wrapped in cling film.
How to make a stylish vase with your own hands
Tall vases trimmed with jute and voluminous appliqués look original and elegant. They can be full-fledged containers with a waterproof base for flowers or have a decorative function, serve as a stand for pens and pencils, and protect glassware from impacts.
Required Tools
For weaving you will need:
- Jute, thick and thin. They braid a vase with large twine, and openwork decorations are made from thin twine;
- Scissors;
- PVA glue;
- Container for the base: packaging for cookies, chips, glass bottles, jars for storing bulk products, plastic and ceramic bottles, tin cans, containers;
- Cardboard;
- Colored paper;
- Set of brushes for painting and gluing;
- Paints.
Description of the craft formation process
The twine crafts master class for braiding consists of two parts: preliminary preparation of the base and careful laying of the cord on the surface and decorating the finished container.
- Step 1. The container is thoroughly cleaned, washed and completely dried.
- Step 2. Braiding can be started from the top or bottom. Cover the surface with a layer of glue and attach one end. Wrap the rope in concentric circles, pressing the rows tightly against each other. Having completed the weaving, securely fix the other edge of the rope.
Crafts made from twine and ropes are distinguished by their pleasant, natural color, environmentally friendly production and materials used. It's easy and convenient to work with. Crafts can be presented to acquaintances, friends, colleagues.