There has always been a romantic aura around the music box. A music box is a special thing; it smells of something ancient, and even a little magical. It is both a musical instrument and a beautiful piece of furniture. Making a music box is a labor-intensive process that requires its creator to have knowledge in several areas, refined taste and an ear for music. Its manufacture requires about a hundred manual operations.
Mechanism dimensions
For most standard musical mechanisms, a box with the following dimensions is suitable: at least 50 millimeters deep, 75 millimeters long and 50 millimeters wide. These are the main dimensions for a barrel organ, the rest of the space can be given over to placing various small items. A wooden box is a good base for creating a music box, but you can experiment by placing the mechanism in a metal tin can or in a box made of thick papier-mâché.
Glass wedding
A glass ring box can be a good wedding gift. For work you will need the following tools and materials:
- window glass 3 mm thick or stained glass;
- glass cutter;
- soldering iron;
- Sander;
- blue permanent marker;
- ruler;
- copper foil with black backing;
- flux;
- alcohol;
- natural sponge;
- solder;
- antioxidant.
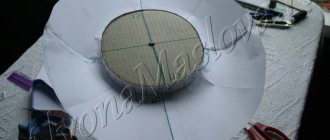
The wedding box is made in the shape of an open icosahedron, which consists of regular triangles with sides equal to 6.5 cm and a height of 5.6 cm. To cut the glass correctly, you will need a pattern.
Procedure:
1. Place the pattern on the glass and trace the outlines with a marker.
2. Cut out the glass triangle along the contour using a glass cutter and a ruler. You need to press it hard enough to get even edges.
3. Turn the glass over, place it on the ruler and press to break off the resulting part.
4. Using the pattern, cut out all the other glass elements of the box. There should be 15 triangles in total.
5. Inspect the edges of the parts for chips and irregularities.
6. To make the parts perfectly smooth, the edges should be sanded using a special grinding machine. In this case, you need to cover your eyes with safety glasses to prevent small fragments from getting into them.
7. The treated pieces of glass must be rinsed with water and dried naturally on a paper towel.
8. Before proceeding to decorating the elements with copper foil, you need to wipe each piece of glass with alcohol.
9. To decorate the details of the box with foil carefully, the glass must be placed in the middle of the ribbon.
10. Wrap the edges of the triangle with foil, pressing it tightly to the surface and smoothing it with any flat object.
11. Carry out this operation with all other parts.
12. Now you need to treat the edges with flux. To do this, you can use a cotton swab or brush.
13. Using a soldering iron, apply solder to the edges of the parts. It is important to ensure that the glass does not crack due to high temperature. During operation, the soldering iron must be periodically wiped with a sponge to remove burnt tin and carbon deposits from it.
14. Now is the time to start assembling the box. Parts are placed in angles.
15. To connect them together, you need to apply solder using a soldering iron at two points.
16. Gradually assemble the entire box.
17. Internal seams also need to be sealed so that they are even.
18. Make the external seams more voluminous by applying several layers of solder to them.
19. Sand the seams with steel wool until smooth.
20. Treat with an antioxidant to prevent oxidation and add shine.
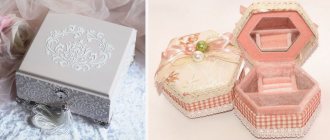
Coloring
Once you have decided on a box to house the musical mechanism, it should be painted. This can be done using a roller or brush. You can use any paint, but it is most convenient to use acrylic paint to decorate a music box - it does not have a strong odor, covers the surfaces well, gives an even color and dries quickly. If the box for housing the musical mechanism is made of wood, then you don’t have to paint it, but use special products - stain, furniture wax, wood varnish, which will either emphasize the natural color of the wood or give it a slightly different shade. Naturally, the box should be painted only if it is not decorated. But if you have already chosen a beautiful box to your liking, then you don’t need to do anything.
Ceremonial completion
Use needle-nose pliers to bend the trigger lever so that the tune plays when the lid is opened and fades out when the lid is closed.
1. Remove the hinges and transparent cover. Sand all parts with 220-grit sandpaper. Then begin finishing. We sprayed three coats of semi-gloss nitro varnish, smoothing each dry coat with #0000 steel wool.
2. Install the musical mechanism into the housing. Gently bend the wire trigger so that the mechanism stops when the wire touches the bottom of the fold in side wall B (photo H).
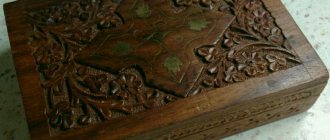
People who prefer to make memorabilia and gifts themselves sooner or later think about how to make a box with their own hands. To do this, you do not need to have any special skills in a particular field. To work, you will need a set of tools and available materials: cardboard, fabric, plywood, glass, etc. You can also use old postcards or a tin of cookies or tea.
Installation of box supports
The next stage of work is the design of the legs of the box. To do this, you can use large beads from 1.5 to 2.5 centimeters in diameter. It will be much more convenient if they have the shape of a cube or parallelepiped. The beads should be placed in the corners of the bottom of the box, departing half their diameter from the edge plus 0.5 centimeters from each edge. If these are beads or some objects that do not have space for special fasteners, then they can be glued using a hot gun or universal glue. If you have chosen special parts designed for this purpose, they should be secured using the screws included in the kit.
Classic plywood
For beginning craftsmen, the easiest way to make a box is from plywood. Required materials and tools:
Preparatory stage
Before proceeding directly to making the box, you need to cut several blanks from plywood with the following dimensions:
- 23 cm x 14 cm - 1 pc. (bottom of the box);
- 14 x 7 cm - 2 pcs. (end sides);
- 25 cm x 7 cm - 2 pcs. (sidewalls);
- 25 cm x 16 cm - 1 pc. (lid);
- 14 cm x 4 cm - 2 pcs. (external partitions);
- 14 cm x 9 cm - 1 pc. (outer cover No. 1);
- 14 x 7.5 cm - 1 pc. (outer cover No. 2).
You also need to make the parts in advance for assembling the small box, which will be located inside the box:
- 4.5 cm x 4.5 cm - 4 pcs.;
- 4.5 cm x 6 cm - 2 pcs.;
- 6 cm x 6 cm - 1 pc.
When cutting plywood with a jigsaw, the edges are uneven. Therefore, they need to be sanded, as well as the surface of the walls that will be inside the box.
Assembling the outer frame
At this stage it is necessary to assemble the base. Procedure:
Making a small box and a large lid
Procedure:
- Make a small box using the same principle as a large one.
Firing and staining
Algorithm of actions:
- Lightly burn the workpiece to form beautiful scorch marks.
You need to work with a blowtorch very carefully. Plywood should only be burned lightly to avoid the formation of unsightly burnt chips.
Box lid decor
If you wish, you can decorate the lid of the box if you are not satisfied with its original form. If you have chosen a musical mechanism with a specific melody that evokes specific memories, then the decoration of the organ can be done according to the same motives.
Are you bad at drawing? No problem - stencils, decoupage, and stickers will help you decorate the lid of your music box. It is convenient to use spray glue in this case. You can complement the decor with various details - beads, rhinestones, shells, decorative sand, or place a beautiful cabochon or cameo in the center. In general, you can decorate a music box in any style and technique, in any design.
Installation of the musical mechanism
In order for the musical mechanism to work well, it must be securely fastened inside the box. This can be easily done using the following algorithm:
Why French children behave well: eight ways to raise them
Women's jeans: before you buy them, you need to pay attention to one detail
Smooth and fresh skin: dermaplaning, or why a woman needs to shave her face
- determine where it is most convenient to place the mechanism; if the box will be used for its intended purpose - to store something, then the device itself that reproduces the sound is most conveniently located in the corner near the back wall;
- When determining the location of the mechanism, make sure. that the fasteners for it will not fall on the legs of the box;
- mark the location of the fasteners for the musical mechanism by making it on a separate sheet of paper, drawing the outline of the bottom and marking the holes for the fasteners;
- transfer all the markings to the bottom, for these purposes you can use small pieces of tape that will not spoil the already painted surfaces of the box, securing the paper template with them;
- mark the location of the hole for the winding key or the handle of the organ on the side wall of the box, carefully measuring the distance from the bottom surface of the mechanism, and the ratio of the fasteners and the handle along the lengths of the sides;
- make holes using a hand drill with a thin drill bit, suitable in size for fasteners and corresponding to the diameter of the handle or key;
- remove all sawdust and dust, the bottom under the organ should be clean;
- Carefully place the mechanism inside the box, removing the plastic case from it (if any);
- make sure that all holes are located correctly both on the bottom and on the side wall;
- secure all the fasteners using a screwdriver with a thin blade, once again check the correct location of the side hole for placing a key or barrel organ handle;
- put on and latch the protective case;
- insert the key or handle of the barrel organ into place, follow the instructions, it should either snap into place, or you will have to screw it all the way until the barrel organ starts making sounds;
- check the functionality of the mechanism.
If the musical organ plays a melody without failure, and the handle does not cling to the body when turned, then the box is assembled correctly. Please note that not all musical mechanisms have holes for mounting fasteners. If they are not there, then the organ will be held in place only due to the rotary handle and the transparent upper partition.
If there is little snow, there will be no harvest: December 16 is Ivan the Silent Day
Rare shot: Viktoria Isakova showed her grown-up daughter from Yuri Moroz (new photo)
A student at the Vietnam Police Academy shared how she takes care of her facial skin.
How to make a recess in the front wall
1. To make a recess for the lid handle I
, make a template the same size as the front wall
A
from 12 mm plywood
(Fig. 1a).
Cut a cutout in the template and use double-sided tape to attach the template to the front wall
A
, aligning the edges.
2. Attach a 6mm straight bit to the router collet. Then install the 12mm copy sleeve.
Note.
The router bit should be long enough to protrude 27mm from the router sole.
3. Place the front wall A
with a template attached to it on an anti-friction mat or secure it on a workbench with double-sided tape.
Set the routing depth to 1.5mm and cut along the edge of the cutout in the template (Photo A).
Using a sharp knife or chisel, make cuts along the edges of the resulting shallow depression so that when removing the rest of the material, chips do not appear on the edge
(photo B).
Trim the inner corners of the recess with a chisel.
After removing some material with a cutter, make cuts on the edges of the recesses on the top side of part A with a sharp knife. Mill further to a depth of 14 mm to create a recess with a cutout for the handle in the upper edge of wall A.
4. To determine the dimensions of the bottom D
Dry assemble the walls and measure the internal dimensions of the box. Add 5mm to each dimension and cut the bottom out of 6mm plywood. Sand the inside of all sides and bottom with 220-grit sandpaper.
5. Assemble the box (photo C).
Do not glue the bottom
D
into the tongues so that it can freely change its dimensions when humidity changes.
Glue the back wall C to the side walls B and clamp the assembly with a clamp. Slide bottom D into the tongues. Add front wall A and miter the corner joints with strips of masking tape.
Place 16mm deep cuts at the top of the walls. Lift the discs and turn the body over in the jig to make bottom cuts 22mm deep.
Finishing touches
An arrow can be placed on the side surface of the box around the handle, indicating the direction in which the handle should be turned to play the melody. This is worth doing if you plan to show your work to strangers.
From a sheet of thick cardboard or plywood, cut out a partition that will separate the mechanism from the rest. If the box is large enough and a separate corner is allocated for the mechanism, then there will be two partitions. They will make a right angle to each other. In size it must correspond to the dimensions of the mechanism plus 5 millimeters for the technological gap. The height of such partitions should be slightly higher than the highest point of the surface of the barrel organ.
Paint these parts to match the color of the box. Install the partition using all-purpose glue or a hot gun and allow it to adhere securely to the base. Then, using a ruler or caliper, measure the dimensions of the resulting chamber. Using these dimensions, cut a piece of plexiglass or thick transparent plastic. Glue plastic on top of the music chamber as protection.
Why is the transparent upper partition made? For aesthetic pleasure, it is interesting to observe how a melody is born from a set of plates, hooks, grooves, and hammers when you turn the handle of a barrel organ. In addition, this way the musical mechanism will be protected from everything that will be stored inside the box. But if the box has a transparent plastic body, then installing such a top cover is not at all necessary.
From postcards
From old postcards with a similar theme, you can make a “chest” for storing photos. Required materials and tools:
- old postcards;
- threads (floss, knitting, iris);
- needle with a wide eye;
- scissors;
- pencil;
- ruler.
For manufacturing, it is advisable to use the drawings:
Using these drawings you need to create patterns. To do this, you need to transfer the elements onto postcards and cut out the details along the contour.
Algorithm of actions: