Plastic is a universal material. It has found wide application in the manufacture of various components and parts in both industrial and household appliances. Products made from it are used in interior design of residential premises and offices.
A type of material called liquid plastic allows you to create crafts of a wide variety of shapes and sizes. This makes it possible to implement original design solutions. How to make liquid plastic at home?
Materials for production
To make liquid plastic with your own hands, you need to prepare the following:
- container made of glass or metal;
- acetone;
- Styrofoam.
In this case, the amount of acetone used depends on the desired volume of the finished product.
If you want to make liquid plastic with your own hands, the recipe for its preparation will be based on dissolving polystyrene foam in acetone. For this, polystyrene foam is used. It is a packaging container for various household and electronic equipment.
Hot welding methods and necessary equipment
The following tools are used to connect plastic elements by heating:
- manual units that produce a stream of hot air;
- extruders;
- devices for joining sheet polymers;
- automatic welding units.
A plastic welding hairdryer can be used to join any thermoplastics.
To choose the right thermoplastic welding tool, you need to study the operating principles, advantages and disadvantages of each device.
Handheld hair dryer or gun
Together with such equipment, a consumable material is used - a rod, which is placed between the elements to be connected. After this, the seam is heated with a construction hairdryer. The device resembles a household appliance used for drying and styling hair. The temperature and power of an industrial hair dryer are higher. Thanks to this, the edges of the elements being welded are melted, forming a homogeneous mass. As it hardens, it holds the parts together.
The temperature of the air stream is adjusted automatically or manually. The kit includes attachments that help connect plastic elements end-to-end or overlapping. The nozzle configuration is selected depending on the type of plastic, the thickness of the parts, and the experience of the welder.
Household hair dryers are used to perform routine operations. Industrial options are designed for laying polymer pipelines.
Extruder
The device is similar to a gun, at the end of which there is a nozzle for fixing a filler rod or tube.
An extruder is a machine for continuous processing of polymer raw materials.
The operating principle is based on:
- heating the consumable to a semi-liquid consistency;
- removing mass to the junction of parts;
- solidification of the melt followed by the formation of a seam.
Using an extruder, you can weld elements of any thickness in one pass. The performance of the device is higher than that of a hair dryer. The main disadvantage is the inability to weld products made from different types of plastic. This is due to the difference in melting temperatures. Before starting work, the edges of the parts are cleaned of traces of dirt and grease that can impair the quality of the seam.
We recommend reading: How to solder a cooling radiator yourself
contact welding
The equipment produces short-term heat pulses applied in combination with pressure. The devices are used at production sites where welded polymer sheets are produced.
How to make liquid plastic with your own hands
The step-by-step recipe for preparing the named material looks like this:
- Open the container with acetone and pour the liquid into the glass container so that its level from the bottom is approximately 1 cm.
- Polystyrene foam must be broken into many small pieces, each of which will be easily placed under the thickness of the solvent.
- You can make liquid plastic with your own hands by dropping each piece into a container and waiting for it to completely dissolve.
- Polystyrene foam should be added to the container until it stops melting. Then you need to wait 5-10 minutes for the unused acetone to evaporate.
- After this, a viscous mass is formed at the bottom of the container, which can be used to produce a variety of products.
Knowing how to make liquid plastic, remember that complete hardening of the mass lasts 20-30 hours. Consequently, the part being manufactured cannot be removed from the mold within this period of time.
The substance should be applied with a small rubber spatula. Movements should be smooth. Liquid plastic must be stretched over the surface to be treated. If you use it to fill cracks, it is better to use brushes with hard bristles. They need to “push” the mixture into the gaps. After the plastic has hardened, it is recommended to apply another layer of the substance.
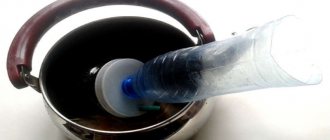
The described product has long been sold in finished form. It only needs to be heated in a water bath or in special equipment. A hair dryer is also often used for this.
As a rule, liquid plastic is produced in dense packaging. Its terms and storage conditions are strict. The temperature in the room where it is located should not fall below 15 degrees. Otherwise, the product will lose its performance characteristics:
- viscosity;
- elasticity;
- hardness after hardening;
- practicality;
- durability.
The cost of liquid plastic is quite high. That's why it's better to do it yourself.
Plastic injection machine at home
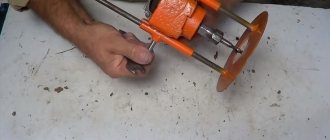
Below is a video explaining how to make a plastic injection molding machine. What do you need for this in a DIY home environment? Rod with piston. Three-quarter pipe as a cylinder. Half inch adapter to 3/4 pipe. Fitting cut off for convenience. Metal gasket with mica for insulation. Thermostat. It regulates temperature up to 350 degrees. 600 watt ten. Two nuts and a box for attaching the thermostat. We put on the adapter. We tighten the washer. To prevent the nichrome from sliding down.
We begin to assemble the control unit. Then we attach the thermocouple from the thermostat to the cylinder body. The author did not show how he would assemble all this, but presented a diagram. The photo shows the device assembled.
We attach the control unit to the syringe. Tighten with nuts. The thermocouple is long enough. Now you need to secure it. Mica to prevent thermocouple from slipping through ceramic insulators. For rewinding, not just a thread is used, but a silica one. It is heat-resistant, that is, it does not burn or melt. You can use asbestos cord. But since the master did not have it in stock, he had to buy silica.
We wrap it with heating element. Next, you can use mineral wool or asbestos fabric. Necessary to avoid heat loss. The master used mineral wool from an old oven. Fixed it with aluminum wire. Assembly is complete. Pressure tests can be carried out.
Set the thermostat to 100 degrees. Let's see how the machine will work in this mode at home.
Precautionary measures
Acetone is a very dangerous liquid that has an extremely negative effect on the human body. Therefore, it is allowed to make liquid plastic with your own hands only if the following precautions are strictly observed:
- Before working with acetone, you must carefully study the instructions for its use. It is indicated on the container label.
- Special sealed safety glasses should be used. They will protect your eyes in case of liquid drops and vapors. Working without them can cause serious eye injury.
- Acetone is toxic, so it should only be used in a well-ventilated area. In this case, it is necessary to use respiratory protection.
- This is a highly flammable product. Therefore, liquid plastic is made with your own hands away from sources of open fire. Smoking is strictly prohibited when performing work.
- Residues of acetone must not be poured into the sewer system.
- At the end of the process, as well as after pouring the finished plastic into molds, you must thoroughly wash your hands.
Using glue
Before we figure out how to solder plastic at home, we’ll look at a simpler method - gluing. But gluing plastic is much more difficult than, for example, ceramics. The fact is that plastic has a smooth structure and low adhesion (“sticking”), so in industrial conditions the parts are usually soldered together.
But you can still glue them together. In this case, special adhesives are used that dissolve the surface of the plastic. The dissolved parts are compressed, they stick to each other and do not fall apart.
Let's figure out which glue is best to use:
- Liquid . Not the most effective option: it should only be used for gluing small objects that will not be subject to stress afterwards. Liquid glue does not deform the surface (this is important for small parts), but it does not adhere well to parts and takes a long time to dry (at least a day).
- Contact . The plastic adheres firmly. It consists of 2 parts: the glue itself and the activator or hardener, which are mixed before use. The main disadvantage is that cantate glue is toxic. It can only be used in a ventilated area and using protection.
Source prom.st
- Reactionary . When analyzing options for how to seal plastic, reaction adhesive is considered the most suitable. It can be used in hot and cold, in water. It can even be used on surfaces that will be regularly subjected to stress.
- Hot melt adhesive . Sold in the form of sticks for glue guns, melts when heated. Does not glue parts well and can only be used for small parts or for a short time.
Most often, the packaging of the glue will indicate whether it is suitable for plastic, as well as how to use it correctly. It is recommended to follow the instructions, since glue from different companies may differ in composition and use.
The gluing process will be carried out in several steps:
- The place is cleared of dirt and dust.
- Degrease with a soap solution or alcohol.
- Lightly wipe the gluing area with sandpaper - the surface will absorb the solution better.
- Apply glue carefully so that there is no excess, otherwise there will be smudges.
- The parts are placed evenly, clearly along the line, pressed tightly for the time specified in the instructions.
Source ad-cd.net
When deciding how to solder plastic at home, it is important to remember that the glue dissolves the surface, after which it is easily deformed. It is better not to touch the part until it has completely hardened.
Applications of liquid plastic in finishing
The product has been used for finishing for a long time. After its application, an elastic film appears on the treated surface. It is highly waterproof and UV resistant. The material protected by such a film is not afraid of exposure to aggressive detergents. The smooth surface has a pleasant shine and retains its characteristics for many years.
Types of plastic with weldability characteristics
The joining method is chosen in accordance with the type of polymer and its characteristics.
They are distinguished by high weldability:
- Polyethylene. Products made from such plastic are joined by melting the edges, which are then combined under pressure to prevent deformation.
- Polypropylene. The material is used in the production of pipes, which are connected using a 1500 W electric soldering iron. By increasing the temperature at the junction, the 2 elements are tightly fastened. The properties of the material help to obtain a seam that does not allow moisture to pass through.
- Polyvinyl chloride (PVC). Plastic does not deform when heated. The welded joint is strong and uniform.
Polypropylene is a synthetic thermoplastic non-polar polymer.
The following polymers have medium or low weldability:
- Polystyrene. The polymer is used in the manufacture of dishes, toys, and household items. Parts made from this polymer have rather poor weldability and require careful preparation.
- Polyvinyl chloride. It is not recommended to use hot methods when comparing elements from such a polymer. This is explained by the possibility of edge deformation, which impairs the quality of the seam. Cold methods are more effective.
We recommend reading: Heating temperature of polypropylene when soldering pipes
Hot gas
Gas welding of plastic means that a directed flow of hot air or industrial gas - argon, nitrogen and others - is used to soften the material. In domestic conditions, air is usually used, and the tool for supplying it is a hair dryer.
The temperature of the supplied gas should be approximately 80-100 ° higher than the temperature of viscosity, that is, softening of the welded metal to the desired condition. Under these conditions, it is also necessary to ensure pressure on the plastic edges being joined. To do this, you can use a pressure roller, which is moved along the seam following the hair dryer (the help of another person is required), or special fixing attachments for the hair dryer.
This attachment allows you to compress the surfaces during welding. Specially for processing large-format sheets - banners, awnings, blood elements - crevice and forming attachments have been developed for a standard industrial hair dryer (heat gun).
In industry, a special gas composition is more often used to ensure the absence of oxides in the weld, which weaken its structure. In everyday life this is not critical, since the load on plastic parts is usually insignificant.
Gas heating imposes a limitation on the thickness of the material being welded - no more than 2 mm. Optimal - 1.5 mm .
Gas welding of plastic can be done either without the use of filler material or with an additive. The role of the additive is played by the so-called electrodes - rods made of plastic of various brands (selected based on the brand of plastic), with a diameter of 2 to 6 mm.
Calling them electrodes is not entirely correct. No current flows through them during gas welding (almost all plastics are dielectrics). But the name stuck simply by analogy with metal welding.
The use of an additive can increase the strength of the seam and deepen the weld. This method is suitable for fastening thicker parts. It is possible to either manually feed the additive with rolling or use special equipment - an extruder, an extrusion gun.