Recommendations for assembling a walk-behind tractor
Firstly, it is worth saying that by creating such equipment yourself, you can take into account those nuances that purchased serial devices simply cannot have. For example, it is possible to combine the functions of a plow and snow removal in one device; it is possible to supplement it with a useful trailer.
All key parameters are usually shown in do-it-yourself walk-behind tractor drawings, which should be done in as much detail as possible.
As a rule, there are no uniform sizes for a walk-behind tractor. You can find models where it barely reaches 10 kg.
These are usually created for a small amount of work on small plots of land. And there are others that are already similar in their power to mini tractors. This technique is capable of reaching speeds comparable to a full-fledged vehicle, up to 60 km/h.
Diagram templates are widely available in various sources. You just need to choose the one that will be as similar as possible to the expected result and edit it depending on your needs.
To create equipment, you don’t have to be an engineer or have a special technical education; you just need to carefully study the video examples that are in the public domain, and also select the most suitable drawing.
What to add?
It is interesting that many owners of walk-behind tractors who want to convert their existing equipment into an all-terrain vehicle set the following task: the device must be easily transformed from a country assistant to a highly cross-country vehicle and vice versa. That is, in the shortest possible time, the walk-behind tractor should turn into an all-terrain vehicle for a trip, for example, on a fishing trip. If there is a need to plant potatoes, then the all-terrain vehicle should again turn into a walk-behind tractor in the same short time.
The goal is reasonable, because losing the agricultural functionality of the equipment in order to be able to go to the forest or lake 3-4 times a month is not very reasonable.
Let us immediately note that the goal: getting a transformer can be achieved quite easily. The key to achieving the goal is the following rule: design changes should be minimal.
In fact, to solve the described problem, you need to add a frame with cardans to the walk-behind tractor, removing the wheels and controls. Other modifications can be made, but this is optional.
Basic materials
Considering different options for how to make a walk-behind tractor with your own hands, you will notice that the most common recommendation is to use engines from old motorcycles or mopeds.
But in addition to this main component, you will need several more elements, which include a steel pipe used as a frame.
It is also worth stocking up on a sheet of iron. The casing, as well as body parts, are made from it. The axis, which will be in the supporting structure, is made either from a strong steel rod or from a pipe.
The equipment will not be able to function without wheels with tires with the widest possible tread.
Among others, gearboxes, bearings, and transmission elements stand out. When creating a Neva walk-behind tractor with their own hands, owners, as a rule, want to minimize costs.
To do this, before starting design, it is necessary to evaluate what is available; perhaps the elements useful for such equipment are lying idle in the garage.
We build a walk-behind tractor according to instructions from Arkhipov
Design features of the unit
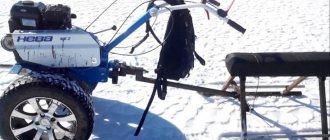
The walk-behind tractor is a self-propelled machine on two wheels, equipped with an engine removed from a VP-150M motor scooter. The reason for choosing this particular engine was that it has a design solution that allows forced air cooling of the cylinder head.
Such a motor from a scooter is capable of operating at the lowest speeds and at fairly heavy loads.
To build the walk-behind tractor, the master used control cables, engine mounts taken from a motor scooter, as well as a double arc of the frame, handles and chains. The rest of the design details were industrial production
Separately, the designer produced a U-shaped frame welded from pipes and a wheel axle turned on a lathe. He also made 3 homemade hinges for the main and control rods. They will be used as connecting elements between the walk-behind tractor itself, its steering wheel and the plow.
A steel pipe is attached to the frame of the unit by welding, ending with an axis, which is necessary for tensioning the cables going to the engine gearbox. The tension itself is carried out by means of a swinging rocker arm, the gear shift knob of which is a welded section of steel pipe.
Recent Entries
Lilac perennials that are beautiful, compact and do not crowd out other plants Why when buying seedlings you should not take the sellers’ word for it and how to determine the age of the plant using 3 signs Tomato seedlings have turned purple or whitish: why the color has changed and how to save the plants
The pitch of the chains used to create the device is 12.7 mm and 15.9 mm. Number of teeth on sprockets: output shaft – 11, secondary shaft – 20 and 60, drive axle – 40.
What is good about this particular design?
There are dozens of analogues of this model, but in comparison with them, the original model of the Kaluga master’s walk-behind tractor has a number of undeniable advantages.
- Swivel joint. The processing tools and tractors of most of these models have a rigid connection, which complicates the maneuvering of the unit and thereby makes it difficult to work with it. The parts of this agricultural unit are connected by means of hinges. This makes it possible to change the direction of movement during work, if necessary, without removing the plow from the furrow.
- Shift of the axis to the direction of movement. Many owners, when cultivating soil using a walk-behind tractor, have encountered such a difficulty that in the process of moving forward under the influence of soil resistance, the unit moves to the side. To level the furrow, a lot of effort must be made. To compensate for such a skid, the master positioned the plow axis at a slight angle in the direction of movement. When plowing, the structure is slightly turned to the left. The desired position can always be adjusted using three rod joints.
- The level of the specified plowing depth. If in other models the plowing depth is maintained by lowering or raising the plow, then when working with this walk-behind tractor it is performed automatically. Regulation is carried out by changing the angle of the plow in relation to the furrow. The structure is equipped with a field board, which acts as a lifting force when burying the plow. If, on the contrary, the ploughshare appears above the surface of the earth, then its angle of attack instantly increases, under the influence of which it again plunges into the ground to a given depth.
Step-by-step device assembly technology
The assembly of the structure begins with the arrangement of the drive shaft. To do this, a housing with bearings is attached to it, a sprocket is welded and overrunning clutches are mounted, which will perform the function of a differential during operation. After this, the structure is equipped with wheels and a frame. A telescopic rod, a plow and a steering wheel are installed on a fixed frame.
The main elements of the running shaft: 1 – shaft, 2 – sprocket, 3 – cover, 4 – bearing housing, 5 – support platform, 6 – bearing No. 308, 7 – freewheel housing, 8 – pawl axis, 9 – pawl, 10 – ratchet, 11 – bearing No. 307, 12 – washers, 13 – wheel, 14 – pawl spring
The agricultural walk-behind tractor is equipped with special wheels, which, unlike rubber counterparts, are able to provide better traction with the ground.
Such metal wheels do not become clogged with soil. When they come into contact with the soil, they do not compact it, but rather loosen it.
To connect the frame of the unit with the engine mount and the frame of the scooter itself, two arc-shaped pipes are used. Between them there is space for placing a fuel tank.
You can also build an adapter for a walk-behind tractor, read about it:
To equip the engine, a bracket is used, ending with a steel axle 150 mm long. The bracket is welded cantilever to the U-shaped frame of the structure. The motor with suspension is suspended on the axle itself. The assembled structure is connected to the arc-shaped arcs of the frame. Only after this the secondary shaft is mounted, the control cables are pulled and the chains are tensioned.
Main elements of the control unit: 1 – connecting axis, 2 – bar, 3 – pipe, 4 – handles
Connecting elements of the structure: 1 – main rod, 2 – control rod
How this whole thing works - video example
A clear example of using a walk-behind tractor:
Assembly tools
- One of the main tools that is needed to create a walk-behind tractor is, of course, a welding machine. Welding involves almost all devices for a do-it-yourself walk-behind tractor.
- Basic tools needed for plumbing. Among which there are hacksaws with files, and various taps suitable for different threads.
- Despite the fact that many fasteners are made by welding, you will still need a screwdriver or drill.
- Measuring tools should also be available, with which you can always check compliance with the sketch.
- Fasteners: nuts, bolts, self-tapping screws.
- Screwdrivers.
Opinions from forums
When covering the issue, it was impossible not to study what people who had already brought the idea to life or were just about to do so wrote on the forums.
A few points worth mentioning:
- the maximum speed of an all-terrain walk-behind tractor can be increased by replacing pulleys or making double pulleys;
- There is no problem with speed fluctuations;
- It is possible to use an all-terrain vehicle as a mini-tractor, but within the scope of work that is permissible for a walk-behind tractor that has not been converted into an all-terrain vehicle.
Safety precautions when creating a walk-behind tractor
Having been inspired by photos of a homemade walk-behind tractor, which can be found in abundance on the Internet, and having completed the drawing of yours, you can proceed directly to production.
It is important to carry out all work taking into account simple safety precautions.
- As for the tools used, each one comes with appropriate instructions on how it should be used.
- It is extremely important to start working by first wearing safety glasses and gloves.
- It would also be useful to have special clothing. Firstly, it’s not such a shame to ruin it, and secondly, this is an additional opportunity to stay safe when making any mistakes when using tools.
- The premises where such work is planned to be carried out must have good lighting, and there must also be a constant supply of fresh air.
Let's look at how to make an ATV with your own hands
The first step is to be confident in your turning and welding skills. It is necessary to immediately decide on the version of the motor and the main components. Some elements are taken from a walk-behind tractor, others from a motorcycle.
In this video, we'll look at a DIY ATV:
In addition to the details, you should choose the place where the production will take place, the necessary tools and equipment, and also prepare drawings, which you simply cannot do without.
Having come to the decision to make an ATV from a walk-behind tractor yourself, you need to understand that the unit will turn out to be less powerful and speedy. You will also have to sit on it not like on a motorcycle, but like on a walk-behind tractor. But endurance and maneuverability will be at their best.
Making a walk-behind tractor step by step
- Preparatory part (collection of materials, development of project drawings)
- Manufacturing of the supporting frame (main component)
- A motor is installed on it, which is connected to an exhaust pipe and a handle responsible for controlling the entire mechanism.
- Gearbox connection.
- Installation on the wheel structure. Their parameters were indicated earlier.
- Do not forget that a fan must be installed on the engine, which will perform the task of cooling the structure.
- After which a special tank is installed into which fuel will be poured. It must be connected to the motor using a special tube.
- Next it was the turn of the lugs.
- Then you need to check how firmly all the parts are fastened to each other.
On 4 wheels
The 4 wheels can be installed in different ways on the device. The first option is to transform the equipment into a mini-tractor and equip it with a seat. The second option is more common when making homemade equipment. In this case, and the use of unsuitable machine or motorcycle parts, two identical pairs are paired with each other.
Standard conversion of equipment into a mini-tractor is a common procedure if the unit has sufficient power. For this process, a free axis is created, which is installed on an elongated body. Paired equipment is placed on this axis.
When using the paired version, two sibling pairs are broken up and paired with the second wheel. It is also possible to install weighting agents between adjacent disks, but in homemade work, most often the disks are paired with a small gap using a small rectangular window, which then serves as a weighting agent.
Important! Paired options can be either solid rubber or pneumatic, but one pair must have an aggressive tread.
When fully created, each part will be a double element, which is created from equal parts. It turns out that the elements must be the same in shape and size.
Among the advantages of this design:
- higher level of productivity;
- quick removal of external parts;
- ease of creation;
- high level of contact with the surface.
The main advantages are increased maneuverability and increased speed.
A walk-behind tractor with 4 wheels is considered the most practical for creating at home.
Photo of a homemade walk-behind tractor
Description of the jack for a walk-behind tractor
It was not for nothing that Archimedes said: “Give me a point of support, and I will change the world.” The idea of creating a jack is to use a lever of the 1st kind.
Lever with different arms is used:
- the handle is a longer lever, the horses of which describe a longer arc when lifting; at the end it is slightly bent, so that the end rises at an angle from the ground and you can stick your hand in when you need to remove it from the jack and not get your fingers pinched when you lift the walk-behind tractor on the jack;
- double bracket with corners to hold the walk-behind tractor suspended;
- the axis on which the jack rests when lifting and connecting the handle and brackets to each other at a certain angle.
A jack for a walk-behind tractor is made by craftsmen in 2–3 hours from available material in the form of pieces of pipe and corners.
Design Features
Everything is done to the size of your walk-behind tractor.
Main critical dimensions:
- Height of brackets. It should be 3–5 cm larger than the radius of the wheels so that the wheels are suspended and do not touch the ground.
- Main axis length. Should not be longer than the distance between cutters when cutters are installed instead of wheels. If the axis is too long, the cutters can be damaged when they hit the axis or when lowered from the jack.
- The distance between the brackets depends on the width of the drive sprocket casing on the walk-behind tractor axle. It should not be smaller so that the corners do not rest on it. The distance should not be too large so that the jack does not rest on the tube with the wheel. The angle ribs must fit exactly into the gap between the casing and the wheel tube.
- The handle and bracket are at an angle of approximately 80° to each other. This is necessary so that the center of gravity, after lifting, rests on the handle and does not tend to tip over.