-> How to make veneer at home
Veneer is a very thin sheet of wood, the thickness of which can vary from 0.1 to 12 mm. For industrial purposes, veneer is often made from valuable wood species such as oak, ash, beech, walnut, mahogany and others. But if you need veneer for personal purposes in small quantities, for example, for aircraft modeling, then you can read how veneer is made at home and, if you have the tools, do it yourself. In this article we want to talk about how to make veneer with your own hands.
How to make veneer at home
The easiest way to get yourself a few pieces of veneer is to “disassemble” a sheet of plywood. Place the plywood sheet in a container with hot water for 2-3 hours, maintaining a high temperature throughout the soaking period, and then cut the plywood into layers with a well-sharpened knife. Immediately after this, you need to put the resulting veneer slabs under a press to maintain a flat surface.
You can even make sawn veneer at home, but be prepared that this work will take a lot of effort and time. All you need is a prepared beam (not necessarily elite wood, ordinary maple or birch will do), a pencil, a ruler, a workbench and a good jigsaw, preferably with a set of replacement blades in reserve. Fix the workpiece in the workbench and mark it vertically in increments of 10-12 mm (thicker is not practical, and if thinner, it will be very difficult to saw). Take a jigsaw in your hands and cut the veneer along the lines, layer by layer.
How to make veneer if you have a plane at home. Sliced veneer is made from the same timber as sawn timber, with the only difference being that thinner plates can be made. But there is also a downside to the coin - it is difficult to make plates of the same thickness with a mechanical plane. Well, if you have an electric plane with an adjustable layer thickness control, then the task is much easier. Firmly secure the timber in the workbench and remove the veneer, remembering to use a clamping ruler or beam. If you have access to a peeler or other woodworking machines, then the process of obtaining veneer is no different from the industrial one. How to make veneer suitable for further use? It must be sanded, coated with waterproof solutions or varnished, depending on the purpose of production.
There comes a time when wooden furniture or doors lose their original appearance. There is no need to throw away such products. Thanks to new technologies, a variety of finishing materials, and design developments, they can be given a modern look.
One of the finishing materials is veneer. To make it, wood is used, from which a thin layer is cut. At the same time, the material retains the structure of the tree.
You can decorate interior items using veneering technology. Making a new one out of an old product is not too difficult. If desired, repairs can be done by yourself. It is advisable to watch the video before starting work.
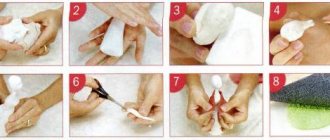
Decorative veneer basket
A small veneer basket is a charming solution for storing various materials, small items and even fruit.
For weaving you will need:
- veneer
- scissors
- clothespins
- metal ruler.
Place the veneer in water at room temperature for an hour. Then we hang it up so that excess water drains away. When there is no moisture left, cut approximately identical strips. Their length and number depend on what size basket you want.
We lay out half of the blanks on the table and secure them with a book or tape.
We weave the first strip in such a way that the edges are bent as shown in the photo.
We weave the next strip according to the classic weaving pattern.
When all the remaining strips are woven in, you should end up with a square.
We check in which direction the veneer should be bent. The fact is that on one side it will be smooth, but on the other it may flake.
We place the workpiece on such a side that it does not flake. We bend all the strips along the edges of the resulting square. This is much easier to do by using a ruler.
Align the workpiece along one side and weave in a long strip. It must be long, because it must be enough to cover all sides of the basket.
We weave two more strips in the same order.
We bend all the strips along the intersection line.
We weave three long strips along the side of the square.
We continue to do the same on the third and fourth sides.
We cut off the remnants of the woven strips and leave a reserve of 3-5 cm.
The basket is almost ready, therefore, if desired, you can weave stripes in order to make it taller.
We bend the vertical strips inside the basket and weave them under the third from the top. Before this, you can trim them a little.
We do the same with the remaining strips. As a result, not all of them will remain woven. To do this, we fix another piece of veneer along the perimeter of the last strip. You can secure it with clothespins.
We fold all the remaining strips over the last segment and weave them into the second strip from the top.
Cut the strips to the required length.
A wonderful decorative basket is ready!
Advantages of the material
Natural veneer has a number of advantages:
- Veneer made from wood is an environmentally friendly material. Its qualities are equal to solid wood.
- Decorative trims with patterns, different colors and textures are available on the market.
- The surface after pasting is smooth, chips, scratches, and mechanical damage are almost impossible.
- Finished products covered with veneer are distinguished by sophistication and nobility.
- Plywood is made from veneer.
It is important to know:
When choosing the right material, read the composition. Today there are similar products made of plastic or eco-veneer (glued together pressed wood waste).
It is not advisable to replace wood veneer with them; they are less environmentally friendly and have a short service life.
Preparatory work
To perform high-quality veneering you need to acquire:
- veneer and glue;
- ruler and paper for cutting out the template;
- plywood knife and veneer cutter;
- iron and syringe;
- with a wooden roller or iron.
Restoration should begin with the dismantling of fittings and decorative elements on furniture walls, doors or other products. The old coating, which has served its purpose, is removed with a spatula.
The surface must be carefully leveled, eliminating any defects with glue or putty.
. After complete drying, sand it with sandpaper.
Under each sheet you need to put soft paper (to absorb moisture) and plywood. Place a small press on top. This is clearly visible in the photo. Smooth sheets are cut into strips with a veneer cutter or plywood knife, in accordance with measurements.
The facing material is glued to the base of the restored products using the hot veneering method:
- The adhesive composition is applied to the prepared tape, as well as to the required part of the product. To ensure that the veneer is glued, the glue application procedure is repeated again after the first layer has dried. If the glue is applied only once, then it needs to dry slightly for 10 minutes.
- Using an iron heated to 50 degrees, we iron our workpiece, using white paper as a backing. The glue should not boil so as not to lose its properties.
- We press the veneer using a roller to the place to be restored on the product.
- When joining, an overlap of approximately 4 mm should be used. In these places you need to work hard with the iron. If there are any defects left, you will have to trim the veneer and add glue by squeezing it out of the syringe.
- After this, the area is ironed again with a hot iron.
Transferring marquetry to the surface
After the individual parts of several types of veneer have been precisely cut, it is necessary to assemble them into the desired motif. The pieces must be cut out with maximum precision so that after folding the pattern there are no large gaps left between them.
The assembled pattern is temporarily glued together with paper adhesive tape, which allows you to process the entire part.
- The resulting trim must be transferred to the required substrate - plywood or the piece of furniture itself. You can use glue or epoxy glue for gluing.
- Only apply the required amount of glue, otherwise it will begin to seep through the motif and cleaning it will be difficult.
- After gluing to the base, the tape needs to be pressed. To protect the veneer, the pattern is covered with newspaper on top and properly tightened with pullers. The ideal time to press the binding is several hours.
- After the glue has dried and pressed down, the paper adhesive tape is removed from the marquetry and surface treatment begins. Small gaps between the individual parts are filled with glue mixed with fine sawdust.
- The grinding phase continues until the entire surface is uniform, smooth and without noticeable differences in height. The last stage of marquetry production is surface treatment with paint.
Nitrocellulose varnish is applied with brush strokes in one direction. After applying and drying several layers, the finished work is sanded again with fine sandpaper.
Marquetry making is an impressive craft that is practiced not only by professional carpenters and carvers, but also by amateurs. Interest in marquetry is also manifested in the organization of courses and handicraft clubs for children and adults
. You can also try making your own marquetry at home, other than veneer and basic carpentry tools, you don't need many tools.
Finishing
For veneering to be successful, you need to iron the coating for at least 15 minutes with a roller or wooden iron.
Start from the middle and work towards the edges. You shouldn’t spare any effort, but don’t forget about accuracy. Then iron again with an iron at a temperature of approximately 50 degrees.
It often happens that bubbles form under the coating, making the veneer look like leather. This is a defect that is easy to get rid of. The swelling areas are moistened with water, small punctures are made, into which glue is injected from a syringe. Needs to be ironed again.
We leave the veneered piece of furniture alone until it dries completely at a temperature of 25 degrees. All that remains is to apply stain or furniture varnish. Lastly, the fittings are installed. If desired, the finished product can be decorated.
In the factory, special machines are used for this process.
But it’s not difficult to glue veneer on your own at home. Then the price of the finished product will be much lower.
The main thing is to prepare the necessary means at hand and choose high-quality finishing materials. And, of course, adhere to the recommendations for veneering. Then the finished product will delight you with its sophistication and novelty.
If you have the means, you can purchase veneer, for the manufacture of which valuable wood was used. Then the finishing of interior items will be called veneering.
How to veneer the edges of furniture, see the following video:
In simple terms, veneering is gluing thin plates of wood with a beautiful structure (actually) onto a wooden base - be it a table, wall or door - of lower decorative qualities. It turns out that veneering furniture means dressing it in beautiful clothes.
Veneering is more correctly called veneering
. But it just so happens that the slang word “veneer” is more familiar to the average person’s ear than “veneer.”
Easter basket
A cute Easter basket is a perfect option for kids. Be sure that they will enjoy taking it with them.
Necessary materials:
- PVA glue
- balloon
- scissors
- thick thread
- brush.
Inflate the balloon to the required size and fix it. Cover it with glue using a brush.
We wrap the ball with thread until the glue dries. We do this quite tightly, from different sides.
Apply another layer of glue on top of the threads.
When everything is perfectly dry, we pierce the ball with a needle and take it out.
We cut it in half with scissors and cut out the handle separately.
Glue it to half of the product. A beautiful children's basket is ready.
Why veneer furniture?
Two main points can be highlighted.
Firstly, the price
. You can veneer a pine table with your own hands, “turning” it into oak, and the appearance will hardly be inferior to real oak. But the price will be much lower. And if you remember that it does not dry out, does not deform, and is not affected by moisture and temperature, then you should seriously think about whether it is worth spending money on furniture made from valuable wood?
Secondly, wide design
. Do-it-yourself veneering allows you to turn a tattered window sill into a new one, and a boring cabinet into a completely new item in the Art Nouveau style without much expense, just by applying veneering.
How to do veneering yourself - technology and step-by-step instructions
One of the significant disadvantages of wood is that it quickly loses its attractiveness. Even if the conditions for its storage and use of lumber products are the most favorable, over time the surfaces inevitably change color and “fade,” that is, the wood loses its original appearance.
Many technologies have been developed for restoration and renovation of furniture and structural elements. One of them is veneering (the term veneering is sometimes used), which is quite accessible for DIY implementation.
Veneering: types
There are several main types of veneering, let's take a brief look at them.
— Hot veneering. With this method, the veneer is glued to the base using adhesives. The most accessible method for home conditions, it will be discussed in the article.
— Cold veneering. Here the veneer is pressed onto the base. We are talking about pressing machines or screw clamps, which not every home owner has.
— Membrane veneering. An industrial method used for veneering complex surfaces. Membrane veneering is based on vacuum joining of veneer and boards - both smooth and textured.
Restoring polishing
Restoring a layer of varnish is a complicated matter. Any furniture restoration begins with cleaning and degreasing, and repairing the varnish coating too. We use dishwashing detergent diluted in water: safe and reliable. After drying, we proceed to refinishing the polish.
- On dark furniture, a scratch can be painted over with iodine, achieving the desired color in a number of layers or diluting it with water. If you have furniture markers, you can use them.
- Deep scratches that have turned white cannot be painted over like this. There are other methods: Make mastic from 4 parts melted wax and 3 parts turpentine. This paste is applied to the polish and rubbed with a soft cloth.
- If you have shoe polish of a suitable color, you can cover it with it and then polish everything with a cloth. Scratches are painted over, then the coating is restored
You can simply refresh the faded polish on furniture using mixtures you prepare yourself:
- Two parts each of linseed oil and turpentine and one part vinegar. Mix everything, apply with a swab, wait until it is absorbed and polish.
- Mix oil and beer in equal parts and wipe the furniture with this mixture. After it has been absorbed, rub.
- The surface will be more shiny if you boil beer with a piece of wax, cool it and apply it slightly warm to the furniture. When the composition is absorbed, the surface is rubbed until shiny.
A few more recipes in the video.
How to remove polish from furniture
Quite often you have to remove the polishing: it is not the most fashionable finish. Modern furniture is most often painted with opaque or tinted paints, and the surface is matte. In any case, the polish must be removed. There are several ways. Since varnishes come in different compositions, you have to select them experimentally. But one of the methods should work.
- You can remove old polish from furniture mechanically. If you have a sander, the process will go faster; if not, take coarse-grain sandpaper and remove the varnish layer until wood appears. Then take a fine grit and sand it to a smooth surface. Mechanical removal does not always work. Sometimes even a grinder does not give results: the polish does not come off, but begins to melt and stink. Then they change tactics.
- You will need a piece of old glass. Put on gloves and break it into several fragments. Use the sharp edges that have formed to scrape the coating down to the wood. If there are chamfers and recesses, it is convenient to scrape them out with sharp edges. After the main layer of polishing is removed, everything is brought to a smooth state using fine-grain sandpaper. Often, restoring furniture with your own hands requires tough measures: some types of polishing can only be scraped off with glass
- If working with glass does not appeal to you, chemical methods remain. There are ready-made products for removing polish. You can work with them either in the open air or in a draft: the fumes are harmful. How to remove polish - you need to read on the packaging. The means are different and the duration and order of processing may vary.
How to paint polished furniture
If old furniture was prepared for painting, it must be cleaned of dust, wiped with a damp cloth and allowed to dry. Then level everything with putty, smooth out all the unevenness, wait until it dries. Take sandpaper and sand again, first with medium, then with fine grain. Next, apply a layer of primer and wait for it to dry.
Applying varnish with a brush when restoring furniture polish
You buy a primer for the paint you are going to use, or you can dilute the paint with a compatible solvent and coat it instead of primer. After drying, you can paint.
You can paint with a roller or brush. Usually several layers are needed: do not try to apply a lot of paint at once, as drips may appear. It is better to apply several thin layers. This way the surface will be smooth and uniform. Another trick: for uniform coloring, layers are applied in different directions - along, then across. This also applies to applying varnish.
Some types of varnish are easier to work with when they are warm. They are heated a little and then applied with a spray gun or brush. When heating, you need to be careful: vapors may flare up.
In order of painting: first paint the internal surfaces, edges and joints, then move on to the external ones. With this sequence, there is less chance of getting dirty or touching an already painted surface, ruining it.
If the varnish coating is smooth, without defects, and it needs to be painted over, you can do without removing this layer. There are special primers for complex surfaces. Apply them to the surface and paint after drying. They have components that penetrate even the varnish layer. Therefore, the paint will apply well and last a long time. But such soils have a disadvantage: they are expensive. But they save significant time.
Some secrets of painting wood (including brushing and painting in two colors) are in the article “How to paint lining.” Watch the video for a few secrets to applying acrylic paint evenly.
If the restoration does not bring the expected result, maybe you need to change the appearance? How to remake furniture in a new way is described here.
Stages, materials and technology of the production process
So, you have to initially soak the wood for some time in water (the time depends on the density of the wood and its initial condition) and steam it.
Soaking and steaming are necessary to give the wood the same physical properties throughout its entire volume.
Otherwise, you risk damaging the interior of the wood or even rendering the equipment unusable. Next comes the drying process in a drying chamber. Natural drying of the wood will not give the uniformity you were striving for. Insufficiently dry wood is not used in the production of veneer, since in this case the percentage of defects is very high.
The moisture content of wood can also be checked in a homemade way using a laboratory hygrometer. To do this, cut a small section of wood and place a thermometer in the sawdust. The second thermometer remains open. Humidity is determined by the difference in thermometer readings and using a table. This method is not entirely reliable, because it gives very noticeable deviations from real results.
Return to contents
Rope baskets
A beautiful rope basket is a must-have item in the home. It will complement the interior and make the room extremely comfortable and homely.
To make such a basket, prepare the following materials:
- natural rope;
- yarn for knitting;
- large scissors;
- glue or a special glue gun;
- needle.
First, we tie colored yarn around the end of a natural rope and wrap it a few centimeters. This will be the bottom of the basket.
Using glue, we wrap the rope around the bottom. We use colored thread to secure it additionally. After the bottom is ready, we continue to do the same, building up the walls of the basket. Handles can be made in the form of loops. We fix them with glue.
As an additional decoration, we use colored thread, which can be wrapped several times around the handles.
Another version of a rope basket looks completely different. And all because a bucket is used as the basis for its creation.
We create the bottom of the basket by folding the rope into a specific shape. We fix it with glue. When the bottom is ready, slowly move the rope so that it covers the walls of the bucket. As a result, we take out the bucket and fix the end of the rope with glue.
We make handles from strips of leather or from tape or contrasting rope.
We attach them to the basket and use them with pleasure!
Sawing finished material
Sawing veneer is similar to sawing an ordinary board. But the requirements for the sawmill are much stricter: very precise adjustment of the cutting planes is required, and the wood feeding speed is much lower than usual. The veneer turns out even, smooth, requiring virtually no modification. Band sawmills are quite suitable for this method of veneer production. There is only one thing to consider: about 60% of wood inevitably turns into sawdust. Let's call this a payment for the quality of veneer, but when using valuable types of wood, this production method is not used. High-quality material obtained by sawing is always used to produce expensive goods. They decorate furniture with it. The soundboards of musical instruments are made from the same veneer.
Veneer obtained by sawing must still “ripen” for a certain time in a darkened room where a certain humidity is maintained. In mass production, the resulting veneer is kept under pressure for a short time. This is a completely unnecessary procedure, since after sawing the wood can be heated, and the process of moisture evaporation will accelerate. This can cause various distortions and bends. It is better to play it safe and avoid damage to the material by placing it under a press.
It is much easier to obtain veneer by planing. Don’t be alarmed: it was only in the Middle Ages that veneer was planed from an ordinary board using a plane. Nowadays, everything is much more technologically advanced: a block of wood (namely a block!) is fixedly fixed on a workbench, and a wide, sharp knife removes a layer of a given thickness.
Here's the veneer for you. The equipment requirements are the same: very precise settings, low feed speed. The knife must have a certain sharpening angle, which is selected depending on the thickness of the required veneer and the density of the wood. This veneer is very often used for the production of plywood. For plywood to be of high quality, the veneer must be of the same quality. True, this rule is often abandoned in production in favor of the quantity of goods produced. At the same time, it is completely forgotten that at the final stage the plywood is pressed, which means the veneer is subjected to a rather impressive load. When its quality is low, normal cracking occurs.
Veneer refers to wood materials that have the form of thin sheets of wood, the thickness of which ranges from 0.5-3.0 mm. Veneer is usually glued to wood panels or fiberboard, thus giving the material a more aesthetic and attractive appearance.
Varieties of veneer
Veneer is divided into various types. Depending on the production method, the material is divided into:
- peeled;
- sawn;
- planed.
Depending on the appearance, veneer is divided into the following types:
- Natural. This material takes the form of thin sheets of natural color and structure. The main task in the production of such material is to preserve the naturalness of the wood. The advantages of natural veneer are its environmental friendliness, preservation of the unique structure of wood, and attractive appearance. Products finished with the material are similar to products made from solid wood, but cost an order of magnitude lower, and the weight of the structure is less.
- Color. When producing colored veneer, its surface is painted and treated with stain. As a result, the material comes in a wide range of colors.
- Fine-line. This type of material is obtained as a result of the reconstruction of peeled veneer obtained from softwood. Initially, blocks are formed, from which veneers of various structures, patterns and colors of natural wood are subsequently produced. This method allows you to imitate valuable wood species when making material from cheaper wood. As a result, veneer has a more aesthetic appearance and costs less.
Veneer has found application in the manufacture of various structures and products. The most popular material is for finishing doors, furniture, and for making plywood. It is also quite often used in the production of guitar bodies and for decorative work. In addition, veneer is widely used in car tuning and interior trim.
It is worth noting that some manufacturers save on high-quality glue and varnish by using low-quality compounds. All this significantly affects the environmental friendliness of the product.
Development of marquetry
According to historical sources, the marquetry technique was known back in the times of Ancient Greece and Egypt. However, these were isolated attempts; The greatest expansion from a historical point of view was recorded only during the heyday of the Baroque and Rococo styles.
At that time, marquetry was one of the most common techniques for decorating wood and wooden furniture. Gradually, proven methods and techniques for marquetry production began to develop, the greatest advantage of which was the invention of the veneer cutting machine.
With the use of plywood for insertion, there has been a gradual transition from hardwood to softwood, especially spruce or other softwoods.
- Initially, carpenters were engaged in the production of marquetry; later a separate craft was created.
- Today, carpenters-artists, together with carvers, are again working in this area. Over the centuries, the use of woody plants has also changed.
- At first, fewer types of wood were used, which gradually increased.
In addition to commonly available woody plants, exotic species and combinations with other types of materials such as metal, pewter, mother-of-pearl or brass also began to be used.
Veneer manufacturing methods
As mentioned above, veneer is divided into three types according to the manufacturing method.
Let's take a closer look at these methods of producing material.
- Peeling method. In this case, specially prepared wood is used, and when rotated, the top layer is removed using a special machine. In the production of veneer using the peeling method, soft and hard woods are used. With this treatment, the top layer is cut off spirally. The result is large sheets of veneer, but their pattern is not very clear and bright. Therefore, peeled veneer is most often glued to plywood.
- Planing method. With this method, the top layer of wood is cut in the transverse or longitudinal direction. This type of veneer is made only from hardwood. The result is a sheet of material of fairly high density with a bright and beautiful pattern. Therefore, sliced veneer is used in the production of furniture and doors.
- Sawing method. In this case, veneer is obtained by sawing sheets with a minimum thickness from a prepared log. The material obtained by this method is the most expensive, since a large amount of waste is generated during production.
When producing veneer, it is important to pay attention to the quality of the wood itself. The tree must have a straight trunk with a minimum number of twigs and branches. The prepared log is inspected by a specialist and determined by him for one or another processing method.
Chic paper basket
You can’t buy a basket like this in a store; everything here is thought out to the smallest detail. The beautiful combination of the delicate color of the basket with contrasting handles makes it truly unique.
We will prepare the following materials:
- baking or kraft paper
- two cardboard or fiberboard bases of identical size
- skewers
- scissors
- glue
- acrylic varnish or paint
- leather belt
- a set of fasteners consisting of nuts, screws and washers
- awl or drill
- marker.
We begin to make thin strips for paper and twist them as shown in the photo. Lubricate the tip of the tube with glue to secure it.
We take a cardboard base and glue tubes to it at intervals of 3-5 cm. The result should be a design similar to the one in the photo.
Glue the 2nd piece of cardboard on top and firmly attach it to it. Leave to dry for several hours.
Let's start weaving, for which we bend the tube and wrap each vertical tube. Cross the ends as shown in the photo. We continue to do the same with the remaining vertical tubes. When the horizontal tubes run out, secure them with glue.
When the desired height is reached, we finish weaving. To do this, we cut off the horizontal tubes, keeping about 5 cm. We remove them inside and do the same with the vertical ones.
We paint the basket with acrylic spray or paint.
To make beautiful handles, cut off the buckle and the part with holes from the belt. After that, cut it into two identical ones.
From the inside we note the location of the latches.
We make holes with an awl, nail or drill.
We connect the handles with the washer and screws using a screwdriver.
We attach the handles to the basket so that the screw fits between the rows of weaving. We fix each of the screws from the inside.