A good craftsman never wastes anything, every little thing is used: leaves, acorns, plasticine, clay, flowers, etc. Even straw can be used, products made from it are pleasant to the touch, have beautiful colors and are easy to work with.
Luxurious ladies' hats were made from straw and used in everyday life as furniture, crafts, boxes, panels, decorations, etc.
How to prepare straw for work?
Straw is used - these are dried shoots of cereals (wheat, barley, rye or oats) that remain after threshing. It is a soft material and can be used to create exquisite works of art. And work brings pleasure.
Let's figure out how to properly make crafts from straw with your own hands. If the straw dries out, it will be difficult to make anything from it. Thin stems can break quickly.
Experts advise steaming them before work to impart plasticity to the stems of cereal crops. In this form it is easy to weave any product. Then the craft is dried to maintain the desired shape.
Beautiful shine, sunny shades (from pale yellow to light brown), ease of work and aesthetics make ordinary straw a valuable material for needlework.
To work, you only need straight stems. It is better to collect raw materials manually along the outskirts of the fields. Use the middle of the stem and the bottom of the stem. It is better to cut in the nodal parts, this makes it easier to save pieces of straw.Vintage crafts
Dry stems are an ornamental material, indispensable for straw weaving for beginners. Many exhibits are made from it. In ancient history, the main occupation was handicrafts . Straw is made from:
baskets;- tueski;
- caskets;
- hats;
- bast shoes;
- dishes;
- paintings;
- applications.
In ancient times, making such items was a way to earn a living; now they do it as a hobby. By the way, this hobby is still profitable. Many needlewomen make items to order for a lot of money.
Straw applique
If primary school children will do the work, then it will be impossible to do without the help of adults.
Instructions on how to make a craft from straw:
- Smooth stems are steamed with boiling water in a deep basin (saucepan), cover with a lid and hold for several hours. They will become elastic and soft.
- You need to take the exact amount of material so that it is enough for 1 day of work. The remaining straw should be wrapped in cellophane, or in thick fabric.
- For appliqué, long strips of straw tubes are required. To do this, carefully cut the stem with scissors (knife).
- Smooth the bent stems with a hot iron, separate each ribbon and place it in a container.
- To glue shiny strips you need PVA glue and a design stencil.
- You need to select the strips by color and gradually glue them onto a piece of notebook paper or a printed stencil. There should be no gaps.
- When the applique is ready, you need to carefully iron it with an iron (hot) and place a press on it, for example, thick books.
Note! Application made of colored paper Cockerel - templates, diagrams and tips on how to make it yourself (120 photos + video)
Preparation of material
For needlework, it is better to use rye straw. The stalk of rye is long, compared to other cereal plants, and durable. The soaked straw is plastic and soft. Wheat material is also used for weaving, but it is coarser, shorter and thicker than rye.
Rye straw is harvested from the end of July to the beginning of August , during this period the spikelet begins to ripen:
- The stems are cut under the root. If the material is greenish and damp, it should be dried so that the stems do not turn black and trample.
- To dry, lay out the stems in a thin layer and turn them over periodically. If green stems are dried in the shade, the color is not lost. The material, dried in the sun, acquires a golden color to white.
- The dried straw is cleared of leaves when divided into pieces along the knees.
- The peeled stem sections are sorted by thickness and length. Calibrated and dried straw is stored in paper boxes for years without losing quality.
- The top three segments, the thinnest and most uniform, are suitable for weaving.
Before making crafts, dry straws are soaked or steamed. The required amount of material is lowered into a container of water. For fresh straw, half an hour in water at 20 degrees is enough. The old material is poured with hot water and pressure is applied, held until elastic, but not for long, so that the material does not darken.
The steamed stems are wrapped in polyethylene so that they do not dry out during needlework. If after completing the work there is still a wet straw left, dry it and use it later.
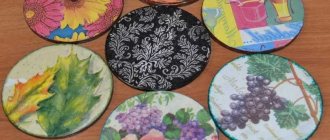
Beautiful flowers made from straws (or panels)
Prepare the following tools for work:
- wire 2 mm-20 cm;
- purple linen fabric;
- similar cotton threads (purple and yellowish);
- thin ribbon;
- container to bleach the straws.
Stages of work:
Place the straw in a deep container. Pour in the solution: 0.5 liters of water, hydroperite (9 tablets), ammonia (1 tsp) for 5-6 hours for uniform bleaching. You can press it down with a weight. Then rinse well and put in polyethylene for quick work.
Flower. You need 8-10 straw tubes, cut along the stem, unfold, and smooth with a hot iron.
We glue our strips onto white paper (preferably thin tracing paper) with PVA glue as a continuous sheet. Remove excess glue, roll with a rolling pin or put under a heavy press.
You need to make a stencil for flowers from cardboard. Place a stencil on the reverse side, draw 12 petals and cut out. Glue 12 petals onto purple linen fabric.
The same dense threads (twist with a rope), glue around the petal onto the fabric, leaving the “tails” at the bottom.
What is plumbing work- How to make decorative candles with your own hands at home
How to make an office organizer with your own hands at home
After drying, cut out all the blanks.
- You need to cut out a 10 cm circle from thick cardboard and glue 6 petals to it. It turns out to be a flower.
- On the other side, glue 6 more petals, and they should be slightly larger than the central ones, located between them. We are waiting for it to dry completely.
- We pierce it in the center in 2 places to tie it to the prepared wire. Cover the center nicely with straws.
- We bend the flower beautifully and cover the wire with thread or ribbon. The flower is ready.
You can make another flower from 1 layer (6 petals). Place 1-3 flowers in a small vase.
You can make an oval-shaped panel and decorate the inside with a large cage of sticks. Attach 3 flowers to the “net”, tie a ribbon or twist a thin straw into a spiral. To do this, we run scissors along the fiber of the straw, a “spiral” will spin,
Note! How does an air source heat pump work?
Straw bleaching
Harvested and sorted straw is bleached in two cases: when they want to obtain a material that has a silvery tint, and when they want to achieve a brighter and purer color when dyeing, for example, with aniline (that is, synthetic) dyes.
When bleaching, wear rubber gloves on your hands and try to work very carefully so that the bleach solution does not get into your eyes. Bleach the straw with a solution of hydrogen peroxide.
The straw is placed on the bottom of an enamel or glass dish and pressed with a wooden lattice, and on top with a fairly heavy oppression.
Then the straw is poured with a hot 5-10% solution of hydrogen peroxide and kept in it for about 6 hours. The bleached straw is washed several times with clean water to remove any tiny particles of bleach remaining on the surface.
Straw applique
The preparation of the material is described above. The straws can be steamed in water, always over low heat. Cut, steam with an iron.
You get beautiful children's crafts from straw based on a stencil, which is best drawn on tracing paper.
- Making a diaper cake with your own hands: a step-by-step master class on how to fold a gift for newborns (100 photos)
DIY crafts from egg trays: original toy ideas for children and useful crafts for adults (115 photos)
- How does an air source heat pump work?
To get different shades of straw, the iron must be at different temperatures. The hotter the iron, the darker the straw will become.
Straw dyeing
If desired, bleached straw can be dyed any color with aniline or vegetable dyes. With the help of vegetable dyes, straws are painted in green, brown, brown, red and similar tones, differing in varying degrees of saturation.
Although vegetable paints have soft, muted tones, they are distinguished by their natural beauty and high light fastness.
Straw painted with aniline dyes has a bright, rich color, which seems to enhance the iridescent shine of the natural material. But it should be remembered that, unlike vegetable dyes, aniline dyes quickly fade in light, especially in the sun. Therefore, products painted with them should not be placed near a window for a long time or kept in the open air.
Methods for dyeing with aniline dyes are indicated on the packaging in which they are sold.
After any dyeing, the straw is thoroughly washed in cold water and then dried.
Straw boat
Separate parts, for example, sails - it is more beautiful to cut the strips in one direction.
Take turns gluing them onto dark-colored velvet paper, carefully looking at the diagram.
We make the sails light, the schooner itself is a little darker, and the sea - the wavy stripes can be darker. Place it under a press to dry the picture. Then you can put it under glass and frame it.
Interesting ideas for crafts made from straw:
- one flower;
- a bouquet of flowers in a vase;
- animal (bunny, bear, fox, dolphin, etc.);
- birds;
- fish with algae;
- a bunch of grapes with 2-3 small leaves.
DIY birch bark crafts - techniques and master class for making crafts for beginners (105 photos)What can be made from a construction set - methods of application and examples of what things can be created from children's construction sets (135 photos)
Crafts from baby food jars - 125 photos of original ideas for using small jars
Any drawing can be transferred to tracing paper and glued with straws onto beautiful (velvet) paper.
Wonderful crafts - wickerwork using the macrame technique, etc. You can weave a summer hat or make a three-dimensional doll or animal.
Note! Balloon figures - step-by-step instructions for making products, jewelry and toys (140 photos)
Creative ideas for photos of straw crafts.
Braid - two ends
A double braid, or double-ended braid, is braided from one straw, and in this case, that is, during training weaving, from one paper strip (Fig. 23). The strip is bent at an angle of 45 degrees, as a result its ends are at right angles to each other.
Moreover, the fold line is prudently shifted to one of the ends so that they are of different lengths. Then it will not be possible to build up each end at the same time, which means that the strength of the braid at the joints will be greater.
The same conditions must be observed when weaving braids that have a different number of ends. At the next stage, the left end of the strip is bent at a right angle. Then the end of the strip located on the right is also bent at a right angle.
The other end, which is at the bottom, is bent from top to bottom. And now the other end of the strip is bent at a right angle from left to right. This is done until a braid of the required length is obtained.
The extension of new braids is carried out by simply placing them on the ending braids.
Having finished weaving, the braid is stretched like an accordion and a braid is obtained in the form of a cellular narrow spiral (Fig. 23a). Such plaits are used for finishing finished straw products - boxes and straw sculptures.
Photos of simple DIY straw crafts
Toothed braid - four-ended (herringbone)
It differs from a simple four-ended not only in its special decorative effect, but also in its higher strength.
They begin to weave a “herringbone” (Fig. 24a) in the same way as a simple four-ended one. And only at the fifth stage of weaving does a difference arise, when the first clove is formed and the second clove begins to form.
The green strip is inserted into the lash, bent around the green strip on the left and brought out on top of the white one. In turn, the green strip located on the left is inserted into the lash and brought out on the right.
As a result of these operations, a second clove is formed. When starting to form the third, the green ribbon drawn on the right is folded around the white one. And in order for the third clove to finally form, the white strip located on the right is bent to the left and passed inside the lash.
All further operations for the formation of denticles are no different from those that were considered.
Despite the apparent complexity, the jagged four-end weave is quite simple, even simpler than a regular four-end. But to do this, you need to carefully study the weaving techniques, then repeat them several times until a certain automaticity of finger movements is developed.
Drying
If during collection in the field the straw was collected into sheaves, then the sheaves must be untied at the processing site. Place the straw on the floor or shelves in a dry, well-ventilated area. It is not recommended to keep straw in sheaves, since if left undried, it will rot and become unsuitable for work. Green stems that do not yet have spikelets must be dried in the shade or in a closed, ventilated area before storage. Otherwise they will rot. To dry, spread the straw in an even, but not too thick layer, otherwise the drying process will occur unevenly. You should turn the straw several times throughout the day. If you dry the collected straw in the sun, then under the influence of sunlight it will turn white, acquire a golden-fawn hue and a beautiful silky shine. However, we must remember that straw burnt out in the sun, acquiring a unique color, somewhat loses its strength. Drying the collected straw in the open air usually takes at least 4–5 days. During drying, the workpieces should be protected from rain and dew. When exposed to moisture, the stems may darken and wither.
Cutting
The dried straw needs to be cleaned, knots removed, the leaves will still be useful. Carefully cut the stems into pieces crosswise, cutting off thick nodes (knees). The longest pieces can be used in the future for weaving round straw, making mats and curtains. Shorter lengths that can be smoothed are also suitable for weaving. Sort the cut and peeled straws by length and thickness, then tie them into bundles. However, some of the straw should be left uncut; it will be used to make sculptures or for spiral weaving. The stems are cut longitudinally to make straw ribbons in two ways. With the cold method, the stems simply need to be cut lengthwise and smoothed firmly with the rings of scissors, a ruler or other hard, blunt object along the front side. In this case, the strips retain their elasticity and shine. This work should be done as carefully as possible. Working with poorly smoothed straw ribbons can result in an uneven application surface. This method of processing straws is indispensable when water-heat treatment of the material is excluded. With the hot method, wide, shiny and pliable ribbons are obtained from straw. This method consists of several operations: the stems are pre-steamed at a temperature of 70–80 °C, then cut longitudinally and ironed with a hot iron. This is how straw ribbons are prepared for many crafts or applications.
Steaming, soaking and steaming
After long storage, the straw becomes dry and brittle. To restore flexibility and elasticity, it is boiled or steamed, soaked in hot water. The time required for steaming depends on the hardness of the straw: the harder it is, the longer it should be steamed. Straws soaked in boiling water acquire the necessary elasticity, softness and flexibility. To soak, place pieces of straw 10 to 30 cm long in an enamel container, pour boiling water over them, and keep in water for a while. It is enough to soak newly harvested straw for 30 minutes in water at room temperature.
Braid - six-ended
The six-ended stitch is used for sewing all kinds of bags, mats, screens, etc.
Braiding any braid, especially a wide one, is difficult. It is especially difficult to braid wide multi-ended braids. Straws that are not connected to each other in any way fall apart and slip out of your hands.
To make the work easier, it is convenient to use a special pin, which is bent from steel wire. Paper strips, and subsequently straws, are clamped with a pin at a certain angle (Fig. 25a) and bent at the place where it is secured (Fig. 25b).
Then they begin to weave the strips together without worrying about them falling apart.
The gray stripe in the middle is intertwined with white and green (Fig. 25c). The gray stripe on the right is also intertwined with them (Fig. 25d), then the green stripe on the far left with a white and two gray stripes (Fig. 25d).
They continue to weave in the same sequence. When all the strips are intertwined several times and the weaving goes on as usual, the pin can be removed from the weave without fear that it will collapse (Fig. 25e).
The six-ended braid, like all other flat braids, twists along a helical line when it dries. Moreover, it was noticed that braids consisting of an even number of straws twist much stronger than those woven from an odd number of straws.
Regardless of the degree of curl, all braids are moistened again and smoothed with a hot iron, and then rolled into rolls and tied in several places with twine. Rolls are stored in a dry place.
Weaving finishing braids
Finishing wickers are used for finishing products sewn from straw strips, as well as wooden and cardboard boxes, cylindrical boxes and much more. Finishing braids come in two types - flat (Fig. 27, I) and screw (Fig. 27, II).
Both are woven from at least four straws. For training exercises, you can use electrical wires that have multi-colored polyvinyl chloride insulation.
Placing a green cord on the left, two gray ones in the middle, and a white one on the right, tie their ends tightly with thin wire (Fig. 27a). The two middle cords will serve as a base, constantly remaining nearby, and the other two, located at the edges, will braid them.
You can start weaving with any cord, for example white. First, white (Fig. 27b) and then green (Fig. 27c) are inserted under the gray cords. The white cord, in turn, is laid on top of the gray ones and pulled from above with a green cord (Fig. 27d), bending in the opposite direction (Fig. 27e) on top of the gray ones.
Already on the other side he is again attracted by green (Fig. 27f).
All other weaving is carried out in the same sequence (Fig. 27g, h). The width of the flat finishing braid depends on the number of cords located in the middle. So, instead of two, you can take three, four or even five cords.
If, when weaving a flat finishing braid, the functions of the left and right cords involved in weaving differ from each other, then for a screw braid they are absolutely the same. Four cords are tied together and weaving begins (Fig. 27i).
The white cord located on the right is inserted between the green and two gray ones located in the middle (Fig. 27k). In turn, the green one goes around the end of the white one, brings it over the gray ones and inserts it into the loop formed on the right with the green cord (Fig. 27k).
The resulting knot is tightened as tightly as possible and weaving continues. At this stage, the white and green cords change roles: now the green cord is inserted between the white and gray ones, and the white one goes around the end of the green one and is inserted into the loop formed on the right by the green cord (Fig. 27m).
The resulting knot is also tightened as tightly as possible.
All other knots are knitted in the same sequence. During the weaving process, the braid will be evenly twisted along a helical line counterclockwise. If we started to weave not from the right (white), but from the left (green) cord, the braid would begin to twist clockwise.
As already mentioned, the length of the cords located in the middle and serving as the base always remains constant, while the side cords will be braided periodically. The ending side cord is extended by inserting the end of a new cord into the next loop (Fig. 27n). The loop is tightened as tightly as possible and weaving continues as usual.
To make the connection more durable, it is necessary to intertwine the old end with the new one for some time (the remaining tip is cut off with scissors). If a screw braid is woven from whole straws, then when extending, insert the thinner end of the new straw into the socket of the old straw and tighten the junction with a knot (Fig. 27p).
For screw and flat weaves, it is advisable to use long straws harvested from the upper part of the stem. Fine weaving should be made from narrow strips of split straws harvested from the middle part of the trunk.
The straws located in the middle part of the weave may not be very flexible, while the side ones should have very high ductility. Therefore, immediately before weaving, they are soaked or steamed especially carefully.
Straws that can be easily tied into a knot are considered suitable for work.
Take one or two from a batch of soaked straws and tie them with a simple knot. Having tightened the knot as tightly as possible, carefully inspect it. If the knot turns out to be round, without chips or splinters, and the straw around it is not cracked, then the prepared material is quite suitable for weaving.
Braid - five-ended
This braid will be slightly wider than the four-ended one. It differs from a simple four-ended pattern in that instead of one chain of diamonds, there are two such chains in the middle, which complicate the pattern of the braid.
They braid the five-ended line by holding three straws in their hands, and for training exercises, three paper strips - gray, white and green. The gray and green stripes are simultaneously bent around the white stripe in such a way that a right angle is formed between their ends (Fig. 24b).
The white strip is bent to the left and slipped under the adjacent gray strip. Then they bend the gray strip on the right side, placing it above the green strip, and slip it under the white one.
The green stripe on the right is intertwined with white and gray. As a result, there will be two strips on one side of the fence, and three on the other. Further weaving is carried out in the same order.
Weaving a five-ended pattern can be started a little differently. At the first stage, just as when braiding a four-ended braid, only two strips are used - green and white. They are placed at an angle to each other, and then intertwined, as when weaving a four-ended thread.
At the next stage, a fifth (also gray) strip is inserted into the lash.
Otherwise, the weaving process is no different from that which was considered in the first version, that is, the outer strips are bent one by one and intertwined with others located in the weave.
Sewing braids
Various products are sewn from braids manually with a needle or on a sewing machine. The two most common methods of stitching are butt stitching and shoulder stitching. When stitching end to end, use a needle to alternately hook the edges of two braids and pull them together as tightly as possible with thread.
The braids sewn in this way provide a flat surface, since they are all on the same level. This stitching technique is used to make mats and screens.
When making, for example, a rectangular mat, each weave is bent at the edge at an angle of 45 degrees 2 times (Fig. 25g, h). In this case, a triangular protrusion is formed (Fig. 25i).
They are bent in the same way on the other edge of the mat.
As a result, two sides of the mat will have jagged edges (Fig. 25k). But if necessary, they can be disguised by sewing a braid with smooth edges on top. The side of the mat where the stitches remain visible will be considered the wrong side, and the opposite side will be considered the front side. On the front side of the mat, you can draw a pattern with a pencil and sew various braids along its contours.
The ledge stitching method is used in the manufacture of various hats, bags, lampshades, etc. (Fig. 26).
Products sewn using this method are highly durable. Each new braid is superimposed on the previous one, overlapping it by about one third, then they are sewn together. Before stitching, the braids must be slightly moistened.
Sombrero-type hats, jockey and children's caps, and sun visors are sewn together in a spiral. The hat consists of a bottom, crown and brim. They start sewing it from the bottom - first with a needle, and then with a sewing machine.
You can, of course, do all the work with just one needle. It is quite difficult to immediately obtain a flat spiral; a small cone forms in the middle of the bottom. Gradually the braids are sewn together turn by turn.
As soon as the bottom is ready, the edges of the braids are bent along and proceed to stitching the crown, which has a surface close to cylindrical.
Having finished with the crown, the edges of the braids are again bent lengthwise at a right angle, only in the opposite direction, and they begin to sew the fields together. To ensure that the edges of the hat wear out less and do not break, they are trimmed with a narrow fabric ribbon.
The finished hat is moistened and ironed - the brim on an ironing board, and the crown and bottom on a wooden block. The conical protrusion protruding above the bottom is turned out so that it is inside the crown.
The cap with lapels and visor is sewn in the same way as the crown of the hat. A cutout is made in the crown, covered with fabric tape, the edges are turned back and the visor is sewn on.
From straw plaits, in addition to hats, you can sew light and durable bags, all kinds of trays for small items, decorative figures and lampshades. It’s easy to weave a rectangle from simple braids, and then fold it into an envelope to get an original pocket for wooden spoons and other kitchen utensils.