Content:
- Step 1. Cut the plastic bottle
- Step 2. Turn the workpiece into a ball
- Step 3. Color the blank
- Step 4. Hanging the lanterns
- Transformation into a real lamp
They say that magic lanterns can make our wishes come true, especially if hieroglyphs are drawn on them, symbolizing love, happiness, prosperity, etc.
They can be hung everywhere - on trees, gazebos, on terraces in front of the house, arches, etc.
So get to work!
7 interesting lamps made from bottles: step-by-step instructions
Desktop
The diagram for making a table lamp from a glass bottle is as follows:
- Determine the place on the workpiece for the wire, mark it with adhesive tape or other adhesive material.
- Place the bottle lying down and make a hole with a diamond drill.
- After this, the container should be kept in water (preferably warm) to remove all remnants of the label and dirt.
- Carefully pull the wire through the hole to the neck, and then bring it to the cartridge.
- Securely attach the lampshade to the neck. That's it, the bottle table lamp is ready.
Loft style
There are many options for industrial-style bottle lamps. You can, for example, hang a rectangular frame divided into many sections, and in each of them place a bottle with a lamp inside, of the same color or different.
These same containers can be attached to the platform.
Another option is to install a bottle-shaped lampshade on the pipe structure. The main thing is that the same adapter is selected for its thread.
Chandelier
An original and stylish hanging chandelier from a wine bottle is not difficult to make - just follow the algorithm of actions.
- Soak the workpiece in water, remove fragments of labels, then wipe thoroughly dry.
- Use a glass cutter to make a cut line on the bottle. The cut is made transversely. The work must be carried out without haste, so as not to disturb the evenness of the line.
- In order for the unnecessary half to disappear, the workpiece should be placed under water and alternating hot and cold temperatures. The bottle will split clearly along the line.
- To give additional smoothness and evenness to the cut, its edges are treated with sandpaper.
- A wire is pulled into the neck and connected to the cartridge.
Step 2. Turn the workpiece into a ball ↑
Even with the walls cut, the bottle will keep its shape. We need to make a ball out of it.
- Using a hot awl, carefully make 2 holes in the bottom and stretch a fishing line through them, the free ends of which will be pulled out through the neck.
- Pull both ends and squeeze the bottle. The more we pull the line, the more rounded the structure becomes.
- Now let's secure its ends (wrap and tie around the neck). You may need a couple more holes - a heated awl will always help.
- Don't cut off the ends - you'll need them to hang the decoration.
How to hang a lantern or make a craft lamp
Hanging Chinese lanterns on tree branches or attaching them to a street canopy or gazebo is very simple. We insert a stick with a fishing line, twine, or ribbon attached into the neck, and turn it so that it fits into the spacer. Can be hung.
It’s just as easy to make a lamp out of this craft for the garden. Just first you need to insert the wire through the neck of the workpiece and secure it. It’s simple, since the neck is narrow, you can use a washer, a plate with a hole, or simply seal it with some kind of non-flammable material. Option: close the neck with a plug, make a small hole in it so that the wire can be pulled through, but with difficulty. The light bulb can be screwed in by spreading the strips of the craft.
The embodiment of this idea for a garden with your own hands - an elegant and, without a doubt, magical Chinese lantern (granting wishes) - will bring you pleasure and will decorate your site in an original way. And, of course, don’t waste your time on trifles: make not one, but several of these lanterns - after all, you have many desires. By the way, such crafts for the garden can be made from bottles of different sizes: 0.5 l, 1 l, 1.5 l, 2 l. Together, bright, elegant lanterns of different sizes look simply wonderful.
MORE IN THE GARDEN:
Wonderful pied hen and cockerel for the garden
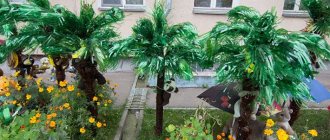
Crafts from plastic bottles: Unique palm tree
The flowerbed swan is a simple creature
Flowers made from plastic bottles with dense petals
Crafts from plastic bottles: amazing tree
Figurines for the garden: Funny boar
Garden crafts: Tire alligator
Crafts from plastic bottles: Theater in the garden
Crafts for the garden: good-natured Hippopotamus
Step 3. Color the blank ↑
In order for such crafts made from plastic bottles to look good in the garden, they need to be painted with bright colors. You can use acrylic ones, but oil ones will also look good.
The first option is to carefully paint the cut strips with a thin brush in different colors. It will look very elegant against the background of green foliage.
The second option is more difficult.
- We paint the workpiece with one color. This can be done at the very beginning, when the bottle has not yet been cut. Chinese tradition calls for red! But we are not in China. So we choose the one we like.
- When the paint dries, apply hieroglyphs on top of it in a contrasting color. It will turn out very beautiful. And if we choose those that mean “love”, “well-being”, “health” - perhaps such a flashlight will really fulfill our desire. The Internet will always help you find the right one.
- If you apply a layer of varnish over the dried paint, the structure will be better preserved. And it will look even more like real Chinese lamps.
How to cut a plastic bottle straight?
In order for the stripes of the Chinese lantern to be even, first of all, the bottle needs to be marked. It’s better to do this with a felt-tip pen: the lines are clearly visible on the plastic and washes off easily.
It seems that cutting a plastic bottle straight is difficult: the plastic of the future garden craft will sag when cut. In fact, it's simple. The empty bottle must be closed with a lid, and puncture holes must be made with a hot awl or nail at the beginning of the lines (for example, at the neck). And from these holes, slowly, we cut along the lines with sharp scissors. The result is perfectly even strips.
Controlling humidity in the garden
Drip irrigation and drainage can be done using plastic bottles.
A plastic bottle and a few dish sponges can easily turn into an excellent drip irrigation system. You can do it yourself and not spend extra money. The system created using this life hack is universal, because if necessary, the plant will receive the necessary moisture, and if the soil is waterlogged, the sponge will absorb excess water. A homemade drip irrigation system allows you to water the beds less often and even leave them unattended for several days in the summer.
Manufacturing begins by making holes in a plastic bottle in a random order. The inside of the bottle is filled with diced sponges. Then you just need to bury the invention in the ground next to the garden crop. In dry weather, water is poured into the bottle, which will gradually go into the soil and feed the roots. If it rains, an empty bottle will help save the roots from rotting and waterlogging. In order for the system to work, the sponges need to be changed from time to time.
Garden furniture in a hurry
A useful addition for a recreation area.
In order not to throw away plastic bottles and use them for good, you can use them to make quite comfortable and practical garden furniture. To do this, you will need a base, which can be made from wooden blocks or metal knocked together. Then, using a rope, you need to secure the bottles on top, which act as a seat and back. The base should take into account the size of the plastic “pillows”, that is, the gaps between them should be smaller so that the bottles do not pass through.
Homemade mousetrap
Fighting rodents is often exhausting, but not with a mousetrap like this.
If a mouse appears in the household, then trying to get rid of it with chemicals is not the best idea. This can cause harm to yourself, the soil, or other pets in the area. It is much easier and safer to deal with an annoying rodent using a mousetrap, which you can make yourself using a plastic bottle. In this case, you do not have to kill the mouse, because the mousetrap is aimed at catching a living rodent. In addition to a plastic bottle, to make a useful device you will need a small wooden board and beam, steel wire, and a couple of screws or nails.
The mouse won't be able to get out.
First you need to make a through hole in both sides of the bottle, placing it a few centimeters from the middle, closer to the neck. The puncture must be made with a steel wire or knitting needle, the edges of which must be bent to secure it in place. It is desirable that the free edges of the wire be lowered 5 cm below the bottle, which is in a horizontal position. The lower end of the wire should be bent into a loop, leaving 2-3 cm between the walls of the bottle and the wooden board. Self-tapping screws or nails are used to secure the wire to the board. The main principle of how a mousetrap works is that until the mouse runs inside, the neck of the bottle should look up and its bottom should rest on the board.
An additional piece of wire is used to secure the bait inside the bottle. A wooden block is placed next to the neck of the bottle, located slightly below the hole. The mouse can use it to get inside the bottle, but when it tilts, the entrance will be blocked by a block.
LiveInternetLiveInternet
Quote from irisha1378
Read in full In your quotation book or community!
Crafts from plastic bottles: magic wish lanterns
DIY garden ideas are so capacious that an ordinary plastic bottle can be turned into an “almost magical” object. Moreover, it’s quite simple.
For example, Chinese wishing lanterns are considered magical. Real Chinese wishing lanterns are flying (they are filled with hot air or gas). But they don’t fly all the time: waiting for a special occasion, Chinese lanterns serve as decorations for the garden or home (in a suspended state), as well as original lamps.
Crafts for the garden in the form of Chinese lanterns are a rewarding endeavor. The material is free and available in unlimited quantities. The technique is the simplest. But it requires caution.
How to cut a plastic bottle straight?
In order for the stripes of the Chinese lantern to be even, first of all, the bottle needs to be marked. It’s better to do this with a felt-tip pen: the lines are clearly visible on the plastic and washes off easily.
It seems that cutting a plastic bottle straight is difficult: the plastic of the future garden craft will sag when cut. In fact, it's simple. The empty bottle must be closed with a lid, and puncture holes must be made with a hot awl or nail at the beginning of the lines (for example, at the neck). And from these holes, slowly, we cut along the lines with sharp scissors. The result is perfectly even strips.
How to make spherical crafts from plastic bottles
When you cut the bottle into strips, the bottle will still hold its shape. Therefore: we make two holes in the bottom with a hot awl and stretch the fishing line through them to the neck. The more we stretch, the more the shape of the craft made from plastic bottles becomes like a ball. We secure the ends of the fishing line to the neck (we tie it, wrap it, or make more holes).
The blank for garden crafts made from plastic bottles is ready. Let's start turning it into a Chinese lantern.
How to color a Chinese lantern
First of all, the workpiece needs to be painted with bright colors (acrylic, for example, but oil can also be used). Paint carefully with a thin brush so as not to stain adjacent strips. This is a simple coloring option, but bright and beautiful.
The second option: painting the craft in one color (red, for example), and applying hieroglyphs to the stripes with contrasting paint. It turns out amazing, despite the fact that the stripes diverge (or maybe because of this). Decorating crafts made from plastic bottles with hieroglyphs is interesting in itself. But you can put hieroglyphs with meaning. For example, the hieroglyphs for “love”, “health”, “well-being”, etc. You can find many images of hieroglyphs on the Internet, so this is not a problem. Painted crafts can be opened with varnish - they will look absolutely amazing.
Look at real Chinese lanterns and maybe ideas for additional decorations will come to your mind. Do not try to repeat the decorations exactly: real Chinese lanterns have different shapes and are decorated in different ways.
2.
How to hang a lantern or make a craft lamp
Hanging Chinese lanterns on tree branches or attaching them to a street canopy or gazebo is very simple. We insert a stick with a fishing line, twine, or ribbon attached into the neck, and turn it so that it fits into the spacer. Can be hung.
It’s just as easy to make a lamp out of this craft for the garden. Just first you need to insert the wire through the neck of the workpiece and secure it. It’s simple, since the neck is narrow, you can use a washer, a plate with a hole, or simply seal it with some kind of non-flammable material. Option: close the neck with a plug, make a small hole in it so that the wire can be pulled through, but with difficulty. The light bulb can be screwed in by spreading the strips of the craft.
The embodiment of this idea for a garden with your own hands - an elegant and, without a doubt, magical Chinese lantern (granting wishes) - will bring you pleasure and will decorate your site in an original way. And, of course, don’t waste your time on trifles: make not one, but several of these lanterns - after all, you have many desires. By the way, such crafts for the garden can be made from bottles of different sizes: 0.5 l, 1 l, 1.5 l, 2 l. Together, bright, elegant lanterns of different sizes look simply wonderful.
SOURCE