Home » Building a house » Do it yourself
Alexander Korovaev 03/18/2020
17260 Views
Cooking in the heat, and even in a cramped room, is not a pleasant experience. Especially if you have to do this quite often. A summer kitchen at the dacha created with your own hands is simply the ideal solution in this case. We will describe in detail the types of such buildings, their design features and construction methods.
Kinds
In order for the erected structure to fully meet the requirements of comfort and safety, the design of a summer kitchen should be thought through to the smallest detail. The use of non-standard solutions is only permissible if you already have serious experience in construction.
In order for the building to fit harmoniously into the surrounding landscape, it is better to use the same materials for its construction as for the construction of the house itself.
Open building with barbecue
A room intended for cooking in a summer cottage can take the form of an extension to the house or be constructed as a full-fledged separate building.
By type of design, all summer kitchens can be divided into:
- open : the simplest option is a canopy for protection from precipitation, attached to supports (pillars)
- semi-open with 2-3 walls
- closed in the form of a full-fledged building with 4 main walls, a door, windows and a roof
- combined open-closed, when some of the rooms are completely closed by walls, and one or two remain semi-open or completely open
Varieties of types of summer kitchens
Today you can find many different design projects. What kind of premises will be built depends only on the desire of the owner and the size of the allocated budget. A large, spacious room is best suited when designing a site for a private house or for country houses where people also relax in the winter. They install modern technology, electricity and heating. If you plan to combine a work area and a recreation space in one house, then the building is made two-story. In the attic there can be a playroom for children or a dining area.
The design of summer kitchens can be closed or open. Both are popular among owners of private houses.
If you have little money or you come only in the summer, then you can easily limit yourself to the simplest option. Equipment is practically eliminated and replaced with barbecues, barbecues or ovens. They look laconic, but perform their main function.
A closed summer kitchen is, in essence, a real home. It has a door, a roof, walls, a floor and a ceiling.
Open type
An open kitchen is an ideal solution for intimate conversations with friends and family on sultry days and warm evenings in the garden. The ease of implementation and low cost attract many. In addition, the absence of windows and walls allows odors to quickly dissipate. And cooking in hot weather is much more pleasant in the fresh air than suffering from stuffiness in the house.
Open kitchens are structured like a gazebo.
However, one cannot ignore the disadvantages of such a building:
- seasonality and dependence on weather conditions;
- the canopy will not be able to completely protect from precipitation;
- You can't leave food. Otherwise, insects may get into it;
- It is recommended to remove all appliances for the winter so that they do not become unusable.
This type of kitchen has only 2 or 3 walls. If there is a wide veranda, a working panel is installed along the wall. If an outdoor kitchen was not planned right away, then it can be attached to the main room (house or bathhouse). This will require an increase in the terrace. The owners are also required to install supports and a canopy. The workplace, stove, sink and drawers for storing small items are often located on the wall of the main building.
There may be a canopy on top of the structure, or perhaps a light roof.
An equally popular option is a kitchen-house. Outwardly, it resembles a gazebo. It is chosen when they want to install a grill or barbecue on the site. The distance from the house does not allow smoke to enter the room. The combination of a kitchen and a relaxation area in one building becomes a wonderful cozy place in every suburban area. Tall bushes and flowers planted nearby will provide privacy and will not allow the prying eyes of neighbors to follow you.
In an open kitchen it is much easier and safer to install a grill, barbecue or oven, because the likelihood of fire is much lower.
If the budget is limited, then you can install the kitchen close to the house, and put a canopy between them. This way the recreation area will be in the middle, and in case of bad weather, guests do not need to run into the house.
Closed type
The closed type is most suitable for unpredictable climates and also for picnickers in winter. It can be placed separately or attached. It is built by those who want to get the most functional space possible when the work is completed:
- in a dug pit for a cellar you can store harvested crops and preserves;
- the room is protected from precipitation and insects;
- the dining area will become a place for company to gather and relax;
- a couple of sleeping places inside will provide an opportunity for guests to spend the night.
In most cases, for the construction of a summer kitchen, lighter building materials are chosen and insulation of the structure is abandoned.
Construction requires significant financial investments: it is necessary to lay a foundation, build walls, install windows, doors and a roof. Electricity and water supply are often failed. The installation of a stove, fireplace or chimney for a barbecue complicates the task.
The advantages of a closed kitchen are protection from precipitation, winds, street dirt and insects and rodents.
Combined
This option is perhaps the best combination of all the advantages of the two previous options. This is a union of a compact indoor space, which consists of a functional area and an open one for eating. There is a table, chairs, grill or barbecue here. The dining area can be covered with a canopy, and the walls can be covered with climbing plants. This will provide shade and coolness in hot weather. If the budget is limited, then you can decorate this area in a patio style, that is, guests sit in the open air.
There are projects combined with a glassed-in veranda, a terrace, a cellar, even a bathhouse - there are many options, the only limit is the owner’s imagination.
Choosing a location
Let's start with the fact that such a structure should not be located too far from the house. Firstly, with a strong distance, laying communications can turn into a serious problem.
Plus, if the kitchen is not equipped with a dining area, the housewife will have to carry breakfast, lunch and dinner into the house across the entire site every day.
It is better to locate the summer kitchen in the shade of trees, which will protect it from both heat and piercing winds
The ideal option is a place in the shade away from the road . It is good if the building is built on a slight elevation to ensure drainage of sewage and melt water. You should not locate the building next to a toilet, septic tank, compost pit, barn where animals are kept, an enclosure or other places that emit unpleasant odors.
If you do not want to periodically “enjoy” exhaust gases, you should not build it near a garage.
A summer kitchen in a country house can be adjacent to the house (for example, located on the site of a veranda) or built separately. It is better to attach the kitchen to the house from the north side. The walls of the main building in this case will become a reliable natural protection from the sun's rays.
The construction of a summer kitchen with a barbecue, that is, a brazier with an open flame, is allowed only at a distance from any buildings - you should retreat 5-7 m from them.
Where to build
Gazebo with summer kitchen
The location of the kitchen is of great importance. The utility yard, compost and cesspools should be located as far as possible, but communications, on the contrary, should be closer. You will have to supply water to the kitchen and connect electricity, so it is best if the site for construction is near the house. You cannot choose a place in a low place, otherwise the floor will become damp. A closed kitchen can be attached to the house, but an open kitchen is better placed in the garden or near a pond, away from the road.
Foundation types
An expensive strip foundation will only be needed when constructing a full-fledged building made of stone or brick.
For light open or semi-open structures made of wood or foam concrete, a solid foundation is not required - it is enough to install the building on a columnar or pile-screw foundation. This kind of summer kitchen is easy and cheap to make with your own hands.
The simplest support for an open light timber structure
You can also use a concrete slab as a foundation, which will also serve as the floor of the summer kitchen . If desired, it can be finished with non-slip paving slabs in the future. Do not forget to make a slope for such a site for rainwater drainage of 1.5-2 degrees.
To build a closed structure made of timber or foam blocks, you can use a pile, slab or strip foundation . For a brick building, the foundation must be more solid, therefore, during its construction, a deeply buried strip foundation is most often used.
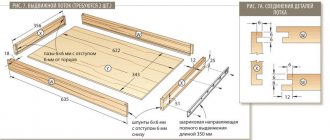
We make sketches and necessary drawings
When making furniture yourself, documentation is also prepared. In this case, it is not necessary to develop a project; it is enough to draw up drawings and installation diagrams for the furniture that will be created. If this is not done, the assembly of the structure, consisting of lower-level cabinets and hanging pieces of furniture, will be carried out with errors: individual elements will not fit together, there will be a significant difference in the levels of the furniture, etc.
If the user has developed abstract thinking, you can do it on your own by drawing up drawings in an isometric projection. Otherwise, it is recommended to use special programs: AutoCAD, Basis furniture maker.
It is important to determine the dimensions in three projections: frontal, side, top view. It is necessary to set the dimensions of the entire structure, each individual cabinet and element.
If you are creating a wooden kitchen with your own hands, you need to remember that this material can be deformed during processing, so the dimensions are set taking into account some error (up to 4 mm in the larger direction). If it is not possible to create drawings yourself, you should seek help from professionals. In this case, the total cost of the set and other furniture will still be lower than the price of the finished structure.
Water pipes. Drain system
When drawing up a summer kitchen project, think separately about the communications lines. After all, most of them are laid at the excavation stage.
The simplest plumbing in the country
Full plumbing in a summer kitchen will not be cheap. For its installation and thermal insulation (and in cold climates this will have to be done, otherwise the pipes will simply freeze in winter) you will need about $300-500.
It is much easier to equip an electric pump to drain water for the winter or make a water supply system at an angle - then to drain it, it will be enough to open the valve. You can do it even easier by connecting a regular garden hose to the sink in the summer.
You will also need to think about the drainage system. Pipes for these purposes are laid at the stage of foundation construction. To prevent fluid stagnation, they are installed at a slight slope.
In this case, no insulation will be required - the water will flow freely from the pipes and will not freeze in them. If it is not possible to tap into the central sewer system, a septic tank will also be needed to drain wastewater. It is erected at a distance of 5 m from the building.
Deciding on a kitchen project
Convenience, practicality, functionality, aesthetics - the qualities that this extension should have, what the owner expects from it. The summer kitchen project is of great importance. It describes everything down to the smallest detail, from a single detail to the final design as a whole. You can take a ready-made plan, turn to professionals, and try yourself as a designer.
Work begins with a drawing and creating a layout. Everything is taken into account: foundation, flooring, facade, roofing, presence of windows and doors. Lighting, sewerage communications, and gas supply are provided. Afterwards, the design of the interior is included in the project. The design of the building is being considered, which should be combined with the overall development and not disturb the surrounding landscape. The building materials chosen are the same as for a residential building.
The design stage includes the location of the object on a common site, calculation of the size of the structure, the amount of materials for construction, the possibility of using the structure year-round or seasonally. An important role is played by the budget allocated for this undertaking, which can make its own adjustments.
Electricity and gas supply
To supply electricity to the summer kitchen in the house, it is better to provide a separate panel with automatic switches so that the system can be completely and easily de-energized. It is better to take machines with a GFCI circuit breaker.
Also purchase waterproof sockets with grounding and a rubberized curtain. Pay attention to the markings. The last number indicates the degree of moisture protection. For example, products with the number “3” are able to operate smoothly even in the rain. The number “5” means that the socket can withstand even a stream of water without shorting.
Select a separate RCD for the summer kitchen
Installation of gas stoves, even outside the home, is permitted only with the permission of the operating organization, taking into account existing conditions. As a rule, too many problems do not arise when arranging them in open areas.
Gas supply will cost $500-600. Please note that any installation of gas equipment is carried out only by specialists from gas companies.
If there is no gas supply, gas cylinders can be used. They are stored at a distance of 5 m from buildings and basements in special locked cabinets or outbuildings with the inscription “Caution, gas.” Such cabinets must have blinds for ventilation.
Summer gas will need to be used up before frost sets in. Winter gas is not afraid of negative temperatures.
When supplying any type of devices, you will need to lay seamless pipes with welded bends. They are connected to the stove or grill using flexible bellows tubes and gas valves. Such a room must be equipped with a hood.
Where to start
You need to approach each job slowly and carefully think through all your actions.
Table. The procedure for making a headset
| Manufacturing stage | Brief description of actions and practical recommendations |
Design selection | You should not do an independent project from scratch; this requires special education and a lot of experience. It is much easier to choose a ready-made one and adapt it to your conditions. Now there is a huge selection of different options for kitchen sets with detailed diagrams, stop at the one you like, adjust its size. You can increase or vice versa, reduce the number of items, supplement them with your own decorative elements, change the material of manufacture. If you have basic knowledge, then use special programs for 3D modeling. Take measurements of the room and, taking them into account, experiment with the elements of the set. It is recommended to take into account existing size recommendations that meet ergonomic requirements - the most convenient dimensions for work are height (≈ 85 cm), width (30–80 cm) and depth (45–50 cm). |
Sketch of cutting map | A rather complex technical stage, the amount of waste depends on the correctness of its implementation. If you doubt your capabilities, we recommend contacting specialized companies. A more detailed justification for this decision will be given below. |
| Purchasing materials | Kitchen sets can be made from various materials. But you need to know that even the cheapest ones can be of high quality and last for many years, and vice versa, among the expensive ones there are often defective ones. Before purchasing, you need to have a calculation of the total quantity - standard slabs are purchased taking into account the compiled cutting map. For a kitchen set, additional and decorative elements, fittings, and special fixtures are immediately purchased. You should always make a margin of 5–10%; the specific dimensions depend on the complexity of the headset geometry and your professional skills. |
Preparation of technological holes and assembly | This stage requires a lot of attention; errors will definitely be noticeable and will significantly worsen the appearance. What tools are needed, how all the fittings are assembled step by step can be read in this article a little lower. |
| Checking the headset | At this stage, it is necessary to check the functionality of each element; it is not too late to correct errors. It is much easier to do this than to later repair fallen pieces of furniture; in addition, there are materials that cannot be repaired after mechanical damage. As long as the furniture is unloaded and all connections retain their original strength, troubleshooting is relatively easy and without much loss of time. |
If you decide to make a kitchen set yourself, then keep in mind that such work cannot be called easy; you will need maximum effort and patience.
Open summer kitchen
Even if you have no experience, installing a summer kitchen in the form of a canopy will not be difficult. Its construction is in many ways similar to the construction of a gazebo. The simplest structure will be a timber structure installed on a columnar foundation.
The covering can be anything - from lining, OSB boards to plaster or siding.
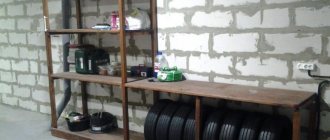
Summer kitchen, one of the walls of which is permanent
A very convenient structure is one that has two solid walls along which the stove, tables and shelves will be placed. The rest of the space remains open.
To protect from the sun, it can be decorated with trellises, next to which climbing plants are planted. You can separate the dining and work areas on such a site using curtains or light partitions.
Foundation for a light building
Even light open or semi-open areas should not be left unsupported. After all, loose soil will compact over time, and the building will warp.
Plus, due to uneven soil moisture during the process of swelling during freezing, the pressure on the site will be uneven, resulting in deformation of the load-bearing structures and the appearance of cracks in them.
Columnar foundation
So, let's describe how to make supports for a summer kitchen.
Even for the lightest building it is necessary to provide the simplest brick or concrete racks:
1The first stage is clearing the area and marking the site using pegs and twine.
2To lay the supports, pits with a depth of 50-60 cm are prepared. Their number depends on the size of the structure - the supports are placed at a distance of no more than a meter from each other.
3 At the bottom of the pits, a layer of sand is poured alternately, and then crushed stone, 15-20 cm each. It is better to additionally pour crushed stone with cement mortar.
4After the concrete has dried, a few days later the construction of columnar supports begins. You can use ready-made concrete blocks. When pouring them yourself, the formwork is first prepared, where the reinforcement is laid.
5Supports can also be made from bricks fastened together with cement mortar. They are laid in 5-6 rows. The last one should be above the ground.
Construction of walls and roof
When preparing the base for a summer kitchen-gazebo, thick-walled timber 100x100 mm is used. To do this, 4 interconnected bars are “placed” on metal pins, pre-filled in concrete. Columnar supports are also installed on the same pins.
To strengthen the structure, a timber frame is prepared on all its sides, which serves as the railing of the building. For flooring, ordinary floorboards or paving slabs are used.
The simplest wooden structure
The roof for a summer kitchen is made in the form of a frame made of timber (rafter system), sheathed with roofing material. The simplest roof is a pitched roof with a slope from the entrance to the building. In its gable version, inclined or hanging rafters are used.
The installation of open fires (barbecues and barbecues) in buildings with polycarbonate roofs is strictly prohibited. In this case, roofing tiles or corrugated sheets must be used as roofing material.
Materials for different parts of the headset
When making a kitchen with your own hands, you should not focus on any specific material. It is better to calculate several different options and choose the best one.
Denser types of wood are usually selected for the frame than for panels. The softest varieties are used in places of future carving, if any. Part of the natural solid wood can be replaced with plywood, chipboard or MDF (depending on the design of the future set).
Overview of different types of wood and their derivatives:
- oak _ Very durable and strong. It takes a long time to dry, and may crack if dried too quickly. The cut has a beautiful structure. The palette ranges from light brown to yellow-brown;
- acacia _ Has many varieties. Widely used in carpentry. Due to the high density it is quite difficult to process. The heartwood has a red-brown base with black veining, and the sapwood (the space between the growth rings) is light brown;
- nut. Very beautiful, resistant to deformation. It has a brownish-grayish tint diluted with dark inclusions;
- birch . It is easy to process, relatively inexpensive, but does not like moisture - it begins to rot. Requires moisture-repellent impregnation. Due to its low hardness, it is better suited for walls and facades than for frames. Light, delicate, summer palette: golden with darker veins;
- maple. If not dried properly it will crack. But it looks very impressive. The color is white, but turns yellow over time;
- cherry. The structure is uniform, easy to process, but darkens over time. It has a pinkish-brownish tint. Certain varieties are pinkish-grayish;
- beech. Easy to sand. Good density and strength, but relatively high cost. The color is light, but has a reddish tint;
- pine. Resistant to rotting, fiber texture is medium-coarse. Due to its increased softness, kitchens from pine are not often made, but they are still made due to the low cost of this type of wood. Shade from yellowish to red;
- plywood. It can be already polished on one or both sides, and have impregnation that increases moisture resistance. Some varieties have very high wear resistance and moisture resistance;
- Chipboard. The main advantage is the affordable price. In other respects it is inferior to most materials;
- MDF. Easy to process, suitable for making bent facades and shaped panels. It has a fairly high density. There are moisture-resistant and fireproof varieties. Can be painted or laminated.
Below are the technical characteristics of various types of wood.
| Material | Brinell coefficient (hardness) | Density (kg/m3) |
| Oak | 3,7–3,9 | 700 |
| Acacia | 7,1 | 650–1050 |
| Nut | 3,5 | 600–650 |
| Birch | 3,5 | 670 |
| Maple | 4,1 | 670 |
| Cherry | 3,1 | 580 |
| Beech | 3,8 | 650 |
| Pine | 2,49 | 520 |
When choosing materials, you must also take into account the characteristics of individual parts of the structure:
Tabletop
Yes, a kitchen wall with a wooden countertop looks very rich and solid, but, first of all, the countertop is a work surface, not a decorative element. It will absorb moisture, odors from food, traces of wine or bright juice. It is almost impossible to remove them from such a surface.
In addition, scorch marks from hot objects and burners may appear on the countertop, or mold from high humidity in the sink area. You should be aware of all this when choosing a tabletop from an array.
Several layers of varnish and moisture-resistant impregnation can only partially save the situation. If there is no desire to pay special attention to the tabletop either during the manufacturing process or during operation, the wood should be replaced with a more unpretentious material (plastic, stone).
Frame
This is a kind of “skeleton” of the entire structure. It must support the weight of not only all shelves, fronts, drawers and walls, but also all their contents.
The kitchen frame is best made from the densest and most durable wood. Acacia, oak, walnut, ash, etc. are well suited for these purposes. But these types of wood are quite expensive, so when choosing, the main thing is to maintain a balance: price - quality.
Back wall
Since this element of the headset is most often hidden from prying eyes, they usually save on it by making it from chipboard, fiberboard or not making a back wall at all.
You can completely abandon the back wall if the set is located close to the wall, and it is perfectly flat. Otherwise, small objects will fall into the gap, which is not very good or convenient.
Side walls
Fastenings for internal drawers and shelves are fixed on them, so the material should be selected quite durable. If it is not solid wood, but plywood or chipboard, then they should not be too thin.
Depending on the dimensions of the cabinets, the thickness of the side walls can vary from 10 to 20 mm.
Facades
The material for them is selected based on the general style. The more carvings and panels the design suggests, the softer the wood should be. Sometimes facades are made from ready-made elements, making only the frame and auxiliary parts with your own hands.
Hanging cabinets and shelves
When selecting materials for these elements, you need to pay special attention to their mass. This is especially important if the wall to which they will be attached is not very reliable (a self-leveling house or a plasterboard wall). Taking into account the weight of the contents, these structures should be made as light as possible.
Legs
Wooden furniture should have them. Otherwise, in the event of a flood, the entire set will swell and become unusable. If the presence of legs does not fit into the interior at all, they can be hidden behind a decorative strip. It is advisable to make them from materials that are inert to moisture (plastic, metal).
Accessories
You shouldn't skimp on it. After all, the performance of a kitchen set depends on the fittings. What's the point of beautiful facades and carved drawers if they fall out, squeak and don't close?
You can use the kitchen comfortably if the hinges are equipped with closers, the guides are high-quality telescopic, and not rattling and wedging roller ones, etc.
Open area with tiled base
A platform made of concrete or brick is a fairly expensive structure. To save money, you can simply lay it out using non-slip paving slabs.
Dry installation
The principle of constructing such a building is similar to the previous one. The only difference is in the preparation of the base. At its location, the soil is leveled, onto which layers of sand and gravel are alternately poured. Next, the tiles are laid using dry or wet methods.
In the first case, a mixture of sand and cement is used. After laying and leveling using a building level, all seams are carefully sprinkled with sand.
The second (wet) installation method is to use cement mortar, which is poured 2 cm thick. There is no need to lay too large a surface at once - the work is done in stages over an area of 0.5 square meters. m.
When installing a barbecue, a small platform lined with refractory bricks is prepared separately. All subsequent work is carried out after the solution has dried for a couple of days.
Required Tools
To make a kitchen from wood, you prepare the equipment yourself. If the user does not have the required tool, it can be rented for a while. This is advisable to do in cases where there are no plans to engage in similar activities again in the future. Required tool:
- screwdriver;
- electric drill;
- jigsaw;
- rule;
- building level;
- tape measure, laser range finder;
- hammer;
- file;
- screwdriver;
- pliers;
- hacksaw;
- plane.
For work, sandpaper of varying degrees of grain is prepared. It is necessary to connect elements made of wood and wood-containing sheets with each other using screws, nails, and self-tapping screws. Fasteners of the required size and type are selected taking into account the type of material. For example, nails are more suitable for a solid mass. Screws, self-tapping screws - universal fasteners. The good thing about a homemade kitchen is that you can create a durable structure using the type of fasteners, as well as their quantity, in accordance with your own preferences.
Setting up a stationary barbecue or oven
Since the grill is a device for frying over an open fire, it can only be installed under an open or semi-open canopy. Such a building will require the removal of a chimney, so its design must be thought out in advance.
Types of foundation
Foundation for barbecue
Remember the main rule - brick grills, barbecues or Russian ovens require the construction of a separate foundation that has no points of contact with the main foundation of the building.
After all, even when building a small fireplace, you will need at least 800 bricks, the total weight of which will be almost 3 tons.
Without a strong foundation, there is simply no point in installing a brick fireplace - over time it will quickly sag and become covered with cracks. Such a base is made in the form of a monolithic reinforced slab.
Laying the foundation
Open building with barbecue
Let us describe the main stages of pouring the base for a barbecue or stove:
1The size of the pit is always 10-20 cm larger than the structure itself.
2The height of the foundation is no more than 30 cm. However, when preparing a hole for it, it is necessary to take into account the depth of the crushed stone cushion - it should be equal to 15 cm.
3After installing the waterproofing layer, prepare the formwork so that it rises 10 cm above the ground level.
4A 12-14 mm rod is used as reinforcement, from which cells measuring 150x150 mm are knitted.
5When liquid leaks from the solution into the ground, its quality may deteriorate, so it is better to lay a layer of plastic film into the formwork before pouring.
6The proportions of the solution are selected depending on the brand of cement. For example, when using M200 cement, the proportions will be 1:2:4 (cement, sand, crushed stone). Less durable concrete will be obtained by mixing them 1:3:5. When using tables of solution proportions, do not get confused in the notation. After all, there is a brand (class) of ready-made hardened concrete, indicating its compressive strength.
7After pouring, poke the mortar with a shovel to remove any voids that may have formed. To make it dry more evenly, cover it with film. In hot weather, it is better to periodically water the surface.
The concrete foundation must be well strengthened, and this will take at least a month. Therefore, all further work begins only after the end of this period.
Construction of a stove or barbecue
To build a barbecue or stove you will need solid red and fireclay bricks. The walls are made of red brick, and fire-resistant fireclay is needed for the construction of the fireplace.
Since cement can crack under the influence of high temperatures, it is necessary to mix a sand-clay solution for masonry.
For the hearth it is better to use special dry mixtures made from fireclay clay. Any hardware store provides a large assortment of them.
BBQ Layout Scheme
Building a stove or barbecue without any experience can lead to disastrous results. After all, this process is not as simple as it seems.
There are enough masonry schemes online (they are called ordering) , but even if you decide to do it yourself, be sure to invite a specialist who can help you with advice.
After all, the slightest mistake is enough, and the stove will begin to smoke mercilessly or will not light up at all. Even when constructing the simplest structure, you use only standard procedures - any innovations with a complete lack of experience can end in failure.
Construction of a chimney
Regardless of the type of kitchen, when installing a stationary barbecue, you will need to install a chimney. Its height and diameter are directly dependent on the volume of the firebox. For example, for a metal barbecue 72x25 cm you will need a 2-meter pipe with a diameter of 16-17 cm.
Metal chimney
There are special formulas for calculating its size, but they are quite complex, and it is not worth spending time on them if you have no experience. When laying a brick hearth, it is much easier to use standard ordering schemes - they indicate the number of bricks used in the construction, including the chimney.
Above the metal barbecue, before connecting the pipe itself, a smoke collector is placed in the form of an extended hood with a height of 0.8 m. Its edges should protrude 0.3-0.5 m beyond the brazier.
It is better to make a metal smoke collector adjustable - after all, when using different types of fuel, the distance to the fireplace may change. In the future, this parameter can be adjusted experimentally, so that the ball of smoke is at a height of 3-7 cm above the level of the skewers.
Benefits of natural wood
Wooden furniture has the following advantages:
- Wood is a traditional material for making furniture. Among new, technologically advanced materials, wooden furniture occupies the highest level, due to its environmental friendliness and naturalness.
- Such furniture is safe - the material does not release harmful substances into the environment, but, on the contrary, heals it, since the wood contains natural antiseptics and phytoncides. They have a positive effect on the microclimate, purify the air in the room and fill it with a unique aroma.
- Wooden facades always look expensive and solid. They create a cozy atmosphere in the room.
- Depending on the design of the exterior, the presence or absence of decor, a wooden facade is appropriate in many styles: loft, minimalism, modern, high-tech, country, Provence, classic and others.
- Natural wood has a long service life, provided that it is initially properly processed and subsequently maintained. Good quality wooden furniture can last for decades.
Made independently, wooden kitchen furniture has a special charm and personality.
Solid wood furniture looks solid and rich
Closed building
If the kitchen in the country house will be used in winter, it makes sense to make it in the form of a completely enclosed building. In this case, it must be insulated from the inside.
The flow of fresh air in the summer can be ensured by wide window openings or by installing an air conditioner or fan of sufficient power in the cooking room.
Completely enclosed building
A major covered building, heated all year round, is good because it can accommodate a full-fledged kitchen with any type of modern equipment. There are a lot of projects online for arranging an enclosed summer kitchen in a country house.
It is convenient if a cellar or bathhouse is provided in the same building. A covered summer kitchen attached to the house can have a single foundation and a common entrance.
We will not describe the construction of the building itself step by step. After all, this is a rather labor-intensive and complex process, little different from the process of constructing any permanent building. A separate article will be needed to describe it in detail.
Kitchen bedside table
It’s easy to assemble a kitchen cabinet with your own hands. It is important to decide on the design you need and the available material. Then the product will be useful and practically free. For country furniture, you can take old chipboard, boards or disassemble several wooden pallets. Our nightstand will have a main compartment, for example for dishes, and a drawer for cutlery. In principle, each owner will decide for himself what to fill his furniture with.
Materials and tools
To make such a bedside table you will need 915x1220 mm chipboard (half sheet) 16 mm thick. Therefore, if you are going to purchase new material, look for a company. In addition, you need to prepare:
- Table top 525x400 mm, thickness 28 mm.
- Plywood for the bottom of the box and the back wall of the product.
- Roulette.
- Pencil.
- Square.
- Screws 50x70 mm.
- Circular saw.
- Wood glue.
- Sandpaper.
- Drill with a set of drill bits for wood.
- A cutter for hinges with a diameter of 35 mm.
- Iron.
- Melamine edge strip 0.5 mm thick. Choose a material for the ends that matches the color of the chipboard.
- Furniture legs.
- Set of drawer guides.
- Two handles.
- 2 hinges per door.
If you do not have experience cutting chipboard sheets, contact a specialist. They will prepare the details based on the measurements provided.
- 2 pieces of 7.72x50 cm each for the sides of the cabinet.
- 2 pieces of 3.68x50 cm each for the bottom and shelf.
- 3 blanks of 3.68x10 cm each for the base and two upper strips.
- 2 side walls of a box 4.8x11 cm.
- 2 blanks 33.4x11 cm for the front and back walls of the drawer.
- For drawer front 15x39.5 cm.
- The door of the bedside table is 51.5x39.5 cm.
- The back wall measures 67x39.5 cm.
- 1 blank 47.5x36.5 cm for the bottom of the box.
Assembling a kitchen cabinet
- Assemble the body of the nightstand. On the inside of the sides, use a tape measure to measure the places for installing the lower and middle shelves. To prevent the chipboard from splitting, drill holes in the designated places, apply glue to the side ends of the shelves, and connect the parts using confirmatories. Then check that the shelves are installed correctly. The angle between the shelves and the sides should be 90 degrees.
- Attach the tabletop strips, the length and width of which are 3.68 x 10 cm, to the upper edge of the sides in a similar way (using screws and glue).
- The third plank, 3.68x10 cm, is the base of the bedside table. Install it at the bottom of the product facade. Use glue and screws. Check with a square that the installation work is correct. Check the resulting design with the image below.
- Proceed to assemble the drawer. Assemble the side walls of the element using screws and glue. Check the angles between adjacent parts. Attach the bottom of the box.
- Mark the guides on the drawer and cavity. Install the slats.
- Mark places for hinges on one side and door. Use a router bit to make the indentations.
- Drill holes for handles on the door and drawer front.
- Attach edging tape to the ends of the nightstand. One side of it is covered with glue. Apply the tape to the end and run a heated iron over the top. Press the tape tightly with a dry rag. Use a utility knife to cut off the excess.
- Screw the handles into place.
- Install the doors and drawer.
- Attach the tabletop with screws and glue at the top of the piece.
Equipment for summer kitchen
With the correct supply of communications, just like in a regular kitchen, in addition to the sink, you can install here any types of appliances from an electric or gas stove to a refrigerator and dishwasher.
Separate side burners are very convenient in a summer kitchen, allowing you to boil water simultaneously with the grilling process. When installing equipment, ensure that the wiring is protected from moisture and ubiquitous rodents.
A full-fledged large refrigerator is unlikely to be needed in such a summer house. It is enough to choose a compact model. But it’s worth paying attention to the technical and operational characteristics.
You should not install this type of equipment in direct sunlight - find a place for it in the shade. Otherwise it will soon fail.
Equipment for summer outdoor building
An ordinary Russian oven, barbecue or grill is often installed in an open space. If it is not possible to place them closer to the edge of the canopy, only take care of the ventilation system. Otherwise, the area will be constantly smoky during cooking.
Installing a stationary Russian stove or barbecue will be justified if you have to cook often, and several dishes at once. If you tinker in the kitchen from time to time, a small stove with 1 or 2 burners and a light, portable barbecue are enough, which can be quickly put away in the house or garage for storage if necessary.
Grills are very convenient, in which cooking is carried out simultaneously on gas and wood. In this case, you won’t have to tinker with fuel for a long time - it is used in small quantities only to add flavor to the food. A gas grill will maintain the desired temperature.
It is better to take equipment with a plastic or stainless steel coating. The ideal option is AISI 304 low carbon steel.
What could I save on?
I chose expensive materials for the kitchen. Here's what I could save on without losing quality.
Tabletop. For a countertop made of chipboard with plastic, I would pay 10,000 RUR, and not 63,000 RUR, as for quartz agglomerate.
The second row of upper modules cost 22,000 RUR. But we could do without it.
The drawers could have been made smaller. With the bottle holder I got ten pieces, but instead of some I could put regular cabinets. And instead of a narrow drawer under the oven there is a blank panel.
I bought Bloom retractable systems, and the same Ikea sells analogues for 30% cheaper. They have good reviews. By taking them I saved about 10,000.
Door hinge closers are not required. I could save 1500 RUR on them.
moisture-resistant laminated chipboard for the frame out of caution: in case something spilled inside the drawers. But I realized that I had to try very hard to make this happen. You could buy a regular chipboard and save 2500 RUR.
The 1mm thick edge looks beautiful. But at the cut they told me that 0.4 mm is no worse. But it would cost 2000 R less.
Furniture jigs are simply wooden templates. You can make them yourself, and not spend 1550 RUR.
Selection of furniture
For an enclosed space, you can choose any type of furniture - the flight of imagination in this case is unlimited. But upholstered furniture installed in an open area is not the best idea. It is better to do it yourself or purchase light wooden or plastic chairs and armchairs with removable cushions. Such furniture will be no less comfortable.
Streamlined armchairs and chairs made of rattan or wicker are very comfortable - by the way, today there are inexpensive imitation of them made of plastic on sale. It is better not to use products in dark or bright colors - they get very hot in the sun and quickly fade and lose color.
Concrete kitchen island with stone trim
When selecting tables and cabinets, also pay attention to the material of manufacture. It is better to use wooden or MDF furniture if you plan to put it away for storage at the end of the season.
Do not install wooden structures near open fire. It is better to build a “concrete kitchen island” from a wooden beam covered with a plaster mesh with two layers of cement mortar applied to it. After it has completely dried and strengthened, the sink and countertop are installed and the doors are hung.
Choose a countertop from tiles, concrete or stone. Plexiglass or quartz can quickly crack due to sudden temperature changes. The ideal material for a sink installed outdoors is stainless steel.
In a small space, using the “working triangle” rule, in which the most important zones - the sink, stove and refrigerator - must fit into its vertices, is not always feasible.
After all, there may simply not be a refrigerator, the stove may be replaced by a grill, and the shape of the room is not always close to ideal. But still, to ensure comfortable work, try to keep these main zones at a fairly close distance from each other.
In an open summer kitchen, much more dust will accumulate, so use easy-to-clean materials to decorate it.
In what form is wood sold for making cabinet furniture?
Pressed wood sheets are represented by MDF and chipboard panels
Boards of various thicknesses are made from wood, which are then used to assemble the body of a cabinet or cabinet. There are two types of shields:
- Solid. They are made from one piece of wood that has undergone special treatment.
- Pressed. Such a shield is assembled from several thinner shields, which are glued and tightly pressed, allowing you to obtain the desired thickness.
Which shields are stronger? Oddly enough, it is the glued ones that demonstrate the greatest strength and durability. Furniture of this type practically does not deform even after many years.
Lighting
A single chandelier in an open area is unlikely to cope with the task - after all, in the absence of walls, the light will be scattered. Therefore, provide several types of lighting. Be sure to place spotlights or LED strips near the work area.
You can hang one large chandelier above the dining table. This lighting can be supplemented with halogen lamps or lanterns hung on nearby trees.
Lighting must be thoughtful
With the help of light, you will be able to easily divide the space into separate zones. For example, after you've set the table, hide the work tables by turning off the lights and leaving only lighting on the dining tables and areas near the structure.
Don't forget that for street lighting you will need lamps and luminaires with a high degree of protection from dust and water (their IP should be in the range of 54-65). The first number is the degree of protection against electric shock. The second is to protect the housing from moisture penetration. Products marked with the numbers “65” will be needed if the lamps will be located outside the canopy area.
We take measurements of the premises
To make a kitchen set, you need to check the quality of the surfaces: evaluate how smooth they are, in which areas there are depressions, curvatures, and bumps. For this reason, measurements are taken at three points: under the ceiling, at shoulder level, above the floor surface (5-10 cm). It is necessary to correlate the actual dimensions of the room with those determined from the documents. Based on these data, a decision is made on what type of set should be made (corner, straight), how many cabinets will fit.
In addition, you need to decide on the height of the headset. When choosing a suitable option, be sure to take into account the average height of the residents of the apartment/house. A set of small height looks inorganic. The structure almost always occupies a significant part of the wall; free space is left under the ceiling in case a suspended, suspended ceiling is installed. In the case when the choice is made on a corner headset, measurements are taken using a laser rangefinder. Otherwise, a simple roulette will be enough.