Night sounds of the forest, the cozy crackling of a fire and sparks flying up to the starry sky... Perhaps there is not a single person who will not be touched by such a picture. The romance of distant travels, overnight stops in the wilderness, hermits in the taiga, hunters, fishing huts, many in childhood read adventure novels that tell about this way of life. But there are many people for whom such romance is an integral part of their everyday life. Geologists, fishermen, commercial hunters. It is about such fishermen and how they live in the taiga that will be discussed further.
Life in the taiga
Of course, life and work in the taiga consists of far more than just romantic moments. This is not easy, daily work, and there is very little time left for romance. Nevertheless, a person periodically needs rest. Eat, sleep, and what if we are talking about the rainy season or winter, which is very harsh in the Siberian taiga? You need somewhere to dry off, warm up, and cook food. After all, you won’t have to clear the area of deep snow every time for a fire. Yes, and supplies need to be stored somewhere, and for this you will need a dugout or hut in the taiga, photos of which are presented in this article.
Dugout
The simplest and fastest solution would be to build a dugout. Yes, equipping such a shelter does not require much time, any special skills or significant effort. It is also quite warm. But there are also many disadvantages. In such a shelter it is dark, damp and quite problematic to equip a normal stove for heating. A dugout is more suitable for temporary shelter. After all, a fisherman walking around his area will often need places to stay for the night. Moreover, the area of the site may be of such dimensions that a complete walk-through will last not one day or two, but a week or more. In this case, temporary dugouts are set up at a distance of a day's march. Well, a real taiga dweller will definitely build a log hut in the taiga as his main home.
Loghouse installation technology
Waterproofing is laid on the horizontal surface of the poured foundation.
Roofing material is suitable as a material. For laying, the foundation is lubricated when heated and roofing felt sheets are placed on top. After drying, another layer is made; boards with a thickness of at least 5 centimeters are placed on the waterproofing layer, and a layer of tow or jute is laid on top of the boards.
This will enhance the thermal insulation properties, because up to 40% of the heat escapes through the floor and foundation!; A log house is installed on the insulation layer. As a rule, production logs are numbered. This wall kit is easy to assemble according to the attached diagram; Lay the crowns strictly level, row by row, and fasten them with dowels.
Make sure that the logs lie flat!; A layer of insulation, also in the form of tow or jute, is placed on each laid crown. The insulation is attached using a construction stapler; In addition to bandaging at the corners, the logs are connected every meter of length using spikes. Additional fastening will make the structure stable.
Taiga hut
There is no point in arguing about the advantages of a log hut as a winter hut. It will perfectly protect against autumn slush and winter cold. It is dry, warm, light and definitely more comfortable and cozy than in a dugout. In addition, a wooden hut will serve not only as protection from weather conditions, but also from wild animals. In general, both a commercial hunter and an ordinary hermit who, instead of the bustle of people, chose unity with nature as their main home, and any sane person will give preference to a log building.
General information about the structure of the Dugout
Where is it used?
Hunters use it to keep warm, leave things behind, and be as unnoticeable as possible in natural conditions.
Gamekeepers and foresters use it for survival in harsh conditions, protection from rain, snow, wind and observation of wild animals.
Gardeners and gardeners use dugouts as a cellar to store their vegetables and preparations. And if you install a stove in the dugout and build it in compliance with all the technology, then it will be no worse than an adobe house .
Eco-settlers. Recently, this type of housing has become very popular among fans of ecological housing.
Instead of logs, moss, and branches, they use high-tech materials and approaches, as a result of which they obtain unusual, but full-fledged modern housing.
Arrangement rules
We will talk about simple dugouts that you can make with your own hands.
Regardless of the purpose of this type of building, there are general rules.
Tips for choosing a location
The location for the construction of the dugout should be chosen for safety reasons. Elevations that protect housing from groundwater and melt water are ideal for this.
A hill should be chosen with soft soil, without stones or large roots.
The wind rose should be taken into account. Since the entrance door should be located on the leeward side in order to retain the maximum amount of heat inside the dugout.
You should not choose swampy areas or open areas for construction.
If you are building a temporary shelter and waiting for evacuation, then the construction should be done near a place from which a signal can be quickly received.
Tips on construction technology
The roof of the dugout should be made in the form of one slope, which will face one side of the slope of the hill. This will protect you from blowing and flooding and keep you warm inside.
If you are building a dugout for a long period, you should consider the availability of important resources such as water and food.
The dimensions of the dugouts are taken into account with a margin for internal insulation. Moreover, this type of construction does not provide for walking at full height, especially if you do it yourself.
Most people believe that a dugout is something damp, gloomy and incomprehensible. But by following the above rules and construction technology, you will receive full-fledged housing.
It is worth noting that the most important purpose of a dugout in forest and taiga conditions is survival, and only then comfort and conditions. Moreover, a hut or a shelter will not provide you with all the amenities.
The dugout can be made almost invisible by placing turf on the roof, which will take root within a week and will be like a single whole.
Main advantages over other temporary buildings
- The best indicator of thermal insulation. This means that it keeps you cool in the summer and keeps you warm in the winter.
- Remarkable protective functions, shelters from gusts of wind and from various types of precipitation.
- If you follow all the technology for building a dugout, it will last a very long time.
- When using the stove, you will need some energy resources.
- Excellent camouflage. The building blends into the wild landscape. For hunters, this is a shelter that allows them to unnoticedly obtain rare trophies. For a forester it is a place to observe wild animals. Also, the inconspicuousness of your home will protect you from unwanted guests.
From all of the above, we can conclude that a properly built dugout is a simple option for a house in which you can fully spend the winter.
Selecting a location
So, permission has been received, and the next step is choosing a location for future construction. It is advisable that this be a small clearing near a pond or at least some source of water. If such a clearing could not be found, then you will have to clear the space for construction yourself. The felled trees will immediately be useful as building material, and the twigs and branches will be used for firewood. You will have to suffer a little with the stumps left after cutting down, but no one in their right mind will uproot stumps by hand. It's easier to burn them. You also need to take into account the fact that there are no tall and dry trees close to the hunting hut in the taiga, since from a strong wind they can fall and overwhelm the building. We must not forget that you cannot build a hut in a lowland due to dampness and possible flooding. You should not build a building on a bare hill, since due to its exposure to cold winds there will be a problem with heat conservation. And in general, taiga housing, if it does not necessarily have to be carefully camouflaged, is worth more or less hiding it from prying eyes. Otherwise, you never know, different people can wander around the taiga.
Preparing the site for construction
How to build a winter hut in the forest with your own hands? First of all, you need to pay attention to finding a suitable place to build a house. The main enemies of the hunting base are people and bears. It is desirable that the house be generally accessible only to the person who built it, or at most to his immediate circle (friends, relatives).
You need to build in a secluded place. The hut should not be located on the river bank, on a path or road, the house should not be visible from vehicles passing nearby. So, a remote area is required. Separately, you need to take into account the visibility of the space depending on the presence or absence of foliage on the trees. The listed rules are difficult to comply with in relatively populated areas. In general, a fishing hut hidden from prying eyes can only be in a deserted and wild taiga; it is very difficult to hide in other forests.
The house should not be visible from the air. It is advisable that a helicopter cannot land nearby. To do this, the logs for construction are taken not entirely near the hut, but some nearby, and the rest in other places. The most reliable way to hide a house better is to move 20-25 kilometers away from the nearest road. This is approximately a day's trek.
The approach to the winter hut from a relatively frequented place should not stand out in any way. There should be no path or road. The path to the hunting lodge can run, for example, along stones in the bed of a dry stream or through a spruce forest, where a springy bedding of pine needles lies under your feet. Some especially careful hunters even go to their winter quarters on a different route each time.
It is advisable to choose a place on a small edge, protected from strong winds, in a pit. This will protect the lower crowns from heavy torrential rains and spring floods. Under no circumstances should you build a hut in a ravine. It is permissible to build a house only on a small hill or flat area. There should be a source of clean drinking water nearby (stream or river).
Selection of trees for construction
Typically, the construction of huts in the taiga is made from coniferous trees. Of course, larch would be more suitable, since it rots much more slowly than conifers, but it still needs to be found in sufficient quantities. As a last resort, lay out the first crown from deciduous trees, and then continue with conifers. Cedar is also perfect for this purpose, since in a hut with cedar walls the air has a healing effect. There is no need to choose very thick trees. Fifteen to twenty-five centimeters thick logs will be sufficient. Practice shows that a raw pine log up to 25 cm thick and up to 4 m long will weigh about 120 kg. And since you will not be lifting the whole log, but only one edge of it, this weight will be quite feasible for an adult and healthy man. If such a weight still seems heavy, you can choose thinner trees. Of course, in this case you will need more of them.
How to bandage a log house
After the materials have been selected and the foundation for the wooden house has been installed, the assembly of the log house begins.
There are two main types of lashing or tying of logs. This is “in the cup” and “in the paw”. Both methods characterize the stability and strength of the structure of the future house, and they differ in the creation of grooves.
Cutting “into a bowl” or “into an oblo” is a traditional Russian method of assembling a log house. He assumes that the corners of the structure are connected to the release of the ends two times the diameter of the log.
Because of this, lumber costs increase. The construction of such a house will cost more, but the warmth inside will remain for a long time. In addition, the corners of the building will not be negatively affected by wind and precipitation.
The “paw” method assumes that the logs are laid along the bracket, aligned along the outer edge and the excess is trimmed off from the inside.
This is a colder room, so for insulation the ends are covered with boards. This is also necessary in order to protect the sawn wood from rotting. Please note that the log house needs to be hewn inside.
Tying logs “in the paw” has a more modern and aesthetic appearance and less wood wasted. But to create a warm and durable home, a lot of additional work will be required. Therefore, such cutting will become a labor-intensive process.
Laying the log house
So, let's start laying the frame of the future hut in the taiga. The first crown can be placed directly on the ground, but it will be much safer to dig a depression of about fifty centimeters around the perimeter and fill it two-thirds with small stones. Compact the stones and place the first crown on top. For the first 2-3 crowns it is better to use thicker logs. Before laying, the logs must be cleared of bark. There are several ways to lay logs. The most famous are cutting into the paw, into the bowl and into half a tree. The easiest way to build a hut in the taiga is to cut half a tree. In this case, grooves in the logs are not made at the corners, but simply the floor of the log is removed, and a treated trunk is placed on top in the same way. Here you can also drill a hole in the logs and additionally secure them with a wooden spike. Chopping into a bowl looks a little more complicated. In this case, a transverse hollow is hollowed out in the upper log, with which it lies transversely on the lower log. If desired, you can also strengthen the logs with spikes, but this is no longer so necessary, since the crowns themselves turn out to be well secured. Well, the last method is cutting in the paw. This is the most difficult method and without some carpentry training a beginner will not be able to do it. By the way, in places where there will be windows and a door, despite the longitudinal hollow in the logs, it is imperative to strengthen the joints with wooden spikes. Since in most cases, hunting lodges are built from raw wood, in order to avoid significant deformation of the walls after drying, it is advisable, despite the type of log house, to additionally strengthen the logs with spikes. Well, with the walls it’s more or less clear. But there are also windows, doors, floor, ceiling and roof. Building a hut in the taiga without boards is possible, but it will not be quite a hut. Where can you get boards in the forest? Don't carry it with you. You'll have to make them yourself.
We build a dugout with our own hands
Materials
It should be noted here that we will be building a dugout for a long time and using a large amount of building materials that cannot be obtained in the wild.
But we will try to offer analogues of materials that can be found in the forest.
We will need a set:
- Poles are a long and thin tree trunk, cleared of branches and twigs: 70 pieces, 6 meters long and 120 pieces, 5.5 meters long.
- Ruberoid . Used as a waterproofing material for floors and roofs.
- Wire 8-9 kg.
- Iron or sheet profile . It will take about two sheets to arrange the roof.
- Insulation, beams, boards and other building materials intended for insulation and interior decoration.
- Fastening elements . Self-tapping screws, nails, corners.
- Doors and windows , if provided for in the project or drawing.
- Bake . It is important to ensure fire safety at home.
How to replace materials in natural conditions
As we understand it, we will use analogues in the wild.
The wire can be replaced:
- willow twigs,
- thin roots of young spruce trees,
- bast is simply young subbark, that is, the inner layer of tree bark.
The insulation can be replaced:
- moss You just have to dry it first.
Ruberoid can be replaced:
- branches,
- leaves,
- grass,
- bark or
- spruce branches (branches of evergreen pine and spruce trees).
Tools
During installation we will need the following tools:
- Shovel (scoop and bayonet).
- Sledgehammer and hammer.
- Building level.
- Knife, axe.
- Saw.
- Roulette.
- Hand drill or screwdriver.
Dugout construction technology
Project
Like any construction, the construction of a dugout must begin with a drawing or drawing by hand. There are many diagrams, 3D layouts, videos and photographs on the Internet. But you can draw and realize all your wishes yourself.
Digging a pit
We start with the most time-consuming and difficult thing - digging a pit. On the selected site we mark the outlines of the future dugout. We install pegs along the edges and stretch the twine. If there is turf on the surface, it should be carefully removed; it will be useful for camouflage. Turf is the topmost layer of soil, which contains numerous roots, and on the surface there is a thick grass cover.
We dig with a bayonet shovel, crush the soil and throw it back with a picking shovel at a distance of at least half a meter from the edge of the hole. It’s impossible to get closer, since this place will be needed to build a roof.
You should immediately provide a place for entry and, if necessary, form thresholds. Usually 3 steps are enough. The depth of the hole must be at least 2 meters if you want comfortable housing.
Roof rafters
Next, we form a rafter system for the roof, for which a large diameter pillar of about 10 cm is dug in the center, if you have a round-shaped dugout.
And then we install the poles in a circle, as closely as possible to each other and fasten them with wire. They rest on the ground at a distance of 50 cm from the edge of the dugout.
If you are making a pitched roof , then the pillars are driven into the ground on one side with an interval of 1.5-2 meters between each other and the poles are also laid.
If you want to make the roof gable , then the pillars are installed centrally along the entire length of the dugout in increments of 1.5-2 meters. The poles are laid in different directions, also resting on the ground. There is no clear definition of the height of the roof above the ground.
Experts recommend choosing the height of the ramp depending on the size of the dugout: the larger the dugout, the larger the ramp should be.
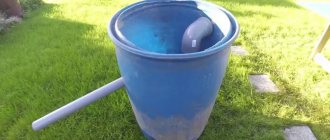
Ventilation
Before covering the roof, you should remove the pipe for the stove if the room will be heated. And don’t forget about ventilation; for this you need at least two pipes. According to the technology for constructing high-quality ventilation, we install one pipe on the ridge, and the second at the base of the ground in opposite directions. The diameter of the pipe is at least 10 cm.
Roofing
- Then we lay the roofing material in several layers, both horizontally and vertically, maintaining an overlap of 5-10 cm.
- Next we lay in layers branches, brushwood, bunches of reeds or reeds, soft clay and, at the last stage, a layer of turf.
- We plug the gaps between the poles at the bottom with moss or insulation, and the roofing material will not allow water to seep through.
- The roof frame and end should be insulated, for which clay and turf are ideal.
- To prevent water from getting inside the dugout, drainage channels should be laid around the perimeter.
- The laying of doors and windows should be done at the time of installation of the rafter system. This is done in order to evenly distribute the load.
- If suddenly a door is not provided, then a porch should be installed. The main thing is that it tightly covers the entrance and does not allow external precipitation to penetrate.
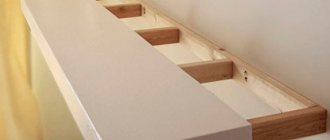
Arrangement of floors and walls
We arrange the floor in the dugout according to a similar scheme.
- First we lay roofing felt, and then boards (plywood, poles, chipboard).
- We build the walls in the same way - first, roofing felt, it will prevent the earth from falling, and then a series of poles, which are also tied with wire.
It is advisable to make the walls in two layers, and insulation will serve as a spacer between the layers. For beauty and aesthetics, the inside of the dugout can be decorated with clapboard or edged boards, and then decorated with paintings and drawings.
Stove in a dugout
If you plan to install a stove, it should be made of non-combustible material: sheet iron or brick.
The stove should be installed at a distance of no closer than 50 cm from the walls and rafters, and the pipe for the stove should be made strictly in the designated place.
A good solution is a portable potbelly stove. The simplest solution is a metal barrel buried halfway into the ground in the middle of the dugout. In addition to the fact that it warms the air inside the room, it also warms the ground under the floor, so to speak, a “warm floor” system.
We build a dugout from bags
It should be noted that in addition to the generally accepted methods and methods of building a dugout, there are others. For example, you can build a dugout from bags filled with earth or clay. This construction technology is called earthbag .
Preparation of mixtures for filling bags
Option #1:
- gravel,
- the soil,
- sand.
Option #2:
- Earth,
- cement or clay,
- Earth.
We moisten it a little and tamp it into bags. We take the bags from polypropylene, but it is best to turn them inside out so that the edges are even.
Pit
Next, we prepare a pit, dig it to a given height, fill it with gravel 20-30 cm thick and tamp it.
Walls
And then we lay out the walls from the bags, periodically check the level, and do not forget about the entrance. During the formation of the entrance, we lay mortgages for doors and windows between the bags. After all the bags are laid out, cover them with 5 mm. film in several rows, and cover it with soil, and then lay out the turf.
Finishing
Since polypropylene is destroyed by direct sunlight, all bags that are not covered with earth should be plastered.
Making boards
Of course, we can’t count on even and relatively smooth boards that are made at sawmills. Nevertheless, we are quite capable of making a product that is quite similar to them and which we are not ashamed to call a board. All you need for this is a sharp axe, and for greater convenience you can make a wooden sledgehammer. It is necessary to choose a straight tree without large knots or twists in the trunk, plan several wooden wedges, make a small cut at the base of the trunk and drive a wooden wedge into it, gradually splitting the log along the fibers. A second cut is made nearby and the wedge is driven in again. Then the entire deck is split into boards, or as they are called - shingles. By the way, these boards have much more strength than those made on a sawmill in the usual way, since the wood fibers are not damaged. In this way, you can provide yourself with the necessary number of boards to build a roof, doors, floors and other necessary parts.
Design and selection of materials
Assembling a log house with your own hands begins with designing a house, taking into account the characteristics of the land plot, future engineering systems and room design. The layout of a log house can be rectangular or square, as well as shaped in the form of a semicircle, hexagon, etc. Of course, the construction of the first option will be much easier.
After creating the project and calculating the estimate, lumber is carefully selected. Rounded logs are the best option for those who want to assemble a log house and build a house themselves.
Such logs are characterized by a smooth and even surface, identical sizes and diameters.
This will allow installation to be carried out quickly and easily. In addition, logs tightly adjacent to each other will provide good thermal insulation. Due to the aesthetics and naturalness of the materials, a house made of round wood will harmoniously fit into the environment. A wooden structure will look elegant and original.
Read more about the advantages of a log house here. To get a reliable and durable house, you need to use only high-quality logs. It is advisable that the lumber be from forested regions and undergo special processing. At the MariSrub company, timber harvesting takes place in the Kirov region, the Mari El and Komi republics. These regions are famous for their good, large and moisture-resistant wood. Raw materials and logs are carefully selected and processed in the company's own workshop.
The wood is impregnated and treated with protective agents against the negative effects of moisture and insects. Such materials will last longer and retain their original appearance and properties. Choose logs harvested from winter forests. Since such wood is stronger and more resistant to moisture.
The presence of knots of small diameter and small natural defects on lumber is allowed. The trunks of quality materials are characterized by yellow or dark yellow color. These must be unspun logs of the same diameter and the same wood species. There should be no mechanical damage, rot or wormholes on the surface.
Roof
A hut in the taiga can have either a single or double roof with an attic. Single - it is done faster and easier, but with an attic it is many times more convenient and practical. Firstly, the hut becomes many times warmer, and secondly, additional space appears for storing various things and supplies. In the warm season, you can dry hay and all sorts of herbs there. The roof is made as follows. First, the ceiling is laid out of shingles. The cracks between the boards are lined with moss. You can sprinkle it with earth on top or cover it with plastic wrap. Next, in front and behind the hut, two supports are attached to the top, the ridge rests on them and on the sides, two or three on each side. Then we cover the entire structure with shingles, we also caulk the cracks with moss, there is no need to spare the moss, and on top everything is covered with plastic film. It is not heavy and you can take it with you in sufficient quantity.
How to make a roof?
There are two types of roofs for winter huts: with and without an attic. Attic roofs can be single-pitch or gable. In principle, you can build any of them. Below you can see examples of these roofs.
Roof with attic
Roof without attic
Roof with attic, pitched
What is the attic for? Firstly, it can be used as a storage room, storing various things there, and drying herbs in the summer. Secondly, the attic is warmer, especially when the attic is closed, since the roof becomes smaller and warm air rises upward. And the lower the roof, the easier it is to keep warm in such a winter hut. Most hunters build their winter huts with an attic. But it’s easier to build without an attic; it will require much less material.
The attic roof is essentially two roofs: one is located at an angle of 90° to the walls, and the second is already above it. From the lower photos we see that the first roof can be laid not even with boards, but directly with small logs or their halves.
You will also need to lay moss between the logs, and pour earth on top or cover it with roofing felt (polyethylene). But for an intermediate roof (ceiling), film is not at all necessary. The photo below shows mineral wool, but instead of it there will be moss and earth. In the photo we see two vertical supports attached to the walls with brackets, a roof ridge and 6 slabs.
Boards are laid on top of the layers, and without much beauty, since the top will need to be covered with film. Carrying roofing material is difficult, so you can take plastic film instead. The main thing is to protect from rain, and the lower roof will protect you from heat transfer. Cover the floor in exactly the same way with the same shingles.
Bake
The stove is one of the most basic internal elements of a hunting hut in the taiga. There are two types: metal (potbelly stove) or brick. The stove can be heated either in a black way (without a chimney), which is extremely inconvenient, or in a white way - with a chimney. Installing a metal potbelly stove is quite simple and does not require any special skills. Building a brick oven is not a very simple matter, and besides, you will first need to make raw bricks from clay, which can be found near the nearest body of water. In terms of its properties, a potbelly stove differs from a brick stove in that it heats up very quickly. Accordingly, it quickly warms up the room. But after the fire goes out, it cools down just as quickly. Therefore, you need to constantly ensure that the fire does not go out. But a brick oven, on the contrary, warms up the room not so quickly, but also cools down much longer, as a result, the heat does not leave the room for a long time. It is better to place the stove in the middle of the room. This way it will warm up the hut faster and more evenly, plus it will be convenient to dry things around it. And in terms of fire safety, this placement option is safer. Photos of hunting huts in the taiga with and without a stove can be easily found and viewed in the article.
The stove is the main element of any winter hut
How to build a hunting house with your own hands? There is a roof, floor and walls. Why not a home? But still, the main element of any hunting lodge is the stove. Otherwise, the hut will only protect from the wind, and it will be impossible to spend the night in it. Hunters most often use iron stoves, which provide heat quickly but cool down just as quickly. You will have to add firewood every hour to keep the whole house warm.
Brick ovens take longer to heat up, but retain heat better. For a settled life you will need a good brick stove, but you can line an iron stove with bricks and stones. This way you can keep the heat much longer. You don’t need a lot of bricks; it’s enough to build a small stove with a hob to make it convenient to cook food.
How to quickly build a hut? How long does this process take? Construction lasts from several weeks to months. Much depends on the hunter's carpentry skills, because the main material (wood) is harvested locally. A person, even without a special tool, but with extensive practical experience, can build a hunting winter hut quite quickly, but sometimes it happens that the whole day is spent adjusting the groove of one crown.
After erecting the furnace, you can proceed to interior work. In the winter hut you need light from a lamp or kerosene lamp, but you must strictly follow safety rules, because the housing is wooden. You also need to leave a supply of food and chop firewood.
Mice and larger animals
The hut must be equipped with a tightly closed door, locked from the inside, to prevent free access for wild animals. Also, inside the ceiling there should be hooks for hanging supplies, since if you place them on shelves or hang them on the wall, you risk losing everything, since mice are excellent acrobats, and in this case they can easily get to the food. To catch mice, you can use one and a half liter plastic bottles. They need to be strengthened at an angle near the corner and the wall with the neck up. The mouse will definitely get inside the bottle, but will not be able to get out back.
Unwritten rules of behavior in hunting huts
Unwritten rules have long been in force for those who hunt in the taiga and hunting huts left unattended for some time, in accordance with these rules, must have a supply of firewood, salt, matches and essentials. It is not customary to lock such houses. The door should be tightly closed, but not locked. Perhaps someday someone will be able to save their life thanks to this. Also, if you need to spend the night in such a hut, behave decently in it, as if visiting a good friend. Don't litter, be careful with other people's property. Before leaving, clean up after yourself, hang supplies from the ceiling, and if you have your own, don’t take the owner’s. Renew your firewood supply. A hunter's hut in the taiga must be ready to meet the next wanderer. Also, someday some taiga traveler will take care of your house. In the taiga it is customary to help and help each other out.
Ready-made or individual design of a hunting-style house
The choice of contractor should be approached with special care; building a country house is quite an expensive undertaking. Perhaps you should listen to the recommendations of trusted acquaintances and friends.
At the initial stage, preliminary negotiations and consultations are held with specialists from the architectural bureau. In serious companies, they strive to find an individual approach to each client and try to interest him with advantageous offers. To work on a project, it is necessary to determine the technical specifications, which are agreed upon with the customer. It is difficult for a person who does not have experience in this field to immediately formulate the requirements for the structure.
In this matter, specialists come to his aid. Consistent acquaintance with several projects will allow you to form your own idea of the subject. Special programs that form a spatial image of objects help well in this matter. If you don’t like anything proposed, then an individual design of a hunting lodge is developed in accordance with the wishes and capabilities of the customer.
Original hunting lodge, built according to an individual project