Types of glass and features of work
Cutting ordinary glass does not pose any difficulties. Not only glass cutters, but also ordinary tailor’s scissors do an excellent job with this task. But what should those who have set themselves the task of obtaining a glass product with a more complex configuration do? To do this, it is worth familiarizing yourself with the properties of some glasses.
- Tempered glass products . In fact, it is impossible to cut tempered glass at home - it loses its properties. If you want to purchase an item with elements of this material, it is worth considering cutting it in the early stages. In addition, work with it must be carried out by professionals, since the hardening process of the resulting product can only be carried out under certain conditions.
- Fluted glass . This patterned glass is especially popular in glazing doors or creating decorative interior elements. Unlike tempered glass, you can cut such glass yourself. Working with it is not much different from working with ordinary glass, the only difference is that the cut is made from the smooth side. A roller glass cutter is best suited for this.
- Acrylic or organic glass is a transparent plastic created on the basis of synthetic resins. No special tools are required to cut it. At home, a metal saw, cutter and other tools used for edge processing do an excellent job of this task. In addition, a regular stationery knife can handle glass whose thickness does not exceed 2 mm.
In any case, it is worth remembering that working with any glass must be accompanied by compliance with certain precautions. The presence of thick gloves and safety glasses are the main conditions for ensuring your own safety. It will not be superfluous to take care of the arrangement of the workplace. Since working with glass involves the presence of fragments, cover the work surface with any material that you won’t mind getting rid of. Feeling safe will allow you to achieve the best results.
Homemade glass cutter from what's on hand
For those who are accustomed to solving all everyday problems with their own hands, a tool such as a glass cutter is not something mysterious, because, as a rule, there is enough glass in our house.
Fragile breakable material is present in large quantities in windows, furniture or interior doors.
For home use, there are, of course, devices that are simpler and cheaper than a diamond head, but experts still choose a noble stone, why?
Glass is a very capricious material, metal often leaves the edge in an unsightly state, requiring long and careful grinding.
Diamond works more accurately and accurately, and it rarely becomes unusable, because it is the most durable material in the world of stones, which cannot be said about metal cutting rollers.
But you shouldn’t think that the tool contains that same precious stone; in fact, a less processed diamond is used for cutting, often it is even replaced by an artificial one. This is possible because they do not differ in strength at the level at which we use them.
A diamond of any origin, be it natural or artificial, makes a very thin cutting line, works very carefully, and the output is significantly less defective. But this is only if you know how to handle it correctly.
Don’t be afraid that such a glass cutter is a professional one; a diamond tool simply requires some skill, and below we will try to acquire it.
There is little value in such a device, because the size of the stone can only reach 0.16 carats, and the smallest representative will weigh about 0.02 carats.
How to cut glass without a glass cutter
Before we begin a detailed description of glass cutting techniques, we would like to remind you about safety. Always wear work gloves and safety glasses while working to avoid cuts and small debris getting into your eyes. Be careful not to apply excessive pressure to the glass.
Burning thread
We soak the thread in a flammable liquid and fix it on the glass along the cut line. We set it on fire, wait for it to burn completely and immediately place it in cold water or pour it onto the heating site. The main thing is that the glass cools down as quickly as possible and bursts due to temperature changes. A characteristic click will signal the success of the work. If the glass does not crack, you can try repeating the operation.
This method breaks bottles fairly smoothly, but does not always work with large glass sizes. It is also very fire hazardous and requires a fire extinguisher or a container of water on hand, which is already required.
Soldering iron
Having marked the line of the future cut on the glass, take a file and make a small groove with it from the very edge. Having retreated 1-2 mm from it, we heat the place with a soldering iron until a microcrack forms between it and the mark.
Next, we retreat from the crack itself to the same distance and gradually move towards the finish point. This takes a long time to cut glass, but you can get any shape.
To speed up the process slightly, the glass can be periodically cooled by applying a damp cloth to it.
Scissors in water
A simple method of directional chipping of glass. Allows you to easily cut out round shapes, but is not suitable for creating straight lines. For such cutting, you will need ordinary scissors and a container of water, which will serve as a kind of lubricant. The maximum glass thickness should not exceed 4 mm.
The cutting process using this technique is extremely simple. We take a piece of glass to be processed, immerse it in water and break off small pieces from the edges with scissors. Water will prevent the glass from cracking, allowing you to make a controlled chip. In this way you can get oval and round shapes.
Diamond blade
Not the safest way to cut glass, requiring increased care and mandatory compliance with safety rules. It can easily break glass and throw a fragment in any direction. Otherwise, the method is quite effective and can cope with the task. For cutting, you will need a special tool (grinder, drill or drill) with a diamond disk 0.1 mm thick.
The cutting process itself is quite simple, but it requires some skill and a steady hand to guide the tool clearly along the line.
We place the piece of glass to be processed on a flat place, then take a cutter and draw a line on the surface of the glass with a disk.
The main thing is not to dive deep, but only lightly touch it so that a small hollow is formed, similar to a wide line from a glass cutter. Next, we simply break the glass in the right place.
To reduce the likelihood of glass chipping and reduce the amount of glass dust while working, you can periodically water the cutting area with water.
File
Another way to cut glass at home without a glass cutter or expensive power tools. To work, you will need a file and a little experience in handling glass. Please note that the file must have corners, so a round one will not work.
To cut glass, it is enough to make several cuts on its surface with the corner of a file. You need to apply a little more pressure on the file than average so that the force is enough to form a clear groove, similar to the cut of a glass cutter. When the place of the chip is marked, we simply break the glass on the edge of the table or by placing a match under the place of the cut.
This method requires a certain skill, and if you are faced with cutting glass for the first time, we strongly recommend that you practice on small, unnecessary fragments before moving on to the main material.
Pobedit drill
If you know first-hand what glass cutting is, then we suggest considering another way to cut glass without a glass cutter. If you have some experience, one drill with a Pobedit tip may be sufficient for this operation. The main thing is that the drill is more or less new, with sharp corners on the head.
The process of cutting glass with a drill is in many ways similar to a conventional roller glass cutter. The differences include a higher pressure force, but otherwise all actions are standard.
We lay the glass on a flat surface, mark the cutting line, apply a bar, and draw a line along it from top to bottom. Before cutting, rotate the tip so that the sharpest angle makes contact with the glass.
Having received a clear line, we break the glass along the cutting line.
The method of cutting glass with a Pobedit drill requires skill and practical experience in handling this material. Beginning craftsmen have very little chance of making an accurate cut using this method, but with patience and straight hands, the desired result can be obtained.
Professional diamond glass cutter – design
We will consider the design of such a glass cutter from our philistine point of view, without going into the formulation of GOSTs, according to which hand tools are manufactured today. Since we will have to work with our hands, the first thing we will feel is the handle.
Its form must meet certain requirements. To ensure that it fits comfortably in the hand, its end has a drop-shaped, plump shape; closer to the working part of the instrument, it bends slightly.
This allows us to transfer the necessary force to the cutter, which our hand will practically not feel, but its very position will create it.
Next comes the rod, that is, the frame that comes out of the handle and holds the remaining parts of the tool. Typically made from brass or steel. As is customary in modern production, this section of the rod is coated with an anti-corrosion compound.
This frame is crowned with a hammer, most often presented in the form of a rhombus, with two corners cut off. This hammer sometimes has slits on the sides, these are not for beauty, they are useful for breaking off glass along the cut line.
In addition to direct breaking, this accessory is used for tapping the cut line if a large sheet of glass is being processed and there is no way to grab it by the edge.
At the end of the tool there is a cutter, which consists of two parts. First comes the steel orb, and the diamond is fused onto it using silver solder, most often. The cutter is held in the hammer by a mounting screw.
When you manage to dull the diamond, the screw is unscrewed and the cutter is turned with the other face of the stone. Yes, they don’t throw it away, but choose a new, still sharp edge of the diamond.
This is another advantage of such a glass cutter: it takes a long time to get dull, and then it doesn’t require a new cutter; it’s enough to turn the existing one.
Diamond glass cutter - tool types
Since we started talking about edges, it’s time to explain what they are. Based on the number of working edges, there are two types of glass cutters. More difficult to use, but long-lasting, is a tool with a tetrahedral diamond pyramid, which is soldered into a square holder.
The second type is more suitable for a novice glassmaker and is equipped with a curved cut diamond, which is fixed in a round base.
This option is easier to use because the chip is in a plane with the main axis of the device, and the master intuitively understands how glass is cut with a diamond glass cutter of this type.
With a tetrahedral diamond, things are more complicated. The cutter has markings for 4 positions, that is, it shows the orientation of the working edge, which will then help you avoid getting confused when turning the ground edge.
Another feature that is more difficult for a novice owner is the process of use itself.
The cutter is not on the axis of the tool, but at an angle of 200 degrees, therefore, it must be held a little differently than it seems at first glance. From here, at first you can ruin a lot of glass.
Glass cutters differ in the size of the stone, which is due to the thickness of the glass planned for cutting. The smallest diamonds (up to 0.05 carats) are cut only into thin-sheet products (up to 5 mm). But glass with a thickness of 6-10 mm will only cut qualitatively a diamond of more than 0.11 carats.
The cost of “precious” glass cutters is actually not as prohibitive as it seems, but significantly more than that of conventional roller tools.
An artificial stone of small mass for thin-sheet glass will determine the price in the region of $10, but a larger and more natural stone will be available in an instrument for $30.
Step 1: Prepare the table and tools
First of all, choose a spacious, flat surface and cover it with something soft, for example, carpet. The entire working surface should be larger than the largest piece of glass; there should be at least a 15% margin.
Do not plan to cut the product on the edge of the table; although this is practiced by some craftsmen, the risk of damaging both the glass and the tool in this case is much higher. Additional tools will be required to make working with the glass cutter easier. For example, you need a long ruler, preferably of certain dimensions (up to 2 cm in width and up to 1 cm in thickness).
With such an “assistant” your hand will not tremble at the most crucial moment. Also, for marking, you need to have a square, tape measure, marker and protective gloves in front of you.
Step 2: Glass Preparation and Cutting
Bring and carefully place the sheet on your work area. It should be remembered that this is a heavy material, and if the dimensions are impressive, then use the help of a friend or a rope tie to insure the glass from falling.
Now wipe the material from dust or dirt, inspect for defects (bubbles, chips, cracks, scratches). Somewhere on the edge, check how your tool cuts. The glass cutter should be held by the hammer with two fingers (index and thumb), and you should press no harder than on a simple pencil when writing.
If you get a thin, barely noticeable white line, then you have found the right position, and you can proceed to the main work, but if it turns out to be thick and leaves a lot of glass dust, this will not work. Look for the desired position by slightly changing the orientation of the tool.
Never try to cut along the same line twice. This will not add quality, but will only completely ruin your glass.
Step 3: Slicing Techniques
You should always strive to save glass, so before work, check to see if the number of operations can be reduced by taking some side of the original sheet as the finished side of your product.
For example, a rectangular piece can be cut faster if, after measuring the parameters of the sheet with a square, you find that its edges are also located at right angles. True, you should immediately check the edge for any “fraying”.
If any are present, you need to cut off a strip of glass (for a thickness of 5 mm, it is enough to cut the edge by 2 cm).
Now, to make the planned rectangular piece, mark everything using a square and a tape measure, draw a thin line with a glass cutter, slide this seam onto the edge of the table and press sharply with your hand to break along the line.
You can tap the line with a hammer first so that the break occurs for sure and as smoothly as possible. This is how each side of the right triangle is cut off.
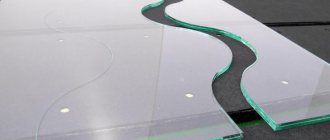
And if you need a curved shape of glass, you will have to make a template from cardboard, place it under the glass and apply markings so that the glass cutter will have to move mostly in a straight line, that is, break your figure into several parts with more or less straight sides.
If you still can’t break it this way, then make a template from plywood and cut the glass with it, moving the glass cutter along it.
- Manager Andrey
Before cutting glass
The main knowledge of a glazier is knowing how to cut glass correctly, so that the required size and shape is obtained, as well as so that the edges are smooth and without chips.
Previously, both glass and the tools for processing it were expensive and only craftsmen with good skills were engaged in cutting glass, but in our time the situation has changed significantly. Nowadays, anyone can work with glass.
Tool
To work with glass, you need a very good tool.
That’s why, before you buy glass and work with it, you need to start shopping with the tool.
But you shouldn’t buy the first tool you come across, because it may be of poor quality and will not be able to cut the glass as needed.
It is very important to determine what tool you need, because there are several types of glass cutters:
- Roller;
- Diamond;
- Oily;
Roller
The roller glass cutter for cutting glass has a built-in special roller, which is made of a very durable tungsten-cobalt alloy. The usual roller diameter is 6.6 mm, this roller diameter allows cutting glass up to 4 mm thick.
Diamond
The diamond glass cutter is equipped with a correspondingly small diamond, this diamond cuts glass. The hardness of diamond is well known and therefore it has long been used for cutting glass.
Nowadays, as before, a diamond glass cutter is considered the best tool for cutting glass.
Oily
Not long ago, an oil glass cutter was added to the list of glass cutters.
This is essentially an improved roller tool that has a reservoir built into the handle to supply lubricant to the roller. This lubricant binds particles that were formed when cutting glass while ensuring smooth movement. This glass cutter can cut glass up to 20 mm.
Workplace
Glass does not withstand local lateral loads well. The pressure from the glass cutter is what causes them. Therefore, a home craftsman should work with glass only on a prepared, clean and level surface.
A coating made from a solid sheet of fiberboard and similar materials is well suited. It is perfectly acceptable to cover a regular table with a blanket and cut on it.
What tools to use?
Many of us are accustomed to thinking that glass can only be cut correctly and efficiently with a glass cutter. But what to do if you need to cut a piece of glass urgently, but you don’t have this tool at hand? There is another unusual, but no less effective method that helped our great-grandfathers get out of this situation. Such a tool is ordinary scissors, available to any owner. Let's look at each method in detail.
Option 1: glass cutter
The technology for cutting glass with a glass cutter is quite simple. To do this, you must comply with certain conditions and choose the right glass cutter. Today, the choice of this tool is quite wide, which allows you to turn work into pleasure.
- Diamond glass cutter, time-tested and remains a leader in its field to this day. Glass cutters with a beveled cutting edge are suitable for home use. This tool is designed to cut glass up to ten kilometers and is suitable for any thickness of the material used. From time to time, such a glass cutter needs to be sharpened on a special whetstone.
- Roller. As the name suggests, the cutting part of such a glass cutter is made in the form of a roller made of a durable cobalt-tungsten alloy. The number of rollers can be from one to six.
- Oil. This tool works on the principle of a roller glass cutter, with the difference that a reservoir with oil is built into its handle, which is automatically supplied to the roller. Suitable for cutting thick glass.
To learn how to choose a good glass cutter, watch the video:
So, having dealt with the glass cutter, place the glass on a flat surface. Mark the glass and get to work. To make the task easier, you can use a ruler. It is worth considering the point that the line must be drawn the first time, otherwise a repeated attempt will lead to cracking of the surface. When cutting glass with a glass cutter, you need to apply equal force along the entire length of the line.
Option 2: ordinary scissors
Cutting glass with scissors like paper is not a fairy tale, but a completely everyday reality. For this purpose, you will need the scissors themselves (sewing scissors are best for this) and a tank of water (preferably hot). It is necessary to apply markings on the glass in advance, and then elementary physics comes into play: scissors create a microcrack, and the capillary effect completes the process. Of course, the result obtained will differ from that achieved with a glass cutter, but if necessary, this method can help out significantly.
How to cut glass
A sheet of glass is not as easy to cut as it seems at first. To make a glass cut, preparation is necessary.
Preparation
- Absolutely new glass will only need to be thoroughly cleaned of dust and wiped dry with newspaper; fabric is not suitable for such work.
- If you have to cut old glass, you should first degrease it, after which the glass is washed well with water and detergents.
- After all the above manipulations, the glass will need to be dried in a closed and clean room.
Cut glass
Preparatory work also includes cutting glass and preparing containers for waste collection. There should be two containers, that is, for collecting small waste and for collecting larger ones, which may be useful for something in the future.
When cutting glass, it is best to start with simple window glass and then move on to more complex options.
How to properly scratch
When cutting a groove, loads are created that work to shear the surface layer.
They cause deformations that form microscopic surface, lateral and deep cracks.
The correct cut is ensured only by those microcracks that are directed into the depth of the material - the middle ones. All others are not needed. They must be avoided.
The cutting quality is affected by:
- cutter sharpening angle;
- roller diameter;
- pressure on glass;
- position of the cutting organ.
Glass cutting technique
- First you need to prepare a table or other surface for cutting glass. The surface is covered with four or five layers of newspaper; this procedure is necessary to protect the table from glass chips. This will also distribute the pressure of the glass onto the table surface, preventing the glass from cracking.
- The glass sheet is placed on the table, and it is necessary to retreat five or seven centimeters from the edge of the tabletop. In order to fix the body and at the same time move the body freely above the cut site, it is best to place your feet shoulder-width apart. This body position allows you to achieve good results.
- When cutting glass, it is best to hold the blade with your free hand to avoid vibration. But keep in mind that glass is a fragile material and with more pressure it can crack.
- Use a glass cutter to draw a line from one edge to the other. In this case, the glass cutter wheel must be guided clearly along the marked line and the glass cutter must also be at a right angle.
When using a diamond glass cutter , you need to hold it at the very bottom of the handle and smoothly draw a line along the ruler, almost without pressing on the glass.
When cutting glass with a roller glass cutter, slight pressure is required and when the glass cutter moves, a whitish stripe appears on the glass surface, deeper than when using a diamond tool.
How does the roller sharpening angle affect the cut?
As an example, let’s look at the designs of three cutters designed to work on industrial glass cutters of automatic robots.
The direction of the forces pushing the surface layer apart when creating a scratch is always perpendicular to the pressing plane. A sharper roller deflects the acting force more widely from the normal to the surface, creating a smaller area of stress penetration.
To cut thick glass, use a tool with a wider sharpening angle, and for thin materials, use sharp ones.
On factory models of glass cutters, the sharpening angle is already created to work with standard glass used for domestic purposes.
How does the roller diameter affect the cut?
Smaller dimensions allow better scratching of the outer surface of the workpiece. However, the designs of the glass cutter have already been adjusted at the factory to optimal performance, and the home craftsman will not be able to change anything here.
The tool is purchased ready-made with standard roller diameters. As they lose their sharpness, which rarely occurs in everyday life, the dull part is simply replaced with a backup one.
How does pressure on the roller affect the cut?
The depth of penetration of a scratch into the glass depends on the applied cutting force. When choosing a sharper cutter for thin material, you should take into account that it is dangerous to create a high load with it, because you can simply crush the material.
To make it easier to cut the workpiece when performing such work, always ensure that the glass is clean and treat its surface with special liquids that:
- lubricate the roller;
- provide a hydraulic cushion;
- reduce the effect of the Rebinder effect, reducing the strength of the outer surface;
- wedge the material.
At home, you can easily get by with kerosene for these purposes. It is convenient to apply it manually with a piece of rag or use a specially designed glass cutter.
How does the roller position affect the cut?
The picture with the sharpening angles of the cutter makes it clear that the roller must be guided strictly perpendicular to the glass surface.
Its deviation from the normal will lead to lateral displacement of the median crack and incorrect chipping.
About the number of cuts
There is a misconception among beginners that one scratch is not enough and that several repetitions must be done. They say they will deepen the crack. So such masters use a glass cutter several times in the same place.
This is a gross mistake: with each movement, repeated deformations of the material and additional cracks are created in all directions. They reduce the overall strength of the workpiece and can lead to improper fracture during bending.
Possible mistakes
When there is a river of glass, there are two mistakes:
- The pressure with a glass cutter can be too strong;
- The glass cutter is carried out several times in the same place.
A little theory
Glass production is based on melting and subsequent cooling of minerals of various compositions. After completion of the technological processes, a transparent, relatively durable structure is created. It normally withstands mechanical loads uniformly applied to the entire plane, but does not withstand local impacts well.
Conventional cutting relies on scratching with the hard, sharp edges of a glass cutter roller. They reduce the strength of the surface and at the same time form microcracks, which, under the influence of operational loads, for example, gusts of wind, snow pressure, lead to destruction during operation.
During casting at the factory, a high-quality glass edge is created without any defects that reduce the mechanical characteristics of the sheet. Let's consider how it is formed with a conventional construction glass cutter or its industrial automatic analogue.
How to cut glass at home without a glass cutter
Twine, gasoline and lighter
The method described below will tell you how to cut glass evenly if you don’t have a glass cutter at hand. Everyone knows that the material is afraid of sudden temperature changes. This property can be used to cut it. For work you will need: twine with a maximum thickness of 2 mm (cotton only), lighter, gasoline (kerosene).
The glass sheet is placed on the table and a line along which it needs to be cut is marked with a marker. Measure and cut the twine so that it covers the entire length of the cut. After that, it is poured with gasoline and applied to the line on the glass. The twine must be set on fire so that it lights up along its entire length. When the thread goes out, water it with cold water. As a result, the glass will crack at the location of the temperature difference. If the crack does not extend across the entire sheet, then you need to repeat the procedure and lightly tap along the cut line.
Soldering iron
A straight cut is not always needed, and in this situation a file and soldering iron will help out. If you don’t have a soldering iron, a wood burning device will do.
The process is long but creative. First, mark the glass and use a marker to draw a cutting line on it. Then, at the edge, at the beginning of the mark, using a file, make a groove, which will serve as a guide. Having retreated a couple of millimeters along the line, use a soldering iron to heat the glass until a crack appears from the groove to the heating point. Then they retreat another couple of millimeters and repeat the process.
To make things go a little faster, the glass can be cooled with a damp cloth or dishwashing sponge.
File
For the first method, you need a file with corners; a round tool will not work. To cut glass, you should make several even thin strips on it with a tool. You need to press the file a little harder than average, and in the end you will get a clear, shallow strip, as if using a glass cutter. After this, you should simply break the glass on the edge of the table, or do this by placing a match under the cut.
The method is recommended for people who already have the skill to communicate with glass. If this is the first time such work is being done, it is better to try your hand at small pieces of glass in advance.
Scissors
It’s worth mentioning right away that the technique allows you to cut thin glass, no more than four millimeters. When working, it is recommended to wear safety glasses and protect your hands with gloves. You will need a container with water, in which, in fact, everything will happen.
Water acts as a lubricant, allowing you to cut the desired shape using scissors. No matter what tool you come across will not work - you need something serious, like tailor's scissors. Cutting is carried out according to pre-applied markings. The cutting force is comparable to what is needed when working with hardboard.
One more nuance: the container must be deep enough so that the layer of water above the glass immersed in it is large. To what extent it can be verified empirically, you should first experiment with an unnecessary piece of glass.
Charcoal cutting
Below we will talk about how to properly cut glass using a charcoal pencil (you can do it yourself). It allows you to cut various shapes from the material. To make the tool you will need: charcoal (linden, birch) and gum arabic. The coal is ground into powder, gum arabic is added to it and a kind of dough is kneaded. Round sticks are made from the mass, after which they are thoroughly dried.
DIY glass cutting table - Metals, equipment, instructions
08.02.2018
Glass tables are always distinguished by their attractiveness and sophistication. They are able to give any interior, regardless of the style in which it was decorated, freshness and presentability.
If your plans do not include purchasing additional furniture in the near future, do not be upset. Making a glass table with your own hands is not too difficult, and therefore even a novice master will be able to cope with the task.
If you follow the instructions below, you can create your own table with a neat glass plate top.
What can a glass table look like?
The variety of models is quite large, and therefore, even before starting work, you need to decide which option you need. If we consider the functional purpose, we can distinguish the following types of tables:
- magazine;
- writing;
- kitchen;
- computer.
Desk Dining table Computer desk Coffee table
Determine not only the purpose, but also other parameters of the furniture before assembling the glass table. The products also differ in shape. The model can have a round, square, rectangular or non-standard shape.
Of course, if you are considered a novice craftsman, then it would be better to choose a simpler option so that the manufacture of a glass table is successful. Use a ready-made drawing to simplify the task and avoid making mistakes.
1 2 3
What will you need for work?
To create a glass table with your own hands to be successful, you need to purchase or prepare the following materials:
- sheet of glass Both regular and special glass are suitable, the main thing is that the thickness of the plate is at least 6 mm;
- legs. Craftsmen believe that chrome-plated metal blanks are best suited in this situation;
- devices for securing legs;
- glue for special work. This substance is suitable for connecting a glass surface and a metal element. It is important that after complete hardening it remains transparent;
- sandpaper, instead of which you can use a special product for grinding glass surfaces;
- gasoline (as an option - acetone);
- chipboard or plywood sheet, which will then be needed to ensure the glass plate is level.
It is impossible to complete the job without having the following tools at hand:
- ruler for taking measurements;
- marker (or simple pencil);
- glass cutting device;
- glasses and gloves that can provide protection when performing work;
- hammer with rubber nozzle;
- drill;
- grinding machine;
- file;
- felt wheel intended for polishing.
How to make a glass table with your own hands?
1 2 3 4 5
If you are interested in how to make a table, follow the instructions provided:
- Cut out the tabletop and finish its edges. To ensure that the result pleases you, make sure that the glass is located on a flat surface; you can use a table for cutting glass, if possible. Before working with glass, wash it, removing foreign particles, and polish it. The fact is that even the smallest pieces of dirt can make cutting work difficult. If you do not prepare the surface properly, you risk making an uneven cut. Use a pencil or marker to mark the bottom. Place a ruler over the line. Use a glass cutter to cut the material along the marks you made. Please note that glass cutting equipment is not very easy to operate, so it is better to practice a little on unnecessary glass elements. Gently tap the cut line and separate the cut area. Wear gloves when performing this work to avoid injury.
- Carefully process the outer parts of the glass workpiece using special tools for this purpose. First, remove the largest uneven areas using a file, and then use a sander and sandpaper to get the job done properly. Do not neglect safety precautions and wear glasses that can protect your vision from foreign particles. Remove sharp edges, starting with the largest imperfections and ending with the smallest imperfections. Shape the glass plate into the desired shape. Polish the edges of the workpiece using a special paste and a felt wheel. This will make the countertop look more aesthetically pleasing.
- The assembly process requires special attention. First, turn the product over, and then mark it, determining the places where the legs will be located. In the upper part of the product, drill holes to fix the suction cups, apply a little adhesive and assemble the individual structural elements. Repeat the procedure using the next 3 legs. As a rule, this is enough to firmly attach one part to another. However, to make the connection more reliable, experts use a special adhesive. In order for the finished product to look presentable and neat, you need to choose the right thing to glue it with. It is important that after hardening it remains completely transparent and does not spoil the appearance of the leg. Fully assembled tables should look neat even upon close inspection.
- If you wish, you can make the furniture more mobile. A table on wheels is always easy to use and practical. When cleaning, you will be able to move it from place to place without much difficulty. To make your own table on casters, follow the instructions above. Having made the product according to this scheme, work on its legs. Choose suitable accessories (if desired, you can take rollers from an old skateboard that is no longer in use). Make sure that they are located at a distance of 100 mm from the edge and are fixed strictly parallel to the slats.
As you can see, it’s not too difficult to construct a glass table with your own hands; you just need to spend a little personal time and effort on the work. After completing the task, you will understand that making practical glass tables is interesting and budget-friendly.
DIY table with glass top: step-by-step instructions
Glass products have always had a special sophistication and beauty, refreshing any interior with brilliance and lightness. A glass table with a properly selected base is weightless, which is especially important in small rooms.
However, the high price of glass furniture often stops consumers from purchasing it. You can solve this problem by making a glass table with your own hands.
By approaching the process with care and responsibility, strictly following the instructions and advice of experts, the result will be a beautiful and unique piece of furniture.
Glass products have always had a special sophistication and beauty, refreshing any interior with brilliance and lightness.
Before you begin the process of making a glass table and purchasing the necessary materials, you need to carefully consider how it should look, decide where in the room it will stand, and how exactly it will be used.
You can solve this problem by making a glass table with your own hands.
According to functional characteristics, it can be:
- magazine,
- written,
- kitchen,
- and even computer.
A glass table with a properly selected base is weightless, which is especially important in small rooms.
By design they are divided into:
- mobile,
- transformers,
- sliding,
- with additional shelf.
Before you begin the process of making a glass table and purchasing the necessary materials, you need to carefully consider how it should look.
Depending on the shape of the glass tabletop, they can be:
- rectangular and square,
- round and oval,
- segmental (angular),
- non-standard.
Choosing a base (be it just legs or a finished structure with a frame for a glass surface).
When choosing a base (be it just legs or a finished structure with a frame for a glass surface), special attention should be paid to the overall interior of the room in which the table will stand:
- metal legs are ideal for high-tech style;
- forged or wooden legs paired with glass belong to the classic or loft style, and are suitable for any color scheme of the interior;
- if the main idea of the room is made in the style of minimalism, you can opt for a table made of glass or thin metal, while it is better to equip the table itself with wheels so that it can be moved to the right place at any time;
- in the case of a rustic interior, you can use rough wooden materials (logs, untreated bars), and oval or round tabletops will look best in such a pair.
Particular attention should be paid to the overall interior of the room in which the table will stand.
A glass table has many positive qualities.
- High aesthetics and versatility allow you to use this piece of furniture in almost any room with different design solutions. In addition, a wide range of glass products allows you to choose the ideal countertop (be it simple transparent glass or frosted, white or colored).
- Glass products are environmentally friendly, do not absorb odors, fats, paints, and are resistant to chemical materials. These characteristics are ideal for the kitchen.
- It is very practical: caring for glass involves regular washing or wiping, even without the help of detergents.
- The technology used in the manufacture of glass makes this piece of furniture very resistant to impacts, chips, scratches, and a special film will retain all the fragments even after breaking, eliminating the risk of injury.
How to make a hole for a handle
There are several options - either drill using a drill with a pobedite nozzle, organizing a bath of plasticine with camphor and turpentine on the surface, or using the thermal method. To do this, apply fine wet river sand to the glass, and using a sharpened rod, make a funnel in it, into which molten solder or lead is dripped. After a couple of minutes, the sand and solder are removed.
Maybe someone will consider the list of methods incomplete - we have a lot of Kulibin methods, and there are many more options for solving the problem. But the advantage of the methods described, and in bold, is that they work.
Possible mistakes
Most often, inexperienced carvers make the following erroneous actions:
- When cutting corrugated glass, they do not use a roller tool, but a different model of glass cutter. In addition, frosted glass with patterns and grooves is not cut from the smooth side;
- The dimensions of the final workpieces are often not respected. Trimming should be done in such a way that the dimensions are a couple of millimeters smaller than the frame into which the glass is planned to be inserted;
- when working with a glass cutter, additional materials are ignored - patterns, which are special rulers;
- It is recommended to ensure that the glass cutter is suitable for use before each cut. To do this, its sharpness is checked - a piece of glass is cut off on already cut pieces. If during cutting you hear an unpleasant creak, the cutting edge needs to be sharpened.
The glass cutter must be checked before each cut.
Compliance with safety regulations
To avoid injury, you should work with gloves. Pay attention to shoes that should be durable so that accidental glass does not cut your feet. It is necessary to dress in thick overalls made of thick fabric.
Sources
- https://vopros-remont.ru/obshhie-voprosy/kak-rezat-steklo-pravilno-uchimsya-rezke-svoimi-rukami/
- https://stroypomochnik.ru/kak-rezat-steklorezom-01/
- https://domsdelat.ru/instrumenty/kak-pravilno-rezat-steklo-v-domashnix-usloviyax.html
- https://HouseDiz.ru/kak-prosto-rezat-steklo-v-domashnix-usloviyax-svoimi-rukami-steklorezom/
- https://FB.ru/article/264894/kak-otrezat-steklo-bez-stekloreza-poshagovaya-instruktsiya-sposobyi-i-rekomendatsii
- https://setafi.com/lajfhaki/kak-bez-stekloreza-razrezat-steklo-v-domashnih-usloviyah/
- https://2lzz.ru/ruchnoj-instrument/steklorez/7-sposobov-kak-bez-stekloreza-razrezat-steklo
- https://izobreteniya.net/kak-razrezat-steklo-bez-stekloreza/