One of the most popular characters that wood carving offers is the bear. The traditional hero of Russian fairy tales could not help but find a visual embodiment in such an artistic direction as wood carving. You will learn from this article how to carve a cute bear yourself, what tools you will need to work on the sculpture and what you need to use to process it later.
Wood selection
To make a bear you will need soft wood. Each master decides for himself which material to choose. Refer to the description of the wood.
Optimal wood species for carving:
- Linden. It deservedly ranks first on this list, as it is a light and soft material. It is not afraid of drying out and cracking, it cuts well and, in general, is considered a convenient wood for processing.
- Willow. This wood can also be called light, tough, and elastic. Willow is easy and convenient to cut, grind and polish. Ripe wood is perfect for sculptural work, including three-dimensional bears.
- Aspen. And even a beginner will be comfortable working with this material. Wood is resistant to low temperatures, light, moisture and even acid. Master carvers highly value aspen, since this wood allows you to make cuts in any direction, the wood will not chip or wrinkle.
You can also consider poplar, alder, walnut, birch and chestnut options. If the sculpture is for the garden, you can take a closer look at larch. Without treatment it will crack, but this issue can be resolved.
You can find out detailed information about different types of wood from our article: “Wood for wood carving: features of materials, and which types of wood are best to choose?”
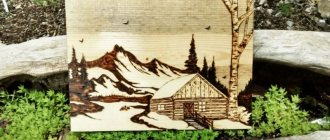
Panels and paintings
Creation from photo
Simple crafts from plywood: features of design and production of complex and simple crafts (115 photos)
The following pictures, in our opinion, are quite suitable for creating three-dimensional reliefs based on them. If you like any of them, we will be happy to make them.
Prices
The approximate price for a panel with a bear starts at 5,000 rubles. We work with oak, beech, cherry, walnut and other valuable species. Walnut bears look especially good.
The imagination of carving artists knows no bounds - a carved bear can be found decorating a table clock, a stationery set, a stand for a glass bottle, in the form of an unusual design of a decorative bench, in the form of a support sculpture decorating a garden well. Often large garden and park sculptures of bears are carved using a chainsaw. All wooden images of bears are either carved from solid wood or have decorative carvings. The bear is the main “ideological” inspirer of Russian woodcarving masters at all times.
How to carve a bear's head
Since the head and muzzle of a bear are the most difficult to sculpt, before creating a full-fledged sculpture, it is better to practice a little and sculpt the head of the animal separately.
The details are completed with a Bogorodsk knife; thin chips are removed with gentle movements. Small elements, the cutout of eyes, ears, mouth and fur are worked out with small chisels.
The supporting part of the beam is cut and processed with a knife and chisel, the head is removed from chips and dust, and decorative processing can begin.
Processing the figure
You will need to treat a wooden bear with products if you are going to place it in an aggressive environment (for example, in a garden). The figure is usually treated with several compounds.
- To protect the tree from fungus and wood parasites, a solution of table salt is used.
- For toning you should use tea and tobacco infusions.
- The final finishing is done as follows: take a woolen rag and use it to rub the wax composition dissolved in linseed oil into the surface of the figure.
Some craftsmen mix linseed oil with beeswax. This product makes the wooden surface more resistant to various weather conditions. It will be possible to make wood more weather-resistant using synthetic products.
This video shows how to make a sculpture of a small bear cub out of wood.
Material selection
Bear figures should be created from softwood trees.
The choice of the appropriate option depends on which characteristics of the material are especially important to you.
Among the most suitable types of wood for carving are the following.
- Aspen. Even a beginner will find it convenient to cut from it. This tree is resistant to light, moisture, cold and even acid. Aspen is highly prized by carvers because it can be cut in any direction. Such wood does not wrinkle or chip.
- Willow. Quite elastic and light wood. This material is very convenient to polish, grind and cut. Willow is well suited for creating a large, voluminous figure of a bear.
- Linden. This material is considered the most suitable for creating wooden figures. It is very convenient to handle. Linden cuts well, does not crack or dry out. This wood is soft and light.
In addition, you can use larch. But if you want to make a garden sculpture from this tree, you should keep in mind that without treatment it will crack over time.
Benefits of crafts
Plywood is not chosen by chance, as it has such advantages as:
Strength. Special production of several layers provides sufficient rigidity and resistance to warping of the sheet;
- availability. Sold in a wide range in all specialized stores, and the price is quite affordable for everyone;
- ease of processing. It is not necessary to use a power tool for the work; it is quite possible to make crafts from plywood with an ordinary jigsaw;
- safety. This building material is environmentally friendly, so even children’s toys are made from it without fear for the child’s health.
Products are divided into varieties that differ in price and quality. For the purpose of making crafts, the first and second grades are mainly used, which do not have chips, delamination and other flaws.
If the product is used outdoors, it is recommended to use moisture-resistant plywood.
How to process the finished sculpture?
If the sculpture is outdoor, no matter what height and overall size it is, such a figure is located in a deliberately aggressive environment. And her condition is more difficult to control than the condition of the figure that will be in the house.
To process garden sculptures you can use:
Synthetic compounds can also increase the weather resistance of wood, but a mixture of beeswax and linseed oil is considered a universal, time-tested product. You can do it simpler: cover the bear with stain of the desired shade, and after it dries, apply a couple of layers of varnish to the figure.
This video shows how to make a sculpture of a small bear cub out of wood.
If you do not have such experience in wood carving, and the bear will be your first such work, do not take on complex sketches with labor-intensive detailing. You can start with a small figure or even a separate carved bear head. A skill is strengthened by experience, and the path to the top (in this case, mastery) always begins with the first step.
Happy creativity!
First, let's make a figure from plasticine - it's easier to work with, change shapes, sizes and proportions.
Also, guidelines can be drawings from different angles. And the simplest thing is real photographs of the necessary forms.
We scale the figure of the bear onto the log. The chosen material is linden.
For roughing, an ax and impact chisels are used - straight and semicircular.
In our case, the diameter of the log is not enough - we increase the material for the front paws.
we adjust the board (also linden or similar in density - important!) and glue it together using clamps and screws.
For the claws we also glue on the plastic, taking into account that there will be fish in the paws.
We apply wool and fit the fish under its paws and claws.
Cover the first layer with stain. This prevents the material from cracking (our log closer to the core is partially dry - about 14% moisture content).
We are finalizing small details.
After thoroughly sanding the first layer, taking into account the natural color, we apply a second layer of stain.
Sand again with coarse-grained sandpaper, then with fine-grained sandpaper.
Peculiarities
Wood carving with a chainsaw is a relatively new direction in this art form, and who came up with the idea to start it is still not known exactly. Talented people from all over the world today strive to achieve excellence in this matter.
The distinctive features of this carving are the following.
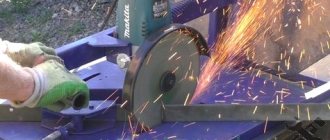
- Using large pieces of wood. As a rule, craftsmen choose whole tree trunks, and more and more preference is given to unprocessed raw materials. It is much easier to use a massive chainsaw to cut out wooden animal sculptures, large and small.
- The instrument itself. Traditionally, a chainsaw is used to cut wood, but here real works of art are created with its help. However, the tool is heavy, and it is not easy to hold it in weight, but also to make smooth and beautiful cuts.
- Duration of the carving itself. In order to create even a small piece, you need to spend about 6-8 hours of your time. Moreover, the largest part of it is spent on cutting small parts.
- The complexity of the work itself. This requires jeweler's precision, adherence to exact dimensions and an excellent eye.
Of course, wood carving with a chainsaw looks amazing, and the process of doing the work is simply mesmerizing - from a simple trunk with the help of a crude tool, you end up with simply stunning wood products.
How to carve a bear from wood: description, tools, finishing of the sculpture
One of the most popular characters that wood carving offers is the bear. The traditional hero of Russian fairy tales could not help but find a visual embodiment in such an artistic direction as wood carving. You will learn from this article how to carve a cute bear yourself, what tools you will need to work on the sculpture and what you need to use to process it later.
Wood selection
To make a bear you will need soft wood. Each master decides for himself which material to choose. Refer to the description of the wood.
Optimal wood species for carving:
- Linden. It deservedly ranks first on this list, as it is a light and soft material. It is not afraid of drying out and cracking, it cuts well and, in general, is considered a convenient wood for processing.
- Willow. This wood can also be called light, tough, and elastic. Willow is easy and convenient to cut, grind and polish. Ripe wood is perfect for sculptural work, including three-dimensional bears.
- Aspen. And even a beginner will be comfortable working with this material. Wood is resistant to low temperatures, light, moisture and even acid. Master carvers highly value aspen, since this wood allows you to make cuts in any direction, the wood will not chip or wrinkle.
You can also consider poplar, alder, walnut, birch and chestnut options. If the sculpture is for the garden, you can take a closer look at larch. Without treatment it will crack, but this issue can be resolved.
Required Tools
If you're just starting out, don't put off collecting carving tools. Each master has his own set, although there are also universal options.
The tools you will definitely need are:
- Hacksaw, hatchet. If the sculpture is large, you may also need a chainsaw. These tools are required for rough initial trimming of the figure.
- Adze. It is used for rough cutting of parts of the figure, those that are smaller.
- Cutters. This is the name given to knives with a beveled short blade.
- Blunt knives. Required for a number of small tasks.
- Chisels. Useful for rough notching, background sampling, and detail work. They vary in cutting edge width. They can be curved, as well as flat, oblique, etc.
- Bogorodsky knife. Equipped with a straight, short blade, it is practically indispensable in the creation of wooden products.
- A grinder, rasps, sandpaper are needed for finishing carved figures.
If the product has through holes, you will need a drill.
Stages of creating a carved bear
Before starting work, make sure that the tools are in good condition and sufficiently sharpened. You should start carving a bear from wood by creating a sketch. This means that the bear must appear on the paper first. It’s good if you can depict it in several projections - front, rear, side views.
Wooden sculpture - bear step by step:
- The sketch has to be transferred to the workpiece. It will be more convenient to transfer the contours of the image onto a rectangular block. And if your sketch is drawn up in a number of projections, then try to work with a rectangular blank.
- Making a molded model. And this stage should not be skipped either. The sculptor must first embody the conceived figure of the bear in plasticine (or clay). This will be a guideline for the sculptor’s work - in front of him there will be a three-dimensional figure, the contour of which he will repeat on the tree.
- Rough cutting. Next, you should remove from the wooden block all excess that remains behind the contour, hatchet or saw. Small parts need to be cut out with an adze. The sculpture, which includes rectangular parts, involves displaying on 4 sides. For large bears, primary wood processing is often carried out with a chainsaw.
- Work on the relief. The carver must remove the corners of the figure with cutters and chisels. After this, the silhouette will begin to be visible. But it’s still too early to round off the craft.
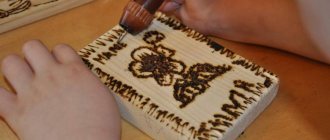
- Detailing. The time has come for filigree detailing. The master proceeds to the formation of such small elements as wool with all the features of its texture. At this stage, the carver works with a chisel, jambs and a Bogorodsk knife.
- Grinding. Next, the master takes sandpaper or a grinding machine.
The work will be completed by treating the figure with varnish, wax or stain, i.e. those means that will protect the bear from external influences.
The most difficult step for a carver can be making the head. It’s great if, even before work, you have decided on a drawing or photo, a finished sketch of a bear’s head. Beginner carvers make a stencil for carving, working in three projections - front view, back view and profile. Then the master takes a suitable block and transfers the contours of the animal’s head without detailing.
After this, the excess pieces of wood are cut off (except for the bottom). You should not cut off the lower base, since the master must comfortably hold on to the workpiece, because further small parts will need to be cut out. The bottom base is removed last.
Next, the craftsman will apply additional graphic lines to the angular blank - nose, ears, forehead and brow ridges. The carver grinds the head with semicircular chisels and jambs. Then he works out the little things and rounds them off with a Bogorodsk knife.
Safety precautions
Despite all the attractiveness of such wood carvings, you should also remember the dangers. A chainsaw is the most dangerous tool, so its use requires compliance with a number of rules:
- It is imperative to wear goggles and protective clothing.
- Before each use of the saw, it must be carefully inspected for damage and the chain must be tightened.
- A defective tool is not allowed to be used.
- You should not work in a place that is too cluttered and does not have enough free space.
- You should only use a chainsaw that you have already worked with before and know how to handle.
Also, ideally even and smooth workpieces should be used for work, especially in the initial stages. Small knots can cause the saw to jerk sharply and cause injury.
Salmon
Another character in our composition is fish. Here it’s a little easier, guided by the plasticine sketch, we prepare the workpiece. Material - linden
One of the most popular wood carving characters is the bear. The traditional hero of Russian fairy tales could not help but find a visual embodiment in such an artistic direction as wood carving. You will learn how to make a cute bear yourself, what tools you will need to work on the sculpture and how it needs to be processed later, you will learn from this article.
Cute pig
In order to make a cute pig, you will need to prepare:
- Five liter plastic bottles;
- Acrylic paint;
- Scissors;
- Dish sponge;
- Marker.
Related article: Crochet blanket with wildflower motifs
First, we take the bottle and remove all unnecessary parts from it, such as rims and handles.
Now we mark with a marker and cut out an oblong hole almost from the bottom to the throat, and above it on the back side, we make another wider hole. From scraps we make ears and a tail for a piglet.
Now you need to paint our animal in any color you like. We paint in two or three layers, and when the paint dries, it is necessary to varnish the product. Such a pig can be very useful in the garden and can be used as a flowerbed for growing flowers.
Required Tools
If you're just starting out, don't put off collecting carving tools. Each master has his own set, although there are also universal options.
The tools you will definitely need are:
- Hacksaw, hatchet. If the sculpture is large, you may also need a chainsaw. These tools are required for rough initial trimming of the figure.
- Adze. It is used for rough cutting of parts of the figure, those that are smaller.
- Cutters. This is the name given to knives with a beveled short blade.
- Blunt knives. Required for a number of small tasks.
- Chisels. Useful for rough notching, background sampling, and detail work. They vary in cutting edge width. They can be curved, as well as flat, oblique, etc.
- Bogorodsky knife. Equipped with a straight, short blade, it is practically indispensable in the creation of wooden products.
- A grinder, rasps, sandpaper are needed for finishing carved figures.
If the product has through holes, you will need a drill.
Making a Christmas tree from plywood
Cutting sheets for children “learning to cut with scissors”
The very first step is the selection and design of the appropriate diagram, according to which the markings will be applied to the sheet and the cut will be made. Such drawings of plywood crafts can be easily found on the Internet or taken from the site’s resources.
The drawing or diagram is transferred onto a plywood sheet using carbon paper. To transfer simple shapes and details, you can use an awl - leave currents at the main points and then connect them with a pencil and a ruler.
But if the shape of the craft, like ours, has complex through holes, then we shade the areas to be removed. For the jigsaw to pass through, you need to leave a small nest.
To make a Christmas tree from plywood we will need:
- product drawing, which can be found on the Internet.
- good grade plywood;
- glue;
- jigsaw;
- thin files;
- drill;
- sandpaper.
- acrylic paints and varnish, brushes
What types of bears are the most dangerous?
Bears are often spoken of as aggressive and dangerous animals. Indeed, their strength and size allow them to easily cope with a person, but the tendency of bears to attack people is greatly exaggerated.
Only polar bears, being true predators, are perhaps the only representatives of the family that actually sometimes perceive a person as prey, while tracking him down according to all the rules of hunting. Their attacks are caused by hunger, not fear. It is polar bears that are considered the most dangerous to humans. However, not many people live near polar bears, and people, knowing who they might have to deal with, always carry weapons with them.
Brown bears are in second place in terms of danger to humans, but their aggressiveness largely depends on their geographical habitat. Grizzlies in the center of the American continent, as well as bears living in Siberia, are truly dangerous. This is especially true for mother bears who protect their cubs, or animals who defend their prey. More aggressive individuals are found in the eastern regions of Europe. But in general, all bears, like other wild animals, try not to get in the way of humans and, if possible, avoid meeting them.
American black bears, especially those that live near humans, often frighten people, but very rarely cause them any harm.
Spectacled bears are very careful and are absolutely not aggressive towards humans, but it happens that they attack livestock.
Among the Asian bears, only the giant panda is a true vegetarian, and naturally does not pose any danger to humans.
Malayan bears often frighten local residents. If they are accidentally disturbed, they usually rear up, let out a furious roar and make a sharp lunge towards the enemy, but they rarely actually attack.
Himalayan bears and sloth bears, which often have to fight off large cats, are more likely to attack than to flee. Many people believe that sloth bears are more dangerous than tigers.
Literature: Mammals: Complete illustrated encyclopedia /Translated from English/ Book. I. Carnivores, marine mammals, primates, tupayas, woolly wings. / Ed. D. MacDonald. – M: “Omega”, - 2007.
You should start making three-dimensional figures with your own hands only after familiarizing yourself with the rest of the techniques and techniques of carving. A particularly popular theme for creating wooden sculptures is the image of a bear.
Carved Bear Wooden Sculpture Design
This mighty owner of the forest has inspired creativity among craftsmen since ancient times. It can be said that no animal appears so often in carved art as the bear.
The choice of wood for work largely depends on the size of the carved figure. So, for making a small figurine of a bear, large branches and small logs can be useful. The main thing is that the material is free of damage, cracks and signs of rotting. For large sculptures, thick, massive logs are chosen.
Experienced woodcarvers recommend that beginners use rectangular blocks. It is easier to transfer the image onto the block and the spatial perception of the future sculpture will be better. As for wood species, the most common are:
Wood for carving must be well dried - no more than 15% humidity. Products made from material with high humidity will begin to crack and warp when dry. It is better to dry the workpieces at home, in a warm place, wrapped in plastic.
Although beginners are advised to start with soft wood, its structure is much easier to cut through with an imprecise motion than harder varieties. Therefore, in some cases it is more convenient to use harder wood. Equally important in carving is a convenient, high-quality and well-sharpened tool. You will need the following set:
Volumetric crafts for the garden
It is wrong to say that volumetric plywood crafts for the garden are noticeably more complicated. Of course, you will have to cut out a few parts yourself. But some of them should be painted in one color, which simplifies the work.
It’s hard for a donkey to understand how you can sleep for so long, he’s a donkey!
All parts are prepared according to the scheme described above, and then fastened with self-tapping screws. Of course, a three-dimensional figure looks more interesting. The photo clearly shows that it is necessary to use material with a thickness of 15-20mm. Each detail has its own shape and size. They can be placed optimally on a sheet of material and plywood can be used sparingly.
The dog protects, the cat helps: in general, everything is in order
It’s especially nice when a homemade craft not only decorates the yard, but also performs a useful function. In the photo you see only some examples.
The observer is looking out for birds - or a hedgehog?
Stages of creating a carved bear
Before starting work, make sure that the tools are in good condition and sufficiently sharpened. You should start carving a bear from wood by creating a sketch. This means that the bear must appear on the paper first. It’s good if you can depict it in several projections - front, rear, side views.
Wooden sculpture - bear step by step:
- Sketch to be transferred to the workpiece. It will be more convenient to transfer the contours of the image onto a rectangular block. And if your sketch is drawn up in a number of projections, then try to work with a rectangular blank.
- Making a molded model. And this stage should not be skipped either. The sculptor must first embody the conceived figure of the bear in plasticine (or clay). This will be a guideline for the sculptor’s work - in front of him there will be a three-dimensional figure, the contour of which he will repeat on the tree.
- Rough cutting. Next, you should remove from the wooden block all excess that remains behind the contour, hatchet or saw. Small parts need to be cut out with an adze. The sculpture, which includes rectangular parts, involves displaying on 4 sides.
The work will be completed by treating the figure with varnish, wax or stain, i.e. those means that will protect the bear from external influences.
The most difficult step for a carver can be making the head. It’s great if, even before work, you have decided on a drawing or photo, a finished sketch of a bear’s head. Beginner carvers make a stencil for carving, working in three projections - front view, back view and profile. Then the master takes a suitable block and transfers the contours of the animal’s head without detailing.
After this, the excess pieces of wood are cut off (except for the bottom). You should not cut off the lower base, since the master must comfortably hold on to the workpiece, because further small parts will need to be cut out. The bottom base is removed last.
Next, the craftsman will apply additional graphic lines to the angular blank - nose, ears, forehead and brow ridges. The carver grinds the head with semicircular chisels and jambs. Then he works out the little things and rounds them off with a Bogorodsk knife.
Detailed study
When you have the finished form in hand, the sketch and pencil will come in handy again. Now you need to apply a detailed drawing to the finished blank. Based on it, the carver’s jewelry work begins. Before starting work, each master sharpens all tools. Sharpening is carried out under the attentive eye of a master. The blade is sharpened on both sides using an emery wheel. When sharpening, the blade is lowered into water, cooled, then removed, then sharpening continues with a drop of water at the very tip of the blade. You need to carefully monitor it, because when it evaporates, this indicates that it is time to put the blade into the water again.
Afterwards, the blade is polished on a diamond or corundum wheel, while the shaft rotates in the opposite direction from the tool. And finally, you need to adjust the point using a felt or leather circle greased with GOI paste. As you can see in the photos presented in the article, do-it-yourself wooden figurines can be processed either with a knife or with a whole set of tools. According to the drawing, the contour of the figure’s base is cut out, then it is worked out in detail with chisels and other cutters.
Volumetric figures
Beautiful crafts with volume can be easily made with your own hands.
The principle of manufacturing such products is identical to the above scheme. The only difference is that the figure is assembled from several parts.
Each part is cut out separately according to the drawn pattern. Then the figurine is assembled together using glue or nails with decorative heads.
Using these methods, you can create any image you like, souvenirs, toys, kitchen utensils, etc. Examples of products can be seen in the photo of plywood crafts and, after copying, you can make them yourself.
Habitats
DIY plywood crafts
The brown bear inhabits almost the entire forest zone from the west of Russia and the forests of the Caucasus to the Pacific Ocean. It can also be found in Japan on the island of Hokkaido, in some Asian countries, in Europe, Canada and in the northwestern states of America.
For life it chooses forested areas, with windbreaks and shrubs, prefers coniferous forests. It can wander into the tundra or settle in high mountain forests, with an undergrowth of edible plants.
The habitat is not tied to a specific place; often the feeding places and the bear’s home are located far from each other and the bear has to make long journeys during the day.
This is interesting: Amazonian manatee