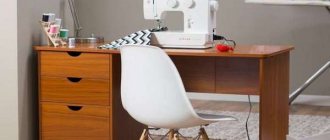
Despite the fact that the modern market offers a wide range of desks, sometimes it can be difficult to make the right choice.
We offer you to make a table that will fully meet your requirements, room size, and technical specifications.
Advantages
In addition to the desire to make furniture on your own, you need to have a special tool and some skills.
If you have everything, then you can start making a table for a schoolchild. The advantages of making furniture items yourself include:
- saving money;
- the ability to make furniture of any design, size and shape;
- independent selection of consumables.
Design and construction
Before creating a drawing of future furniture, it is worth deciding on its design and construction. As for design, it’s worth starting from personal preferences, the general style of the room, and the needs of the owner.
The design of the table can also be anything, from simple to complex shape. If you are new to this business, you should start with a simple table shape without any additional elements .
Most often, such products include classic models consisting of a table top, sides and several drawers.
If you don’t doubt your abilities, you can make a table of complex design with:
- numerous drawers;
- shelving;
- add-ons;
- cabinets.
Main types of workbenches
There are several types of workbenches, which differ in their functional purpose. Complex devices combine several types at once. Simpler ones have limited functions.
- Carpenter's table. It is an ordinary high table with a flat, even tabletop. It is designed for processing and sawing small parts. But it is difficult to process large boards on it.
- Long workbench. It is a long structure with a vice for securing boards and logs. Its main purpose is to process these types of parts. However, it is impossible to collect small items here.
- Universal table. It has a flat, wide table top, nearby holes for dumping debris and a long mount with a vice. The most advanced models are reinforced on individual sides with metal sheets or tape, which makes it possible to process metal and stone products on it.
There is also a gradation of workbenches by type of assembly. There may be the following options:
- Mobile workbench. It is small in size and weight. Designed for carrying from place to place and processing small products.
- Stationary table. These structures are heavy and, as a rule, securely attached to the floor. They process heavy logs, boards, and large parts. Typically, such options are used in private homes, where the owner quite often does carpentry or other work. Most often, these workbenches are universal with a large number of accessories.
- Folding table. This is an intermediate option between a mobile device and a large stationary table. Prefabricated workbenches are also quite large in size, but can be removed fairly quickly. They are suitable for garages or small private houses.
According to its design characteristics, a carpentry workbench is a table on which shelves for tools, drawers and additional equipment are located.
Wood, solid wood or furniture board?
You can build a table for a schoolchild from:
- furniture board . In its production, solid oak, birch, beech, and coniferous species are used. To work with this material, you must have experience in making furniture;
- veneer _ This lumber is classified as natural. Its thickness does not exceed 3 mm. Modern manufacturers offer a wide selection of materials of different textures, textures and colors. The advantages of veneer include: environmental friendliness, strength, affordable cost;
- solid wood. Using an array, you can make an exclusive and original piece of furniture. But keep in mind that working with natural wood requires special tools and experience. The advantages of wood include: mechanical stability, naturalness, and a wide palette of colors. Real furniture makers recommend using solid wood: pine, birch, oak. Solid wood products really look luxurious and noble in any interior.
MDF .
It is environmentally friendly, attractive and easy to use. This material is not afraid of moisture and other negative factors. Thanks to MDF lining with veneer, film and plastic, you can choose any shade and effect;- laminated chipboard. Products made from this material keep their shape for a long time. Laminated chipboard is resistant to high moisture and sudden temperature changes. It is durable and has a long service life. A wide palette of shades opens up endless possibilities for furniture makers. This table can be combined with different shades, and it will become the main decoration of the children's room;
- plywood. This material has been known since ancient times. Modern manufacturers produce plywood from special birch and cherry veneers. This material is not inferior in strength to natural wood. Plywood is in great demand in the manufacture of furniture due to its environmental friendliness, aesthetics and affordable cost.
Advice : if you are a beginner, it is better to opt for chipboard. But for real professionals in this field, you can try making a product from natural solid wood.
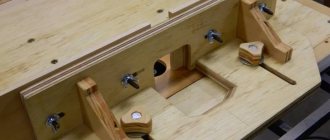
Construction of a carpentry workbench
Despite its simple appearance, the carpenter's table has a very complex structure, since any inconspicuous detail here carries a number of important functions.
Traditionally, woodworkers worked with hand tools, so to work with electric tools, the worktop must be modified to suit your needs.
Main elements of the workbench:
- Base or bed. This element is also called the underbench. This is a support made of thick timber or metal. As a rule, it is a frame that has additional drawers or crossbars. It must support a heavy structure with a tabletop, tools and wood for processing. The drawers and frame elements are connected to each other with wedges and glue.
The construction of a carpentry workbench is simple, but requires careful design, calculation of dimensions and the correct choice of material. - Tabletop. It is also called a workbench board. It is made from thick boards. As a rule, the thickness of the board is 6-7 cm. This is necessary to withstand the weight of tools, workers and heavy blows to them. The table top has the necessary grooves, holes, holes or clamps. Each master places them at his own discretion.
For a home workshop, it is most convenient to make a stationary wooden carpenter's workbench with a base made of metal or wood. - Vices, clamps. The workbench should have at least two clamps on both sides. The clamps are made of wood, since it will not deform the material of the products. The maximum number of clamps is not limited. If you plan to work with parts of different sizes - for example, small items and large boards, then there should definitely be several clamps. At the same time, they should be located on opposite sides of the tabletop so as not to interfere with each other.
All types of work tables known to us originated from the carpenter's workbench. - Shelves for tools and additional stops. They are located under the tabletop. It is important to place shelves for tools so that they can be easily reached with one hand without leaving the table. That is why it is convenient to place them below, and not in the closet nearby.
Scheme and drawing
After choosing materials for making furniture, it is worth making a drawing of it. Without a well-designed project, it is impossible to make and assemble a table the first time without making mistakes. To make a table drawing without errors, you need to be a specialist in this field. If you do not have such experience, contact professionals or use special computer programs.
When drawing up a drawing, all the nuances are taken into account: the materials used to manufacture the product, its dimensions, and the features of the product.
Help : with the help of a sketch, it will not only be convenient for you to detail the product, but it will also be much easier to assemble the table.
Simple drawing with dimensions
If ease of manufacture is critical to you, we recommend using the following drawing:
Drawing with boxes
If you value convenience and functionality, take a closer look at this option:
The box itself:
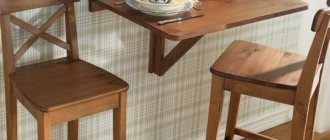
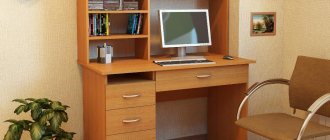
Table with high top in corner
Very often the corner space is the only place where you can put a computer accessory. Knowing the dimensions, it is possible to make it yourself. Use galvanized or water pipes as supports. This table is made high so that it is possible to work, so to speak, “on the go.”
Tools
Tools you will need :
- jigsaw;
- drill;
- hacksaw;
- chisel;
- screwdriver;
- hammer;
- drill.
If you are planning to make a complex model of a table, also prepare:
- milling machine;
- sander;
- clamps.
As for materials , you need to stock up on:
- lumber;
- bolts, nuts, washers;
- self-tapping screws;
- furniture glue;
- dowels;
- paint and brushes;
- liquid nails;
- varnish;
- tape measure;
- pencil;
- building level.
How to make and assemble a table for a schoolchild?
Let's start making and assembling a desk for a schoolchild.
Making furniture begins with cutting the necessary parts . This can be done in special companies, or using a jigsaw. If you contact a specialized company, they will make a competent detailing of the product, according to the created drawing. All you have to do is simply assemble the parts in the right order.
After making all the parts, you can start assembling the children's table.
Attention : when assembling furniture, refer to the drawing.
For a rectangular table, the assembly diagram will be as follows:
We prepare the details : table top, sides, back wall. If the parts are already trimmed, you can begin assembly. If not, carefully trim all the PVC parts with an edge and a hair dryer.- Armed with a drill, we make holes on all parts for fastening . Here again you should carefully check the sketch.
- We start assembly from the side parts. Here it is worth aligning the parts using a building level.
- We connect the parts with furniture screws.
- We put the tabletop on top and tighten it with confirmats.
- We seal the screw caps with special furniture stickers or plastic plugs.
We looked at the manufacture and assembly of a simple table for a schoolchild. If you want to make a more complex model, then the manufacturing process will require the following:
We take the drawing and prepare the materials (in this case, furniture board);- We cut out 8 blanks for product supports.
- Each leg will consist of 2 parts. Therefore, we glue the parts together and secure them with a clamp.
- We cut out recesses inside the frame of the product.
- We make a long groove along the inside of the cross member.
- We make a protrusion on top of the supports using a chisel and a hacksaw.
- We drill holes in the sidewalls with a diameter of 8 mm.
- For assembly accuracy, insert pencils into the holes made and apply them to the legs.
Using wood glue and dowels, we connect the base and support .- Using a router, we make grooves for attaching the upper part of the product.
- We cut out the side walls with a jigsaw according to the drawn sketch.
- Carefully sand all cuts.
- We make grooves in them.
- We cut out the parts for the drawers , glue them together and reinforce them with furniture nails.
- We attach the facing board to the front part of the product using self-tapping screws.
- Carefully coat all attachment points with glue and leave the item until completely dry.
- We fasten the tabletop to the base with legs using dowels.
- We select fittings for the drawers.
- We carry out decorative work if the product was made of plywood, wood or MDF.
Decoupage
After making and assembling a table with your own hands for a schoolchild, it needs to be decorated . You can do this using:
- coatings with paints and varnishes;
- installing countertops in contrasting shades;
- pasting self-adhesive film;
- decoupage with napkins or wallpaper.
Important : using the decoupage technique you can decorate not only a new piece of furniture, but also an old desk. For decoupage you can use: napkins, wallpaper, drawings, ornaments and pictures.
To give your table an attractive look using decoupage you will need:
- sanding machine or coarse sandpaper;
- brushes for varnish and paint;
- PVA glue;
- acrylic lacquer;
- materials for pasting.
The workflow itself consists of the following sequence:
- Degrease the surface to be treated.
- Cover the table with primer .
- If we are decorating an old table, we cover all its surfaces with the selected tone of paint in two layers. We are waiting for it to dry completely.
- Using glue, we attach the selected pictures and ornaments.
- We cover the product with acrylic varnish . This will keep the table looking attractive for a long time.
Tip : The decoupage technique can also be useful when decorating a laptop table, sand painting, or even a coffee table.
Operating rules
In order for the carpenter's table to last a long time and to work at it safely, it is important to follow the basic operating rules:
- All table parts must be firmly secured. If they start to wobble, they need to be tightened or secured. Any unsteady position can result in serious injury. It will not be very pleasant if the saw or jigsaw comes off the part at the most inopportune moment.
- All items for work should also be held well on the table. This will make the work more accurate.
- The device must be protected from moisture. Wooden boards will warp and crack with sudden changes in humidity. If there is high humidity, mold may grow here.
- When working with heavy objects, you need to evenly distribute the load on the tabletop.
Making a carpentry workbench yourself is not a quick task, but it is exciting, because you need to take into account not only your needs, but also the ergonomics of the entire workspace.
Proper assembly of this device and its correct operation will bring joy from carpentry work, which will give inspiration for creativity.
Photo
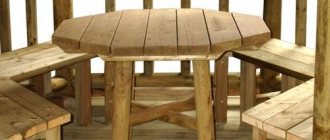
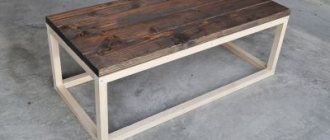
Regardless of the chosen drawing and material, you can get excellent results: