Gas infrared
In this method we will tell you how to assemble such an installation yourself, because... building an infrared burner is very difficult.
Materials and tools
For production you will need:
- Infrared ceramic burner.
- Gas cylinder.
- Oxygen hose 2 m with a diameter of 0.4-0.6 cm.
- Clamp 2pcs
- Screwdriver
- Nozzle for liquefied gas or natural gas (depending on the fuel used).
- Retaining ring
When choosing a ceramic heating pad, it is better to give preference to small models - gas is consumed more economically. The peculiarity of infrared heating is that it heats objects, not air, so if possible, it is good to have a stand under the heating pad, which will allow you to direct the energy.
Manufacturing instructions
The diagram clearly describes the principle of operation of the stove. The gas-air mixture allows you to achieve high temperatures with the least risk of fire.
Principle of operation
Essential elements
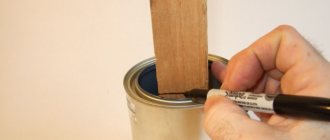
- Place the nozzle into the connection hole of the infrared burner.
- Attach the retaining ring on the reverse side.
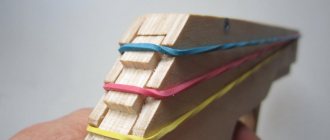
- Place a clamp on the oxygen hose to prevent gas leakage.
- Connect to the nozzle, tighten the clamp with a screwdriver.
- Connect the gas cylinder to the hose, also using a clamp.
- To light the heater, you need to hold a match to the ceramic heating pad. It is forbidden to ignite gas near the nozzle. Fuel can be propane, argon and natural gas. When replacing fuel, you need to change the type of injector. The gas camp stove is ready.
Type of infrared gas stove for a tent
Operating rules
A camp stove for a tent should not only heat the space, but also serve as an assistant in cooking.
Infrared heaters are not intended for this, but craftsmen have learned to cook on the following tiles:
- You need to place the heating pad with the radiating side up, and place two stones or bricks on the sides.
- Place metal rods or skewers on the bricks.
- Place dishes on top for cooking and heating canned goods.
A 200g can will last for 2 hours, after which you need to replace it with a new one. The gas cylinder must stand upright. It is prohibited to leave the stove unattended. Ventilate the tent from time to time. The surface temperature of the ceramic heater is 800-900 degrees.
Do-it-yourself stoves for an winter fishing tent
A fisherman or hunter knows many ways to keep warm. And if he doesn’t have or doesn’t have a stove with him, he doesn’t lose heart. He will make it himself. For example, ordinary candles can act as a heater. Paraffin or wax will do. Candles produce a lot of heat, which spreads well. But in order to cope with a large area, you will need a lot of candles. This option is suitable for temperatures down to -20 degrees.
And even cook food. What kind of fuel should I take? For example, dry alcohol tablets. The problem is that there must be enough tablets
Important! Take care of ventilation. In this case, you cannot constantly use such a heat source
Another popular option is a factory-made stove. To do this, drawings are taken as a basis, and the structure is made in a workshop or independently. The elements are checked and welding is used. Such a stove is not inferior to a store-bought one, but will be cheaper.
From a can of alcohol
The debate about how best to use alcohol, for indoor or outdoor heating, will never end. This does not prevent tourists all over the world from using it as fuel for mini stoves for tents. The weight and dimensions of this design are insignificant; it is convenient to take on a hiking trip.
Materials and tools
To make a homemade camping stove you will need:
- Any tin can.
- Nail or awl for making holes.
- Alcohol 96%. Vodka won't do.
- Metal cover
- Knife and scissors for even cutting of a tin can.
- Ruler.
Manufacturing instructions
To make an alcohol stove, no complex diagrams are needed; the principle is simple and accessible, as are the materials.
From a beer can:
- You need to take two beer cans (or Coca-Cola cans).
- The bottom of the jars is cut off by approximately 5 cm.
- Insert the bottom into the bottom, slightly twisting the edges of the jar. Make a hole in the middle in the part of the bottom that became the stove lid.
- In both beer and coffee cans, holes are made for the fire to escape by using a nail or awl to pierce holes around the perimeter, about a millimeter in diameter. The number and diameter of holes is selected experimentally and depends more on the size of the can itself. For the stove, holes are made from beer cans in the lid, and in a coffee stove at a level slightly above the middle.
4 simple steps - Pour alcohol into the hole on the lid and close it with a coin. The DIY camp stove is ready.
Work process
Operating rules
Such a burner must be ignited in a special way:
- The place for the stove is chosen at a short distance from the walls of the tent. This may be a stone or other immovable, non-flammable base. If a can of alcohol turns over, you will have to wait until it burns out.
- Place the stove on a metal lid; a regular seamer will do.
- Pour alcohol onto the lid under the base of the burner and set it on fire. Burning alcohol outside the stove should heat its contents.
Visual application
Such camp stoves for tents are used in the off-season; the design will not give a large increase in temperature, but it will allow you to heat canned food and boil water. The stove will boil one liter of water in 9 minutes at home; when camping it will take longer, depending on the ambient temperature.
Manufacturing: first option
You need to process the upper edges of the jar, then cut out a 30 cm circle with three tin petals and bend them at a right angle.
You need to drill 3 holes with a diameter of 4 mm in the jar. in proportion to the arrangement of the petals. We place the circle on the bottom of the jar so that the petals fit into the drilled holes, then they are bent and dry fuel is placed. You need to retreat 20 mm from the top edge. and drill 3 holes with a diameter of 5 mm. at an angle of 120 degrees relative to each other. We put washers into the drilled holes and insert M4 bolts 4 cm long, fasten them with nuts. drill 3 holes at an angle of 120 degrees; use thermal insulation material; in this case, it will be unstable; slightly bend a pair of holes with a diameter of 5 mm
The DIY mini-stove considered is one of the options for a stove that you can make yourself. Little tips for use: for quick ignition, add a couple of drops of kerosene; if you need to not only heat food, but also cook, then make cuts on the upper edge of the stove with a dotted line, this will increase functionality.
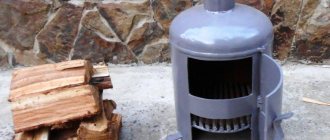
From a pipe on wood
If the trip is planned for the winter, you cannot do without a serious heating device. Any stove should not be left unattended, especially a wood stove. Purchased models of the best tent stoves are equipped with a spark arrester and an additional chamber for complete combustion of gases. It is difficult to make additional cameras in homemade structures.
If you remove the chimney not vertically, but at an angle of 30 degrees, you can increase the efficiency by 30%. A simple mesh in the chimney is used as a spark arrestor. Thanks to the installation, you won’t have to wait long for heat; the stove heats up the space instantly.
Materials and tools
When making a stove for winter fishing with your own hands you will need:
- Chimney pipe 200mm.
- Clamp for plugs 200mm – 2 pcs.
- The chimney pipe is 80mm, the length depends on the height of the tent.
- Plugs 200mm – 2 pcs.
- 80mm clamp.
- Legs from a travel chair.
- Sheet of tin.
Manufacturing instructions
The diagram is quite general, but shows the principle of operation. The shape of the oven depends on the available materials and capabilities. If you don’t want to weld parts, you can use a simpler method described below in the instructions. Tourist stoves for tents should be collapsible and light in weight.
- Cut a suitable pipe length of 200mm, based on the size of the tent and the desired fuel load.
- Bend the edges of the plug slightly to allow free entry into the pipe.
- Use a grinder to cut a hole for the chimney pipe with a diameter of 80mm. Place the hole at a distance of 10-12 cm from the rear plug.
- Try on the chimney pipe, adjust the hole if necessary.
- Cut 20-30 cm from the chimney pipe, cut the edges for riveting by 5-7 cm. This will serve as a diversion.
- Insert the tube into the hole and rivet it, pressing the cuts on the outside together.
- Place a clamp on the outlet; this will hold the metal in place as it expands.
- In the second unattached plug, cut a hole for a neck with a diameter of 70 mm. From a sheet of tin, cut a piece 70 mm wide for the neck hole, and insert a twisted piece of tin into it. Drill holes.
- To regulate the blowing force, you should make a cover from an 80mm pipe. Cut a piece of pipe equal to the length of the piece of tin at the neck. Cut a circle with a diameter of 110 mm from the sheet and rivet it. Put it on the lid.
Using the lid - Place a chimney pipe of suitable length on the outlet, install the stove on the legs of a camping chair, and lead the chimney into the opening of the tent.
- Everything is ready, but due to the round shape of the oven, there is no possibility of cooking.
Operating rules
The operating rules are simple:
- The stove must not be left unattended; non-flammable materials must be placed under the structure, and the chimney pipe must be insulated from the tent. This stove will easily heat a 4*4m tent.
- After use, allow the metal to cool, pour out the ash, and disassemble the stove into parts for transportation.
- Ventilate the tent, check the draft and tightness in safe conditions before leaving.
- All openings must be precisely adjusted to prevent smoke leakage.
A stove for a winter tent is made with your own hands in a day, and lasts for several years.
Requirements
A stove, including a homemade one, should be light, economical, work even on wood and coal, without forcing tourists to buy alcohol, diesel fuel or other petroleum products, or to look for plastic waste to burn, which produces very acrid and smoky smoke.
Design
The main thing is that the structure must be made of metal. The best choice as the main material is fireproof stainless steel, which does not pollute the air in the tent with combustion products, which would lead to suffocation during sleep. The best option is a stove with a chimney. The firebox must stand on legs and be placed on a heat-insulating stand.
Spark extinction and efficiency
Optionally, a potbelly stove or wood chipper can have a chimney-coil, in which the resulting sparks that rise upward have time to die out. If a hot spark falls on the roof of the tent, a hole may be burned, which will put overnight stays and halts in question in the event of sudden prolonged or heavy rain.
If there is no spark arrestor in the structure, then you need to install the pipe so that it does not come out through the roof of the tent (vertically), but through any of its walls (horizontally). In addition, the horizontal pipe significantly improves the heating of the air inside the shelter. This approach is especially relevant on frosty days, when every degree of precious heating counts.
Tent
The ceiling, floor and walls of the tent should not support combustion. It is advisable to purchase a shelter that is resistant to temperature fluctuations during the day up to tens of degrees. For a chimney in the ceiling or one of the walls of the tent, the outlet must be insulated with a heat-resistant insert, which will prevent the tent itself from being deformed.
The tent should be quite roomy so that the owner can comfortably spend the night with a warming stove, when he can no longer warm himself with his own heat, and at the same time there is no possibility of accidentally touching and knocking over a working heating device with his foot while sleeping. If in doubt, it is better to use alternative methods so as not to freeze your hands and feet. For example, you can place a heat accumulator in a sleeping bag.
We invite you to read: Interesting ideas for decorating a garden with your own hands
Which stove is best to use in summer?
In summer, the oven is needed more for heating and preparing food, tea, coffee. There is no point in pulling gas cylinders or wood stoves - heating the tent is not needed.
The best solution would be a mini-alcohol stove for a tent. Light weight and compact dimensions allow each member of the camping trip to take their own homemade stove.
The only drawback in comparison with ready-made branded designs is the inability to transport the stove with filled fuel. But this is not a significant drawback - putting a bottle of alcohol in your backpack is not difficult. Long-burning stoves are used for winter tents.
How the design works
The main requirements for a camping stove are lightness and compactness. It can be easily assembled and disassembled in order to put it in a backpack. The simplest camping stove consists of a minimum of elements and does not require a chimney or a housing with heat-saving properties. Among the main components of this device are the combustion chamber and the blower.
This design allows the fuel, be it wood chips or wood, to completely decompose, while the heat is directed straight upward.
You can do without blowing by constructing just one combustion chamber, for example, from two mugs. This oven can be used to heat food. But in order to speed up the heating time several times and increase the efficiency of the device, you can use a small battery-powered fan as a blower. The result is complete combustion of the fuel with a high flame and no smoke.
Which stove is best to use in winter?
All three types of stoves are suitable for a winter tent. Winter fishing involves staying at low temperatures for a long time; the holes should not freeze, otherwise fishing will not take place. The difference in temperature in the tent and outside without heating devices will not exceed 2-3 degrees, which is not noticeable at -20C.
- Most often, a long-burning gas infrared heater and a wood-burning stove are used. They provide good heating and increase the temperature in the tent by at least 15-20 degrees. The gas model is suitable as a camp stove for cooking, it heats up the space perfectly, it is compact and lightweight.
- A more economical option would be a wood stove. The steel structure is easy to transport. The folding stove can be quickly assembled and disassembled. If fishing is planned near plantings or forests, there will be no problems with collecting firewood, otherwise you will have to bring fuel with you. There is also a risk of carbon monoxide poisoning if the chimney pipe is not sealed. Even if a homemade stove for a tent is made according to technology, it is necessary to ventilate. Wood stoves for winter fishing tents are used for large tents, and gas stoves for small ones.
Design features of a camp stove and its advantages
A self-made camping stove is a wonderful and useful device for relaxing outside the city and in the forest. It is indispensable for fishing and camping with a tent.
If the design provides for the presence of grates, such a furnace is characterized by good draft. Consequently, the fuel will burn very quickly. Therefore, it is best to use firewood for a camp stove.
In devices without a bottom, the fuel is placed directly on the ground. Firewood or other fuel burns more slowly, and coals do not smolder for a long time. The process is resumed with a new batch of fuel loaded. This type of tourist stove provides less heat due to the lack of draft.
The camp stove, equipped with stands, is characterized by maximum traction, which speeds up the process of frying food. If you need to cook food by boiling, the stands are removed and the oven is placed on the ground. In this case, the grates overlap, oxygen enters in less quantity and the combustion process slows down. In this case, the cooking time increases.
Regardless of the design, camping stoves have many advantages:
- Wood stoves are quite economical.
- The fuel burns in any weather.
- The devices can even be used inside tents.
- The manufacture and operation of the stove is quite simple.
- Possibility of manufacturing a mini version of the stove.
- Easy transportation.
- Adjustable fire power.
- Complete security.
- High performance.
Types of combustion
The simplest wood chipper is actually a flame-burning basket roaster. Make one from purchased semi-finished products for 150-200 rubles. You can do it at home in half an hour (see below), but a wood chipper on a flame will turn out to be very voracious. In nature, you will need to prepare a platform for it, like for a fire: embers from the side holes can be shot quite far. In terms of heating technology, a flaming wood chipper has one advantage over a fire: the fuel load does not spread, so you can use difficult-to-burn materials such as pine cones, mountain and desert shrubs.
A good wood chip stove uses pyrolysis and afterburning of waste gases (wood gas) to one degree or another; There are also purely pyrolysis, especially economical wood chippers, see below about turbo stoves. Cost-effectiveness combined with even greater omnivorousness brings wood chippers with pyrolysis to the forefront when there is a shortage of fuel. In emergency situations, a wood chipper with sluggish, but very long and extremely economical surface combustion can literally be a lifesaver, see at the end.
Homemade alcohol burners
In order not to spend a lot of money buying equipment that will be needed one-time, you can make your own alcohol burner. There are projects on the Internet on how to make a tent stove with your own hands. Usually they heat food, but the heating turns out to be too weak.
To make a homemade burner you will need:
- 2 drink cans (tins);
- alcohol;
- coin;
- glue.
Stages of device manufacturing:
- Before starting work, the jars should be washed.
- We determine the height of the future burner and make notches on both cans (horizontal closing line. Cut it off.
- We clean the surface with sandpaper so that the device does not ignite from the paint during operation.
- We insert them first into the second. We fasten with glue along the seams.
Bonded cans
You need to pierce holes along the entire diameter of the jar and in the center.
Punched holes in tiles
- Pour alcohol into it;
- We place a coin in the center so that flames do not come from there, but come out evenly through the side holes;
- It is necessary to light the burner, preferably from the side.
Stoves are also made from other materials, for example, buckets, but this design will work on wood or briquettes
Heating using homemade burners and stoves must be carried out with extreme caution, as they may not be accurately calculated