The rise in energy prices stimulates the search for more efficient and cheaper types of fuel, including at the household level. Most of all, craftsmen and enthusiasts are attracted by hydrogen, whose calorific value is three times higher than that of methane (38.8 kW versus 13.8 per 1 kg of substance). The method of extraction at home seems to be known - splitting water by electrolysis. In reality the problem is much more complex. Our article has 2 goals:
- analyze the question of how to make a hydrogen generator at minimal cost;
- Consider the possibility of using a hydrogen generator for heating a private home, refueling a car, and as a welding machine.
Brief theoretical part
Hydrogen, also known as hydrogen, the first element of the periodic table, is the lightest gaseous substance with high chemical activity. During oxidation (that is, combustion), it releases a huge amount of heat, forming ordinary water. Let us characterize the properties of the element, formatting them in the form of theses:
- The combustion of hydrogen is an environmentally friendly process; no harmful substances are released.
- Due to chemical activity, the gas does not occur in free form on Earth. But its reserves in water are inexhaustible.
- The element is extracted in industrial production by a chemical method, for example, in the process of gasification (pyrolysis) of coal. Often a by-product.
- Another way to produce hydrogen gas is by electrolysis of water in the presence of catalysts - platinum and other expensive alloys.
- A simple mixture of hydrogen + oxygen gases explodes from the slightest spark, instantly releasing a large amount of energy.
For reference. Scientists who first separated the water molecule into hydrogen and oxygen called the mixture an explosive gas due to its tendency to explode. Subsequently, it received the name Brown's gas (after the name of the inventor) and began to be designated by the hypothetical formula NHO.
Previously, airship cylinders were filled with hydrogen, which often exploded.
From the above, the following conclusion suggests itself: 2 hydrogen atoms easily combine with 1 oxygen atom, but part very reluctantly. The chemical oxidation reaction proceeds with the direct release of thermal energy in accordance with the formula:
2H2 + O2 → 2H2O + Q (energy)
Here lies an important point that will be useful to us in further debriefing: hydrogen reacts spontaneously from combustion, and heat is released directly. To split a water molecule, energy will have to be expended:
2H2O → 2H2 + O2 – Q
This is the formula for an electrolytic reaction that characterizes the process of splitting water by supplying electricity. How to implement this in practice and make a hydrogen generator with your own hands, we will consider further.
Advantages and disadvantages
Hydrogen technology, in comparison with other types of thermal joining of metals, wins in many respects:
- efficiency;
- security;
- environmental friendliness
Compact devices are convenient for joining many materials:
- carbon, low-alloy and steels;
- glass;
- cast iron;
- some non-ferrous alloys;
- glass;
- ceramics;
- composite materials.
The welding process does not involve frequent charging of equipment, which saves a lot of time. It takes no more than 5 minutes to generate gas. Despite their small dimensions, the devices have high operating power. Unlike acetylene welding, hydrogen welding does not pollute the atmosphere with combustion products or nitrogen vapor. The equipment is fireproof; the design has minimal risks of fire and explosions. During operation, the seams do not oxidize.
A few words about the disadvantages of hydrogen devices:
- the scope of application is limited by the size of the nozzle; only thin-walled parts are welded with a small torch;
- when working with some non-ferrous metals, porosity cannot be avoided, the strength of the connection decreases;
- the flame is difficult to regulate by eye; the torch is invisible to the naked eye.
Creation of a prototype
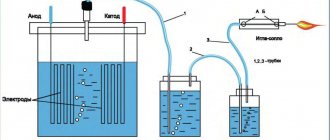
So that you understand what you are dealing with, first we suggest assembling a simple generator for producing hydrogen at minimal cost. The design of a homemade installation is shown in the diagram.
What does a primitive electrolyzer consist of:
- reactor - a glass or plastic container with thick walls;
- metal electrodes immersed in a reactor with water and connected to a power source;
- the second tank plays the role of a water seal;
- tubes for removing HHO gas.
Important point. The electrolytic hydrogen plant operates on direct current only. Therefore, use an AC adapter, car charger or battery as a power source. An AC generator will not work.
The operating principle of the electrolyzer is as follows:
- Voltage is applied to two electrodes immersed in water, preferably from a regulated source. To improve the reaction, a little alkali or acid is added to the container (ordinary salt at home).
- As a result of the electrolysis reaction, hydrogen will be released from the cathode connected to the negative terminal, and oxygen will be released near the anode.
- Mixing, both gases enter the water seal through the tube, which performs 2 functions: separating water vapor and preventing a flash in the reactor.
- From the second container, the detonating gas NHO is supplied to the burner, where it is burned to form water.
To make the generator design shown in the diagram with your own hands, you will need 2 glass bottles with wide necks and caps, a medical dropper and 2 dozen self-tapping screws. The full set of materials is shown in the photo.
Special tools will require a glue gun to seal plastic lids. The manufacturing procedure is simple:
- Twist flat wooden sticks with self-tapping screws, placing their ends in different directions. Solder the screw heads together and connect the wires - you will get future electrodes.
- Make a hole in the lid, insert the cut dropper body and wires into it, then seal it on both sides with a glue gun.
- Place the electrodes in the bottle and screw on the cap.
- Drill 2 holes in the second lid, insert dropper tubes and screw onto a bottle filled with plain water.
To start the hydrogen generator, pour salted water into the reactor and turn on the power source. The beginning of the reaction will be marked by the appearance of gas bubbles in both containers. Adjust the voltage to the optimum value and ignite the Brown gas coming out of the dropper needle.
Second important point. It is impossible to apply too high a voltage - the electrolyte, heated to 65 ° C or more, will begin to evaporate rapidly. Due to the large amount of water vapor, it will not be possible to light the burner. For details on assembling and launching an improvised hydrogen generator, watch the video:
Recommendations
The principle of operation of the device is what you should understand before making the device. You can consider it using the example of a burner for roofing work. How does the burner work?
- The device is connected to the reducers of oxygen and propane cylinders by a system of supply hoses.
- Reducers are placed on the cylinders to create working welding pressure.
- A diagram for gas and oxygen is assembled, the tightness of the connections is checked, the nodes are secured, after which the gas can be opened with valves.
- The gas pressure is set to the operating value and the valve opens.
- The fuel is supplied through hoses to the propane appliance.
- The injector carries out the mixing process to form a gas-air environment.
- A working flame with a temperature reading above 2000 degrees comes out of the device.
When performing any welding work, you must wear personal protective equipment: gloves and goggles, special shoes. You can work with propane cylinders only in a well-ventilated area, and at sub-zero temperatures, any actions with the burner are excluded.
What you should absolutely not do:
- work near open fire;
- keep the cylinder tilted;
- place vessels under the sun;
- carry out work without a gearbox;
- Warm up the gearbox over an open fire.
If you can clearly smell the gas, work with the burner should be stopped by closing the valve on the cylinder. Homemade burners, depending on the purpose of use, can be different: burners with a VK-74 valve, devices converted from an acetylene gas cutter and mini gas burners. It is realistic, profitable, and useful to build every homemade device. Only initially you need to decide on the type of structure and its parameters. The gas burner is also used in private households and for commercial purposes. In plumbing, a metal workpiece is heated with a torch, which ultimately comes out quite hardened.
About the Meyer hydrogen cell
If you have made and tested the design described above, then you probably noticed from the burning of the flame at the end of the needle that the performance of the installation is extremely low. To get more detonating gas, you need to make a more serious device, called the Stanley Meyer cell in honor of the inventor.
The principle of operation of the cell is also based on electrolysis, only the anode and cathode are made in the form of tubes inserted into one another. Voltage is supplied from the pulse generator through two resonant coils, which reduces current consumption and increases the productivity of the hydrogen generator. The electronic circuit of the device is shown in the figure:
Note. The operation of the circuit is described in detail on the resource https://www.meanders.ru/meiers8.shtml.
To make a Meyer cell you will need:
- a cylindrical body made of plastic or plexiglass; craftsmen often use a water filter with a lid and pipes;
- stainless steel tubes with a diameter of 15 and 20 mm, a length of 97 mm;
- wires, insulators.
Stainless steel tubes are attached to a dielectric base, and wires connected to the generator are soldered to them. The cell consists of 9 or 11 tubes placed in a plastic or plexiglass case, as shown in the photo.
A ready-made plastic housing from a conventional water filter can be adapted for the Meyer cell
The elements are connected according to a scheme well known on the Internet, which includes an electronic unit, a Meyer cell and a water seal (technical name - bubbler). For safety reasons, the system is equipped with critical pressure and water level sensors. According to reviews from home craftsmen, such a hydrogen installation consumes a current of about 1 ampere at a voltage of 12 V and has sufficient performance, although exact figures are not available.
Schematic diagram of switching on the electrolyzer
Safety precautions when welding with hydrogen
Industrial devices for hydrogen and atomic-hydrogen welding are equipped with an automatic shutdown system. When the pressure of the gas mixture increases, the current supply stops automatically, without the participation of the welder. As with other hot work, safety precautions must be observed when welding with an electrolyzer.
- The gas burner is located away from flammable and flammable substances. During operation, the nozzle is held in the opposite direction from the power source. Use barrier screens.
- The enclosed space must be ventilated periodically.
- Flame negatively affects the retina and eyeball. When hydrogen welding, it is recommended to use dark glasses.
- During transportation, a protective cap is put on gas cylinders, metal tanks are installed in lattice stands so that the cylinders do not come into contact with each other and do not fall during transport.
- Oxygen is not stored in the welding area; during moments of rest, the welding equipment is turned off.
It is safe to work if you follow the operating rules. High-quality compounds are obtained without harm to yourself and the environment.
Plate reactor
A high-performance hydrogen generator capable of ensuring the operation of a gas burner is made of stainless steel plates measuring 15 x 10 cm, quantity - from 30 to 70 pieces. Holes are drilled in them for the tightening pins, and a terminal for connecting the wire is cut out in the corner.
In addition to sheet stainless steel grade 316, you will need to buy:
- rubber 4 mm thick, resistant to alkali;
- end plates made of plexiglass or PCB;
- tie rods M10—14;
- check valve for gas welding machine;
- water filter for water seal;
- connecting pipes made of corrugated stainless steel;
- potassium hydroxide in powder form.
The plates must be assembled into a single block, isolated from each other with rubber gaskets with a cut out middle, as shown in the drawing. Tie the resulting reactor tightly with pins and connect it to the pipes with the electrolyte. The latter comes from a separate container equipped with a lid and shut-off valves.
Note. We tell you how to make a flow-through (dry) type electrolyzer. It is easier to manufacture a reactor with submersible plates - there is no need to install rubber gaskets, and the assembled unit is lowered into a sealed container with electrolyte.
Scheme of a wet-type hydrogen installation.
The subsequent assembly of the generator producing hydrogen is carried out according to the same scheme, but with differences:
- A reservoir for preparing electrolyte is attached to the body of the device. The latter is a 7-15% solution of potassium hydroxide in water.
- Instead of water, a so-called deoxidizing agent is poured into the “bubbler” - acetone or an inorganic solvent.
- A check valve must be installed in front of the burner, otherwise when the hydrogen burner is turned off smoothly, the backlash will rupture the hoses and the bubbler.
To power the reactor, the easiest way is to use a welding inverter; there is no need to assemble electronic circuits. How a homemade Brown gas generator works is explained by a home craftsman in his video:
We make repairs
When you have carried out an inspection, found out the cause and diagnosed the problems, you can begin to repair the gas stove yourself. It is carried out similarly for all models. The famous Italian brand Ariston or the Belarusian stove Hephaestus, which is in great demand among Russians, there is no difference, the ignition systems are almost identical except for purely individual nuances.
- We ignite the faulty burner using a third-party source of open flame, matches or a special lighter - the flame should be even and distributed over the entire circumference of the divider. A yellow flame means the concentration of gas and air is incorrect: the nozzle needs to be cleaned or replaced. It is possible that the holes in the divider are clogged or moisture has entered there. It is necessary to do preventive maintenance, blow out all the holes, remove the burner body and inspect it.
- All electrodes and switches are connected in parallel. Each electrode is powered from a single ignition unit, but they are turned on from different buttons. To make sure that only this button does not work, and the control unit is normal, you need to turn on the next burner. If the gas ignites, repair the button, and everything else in the system works properly.
- If the ignition device is constantly cracking, then it is necessary to check the contacts - they could be stuck due to grease or carbon deposits may have formed as a result of oxidation. Before repairing, do not forget to disconnect the stove from the mains, then carefully dismantle it, clean the contacts or dry them with a hair dryer. Following safety instructions will protect you from injury.
Most of the breakdowns that led to the failure can be fixed independently - they are not dangerous for the user, but it must be remembered that gas stoves are potentially dangerous products, so even preventative work must be carried out carefully. Sometimes a breakdown of the ignition button leads to the fact that repair will not help - a complete replacement is necessary
In this case, it is better to go to special stores and purchase a similar option.
Sometimes a breakdown of the ignition button leads to the fact that repair will not help - a complete replacement is necessary. In this case, it is better to go to special stores and purchase a similar option.
Is it profitable to produce hydrogen at home?
The answer to this question depends on the scope of application of the oxygen-hydrogen mixture. All drawings and diagrams published by various Internet resources are designed for the release of HHO gas for the following purposes:
- use hydrogen as fuel for cars;
- smokeless combustion of hydrogen in heating boilers and furnaces;
- used for gas welding work.
The main problem that negates all the advantages of hydrogen fuel: the cost of electricity to release the pure substance exceeds the amount of energy obtained from its combustion. Whatever adherents of utopian theories may claim, the maximum efficiency of the electrolyzer reaches 50%. This means that for 1 kW of heat received, 2 kW of electricity is consumed. The benefit is zero, even negative.
Let's remember what we wrote in the first section. Hydrogen is a very active element and reacts with oxygen on its own, releasing a lot of heat. When trying to split a stable water molecule, we cannot apply energy directly to the atoms. The splitting is carried out using electricity, half of which is dissipated to heat the electrodes, water, transformer windings, and so on.
Important background information. The specific heat of combustion of hydrogen is three times higher than that of methane, but by mass. If we compare them by volume, then when burning 1 m³ of hydrogen, only 3.6 kW of thermal energy will be released versus 11 kW for methane. After all, hydrogen is the lightest chemical element.
Now let's consider detonating gas obtained by electrolysis in a homemade hydrogen generator as fuel for the above needs:
- The final installation price, low productivity and efficiency make it extremely unprofitable to burn hydrogen for heating a private home. Rather than “winding” the meter with an electrolyzer, it is easier to install any of the electric boilers - heating element, induction or electrode.
- To replace 1 liter of gasoline for a car, you will need 4766 liters of pure hydrogen or 7150 liters of detonating gas, a third of which is oxygen. The most lying inventor on the Internet has not yet made an electrolyzer capable of providing such productivity.
- A gas welding machine that burns hydrogen is more compact and lighter than cylinders with acetylene, propane and oxygen. Plus, the flame temperature of up to 3000 °C allows you to work with any metals; the cost of obtaining fuel does not play a special role here.
For reference. To burn hydrogen in a heating boiler, you will have to thoroughly redesign the design, since a hydrogen burner can melt any steel.
Selected points of use
First of all, I would like to note that the traditional method of burning natural gas or propane is not suitable in our case, since the combustion temperature of HHO is more than three times higher than that of hydrocarbons. As you yourself understand, structural steel will not withstand this temperature for long. Stanley Meyer himself recommended using a burner of an unusual design, the diagram of which is given below.
Scheme of a hydrogen burner designed by S. Meyer
The whole trick of this device is that HHO (indicated by the number 72 in the diagram) passes into the combustion chamber through valve 35. The burning hydrogen mixture rises through channel 63 and simultaneously carries out the ejection process, entraining outside air through adjustable openings 13 and 70. Under the hood 40, a certain amount of combustion products (water vapor) is retained, which enters the combustion column through channel 45 and mixes with the burning gas. This allows you to reduce the combustion temperature several times.
The second point that I would like to draw your attention to is the liquid that should be poured into the installation. It is best to use prepared water that does not contain heavy metal salts
The ideal option is distillate, which can be purchased at any auto store or pharmacy. For successful operation of the electrolyzer, potassium hydroxide KOH is added to the water, at the rate of approximately one tablespoon of powder per bucket of water.
And the third thing we place special emphasis on is safety. Remember that it was not by chance that the mixture of hydrogen and oxygen was called explosive. HHO is a hazardous chemical that can cause an explosion if not handled properly. Follow safety rules and be especially careful when experimenting with hydrogen. Only in this case, the “brick” that our Universe consists of will bring warmth and comfort to your home.
We hope you found this article a source of inspiration and will roll up your sleeves and start making a hydrogen fuel cell. Of course, all our calculations are not the ultimate truth, however, they can be used to create a working model of a hydrogen generator. If you want to completely switch to this type of heating, then the issue will have to be studied in more detail. Perhaps your installation will become the cornerstone, thanks to which the redistribution of energy markets will end, and cheap and environmentally friendly heat will enter every home.
Water burner - miniature autogen
The principle of producing hydrogen by electrolysis of an aqueous alkali solution is used. Thanks to the small external dimensions of the electrolyser, there is a place for it on a small workbench, and the use of a standard rectifier for recharging batteries as a power supply unit facilitates the manufacture of the installation and makes working with it safe.
The relatively small, but quite sufficient performance of the device for the needs of the modeller, made it possible to extremely simplify the design of the water seal and guarantee fire and explosion safety.
Electrolyzer device
Between two boards connected by four pins, there is a battery of steel electrode plates separated by rubber rings. The internal cavity of the battery is half filled with an aqueous solution of KOH or NaOH.
A constant voltage applied to the plates causes electrolysis of water and the release of hydrogen and oxygen gases.
This mixture is discharged through a polyvinyl chloride tube placed on a fitting into an intermediate container, and from it into a water seal. The gas that has passed through a mixture of water and acetone placed there in a ratio of 1:1 has the composition necessary for combustion and, diverted by another tube into the nozzle - a needle from a medical syringe, burns at its outlet with a temperature of about 1800 ° C.
Electrolyzer composition:
1 — insulating polyvinyl chloride tube 10 mm, 2 — M8 stud (4 pcs.), 3 — M8 nut with washer (4 pcs.), 4 — left board, 5 — M10 plug-bolt with washer, b — plastic. mud, 7 - rubber ring, 8 - fitting, 9 - washer, 10 - polyvinyl chloride tube 5 mm, 11 - right board, 12 - short fitting (3 pcs.), 13 - intermediate container, 14 - base, 15 - terminals, 16 — bubble tube, 17 — needle nozzle, 18 — water seal body.
For the electrolyzer boards I used thick plexiglass. This material is easy to process, chemically resistant to the action of electrolyte and allows you to visually control its level so that, if necessary, you can add distilled water through the filling hole.
The plates can be made from sheet metal (stainless steel, nickel, pickled or transformer iron) with a thickness of 0.6-0.8 mm. For ease of assembly, round recesses are pressed into the plates for the rubber seal rings; their depth, with a ring thickness of 5-6 mm, should be 2-3 mm.
The insulation plates are cut from sheets of oil-gasoline-resistant or acid-resistant rubber. It’s not difficult to do this manually, and yet the ideal tool for this is the “universal round cutter.”
Four M8 steel studs connecting the parts are insulated with cambric with a diameter of 10 mm and passed into corresponding holes with a diameter of 11 mm.
The number of plates in the battery is 9. It is determined by the parameters of the power supply unit: its power and maximum voltage - based on 2V per plate.
The current consumption depends on the number of plates involved (the fewer there are, the greater the current) and on the concentration of the alkali solution. In a more concentrated solution, the current is greater, but it is better to use a 4-8 percent solution - it does not foam as much during electrolysis.
Contact terminals are soldered to the first and last three plates. A standard charger for car batteries VA-2, connected to 8 plates, at a voltage of 17 V and a current of about 5A, provides the necessary performance of the combustible mixture for an injector - a needle with an internal diameter of 0.6 mm.
The optimal ratio of the diameter of the nozzle needle and the productivity of the electrolyzer is established experimentally - so that the ignition zone of the mixture is located outside the needle. If the productivity is low or the hole diameter is too large, combustion will begin in the needle itself, which will quickly heat up and melt.
A reliable barrier against the spread of flame along the supply tube into the electrolyzer is a simple water seal, which is made from two empty cans for refilling gas lighters. Their advantages are the same as those of the board material: ease of machining, chemical resistance and translucency, which allows you to control the liquid level in the water seal.
The intermediate container eliminates the possibility of mixing the electrolyte and the composition of the water seal in intensive operation modes or under the influence of vacuum that occurs when the power supply is turned off. And to avoid this for sure, upon completion of work you should immediately disconnect the tube from the electrolyzer.
The container fittings are made of copper tubes with a diameter of 4 and 6 mm and are installed in the upper wall of the containers on a thread. Through them, the water seal composition is filled and condensate is drained from the separation tank. An excellent funnel for this would be made from another empty can, cut in half and with a thin tube installed in place of the valve.
Connect the electrolyzer with an intermediate tank with a short polyvinyl chloride tube with a diameter of 5 mm, the latter with a water seal, and its outlet fitting with a longer tube with a needle nozzle.
Turn on the rectifier, adjust the voltage or the number of connected plates to the rated current and ignite the gas coming out of the nozzle.
If you need greater performance, increase the number of plates and use a more powerful power supply - with LATR and a simple rectifier.
The flame temperature can also be slightly adjusted by the composition of the water seal. When there is only water, there is a lot of oxygen in the mixture, which in some cases is undesirable.
By pouring methyl alcohol into the water seal, the mixture can be enriched and the temperature raised to 2600°C.
To reduce the flame temperature, the water seal is filled with a mixture of acetone and water in a 1:1 ratio. However, in the latter cases, you should not forget to replenish the contents of the water seal.