Any user of a personal computer, sooner or later, thinks about the need to increase the performance of the operating system, reduce the noise emitted by computer components, and also achieve greater cooling of the components of the system unit or laptop, which to some extent will lead to improved performance of the computer as a whole. If for owners of desktop computers everything is quite simple, just open the lid and simply clean the components from dust or, if necessary, replace the cooling system, fortunately this is done once or twice, then for owners of laptops/netbooks everything is somewhat more complicated. Of course, many modern gaming devices are already equipped with a liquid cooling system, which allows, in principle, not to pay much attention to such issues.
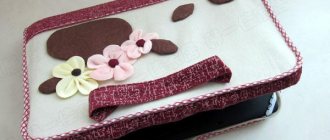
A method for making a cooling pad for a laptop yourself.
For the general segment of laptop computers, there are not many ways to achieve more power from the existing cooling system - this is the same as cleaning the fan blades from dust, or physically replacing it, which does not always actually improve temperature performance. In this case, specialized stands will come to the rescue, which are a metal or plastic substrate, inside of which there is a fan, or more commonly known as a cooler that operates on blowing or blowing. Such systems can be freely found in any computer store, as they are in regular demand and have a reasonable price. But, as mentioned above, the principle of their operation is elementary - these are 1 or 2 large “burdocks” powered by the computer’s power supply using a regular USB cable. So why not make a stand like this yourself, add a unique design to it, and save some good money at the same time? This is exactly what this article will discuss.
Cut a hole in the case to reduce the temperature
In addition to the booth itself, we also had to come up with a laptop. HP gets very hot. I don't remember when, but I had to take out the standard laptop fan and replace it with a small Gelid Silent 5 FN-SX05-40 - I wouldn't say it helped much, but it worked for a while. He also linked it via reobass.
At some point, it was decided that an additional hole would need to be drilled into the laptop to improve airflow and reduce temperatures.
It was also simple:
- Disassembled laptop
- Mapped
- I made a lot of holes with a drill
- Side drilling done with care
- Clean file
- Made small holes for screws
- Screwed to the network
- Colored the silver screws with a black marker
Manufacturing process
How to make a stand for a laptop. First of all, you need to decide on the location of the fan. The end fits best. Be sure to take into account the places where there are ventilation holes in the laptop. The hottest parts - the video card and processor - require cooling first. The fan will be in its place under them.
Before cutting the folder, you need to make markings for the holes into which the screws will be inserted. A ballpoint pen is quite suitable for this. The calculation is checked outside (where the laptop will be placed) and inside (place for the fan). Three screws are enough for fastening. The basic rule is that the cooling device should be located as close as possible to the heating parts.
The fan starts with a current of 0.5A at 5V. USB should have these characteristics. The three wires of the device are minus (black), plus (red). The yellow wire is not involved in further work. It is isolated along with other contacts. When the necessary wires are connected, the remaining metal parts are carefully insulated to avoid short circuits.
It is best to place the ventilation device so that the air is blown out from under the laptop. Then dust will not be driven inside the computer. The side of the device shows how the air flows and the direction of rotation of the blades. Carefully remove the arched clip from the folder. He's redundant.
A simple design made of polystyrene foam and a homemade fan
This method is suitable for those who want to save as much as possible, because the resulting fan will cost you several tens of rubles, and it can be made from any bottle and a piece of foam rubber.
The base of the structure will consist only of foam plastic.
To make the product last longer, we recommend using dense extruded foam or polystyrene foam (sold at any hardware store).
Cut it to fit your laptop.
The cooler design should not come into contact with the table surface. It is advisable to make 4 more small figures from polystyrene foam on which the product will rest.
This will ensure better air circulation.
Please note that the correct position of the cooler involves a slight tilt towards the user, so make one leg 3 centimeters high and the other two centimeters high.
Therefore, the first two parts will support the back.
Rice. 6 - create a frame for the stand
See also: DIY rope knife
You can attach the foam parts to each other using simple PVA glue or superglue
Wait until the frame is completely dry before moving on to the next working steps.
Cut 4 more squares and attach them to the corners of the top of the refrigerator to create this look:
Figure 7 - Creating the front part of the chiller frame
When you place the laptop on top of the product, it will not stick to the case, creating more room for airflow.
All 4 squares must be the same height. As shown in the image above.
Now we need to create a ventilation mechanism. It will be made of ordinary plastic. Take any bottle, cut off the top and draw this detail:
Rice. 8 - create a fan
The resulting element will become a fan base. In order for the blades to rotate, forming a direct air flow, it is necessary to slightly change the shape.
To do this, take a candle and light it. Bring the fan up to heat and heat the base of each blade by rotating them in one direction at a time:
Rice. 9 - formation of blades
Drill a hole in the center of the cooling system according to the size of the fan.
If the blades are too long, trim them and turn the edges again over the heat to smooth them out.
Take 4 popsicle sticks and secure them to act as a support for the vent. You can fasten the sticks with regular masking tape.
It is better not to use glue. Install the fan as shown below.
Rice. 10 - create a cooling structure
Take a simple motorized mechanism (available at any electronics store) and attach a bottle cap to it. Place the resulting part in the center of the blades:
Rice. 11 - create cooling
Take a USB cable and solder it to the motor. Construction is ready. Now you can decorate it by painting it any color.
Fig. 12 - checking the operation of the device
Homemade cooling system
Photos
That's what came out of it:
Laptop Cooler Laptop Cooling System Cool Your Laptop Laptop Cooler
Description
I have Asus X51RL. I can say that I was lucky because the radiator does not come out from the side, but from the back. Thanks to this, the homemade system is located at the back and covers the screen. Before installing this device, the processor temperature in quiet mode rose to 55 degrees, then the standard fan turned on, lowered the temperature to 47 degrees and turned off. And so on every five minutes. Of course, this damaged the processor and my nerves. After installing the artificial cooling system, the processor temperature is constantly maintained around 43-45 degrees. That is, the temperature dropped by an average of 10 degrees. An ordinary refrigerator is resting. Sometimes it connects at the slowest speed in games and with heavy storage. Due to the fact that the device draws air through the heatsink, the overall temperature of the laptop has decreased and it does not heat up. For example, before installing the system, the hard drive warmed up to 45-50 degrees, and now it’s no more than 40.
Design
The design is very simple. The body is a piece of cardboard from a document folder. In principle, it can be made from anything. The fan is a standard 120mm cooler for a 12V system unit. It can be powered from the laptop's built-in USB port, but there is a risk of burning it out in the event of a short circuit. Therefore, it is better to buy the simplest 12 volt power supply. If the cooler is too loud when running on 12 volts, you can easily reduce the voltage using a resistor. The cardboard and cooler are glued together with glue and additionally secured with electrical tape. The cooling system inlet must be closed from opening the radiator.
Operating experience
More than 5 months have passed since the installation began. I decided to clean my laptop from dust and wrote an article about it. If you read it and look at the photos, you will notice that a very thin layer of dust has accumulated under the back cover. As it turned out, the homemade cooling system literally pulled out all the air by force. Dust has appeared on the chiller impeller.
Layer of dust on the cooler Dust on the impeller
Thus, this device prevented dirt from accumulating inside the laptop. For preventive purposes, I supplemented the lubrication of its bearing with machine oil.
Lubricant replenishment
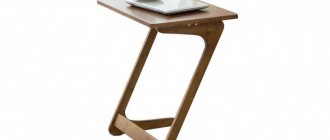
Advantages of the table
What's good about this model?
One of the main advantages is related to the main purpose of the product. The table allows you to increase labor productivity by creating comfortable working conditions and accelerating the work pace.
The presence of a function for adjusting the angle of inclination of the tabletop, as well as the ability to set a certain height of the legs, creates the opportunity to select the most optimal working position of the upper platform (surface) of the table and the laptop itself.
Some laptops tend to overheat and require cooling. There are special stands with fans on sale.
It is inconvenient to place them on stools; there is a risk that the device will fall off and become damaged.
The table has a wide enough surface to accommodate not only a stand, but also additional accessories.
Varieties of folding tables are very compact and mobile. Almost all models are easy to assemble and store in a separate place so that they do not disturb anyone.
If necessary, take it out and spread it out. What’s attractive is that they are convenient to transport from home to the country.
It happens that you become interested in how to make a bedside table for a laptop in order to use it as an element of the interior.
You can come up with the finishing yourself or look at examples from photos.
The weight of such tables can be no more than two kilograms. The loads they can withstand on average reach 15 kg.
Advantages and disadvantages
The Cooler laptop stand is good because:
- very easy to do. By following the tips and collecting the necessary information on the Internet, making such a specific stand for your laptop is absolutely not difficult;
- the cost of the material is the cheapest;
- good performance.
Disadvantages of this design:
- not strong enough;
- it only lowers the temperature by a couple of degrees. This can be changed. The lower part of the computer is unscrewed and air is taken directly from the heating pipes;
- the presence of a noise effect, which mainly depends on bearing wear.
How to use: tips
After you start working with the laptop, you should connect the cooling system to the USB input located on the surface of the board. The block with the cooler itself should be placed near the ventilation hole at the bottom of the laptop, placing the narrower part (truncated corner) against the grille. The fan will draw excess heat from the processor and other elements of the mini-computer, which will significantly reduce its operating temperature, and the factory cooler will not turn on at all.
Subscribe to our Social networks
Where to begin
As with any workflow, you should start by drawing up a proposal/plan and defining future installation steps, which will be discussed below.
Step 1. Budgeting and schematization
- To get started, it’s worth answering a few questions:
- “What are the expectations from the future creation” - for example (to the author of the article below), this is a comfortable substrate with a slight angle and 1/2 cooler for blowing and blowing. And the goal is to achieve a reduction in temperature indicators by at least 5 degrees.
- “How much money can I save for this?” — budget 500 rub.
- “What size/dimensions” - since the device has a diagonal of 18.4 inches, taking into account the position of the legs, the length will be approximately 36 * 38cm, width 35-37cm.
- “What to make the body/base out of.” Considering that the ASUS K95VJ weighs more than 4 kilograms, the material must be durable, but at the same time it is desirable to achieve small dimensions and lightness. Polypropylene water pipes with a diameter of 20 mm had to cope with these requirements very calmly.
- “What to make a substrate for installing a cooler from” - the weight of the cooler is minimal and there will be no load on the substrate, so no excessive effort is required. As a result, the choice fell on an assortment of office supplies, namely a folder for papers with a metal clip and the thickest / roughest cardboard.
- “What is already available” - there is already an old cooling pad from a device of the same Asus brand, but with a 13-inch screen diagonal, from which you can remove the cooler and power port.
- “What additional tools/items are needed”: Ruler, tape measure or tape measure.
- Stationery knife or scissors.
- Drill/screwdriver, drill and screwdriver.
- Metal hacksaw or jigsaw.
- Marker, tape.
- Bolts, nuts, washers.
- Glue gun or double-sided tape.
- Furniture stapler or clear tape.
Step 2. Purchasing materials
Considering that the above list of items and tools does not require additional costs, since any average person has all this, you will only need to additionally purchase:
- “Polypropylene pipes” - 1.5/2 meters of pipe (with a markup) costs on average about 100 rubles (in the example it actually turned out to be 75 rubles * 1.5 m).
- “Angles and tees” - four 90-degree angles and two tees - a total cost of 27 rubles.
- “Folder-folder” - from what we managed to find in the nearest stores, there was a folder with quite thick cardboard costing 120 rubles.
Total: 222 rub.
Replacing thermal paste
Just like a desktop PC, a laptop has a layer of thermal paste applied to the processor and graphics card. If you haven't changed it for several years, then it's time to do it. Before application, it is necessary to remove the old layer of thermal paste. This must be done carefully, otherwise it will only make things worse. Read the article on applying thermal paste below:
How to replace thermal paste on a computer?
Advanced homemade products
But it was a pretty cheap option. If you have at least one “five-wheeler” in your pocket, you can plunge into the steppe of homemade products. The shopping list is as follows: a simple computer fan, a USB type A socket, electrical tape and glue. In general, an old charger will do instead of USB, and for convenience you should get a ten-centimeter cable. The tools you will need are a soldering iron. Plywood is a good base for support, although binder will work.
In the holder, whatever it is, we drilled a hole in place of the laptop ventilation grille. Not just in any case, but according to the size of the purchased cooler. It must be fixed in the hole in any convenient way. And it is advisable to blow from the laptop. Also, the algorithm may differ depending on the materials.
If you have an old charger, cut off the end and expose the electrical cord. We do the same with the fan, but only with two wires. Red and black are often necessary, but yellow will be superfluous. Next, we connect advantages with advantages, disadvantages with disadvantages, and isolate the junction. Ready! Connect the charger and the fan will start spinning.
With USB things are a little different. We will need to take a soldering iron and solder the negative wires to the fourth terminal of the plug, and the positive wire to the first. Here it is very important to have a good understanding of pinouts and avoid mistakes. Otherwise, a short circuit will damage the laptop. And then do the same again - connect cable to cable and isolate the joint. The USB drive is connected to the laptop and the fan spins.
If desired, you can also get confused with the map, speed controller and other gadgets. It will still be cheaper than getting the refrigeration from the store.
Manufacturing
- Two boards obtained after sawing are placed on legs of the appropriate size depending on the diagonal size of the screen.
- Irregularities are smoothed out using available tools. A wider board without irregularities and knots is prepared for the base, cut to size and sanded.
- Ventilation holes are made. To do this, simply trace the fan contour with a pencil directly under the heating parts of the laptop.
- The holes are drilled in a square shape. All parts fit well together and are secured.
Bottom line
Creating a powerful laptop cooling system and maintaining all its internal parts in good condition is a completely doable task.
By spending a few hundred rubles, you can make an excellent cooler of the required size and power with your own hands.
The product options presented in the article can be easily supplemented and improved, it all depends on your imagination and ingenuity.
Thematic videos:
DIY laptop stand. - How to do it? #1
In the video I will show you how you can save money on buying a laptop cooling pad. I’ll say right away that this is not the final version, a lot can be improved. The video shows the principle of operation of the stand.
DIY laptop cooling pad
DIY laptop cooling stand. To make it you will need a pair of hands, plexiglass, and a cooler.
Laptop table drawings
Below you can find drawings of laptop tables that will help you avoid making mistakes in the manufacturing process of the product.
Before making a table for a laptop, it is advisable to draw up a drawing of the future product in detail. A table with cooling for a laptop with widely spaced legs is convenient to use when working on a sofa or in a bed. A stand for a laptop can be made from plexiglass, the main thing is to respect the specified dimension of the sketch. You can get a stand using a special design for laptop with lift-up lid
Manufacturing of the cooling system
To access the fans, you need to make one of the covers removable (preferably the top one). Attach the fan to the bottom cover of the stand using self-tapping screws or glue.
Build a circuit diagram to turn on the fan. The chain is sequential from the fan, molecule, USB cable and switch. To check the operation of the chain, first assemble it without welding. After making sure that everything is in order, you can solder the wires with solder, rosin and a soldering iron. After soldering, wrap the connection points of the wires with electrical tape. If you are going to use multiple fans, you need to connect them in parallel.
Instructions
The cooling pad is the simplest product. I wasted my time trying to make everything as accurate as possible.
1. I measured the laptop and calculated the size of the future holder (I did this before I went to the store, and then again after).
2. Mark with a ruler and cut out the bottom of the metal (bottom) with scissors. Filed.
3. Cut out the top of the mesh. Filed to prevent sticking and cutting during use.
4. Screwed the fan on top. Self-tapping screws are included in the kit. The fan is very quiet. I was especially looking for a large one - 20x20 cm.
5. Measured and sawed all the necessary boards with a hacksaw. Smooth them out.
6. Drilled the boards around the perimeter: I drilled holes for screws so that the shaft would not split into two parts when screwed in.
7. Secure the bottom with self-tapping screws to the wooden parts.
8. I covered all the necessary points with black electrical tape: I paid special attention to the sharp edges of the mesh.
9. Attached the mesh with the fan using self-tapping screws (in the photo the moment before gluing with electrical tape).
10. I cut out the PVC walls of the corners (I had to measure everything very accurately) and processed them with a file.
11. I sealed the walls with double-sided tape (after some time I removed the tape and glued it with epoxy glue).
12. I connected the rheobass (fan controller) to the power supply and holder by correctly inserting the wires in the right place that go through the switch.
13. Fixed everything under the table: everything is hidden and convenient
About symptoms
How to tell if your laptop is overheating? Yes, it is very simple, and this is done both by indirect and direct signs.
The temperature sensor installed inside will directly indicate that the device requires additional cooling or shutdown. You can extract the necessary information from it through BIOS / UEFI or the HWInfo utility (can be launched in the mode of viewing data from sensors), HWMonitor or another with similar functionality.
These programs (consider the second example) show the minimum recorded, current and maximum recorded sensor values and display the rotation speed of the chiller.
Information from the instructions for the laptop or the official website of the developers of its components will help determine the permissible temperature range of the device.
A couple of factors will indirectly indicate a high case temperature:
- hot back cover and very hot air escaping from the case;
- increased chiller noise.
Loud laptop fan noise
There is no money, but you have to hold on
Let's say that the laptop is heating up like a volcano, but there are no funds at all. Absolutely, you won’t even find five hundred rubles to spare. Well, no problem! You can minimally help your electronic friend for mere pennies. Although first you should always apply the most banal and hackneyed advice: clean your long-suffering equipment. This can really help the situation significantly. However, without minimal skills in assembling and disassembling computers, it is better not to try your luck and entrust the task to professionals.
So here's the stand. For a small and light laptop, an ordinary folder with arched clips, or any sharp tool, will suffice. Even a kitchen knife will do.
First you need to lift the laptop, find the ventilation grill on the back cover and remember its location. Then turn the folder horizontally, with the spine facing away from you, and place the device on it. Approximately determine where that same grille is located. And then put the knife in your hand and go ahead – make a hole in the folder in this place. It's better to cut a big hole altogether. What will it give? Some passive cooling. The table surface will not prevent hot air from escaping. You can also place a home fan nearby to provide additional active airflow.
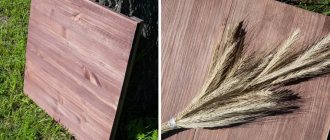
Wood as a base for a stand
A wooden laptop stand is an interesting and necessary thing by today's standards. You can make such a device yourself using appropriate carpentry tools and nails. You may also need a tape measure and sandpaper. If you have a couple of fans and a connection board and cables, then the frame will be assembled quite simply and quickly. Don't forget electrical tape and USB.
What tools and materials need to be prepared to make a plywood stand?
The ideal option for a budget-friendly, but fairly decent base is plywood. The material is easy to work with, environmental friendliness and long-term operation are guaranteed. First you need to find the necessary tools:
- A jigsaw used to break the plywood itself.
- Self-tapping screws selected according to the thickness of the plywood.
- Sandpaper of different grits.
- Plastic cable duct with plywood thickness parameters.
- 2 small sheds.
- Rubber gaskets for furniture.
- Sheet of plywood.
- File and grinder.
- Sponge or washcloth.
Some materials may be superfluous when making another model of plywood support. Sometimes additional elements are needed to add to the list.
How to make a laptop stand with your own hands
The step-by-step guides for making various types of laptop stands with cooling presented below will help you avoid making mistakes during the work process. Those who have no experience should take the simplest option as a basis.
Simple laptop stand with cooling made of wood
Before you begin the process of making a stand for your device, you should take care of purchasing in advance:
- a jigsaw that can be used to cut plywood;
- self-tapping screws, which are selected in accordance with the thickness of the plywood;
- sandpaper of various grain sizes;
- plastic cable channel corresponding to the plywood thickness parameters;
- 2 small awnings;
- rubber pads for furniture;
- sheets of plywood;
- file and grinder;
- sponges for washing dishes.
Advice!
Some of the materials will not be needed during the work process if you choose a different model of plywood laptop stand with cooling. Step-by-step process for making a laptop stand:
- After preparing the drawing and indicating the size, shape and location of the decorative elements, it is necessary to transfer the sketches of the future product onto a plywood board. For this purpose, you should use a ruler and a simple pencil.
- Now you can start cutting out the main body shape using a jigsaw. Using sandpaper and a grinding machine, rub down the cut areas. A sander will help get rid of uneven surfaces.
- Use a file to sand down small gaps and grooves. The treated cut areas are wiped with a sponge, which will make it possible to get rid of construction dust. The cut area is covered with a plastic cable channel.
- Using self-tapping screws, you can begin assembling the parts. In order to get a table with folding legs, you should use canopies. In the area where the stand touches the table surface, it is worth fixing rubber pads, which will make it possible to prevent the cooling structure from sliding. Assembling the structure using self-tapping screws is quite simple
- Plywood is painted in the desired shade. It is worth giving preference to special dyes that will not heat up when exposed to warm air. The wooden base can be covered with stickers or self-adhesive if desired.
Advice! Instead of painting plywood, you can coat the material with a layer of varnish or stain.
DIY laptop cooling pad
Before you start making a laptop cooling pad, you should determine the location of the fan. Experts recommend choosing an area near the end of the folder. It is important to pay attention to the location of the ventilation holes of the laptop.
It is also worth considering that the fan is installed under the hottest part of the device, namely in the area of the processor or video card.
Step by step guide to assemble a laptop cooling pad:
- After choosing the optimal location of the fan, it is worth placing the part that is to be cut. It is important to purchase a fan in advance that is suitable for the number of revolutions and stock up on screws
- The holes for the screws are marked on the fan. Now it’s worth calculating whether the calculations were made correctly. If for some reason it was possible to make only 3 holes and not 4, then nothing bad will happen. The structure will hold quite firmly.
- Once the fan is connected to USB, it will provide 5V 0.5A, which will not only start it up, but also keep it functioning properly. It is important to pay attention to the fan speed, because a device at 800 rpm may not start. Experts recommend giving preference to fans with 1800-2500 rpm.
It is worth considering that red wires are usually positive, and black wires are negative. The yellow wires are considered RPM monitoring. After the wiring has been connected, it is important to begin isolating as soon as possible, which will make it possible to avoid short circuiting the device. If desired, you can cut the connector from the USB extension cable.
The fan should be installed in such a way that it blows air from under the bottom of the device, which will prevent dust from being blown into the laptop.
The airflow along with the direction of rotation of the fan is indicated on the side. Removing the arch clamp allows for easier assembly.
Among the main advantages of this product with a cooling effect are its low cost and flexibility, the ability to manufacture a device that will ideally fit the size of your own device.
Important! A simple type of stand is considered a rather flimsy design that does not have long-term use.
DIY laptop stand for the bed
The classic version of the bed table is quite easy to assemble. Even a person who has absolutely no furniture making skills can cope with this task.
Before starting work, it is worth finding finished drawings of the product and adjusting it to the dimensions of the future product. It is important to adhere to the ratio of the parameters of the design parts.
The following materials and tools will be required:
- plywood (sheet thickness should reach 20-30 mm);
- nails and screws;
- paint or varnish for wood;
- primer or putty;
- wood glue;
- sandpaper;
- brush and sponge;
- hand saw;
- hammer.
Manufacturing process:
- A tabletop is cut out of a sheet of plywood (recommended dimensions 66×30 cm), legs, the thickness of which reaches 2×2 cm, and the length does not exceed 25 cm, long parts of the apron, the thickness of which is within 1×2 cm, and the length reaches 63 cm (the ends of the parts are cut at an angle of 45 °), the side parts of the apron measure 28 cm.
- After preparing the parts, you can proceed to installing the apron. The tabletop is laid face down on the floor. Using wood glue, the apron elements are fixed to the tabletop and pressed tightly for 30-40 minutes until completely dry. Using a sponge, remove the emerging glue until it has time to harden, which is especially important if you plan to further paint the plywood. After complete gluing, the tabletop is turned over face up, and the apron is nailed. After assembling the laptop table top with cooling, you can begin installing the legs
- After turning the tabletop face down, you can begin installing the legs. The legs should be fixed in the corner areas of the apron. For this purpose, you should first use wood glue and then screws. Each of the legs is fixed on both sides. The product must be left for 24 hours until the glue dries completely.
- After a day, you can begin sanding the product and priming. To obtain the smoothest possible surface, use a sanding machine. When assembling a structure from several boards, it is advisable to prime the surface and after a couple of hours cover it with a layer of putty. Once the laptop table is ready for use, you can cover it with a layer of varnish or paint it. It is worth purchasing high-quality paint, which will make it possible to prevent cracks in the product.
The finished product with a cooling effect will be quite durable
. Important! In a similar way, you can assemble a table from slats. This process is quite labor-intensive, but the result is much more creative.
DIY folding laptop table
Novice craftsmen diligently avoid even thinking about making a folding table, believing that the assembly process will be difficult. However, it is not. The step-by-step guide presented below will help you avoid mistakes during the construction process and ultimately get a fairly durable folding table.
In order to make a folding table yourself, you should prepare the following materials:
- a frame from an old painting, which will ideally fit the dimensional characteristics of the future product (you can use slats and boards);
- plywood sheets;
- thin slats – 4 pcs. (the length must correspond to the perimeter of the table);
- slats for legs – 6 pcs.;
- bolts and nuts;
- wood glue;
- paint, varnish or self-adhesive;
- brush and hammer;
- hacksaw
Laptop Cooling Stand Manufacturing Process:
- The picture frame is checked for integrity. If the slats are not tightly connected to each other, they must be secured with glue or nails. The plywood sheet is nailed to the apron-frame. The workpiece is turned upside down. Restrictive strips are glued around the perimeter.
- The legs are assembled in the shape of the letter H. At the end of the work, you should get a pair of supports, which are reinforced with connecting strips. The upper parts and bases of the legs are cut at an angle of 45 ° (when using a table top, the legs will be inclined, which will help increase the stability of the structure). The legs are fixed using bolts and nuts.
- To achieve a perfectly flat surface of the table, do not forget about the need to level the product using putty. After completing the assembly of the structure, it is worth covering each part with a layer of varnish or paint. It is also possible to design in decoupage style.
DIY laptop table on wheels
To build a laptop table on wheels, you need to ensure that the floor product is equipped with furniture wheels. To create the basic structure, you can take any of the master classes presented above.
An option for a laptop table with furniture wheels is characterized by mobility
DIY laptop table
The attached model of a laptop stand with cooling can be manufactured in various modifications:
- with a fixed support height;
- with adjustable support height.
Most adjustable designs have one stand leg and a mechanism for rotating the tabletop. This makes it possible to rotate the table and position its work area differently relative to the bed. The attached design, which is made of wood, is stylish and noble. The tabletop should consist of two parts:
- one rigidly fixed (in this place the mouse, cup and other useful little things will be located);
- a second movable part that allows you to adjust the height so that the laptop is positioned as comfortably as possible.
Important! A wooden plank must be screwed into the lower area of the movable part of the tabletop. The presence of folding legs allows you to compactly store the product.
Before you start making a device for your device, you should take care of purchasing in advance:
- glued furniture board made of ash or beech;
- furniture parts;
- bars for legs (small size).
Furniture panels made of ash are highly durable
Step-by-step process
- The first step is to make a supporting frame.
- The tabletop is fixed to the frame.
- The legs are attached to the bottom of the tabletop. It is advisable to fix the parts using bolts.
- The moving part of the tabletop must be connected to the frame with two hinges. To be able to adjust the angle of inclination, it is worth installing a clamp designed for plastic windows.
- The structure can be coated with a layer of colorless varnish.
The simplest type of attached structure can be coated with ordinary colorless varnish
Laptop stand made of polypropylene pipes
In order to build an original product, you will need to take care of purchasing in advance:
- meter-long PVC pipes, the diameter of which is within 2-3 cm;
- corners – 6 pcs.;
- spray paint;
- silicone pads – 4 pcs.;
- glue.
Manufacturing process
- The first step is to cut the pipes (2 pieces 22 cm long, 2 pieces 20 cm long and a couple of pieces 8 cm long).
- After cutting the pipes, you can proceed to installing the base. The letter P is used to attach short parts to a long part. The remaining elements are connected perpendicularly. A pair of connectors are fixed to the ends using glue.
- After completing the assembly, you can move on to the finishing part. The surface of the product is painted with aerosol paint or covered with a layer of varnish. Painting corners and pipes is carried out in 2 stages. Each layer is dried. It is recommended to attach silicone pads, which will prevent the product from sliding on a smooth surface. Plugs are installed at the ends of the corners.
This stand is very convenient to use
DIY cardboard laptop stand
A small table for a laptop with your own hands with a cooling effect, you can even make it from cardboard.
To work you will need:
- paper;
- sheets of five-layer corrugated cardboard;
- knife;
- ruler.
Manufacturing process:
- It is worth considering that the height of the monitor stand should reach 10-11 cm. This will allow you to comfortably type text on the device. The front area of the stand is made lower than the back by 7 cm. The recommended width of the structure is 27 cm.
- The finished drawing of a stand with a cooling effect can be downloaded on the Internet. After printing the drawing, you need to glue it to the cardboard with glue. All parts should be left for a couple of hours to dry. You can glue the drawings of the stand to the cardboard using PVA
- After the elements of the stand have dried, you should begin cutting out the parts. For this purpose, it is worth using a stationery knife and a ruler. The structural elements are fastened into grooves. The strip with the paper cutout is placed down
- It is worth considering that typing on such a laptop stand is difficult, so it is best to connect a keyboard to the device. A cardboard laptop stand allows for excellent cooler ventilation
DIY laptop stand made from a hanger
To build a laptop stand with a cooling effect, you can use an ordinary iron wire trample:
- The hanger is placed on a flat surface. You can put the trempel on a chair
- At the midpoint of the long side of the hanger, the product is slightly bent. In the extreme parts the corners are bent. The work is carried out carefully so as not to break the hanger
- The device screen is opened all the way. With careful movements, the laptop is inserted into a homemade stand with a cooling effect (in the curved corners).
Installation
Taking into account the above diagram, the direct installation process should also be divided into two parts: the first is assembling the case, the second is assembling and installing the substrate with the cooling system.
Frame
It is worth noting that further on, according to the frequency of the story, individual indicators that correspond to the demand and size of the laptop will be described. Moreover, it would not be out of place to explain that the author's mastery of tools is a common thing of the day, so there are irregularities and unevenness in the details and, overall, the final result cannot boast of visual and aesthetic laurels.
So let's get started:
- take a polypropylene tube of the available length and cut three parts from it: 1 piece - 38 cm, 2 pieces. - 36 centimeters.
- Divide the resulting segment into 2 parts of 10 cm each.
- To ensure the strength and tightness of the connection, wrap the ends of the resulting sections with electrical tape. In the future, if you have a special soldering iron, you can “tightly” connect all the nodes; in the absence of this tool, ordinary glue will be enough.
- take the longest piece at 38 cm and insert the ends into the corners.
- insert the corner on one side into two 10 cm pieces.
- take two 36 cm pieces and insert a shirt at the ends of each.
- Assemble the overall structure: insert the short pieces into the corners of the longer section with the corners facing down.
- Insert the free side of pipes 36 cm long with a tee at the ends into these corners.
- check the strength of the connection and the correct choice of pipe length.
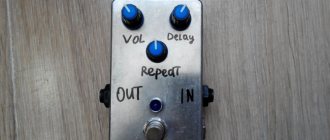
Fan
As mentioned above, the old device has a fan with a power button and a port for connecting a USB cable. A board with a speed controller and several backlight elements was purchased separately for a total of 100 rubles, which increased the total amount to 322 rubles. Otherwise the procedure is as follows:
- take the binder and remove the metal clip from it;
- open the folder and measure the required length along the length of the support and taking into account a small margin on each side;
- use a utility knife to cut off the unnecessary piece;
- since on one side the support was softer and gave way after installation, strengthen the “weak” part with the rest of the fold obtained above and secure them together with a furniture stapler or just tape;
- drill several holes in the cardboard, taking into account the existing holes on the side tubes of the case;
- take a fan and measure the circumference of its blades with a marker;
- it is desirable that the blades are located directly under the ventilation holes of the laptop case;
- use a stationery knife to cut out the marked circle;
- Use a drill or awl on the holder to drill holes to mount the fan housing.
Here it is worth saying a few words about how to position the fan correctly - for blowing or blowing. Opinions differ in this case; some believe that if air is supplied directly to the laptop case, then dust will clog into the ventilation holes, which will increase the frequency of cleaning the computer from dirt, but will cool it to a lesser extent. We should partly agree with this statement. Therefore, as mentioned above, it is planned to install two elements in the rack, one will work to supply air into the case, the other will remove it from the case, which will improve air circulation.
- then secure the fan according to the drilled hole.
This should also explain why the chiller is installed this way in the picture. The fact is that there was a fan from the old cooling system, which was attached directly to the plastic substrate, which did not imply its installation in the considered way. Therefore, I had to cut out the protective plastic part of it and position it so that the blades were below the level of the cardboard. It was easy to obtain: just use three screws, nine nuts and six washers. That is, the connection has the following pattern: screw-washer-washer-nut-housing-nut. This scheme allows you to lower the fan to the required depth and at the same time achieve its stable fixation.
- Next, it remains to attach the cardboard support with the cooling device to the previously made support.
Power and lighting
The final stage is the installation of power ports, a board with a speed controller and, if necessary, lighting elements. The ports and board were placed on the left side of the holder and a glue gun was used to secure it in place. If you don't have it, you can use double-sided tape. The backlight, purchased at a service center for a few kopecks along with the board, is short in length, so it was placed only on one side of the laptop and secured with electrical tape.
What to do if the SSD gets very hot?
Unlike regular hard drives, SSDs should not overheat. It has no moving parts and, for the same reason, no temperature sensors. In fact, an SSD is attached to flash drives, so if this part overheats, the problem is clearly in the power supply. This may be too high for this device. The situation is aggravated by the fact that very often it is not possible to see the voltage applied to it. The reason, again, is the lack of sensors, which in most cases are not needed.
You can try replacing the disk itself - if the problem does not disappear, the reason is in the part itself and it is better to contact a service center.
Stand options
Using a laptop while holding it on your lap is inconvenient. You can neither rest comfortably nor work normally. There are a sufficient number of interesting options from which you can choose the right one and make an original and simple stand with your own hands.
For example, make a table, only on short legs. Therefore, it can be placed on a bed, sofa or regular dining table. Convenient and practical. The material can be very diverse. For those who prefer to maintain the overall style of the interior, it is better to choose a suitable tree. A less expensive option is well-compressed rigid cardboard. The main thing is to follow the drawings and clear instructions for them. Such a stand must be tilted so that the user can comfortably look at the screen and work.
The corner can be made movable. This is very convenient so as not to constantly manipulate the laptop lid. By the way, it is not necessary to cut the parts yourself. Any specialized workshop will quickly cope with this task. But it’s always more interesting to collect for yourself. You can configure and debug all the little things that are individual for the owner and his faithful “assistant”.
For those who are familiar with jigsaw techniques, you can make a stand without nails and screws.
By the way, don’t forget about ventilation. This is the basis. You can drill holes in a circle in the right places, or you can make grooves or a niche of a special size with hot air outlets.
Sources
- https://mahsar.ru/dekor/samodelnoe-ohlazhdenie-dlya-noutbuka.html
- https://asome.ru/diy-cooling-pad/
- https://AllAdvice.ru/488
- https://jamaster.ru/podstavka-dlya-noutbuka-svoimi-rukami/
- [https://nastroyvse.ru/devices/raznoe/kak-sdelat-oxlazhdayushhuyu-podstavku-dlya-noutbuka.html]
[collapse]
Necessary materials and tools for work.
Everything you need for work can be found right at home or go to a flea market and find everything there.
For creative activities you will need a sheet of plywood, several wooden planks, nails, glue and bolts for attaching the legs.
If you want to make a folding table, you must carefully study the installation instructions. Here you will need several additional parts, the installation of which will make the table prefabricated.
The supports (legs) will fold, and the horizontal surface will be lowered and returned to its original position.
Metal strips with holes for bolts will come in handy. To get the effect of folding in half, use regular door hinges.
For folding at one angle, a hinged fastening bracket is used.
Check out several photos of a laptop table offered on the Internet along with a detailed description of the work.