Paper
All you need is a sheet of paper, a glue stick and scissors. Initially, you need to make markings according to the size of the phone. Then cut out the desired stencil from paper. Please note that on one side an allowance must be allowed. This is done so that when gluing the seam is on the outside. Next, simply fold the cut out stencil in half, glue the seam, wait until it dries, and you can use it. Such smartphone cases are only suitable if you urgently need to provide minimal protection for your smartphone. In fact, a paper case will not protect your smartphone from various influences.
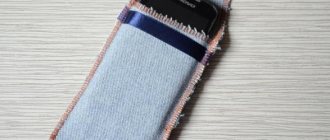
Making a book case
How to make a homemade book case or flip case:
- You need to take thick cardboard and cut out 2 pieces to the size of the phone.
- 1 part should also be divided into 2 equal elements.
- Prepare fabric of 2 colors (for the outside and inside).
- Sew the frame and fabric on 2 sides (1 side will be folded in half).
- Sew elastic bands onto the folding side to secure the gadget.
Description on video:
Adhesive
The most controversial type of case Initially, you need to cover the smartphone with paper so that there are no joints anywhere, everything is perfectly smooth. Next, the paper must be firmly secured with tape, gluing it to the phone screen.
On paper, you need to mark with a pencil where the camera, side and front buttons are located. It is also necessary to mark all the slots and holes of the gadget.
Initially, hot glue should be applied around the perimeter of the gadget. Next, circle the places with a pencil so as not to return to them in the future. After this, the back panel of the phone is filled with some kind of pattern. The pattern should be made in such a way that it connects with the side patterns. In this way it will be possible to create a solid structure.
Once the entire pattern is completed, you need to wait for it to dry completely. Next, take nail polish of the color you like and paint the glue with it. After this, when the varnish has dried, carefully remove the glue from the paper. The result is a kind of smartphone case.
The easiest way to sew a cover
The pocket cover is the easiest to make. That's where we'll start. But first, let's clarify a few details:
- Sewing this model is quite simple, so even a beginner in this matter can handle it.
- The leather must be thick and of good quality. It must be at least 3 millimeters thick.
- You can choose any color of the fabric to suit your taste – from pink to classic brown.
How to cut out a part?
There are several ways to make a pattern for a pocket cover.
Method 1:
- Cut 2 rectangles from leather fabric according to the cardboard template, adding one and a half centimeters on each side for thickness and for seams. We leave one side unchanged, since we will not stitch it. This method is more suitable for smartphones with rounded edges.
Method 2:
- You can also cut out a solid piece, the width of which should be equal to the width of the smartphone, and the length should be two times the length of the gadget. Don’t forget to add 1 – 1.5 centimeters for thickness and allowances. This pattern is a priority for phones with right angles.
Sewing
Sewing a product by hand without using a sewing machine is quite difficult. To do this, you will need to first make holes. The sequence of actions should be as follows:
- Take pieces of fabric and mark places for future seams. Secure them with pins and see if the phone fits there. There should be enough space so that it passes easily, but does not fall out on its own.
- Using an awl, make holes at a distance of about 3-5 millimeters from each other, depending on the thickness of the thread or cord with which you will sew the product.
- You can use a screwdriver to clean the holes to make them look neat.
- When pinning the 2 pieces together, start stitching from the bottom edge with a basting stitch. When you reach the free edge where the phone is inserted, do not sew both edges together, but simply run a blanket stitch along one edge, and when you reach the long side, continue to join the fabrics. If you have one long section (pattern No. 2), then you should sew only 2 sides, overcasting the free edge.
In the same way, you can stitch the edges with beads - this will make the case look more interesting and original. If you don’t have a suitable piece of leather, don’t worry - you can sew any dense material, such as felt, drape or foamiran, using this method.
Attention! Some experts recommend putting the cardboard model in a sewn case, placing the blank in a container with cold water and waiting 2 hours. Then dry the product (it may take 2 days). This way the case will take the shape of the phone.
Ball
In fact, you can even make a DIY smartphone case from thin rubber. The cost of one product is about 10 rubles. First you need to inflate the balloon, but do not tie it. Place the phone on it so that it lies on the ball with the screen down.
In this position, you need to press the phone until there is little air left. When this happens, you need to wait until the ball completely covers the phone. After that you can let go.
There is no need to cut anything anywhere. If desired, it can be easily removed. The downside of this case is that it can easily come off and also covers the holes for the headphones, charger, and function keys.
From a notepad
This method involves using an ordinary notepad as the basis for a book cover. You must first cut out all the leaves, then carefully separate the crust from everything remaining.
The crust from the notebook will serve as the basis for the book cover. On one side you need to draw a line with a pencil exactly in the middle, along the inside of the cover.
Next, cut along this line with a stationery knife so that the cut reaches the outermost layer. Afterwards you need to glue the inside of the cardboard with tape. This is done so as not to break the cut part.
Next you need to take two rubber bands and a piece of cardboard. Outline the phone on a piece of cardboard and cut out the outline. Next, glue two rubber bands to the cardboard outline. After this, glue this outline to the part of the notepad that is cut. Exactly halfway so that the cover can bend.
Note!
DIY satin ribbon bows: photos of original design ideas, step-by-step DIY master class- DIY hair bands - ideas for decorating homemade rubber bands + step-by-step instructions for making them yourself
DIY shadow theater: step by step how to do it at home! 175 real photos
As soon as the structure dries, you can insert your smartphone into the elastic bands and watch your favorite movies.
It is recommended to put some designs on the case, patterns, etc.
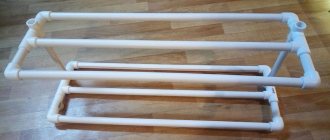
Making a wooden frame for the layout
Once you've made the phone mockup, the next step is to make a wooden frame that will be used to press the skin onto and around the mockup, turning it into the shape of a case. This frame will be slightly larger in width and height to accommodate the thickness of the skin that is being formed around the layout. The 6 oz leather I used was approximately 2mm thick, so I added 2mm to the top/bottom and side dimensions of my phone to determine the internal frame dimensions.
Once I finished measuring, creating the frame was a two-step process. I first used pine lumber and screws with a Kreg Jig to create a rough frame. I then used this frame as a template and cut out the final version using a hand router and a copy bit.
Here is the process step by step:
- create a rough frame from the bars, connecting them with an oblique screw.
- transfer the internal dimensions of this frame to the wood from which the working frame will be cut.
- drill a hole in each corner of the area.
- use a jigsaw to cut the hole
- Move the rough frame so that it lines up with the cut hole.
- attach the rough frame to the unfinished working frame
- use a hand router fitted with a copy bit to clean the edges of the work frame
I made a second – working – frame primarily because it can be used to create round corners using a router. These angles will give a better end result when clamping wet leather than the square corners of the original frame.
Felt
For a smartphone case made with your own hands from felt, you need the felt itself, drawing supplies, glue, needle, and thread.
First you need to take the gadget and place its back side on the material. Draw a circle in detail and create 2 blanks. Please note that the blanks must have an allowance, as they will be sewn together later.
After the blanks are cut, they must be sewn together with a regular seam. If desired, you can apply a design or pattern to the phone case. You can also cut out anything from felt, such as flowers.
Useful tips
Before you start making a smartphone case with your own hands, you need to consider the following points:
- Use only safe materials in your work (liquids without toxic vapors and solid materials that do not cause allergies and comply with sanitary and hygienic standards).
- Do not give children very small, sharp or loose objects.
- A homemade case should not injure the skin of your hands and face or contain sharp or cutting elements.
- The case should not block the speakers and phone camera.
From fabric
The principle of operation is almost exactly the same. Initially, you need to create blanks. To do this, place the phone on the workpiece and trace it carefully on both sides. Next, you just need to sew two fabric stencils together. You can easily add designs to your phone case and various decorations.
Among the advantages, we can note easy production, quite convenient to use. However, it has one significant drawback. The case is not thick enough to protect the phone.
Note!
- DIY bird feeder - interesting ideas on how to make it quickly and easily from scrap materials
- Do-it-yourself cold porcelain: the best options for porcelain products, step-by-step instructions and recipes for making it yourself (photo + video)
DIY curtains - types of curtains, choice of materials for sewing and design + step-by-step instructions and simple patterns for beginners
Leather
A leather phone case is the most neat and beautiful option in this selection. However, to make such a product, you will have to turn to specialists.
First you need to measure the dimensions of your phone. It is imperative to add 1 cm to the length of the gadget, and 2 cm to the width. Next, you need to make 2 identical stencils.
After this, you need to make round, small holes on a cardboard base.
After all the holes have been made, it is necessary to fold all the leather blanks with their insides facing each other. After this, you need to place a cardboard template with holes on top and secure it.
Next, you need to put 2 needles on one thread, which will be located on both sides. This is done so that you can stitch with one needle, and then hem with a second.
It needs to be flashed repeatedly. When the job is finished, you need to make 2 holes through it that will go on top of the phone.
Following step-by-step instructions, making your own leather phone case is quite easy.
Mobile phone case made of paper using origami technique (budget option)
You will need: a sheet of A4 paper of any color, PVA glue.
Master Class
- Lay a sheet of paper horizontally.
- Place your phone on top.
- Wrap the phone to the end of the sheet.
- Fold the bottom of the paper up to the phone several times.
- Fold the triangles at the bottom of the sheet up.
- Secure the folds with glue.
I recommend watching the video master class!
Origami phone case - #Lifehack
Glue threads
Initially, you need to wrap your smartphone in paper. Next, secure the folds and joints so that they do not stick out, and secure them to the screen with tape.
Next, you need to make the base for the back cover of the gadget. For this purpose it is necessary to use glue. Using it, you need to cover the back side with glue, and do the same with the side surfaces. You need to wait until the composition dries and remove the wrapper from the smartphone.
After this, you need to wrap the glue on a ruler, or a similar device taking into account the width of the phone. When it dries completely, it needs to be cut through the opposite edge. So it is necessary to dot the space with peculiar fibers.
Gyaru pad
Gyaru is a Japanese subculture of fashionista girls. They abundantly decorate their smartphones with keychains, glitter and voluminous stickers. If you like richly decorated covers, then let's try to make our own.
Gyaru love a bunch of different accessories on the smartphone case
You will need:
- old cover;
- small accessories (no larger than the size of the case). You can use broken hair ornaments, Swarovski crystals, polymer clay figures, miniature soft toys, bows - whatever comes to your mind and is at hand. Just don’t forget that all this must be combined with each other;
- pieces of openwork fabric or tulle;
- glitter;
- Polish for hair;
- fine-grained sandpaper (a foot file is quite suitable);
- glue;
- alcohol;
- round nose pliers.
Let's get started:
- Gently rub the back surface of the old case with sandpaper. We need it to go from smooth-glossy to rough.
- Wipe the surface of the case with alcohol to remove all excess grease - this will help the decorations stick more securely.
- Now we begin to apply decorations. Usually, the cover is first decorated with fabric to create a background. Apply a little glue to the cover and glue the pieces of fabric as you like. Don't be afraid to go outside the case. The edges can be trimmed with openwork ribbon.
- Think about how you want to arrange the accessories on the case. Before gluing, try just laying them down and see how they fit together.
- Having decided on the location of the accessories, glue them to the fabric. It is better to hold the smallest ones not with your fingers, but with round nose pliers, so as not to accidentally smear the glue.
- If you want, you can add a little glitter. Spray hairspray onto the case and apply fine glitter.
Beads
Beads presuppose the presence of a case and the open question “how to paint a smartphone case.” To decorate it with beads, you need to literally cover it with this material.
You need to apply glue to the old case, and then carefully apply the beads. It is very small and very easy to lose. To create an even pattern, it is recommended to trim the beads with a ruler. With its help, the decoration of your phone will be as smooth as possible.
This work is very painstaking, and it will take a lot of time to decorate the entire phone in this way. Moreover, after the beads are glued, you need to be as careful as possible with the phone. Any careless movement may cause the entire decoration to fall off.
A riot of colors
Necessary materials:
- case;
- colored tape;
- scissors;
- knife.
We glue the tape to the case one by one, alternating shades.
Using a knife, cut a hole for the camera.
A bright case for summer is ready!
Recommendations
When choosing a method for making a case for your phone, first of all you need to be guided by the requirements that the phone case must fulfill.
If you choose a simple, beautiful case, it will not fully protect your phone. After some time it will break or stretch. After that you will have to buy another one of the same kind.
A book case provides the best protection. It protects the phone on both sides, preventing it from cracking or dust or sand getting into the speaker. Moreover, it has a very convenient smartphone location that allows you to watch movies.