June 7, 2022 Home page » Master classes Comment
A papier-mâché plate is, first of all, beautiful! You look at such a thing - and you want to smile, you want to rejoice and consciously understand: life is beautiful, and the people in it are beautiful, and many things in it are simply incredible. Secondly, of course, it is exciting and interesting. True, a little interest in sports appears, and you ask yourself the question: can I do it, will I succeed? In addition, of course, a papier-mâché plate is a convenient and useful thing that can be used to store jewelry, keys, notes and other small things. In general, you can continue to name the reasons why you should make a papier-mâché plate with your own hands ad infinitum, and everyone has their own, but what they all have in common is the result, and the result is wonderful.
Papier-mâché plate with gold
The plate is just a plate, nothing special. It’s just such a plate - exactly until the moment your gaze falls inward. And then - literally with the feeling of “ah!” you understand that in front of you is a very cool, beautiful, cool, unusual and original plate, made using the papier-mâché technique by talented hands. You can do this too. And there will definitely be this “ah!”, don’t even doubt it.
How to make a papier-mâché plate with gold - master class from lovelyindeed
Step-by-step execution of papier-mâché tableware
Materials and tools:
- a ceramic or glass plate (a plastic bowl will also work);
- cling film or fatty cream;
- newspapers or thick napkins;
- PVA glue;
- water;
- brush;
- capacity;
- stack;
- acrylic paint and brush;
- colored paper or other materials for decoration.
Step-by-step instruction:
- Cover the product with film or lubricate it with cream (it is necessary that the adhesive layers come away from the surface well upon completion of the work), tear (important) newspapers or napkins into strips:
- Dilute PVA with water in a container.
- Moisten pieces of newspaper with water and apply the first layer.
- Lubricating the surface of the glued newspapers with PVA solution, stick 2-3 layers and leave to dry:
- Finish the work by repeating point 4 several times. Use papier-mâché to separate from the base.
- Paint the plate with paint so that the newspaper does not show through:
- Decorate the resulting base with paper:
Depending on the shape of the plate you want to get, glue the inside or outside of the ceramic model. However, it is easier to separate the adhesive layers from the outside than from the inside.
Instead of PVA, they also use a paste: for 500 ml of water, take 3 tablespoons of flour or starch and cook for 30 minutes. The resulting material is used as PVA:
Other utensils are made using this principle. It is enough to choose a suitable ceramic or glass product (preferably without relief or irregularities). Remember, the more complex the shape and the deeper the dish, the more difficult it is to remove the workpiece from it. Simply removing a cup and handle from layers of paper will not work. To do this, cut the papier-mâché evenly with a stationery knife and connect the parts together using strips of paper (the seams are glued on the inside and outside). In the diagrams, see how to cut and connect together the parts of a jug or teapot:
Another method does not require a ready-made plate or bowl. A cup for small items and fruits is made using a balloon, which will allow the master to choose the appropriate diameter and depth of the future container.
For step-by-step MK prepare:
- balloon;
- newspapers;
- PVA glue;
- water;
- scissors or knife;
- wide brush or sponge;
- disposable cups;
- paint, preferably acrylic (or primer) and brushes.
Description of work:
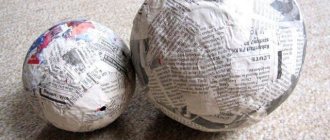
- Inflate the balloon to the desired size and tie the tail tightly.
- Tear the newspaper into wide strips, moisten them in water and stick them on the ball, in the process a “bowl” is formed, smooth it with your hands or a brush so that there are no wrinkles or air bubbles. Apply glue to the surface of the “bowl”:
- Apply a second layer of strips and let dry.
- Repeat step 3 until the desired density of the walls of the future bowl is achieved (5–10 layers).
- Leave the craft to dry; to do this, place the ball on a disposable glass.
- Remove the papier-mâché from the ball and trim the edges with a knife (or cut out curly ones with scissors):
- Prime or coat the outside and inside of the cup with a thick layer of white acrylic paint.
- Draw as you wish:
- Leave until completely dry:
The nuances of such work:
- To make the walls of the container smooth and even, tear the newspaper into small strips;
- instead of applying glue on top, soak the newspaper in a PVA solution, but pour more glue than water;
- completely dry every 2-3 layers - this is a guarantee that the finished bowl will not separate due to excess moisture.
Instead of paper strips for plates and other containers, modeling paste is also used. It is sold in the store in dry form or prepared independently. To do this, prepare toilet paper (2 rolls), water (1.5 liters) and PVA glue.
The mass mixing technology includes the following steps:
- shred (tear) paper in a deep container;
- add water, stir and leave for 24 hours;
- squeeze out the water and add glue to obtain a plastic mass suitable for modeling.
It is recommended to add vegetable oil to the papier-mâché to make the mass stick better to your hands and be more flexible. Store the resulting “plasticine” in the refrigerator, first wrap it in cling film.
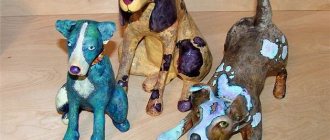
Using the mass, we make a plate or cup using the mashing principle. It will also make handles, lids for teapots, elegant spouts and other elements that are difficult to create using strips:
Papier-mâché plate made from colorful pieces of paper
What happens if you combine mosaic and the art of creating three-dimensional objects from paper and glue? There will be such a cool mosaic plate made using the papier-mâché technique. Of course, it may be difficult to find and select the right material, but it seems that if a person is really fired up by an idea, he will be able to cope with any difficulties, and any problem will seem like just an ordinary task.
How to make a papier-mâché plate from multi-colored pieces of paper - master class from Craftandcreativity
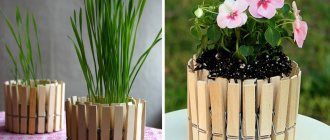
Wicker plate
How to make a paper plate with virtually no glue? Materials:
- Newspapers or paper.
- PVA glue.
- Scissors.
- Skewer or knitting needle.
- Plate form.
What do we have to do:
- Cut newspaper or paper into strips 10 centimeters wide, maybe a little less.
- Wind the strips onto a skewer and secure the end with glue. Take out the skewer and do the same with all the paper.
- To make the tubes longer, you need to drop glue at the end of one and insert the other.
- You can paint the blanks at this stage, or when the plate is ready.
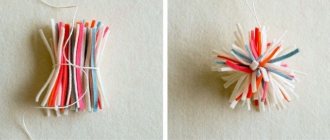
- Now the weaving process itself. You need to take four tubes. Find their center and intertwine them together, as shown in the figure.
- Add two straws on one side and three on the other.
- Take the tube from the side where there are five of them and start weaving, passing it under the others, then above. So in circles.
- When the tube ends, use glue to lengthen it with the rest of the blanks.
- Now we need to create a form. Take the prepared plate, put a weight on it and place it on the base of the basket. The diameter of the already woven structure should be half a centimeter larger.
- Lift the tubes up, placing them along the mold, and secure the position with an elastic band.
- Continue weaving with the main tube, each row should fit tightly to each other.
- You need to complete the weaving by bending the ends of the protruding tubes inward between the rows.
- Now you can decorate the plate, if this was not previously done with straws.
Papier-mâché plate made from egg cartons
Almost any old paper can become waste paper, which is recycled and turned into new paper. There are not many exceptions, but there are some - for example, egg cartons. Modern industry cannot yet turn them into anything else, alas. But you can! They easily turn into papier-mâché paste, from which you can model anything you want, including these cool plates.
How to make a papier-mâché plate from egg cartons - master class from Mollymoocrafts
Rectangular papier-mâché plate
Of course, of course, a plate is something designed for pouring soup and is round in shape. Well, or for potatoes with a cutlet and a flat one. Templates, yeah. However, if we continue the associative series, we can easily reach the point that the plate may not be functional, but decorative, and not at all round, but, say, square or rectangular. And why not, if it's beautiful?
How to make a square plate from papier-mâché - master class from Сatebardelson
Papier-mâché plate with butterflies
Well, and finally about summer. Yes, it’s not very good yet - it’s cold, rainy and all that stuff, but it’s summer, right? Which means joy and happiness, flowers and butterflies! Let's decorate the papier-mâché plate in the appropriate style: fun, joyful and lively, and always with butterflies, because, you see, our mood is ourselves. What we fill our everyday life with is how we live. Fill your days with happiness!
How to make a papier-mâché plate with butterflies - master class from Elsarblog
Items required for work:
First of all, we need to acquire a sheet of thick paper or cardboard (the use of sheet plastic is also acceptable), a compass, a pencil, and scissors.
Instructions:
Initially, we need to take a sheet of paper and draw a circle in the middle using a compass. On one of the sides we now need to cut out a small geometric shape that resembles a triangle. It must be cut in such a way that its upper corner is located in the middle of the sheet.
Next, we roll up a cone-shaped cup from the sheet. Fix the edges. We bend its sharp end inside the product so that we form a stable bottom of our plate. After which we decorate the product to your taste. Now our paper plate is completely ready! In addition to using the product as a decorative element, you can pour all kinds of bulk products into it.
Sometimes, to complete the style and comfort, our home lacks one small detail. Paintings, wall clocks, figurines - all this can complement the design of our home. Today in specialized stores you can see a huge number of all kinds of interior trinkets. However, nothing can replace decorations that were created with one’s own hand, because who, if not the owner, knows what his home is missing. In this article we will talk about how to make a plate out of paper.