Do-it-yourself door sill covers are a topic that interests many car owners. This is explained by various reasons:
- Firstly, homemade tuning looks better, because it is unique and completes the image of the car. The main thing is that it is done with high quality and with love.
- Secondly, homemade pads will cost less than the original ones. Products presented by manufacturers often exceed all possible expectations in cost. Even if you choose plastic, for an inexpensive foreign car it will cost an unreasonable amount.
Anyone can make such a tuning element, the main thing is to choose the right dimensions, take into account the installation technology and other points.
There are many articles on this topic on the Internet. At the same time, we can roughly imagine two ways to create overlays - from cheaper models created by domestic manufacturers, or from scrap materials on our own. Whatever method is chosen, each has its own advantages and is used quite often.
We make the body kit with our own hands. Part 1
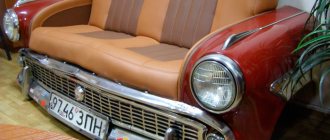
First you will see several photos of a car with an old body kit. This is MR2, everyone is familiar with it.
We disconnect the old aerodynamic body kit from the car and take it to the trash can.)
Corrosion was found under the body kit; we remove it using a grinding machine.
Here! Now the car is ready for a new reincarnation.
The first thing we start with is gluing with tape the places where the styrofoam is applied. Now we cut the styrofoam into the blocks we need. Dimensions depend on your body kit. Having pre-treated the surface adjacent to the car, we glue these pieces to the places of the future body kit using macroflex, applying it in a thin layer. Now this is the basis, one might say the foundation, for a new tuning. I will not describe what kind of glue to glue it with. And we begin to shape the styrofoam. This is one of the most creative processes. You must give shape to the pieces of polystyrene for the future body kit. To do this, you will need an electric knife and a large piece of sandpaper. Using these simple tools, we begin to shape it.
Then the polyurethane foam goes into battle. We use it to blow out the remaining cracks.
After the foam has hardened, cut it off.
Unfortunately it was a mistake, using foam. Foam and styrofoam are two different materials. And they are very difficult to process together. Therefore, the decision was made to do everything again. That is, the styrofoam was torn off from the body and everything was done again.
ADVIСE:
1. Do not use foam to fill cracks. Various materials are difficult to process in the future.
2. Do not glue the blocks together right away! Glue them only on the car.
3. You must shape the styrofoam blocks to ensure a tight fit to the car body. Then you will have many fewer cracks, and therefore problems in the future.
4. Lay out the blocks as if you were laying brickwork, block by block. Carefully adjusting them will take you 30 minutes. more time, but you will thank yourself for it later. DO IT!!
After studying all the errors, everything was started from the very beginning.
Pay attention to how closely the blocks fit together. This time they fit closely. And the whole structure looks much better.
Now we have achieved a fairly good surface. It is much better than what it was at first.
A lot of dirt remains after work.
NEW TIPS:
1. OH SHIT! There is a lot of dirt from this styrofoam. She's everywhere! And it got into the car's air duct; it will need to be vacuumed.
2. Coarse 40-grit sandpaper wrapped around a stick makes an excellent file. An electric knife is great for creating a rough outline.
3. USE 40 SKIN ONLY FOR ROUGH SHAPE. Use the 40 to get within 0.5 cm of the final result, then immediately switch to the 80.
I'm having a little trouble in the rear. Initially, the glued blocks were small. I wouldn't be able to give it a clear shape. That's why I removed them and installed new ones.
Once the desired shape of the diffuser has been achieved.
We proceed to the threshold of the car. We make it from the same material, using technology already familiar to us.
First, as expected, we obtain a rough shape using an electric knife.
Now 40 are going into battle.
Using the same principle, I started working on the front spoiler.
Here is a photo of the almost finished side sill trim.
New tips:
1. If you go to the store and stock your refrigerator with beer, then 100% of your friends will come to visit you.
2. Always have foam blocks in stock; you will have to replace them periodically. Something is not working or the location of the block is not selected correctly.
3. Use a wheel mat. It will make your work easier.
4. Don’t forget about your loved ones when you disappear in the garage)))) They are nervous.
5. To make the bumper skirt even, you need to dismantle the bumper. By placing it on the table, the work can be done much faster and with better quality.
Upgrading the trunk of a car
Quite often, car owners are interested in trunk tuning issues. Someone strives to make it more functional, tries to increase the space, or makes paneling, attaches special shelves, clamps for more convenient transportation of cargo.
Still others focus on improving acoustic parameters or are trying to make opening and closing trunks more convenient. For example, they make an additional handle for the fifth door or an electrically conductive lock.
Let's look at how to do a simple trunk tuning with your own hands, namely, install chrome lining on the trunk, a handle for closing and an electric drive for the lock.
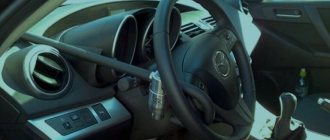
Installation of the electric lock drive
Tuning the trunk, namely installing an electric lock, can significantly simplify the life of the car owner. In order to open the trunk you need keys, and to do this you have to turn off the car every time. Installing an electric drive solves this problem. How to install and connect everything? First of all, you need to buy the electric drive itself, a new lock for it, a mount for fuses, terminals, electrical tape and wires. You will also need tools: wrenches, screwdrivers and pliers.
After all the necessary materials have been purchased, proceed to the process of dismantling the old lock. Remove the plastic trunk trim and dismantle the old lock. After this, you should disconnect the car from the power supply and you can proceed to wiring. It is best to connect from the cigarette lighter; the button itself can be installed in any place convenient for you. A fuse must be installed between the cigarette lighter and the electric drive button. Next, you make a power connection using electrical blocks and lay the wiring along the thresholds of the car into the luggage compartment. After this, you need to install the electric drive and a new lock in the existing hole.
Next, proceed directly to connecting the electric drive. In this case, it is very important to do everything in accordance with the instructions of the electric drive itself and observe the polarity, otherwise the lock will not open. After everything is connected, isolate the connection points, turn on the battery and check the operation. So, now you have no problems with opening, now you need to make closing it easier.
Installing an additional handle
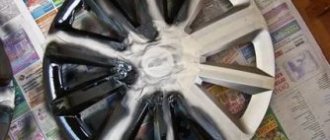
Installation of chrome trims
Once you have figured out the functional side of the upgrade, proceed to installing the chrome trim. To do this, you just need to buy a chrome trim for the trunk for your car brand, degrease the installation site and, after removing the protective film from the adhesive side, stick it in the required place.
You can similarly decorate your car with chrome trim in other places. Quite often they install chrome trim on the hood, radiator grill, or even use them to tune the roof of a car.
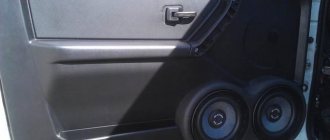
We cover car sills with carbon vinyl film
Let's talk about how you can protect your car from various types of damage, and we'll talk about protecting your car's door sills. They scratch very well.
Once again, after washing the car, I noticed several new scratches and thought about how I could protect the sills from constant shuffling and scratches.
There is always a way out. They sell special metal pads that are glued with double-sided “car” tape. I went to the market. Door sills cost around 500 rubles, but my Nissan Note didn’t have them, they were on the Qashqai and x-Trail. They persuaded me to buy it and try whether it would work or not (if not, then return it). The thresholds were narrow and not original - I didn’t buy them. On the Internet, thresholds for my car cost about 2000 - 2500 rubles (some original ones). I didn't order either.
We are not looking for easy ways! I purchased Carbon vinyl film and planned to cover my thresholds with it. It is quite durable and will not scratch or tear. The film costs 600 rubles per linear meter, I bought a piece of 100 by 150 cm, black carbon.
This is what the threshold of the car looked like before pasting: not very presentable for an almost new car))). Let's get started!
The car or places that will be covered with film must be clean: we wash everything thoroughly.
The place where the process of covering with carbon fiber will take place must be light and clean so that there is no dust. At first I wanted to do everything in the garage, but it wasn’t bright enough and I had to do everything outside