A potbelly stove is a compact iron stove with a chimney at the top. It consists of a chamber into which solid fuel is poured, a grate in the form of a metal grate, a pipe - a chimney and an ash pan for collecting ash.
If you know how to handle a welding machine, the device is easy to manufacture, and at the same time, it will serve faithfully in an unheated room, in field conditions, in the absence of centralized heating for decades.
How to do it yourself?
Manufacturing options:
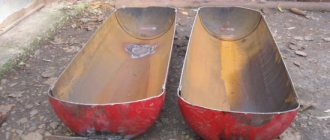
Rectangular oven
It is a metal box; you can independently weld the structure from steel sheets. For a rectangular potbelly stove, an old car tank or box will do just fine.
Typically, this form is chosen when it is necessary to cook food on the stove.
On the spacious platform you can place 2 large pans or containers for heating water at once.
The manufacturing principle is simple: doors are built to cover the ashpit and combustion chamber, a hole is made for the chimney, combustion products must leave the room in a timely manner, otherwise you can inhale carbon monoxide.
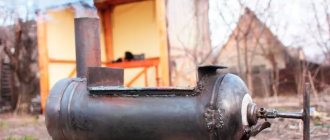
From a gas cylinder
The most common type of potbelly stove. The cylinders have thick walls, making the stove durable, mobile, and fireproof.
First, a drawing is drawn and markings are made. The combustion chamber door will be located in the center of the cylinder. The blower is in the same plane, only 10–12 cm lower.
Instructions:
- We take a grinder , cut out both doors, and draw a closed line between them.
- We cut the cylinder into 2 parts along the line
- at the bottom - a vent.
- We install the grille and weld both parts again.
- For the valve we make a hole with a radius of 10 cm.
- To extract , we insert a hole into the pipe and weld the objects together by welding.
- A simple stove from a cylinder is ready, you can use it, add fuel and check its operation.
For cooking on the top of the stove, the design is slightly different:
- is cut off .
- Rods are inserted and welded inside
- A hole for the pipe is cut out at the top side You can heat and cook food at the same time.
- The hole is welded , the valve is screwed in, and a comfortable handle is adjusted.
- You can also make a stove from a pipe The barrel or pipe must be selected according to its diameter.
- At the bottom of the pipe barrel , cut 2 holes for the firebox and ash pan.
- Make the doors.
- Frame holes with metal strips.
- Under the combustion door, at a distance of 10 - 12 cm inside the barrel, weld brackets in the corners, the grate will rest on them, pre-weld it from any fittings.
When making a stove from a pipe, weld the bottom, as well as the part on top:
- Weld 4 legs to the bottom
- on the surface , weld a pipe to it, this will be a chimney.
- Weld the hinges to the previously cut holes and install the doors. Also, mark and attach a hook so that the doors lock tightly.
- For the aesthetics of the structure, treat all welding seams, clean them 10. Paint the outside of the device with heat-resistant paint. Whatever the factory product, you can sell it or successfully use it yourself.
Working furnace
The option is distinguished by a specific odor that oil waste will emit during fuel combustion, even in the presence of an exhaust hood.
Instructions:
- To make this model , select sheet material with a thickness of at least 4 mm, a chimney pipe, and individual small structural elements.
- Make precise markings of all elements on the sheet, having previously drawn a drawing.
- Cut all the elements with a grinder and clean the edges of the parts. Drill round holes in the pipe.
- At the top of the tank , cut a hole for the pipe, offset from the center to the left.
- Offset to the right on the circle, drill a hole for the connecting pipe.
- You get 2 circles , weld them to the pipe; the thickness of the upper tank will depend on its length.
- Similarly, decorate the part of the stove from below , but now cut a hole right in the center of the marked circle.
- Cut a second hole nearby and attach the sliding cover to it.
- Weld 4 legs to the bottom plane.
- Clean the seams after welding , paint the surface with paint that is resistant to high temperatures.
- Connect the chimney to the stove. The waste will be poured into the lower part of the tank; after the paper is ignited, the sliding lid closes and the waste begins to burn. Oxygen will penetrate through the holes, and the waste will burn intensely.
Operation and working principle
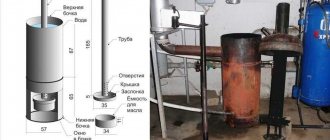
Do-it-yourself potbelly stove is the most affordable, easy-to-assemble and inexpensive to operate option, which is practically no different from the classic and well-known variation. A stove, for which only used oil will be used, will thereby allow you to save a lot of money, and in order for such a heating unit to start working, the oil must be poured into a special compartment shaped like a pipe. Here it will burn out and be converted into gas, which will pass further into the combustion chamber and mix with the air masses.
The combustion chamber of the gas formed during the combustion process is located in the upper part of the pipe, which such a heating device must be equipped with, and the speed and quality of heating directly depends on the dimensions of the combustion chamber of your potbelly stove. If the chamber is very large, you will need many times more fuel, but the intensity and speed of heating in this case will be at the highest level.
A potbelly stove, with which the garage will be heated intensively, quickly and evenly, allows the oil to initially burn out at fairly low temperatures, which increase significantly at the time of repeated burning, already being gases and mixing with air. The maximum temperature of the exhaust gases in the second chamber can reach about 750-85 degrees, due to which the garage is heated, and additional thermal energy comes from the mounted chimney, the surface of which also warms up well and gives off heat.
A waste oil furnace consists of three main structural components, which you can learn more about below:
- The lowest compartment of the design of a potbelly stove operating on waste oil consists of a round tank into which oil is poured; the optimal dimensions of this element will be a diameter of 3.5-4.5 centimeters. These dimensions are enough for the poured oil to burn intensely and evenly release heat to heat the garage;
- The second structural element of a potbelly stove using waste oil is a tank in which re-burning takes place, not of the oil, but of the resulting gases mixed with oxygen. The dimensions of this element are selected individually and can be equal to the first compartment; in the upper part of the second tank it is necessary to leave a slot, a hole that will go into the chimney;
- The third structural element of a potbelly stove furnace in exhaust is a pipe that connects to the second chamber and has a diameter of only 1.5-2 centimeters, and in order for the exhaust gases to be saturated with oxygen, it is necessary to drill many small holes in such a pipe.
A potbelly stove, the drawing of which was thought out independently or found on a specialized resource, will serve you for many years and will not fail if, at the initial stage, you become familiar with the basic requirements and rules for the operation of such a heating unit. Used oil must be poured into the reservoir to the ½-1/3 mark, but not completely, since during the heating process it will boil and splash, which can lead to its contact with flammable surfaces and fire. Also, after the oil has been used, before using it in a potbelly stove, it is necessary to let it sit well for at least several hours.
It is better to initially make the top of such a design removable so that, if necessary, it is possible to simply clean the internal surface of the heating unit from combustion and decay products deposited on the walls. In order to remove decay products from a narrow chimney, you can use a special brush with a long handle, and also tap, which will allow the accumulated soot to fall away.
Also, in order to extend the service life of the potbelly stove using waste oil, it is necessary to paint it after assembly with a special heat-resistant paint, which in the future will not allow the body to rot, deform, or form rust and corrosion.
Necessary materials, tools
Before starting work, prepare the tools:
- metal brush;
- chisel, pliers, hammer;
- tape measure, chalk;
- drill with metal drills;
- sander;
- metal circles;
- welding machine;
- protective mask;
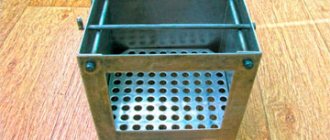
For the body you will need a pipe 30 cm in diameter, at least 5 mm thick. You can use sheet metal of the same thickness instead of a pipe.
For the chimney, you should select a pipe 12 cm in diameter, with a thickness of at least 3 - 4 mm. To prevent burnout, a metal box is suitable for the ash pan, so you need to choose durable sheet metal.
Step by step guide
First you need to cut the metal, taking into account the thickness and length of the required blanks.
Remove the chamfers from the parts, touching the stove will be safer, and the welding seams will be stronger:
- Check that the parts are correctly marked before you start cutting them. When cutting, take into account the thickness of the oven walls, as well as the thickness of the circle.
- Remove the chamfers from the prepared parts for safety from accidental contact with a hot device.
- Check all part markings.
The structure is installed in the following sequence:
- Connect the welding machine to the network.
- Take an electrode with a thickness of 4 - 5 mm, taking into account the sheet or pipe.
- Set the current on the device to 160 A.
- Wear special glasses and protective clothing, and protect your hands with gloves.
- Weld three walls to the bottom of the oven
- the bottom of the device at least 5 cm from the floor.
- Connect the parts at right angles. Check their perpendicularity with a level.
- Where necessary , straighten the corners of the parts.
- Weld the parts and joints relative to the floor level, at an angle of 45 degrees.
- Weld a partition between the ash pit and the firebox, first cutting holes to prevent ash from accumulating.
- Maintain a distance between the holes of at least 5 cm from the walls of the stove. The distance between the partition and the bottom of the structure must remain at least 10 cm.
- Lastly, by welding, cut holes for installing the chimney on the back panel of the homemade stove.
- Make markings , drill rectangular holes in the places intended for the firebox and vent.
- Align all the bottom parts of the holes with the partition. The distance between the walls of the firebox and the upper side edges should be at least 3 - 5 cm. The opening for the vent is slightly smaller, but not more than 5 cm.
- Use a grinder to cut two holes out of metal and form doors. Weld them onto the canopies, raise the blower as much as possible to the top of the slab opening so that they do not sag in the future under the influence of high temperatures.
- to the doors ; they should open and close easily, without obstacles.
Operating principle of a waste oil furnace
The design of the stove is very simple, which will allow you to assemble it yourself without any problems. The unit consists of two tanks connected by a pipe. This pipe is first “perforated” throughout the entire area. You need fairly large holes with a distance of 3-5 cm between them. The lower element acts as a “tank” - used oil is stored and ignited there. Next, the burning vapors rise upward and burn (extremely intensely) in the upper chamber. This is where the strongest heating occurs - such a stove can be used not only to heat the garage, but also as a stove for cooking food. For greater convenience, we recommend welding a metal plate that will stick out to the side - this can be done with your own hands in 10-20 minutes without any problems. The plate is needed to make you feel comfortable while cooking, otherwise it will be very hot.
How to make a long-burning potbelly stove?
To ensure that the potbelly stove radiates heat for as long as possible without adding another portion of firewood and does not burn out quickly, you can make a long-burning stove, the fuel will not burn, but will smolder, the heating process without adding firewood can be extended for several hours.
Making a stove for long burning is somewhat different from the usual design.
The best cylinder for the stove is:
- Cut off the top of it , this will be the lid of the stove.
- Make a hole at the top and side of the stove, this will be the hood.
- Make a hole in the center so that you can easily insert the balloon.
- Weld a pipe to the cut hole of the pancake, slightly longer than the cylinder. The pipe will serve as a blower, and oxygen will flow into the furnace, and the fuel will not smolder and not burn.
- Cut off part of the cylinder in the center, insert a pipe into the hole as a blower. The operating principle of a long-burning potbelly stove is to create pressure inside the chamber. After the firewood ignites, a heavy metal circle plunges inside and begins to put pressure on the fuel, creating pressure on it, the fuel begins to lack oxygen and slowly smolder. The smoke, going upward, comes out through the chimney, the room will not be smoky.
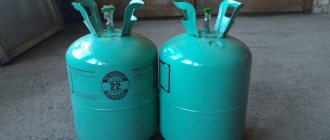
Selection and preparation of the cylinder
The first thing you need to decide is the size of the metal container. The size is chosen based on the area of the room in which the cylinder stove is supposed to be installed. You can choose from the following options:
- 5 l cylinder. A five-liter container can heat a small room. Little fuel fits into it, and only in the form of chips or briquettes.
- For 12 l. The furnace will be able to provide small (up to 3 kW) thermal power. The heat is enough to warm a small workshop, utility room or gatehouse.
- For 27-30 l. You will receive up to 7 kW, which will be enough to heat a garage, garden house or greenhouse.
- For 40 l. Industrial cylinders have a small diameter and thick walls, therefore, the fuel load will be small. It is better to shorten such a container and make a small stove that will hold heat longer and last longer.
Potbelly stove with heater for a bath Source s-proms.ru
See also: Catalog of companies that specialize in the design and installation of fireplaces and stoves
- For 50 l. A propane cylinder is considered the best option for making a potbelly stove; Such dimensions are capable of providing heat to the cottage.
The cylinder needs preparation: removal of gas residues. If cleaning is neglected, an explosion may occur when cutting metal. The cylinder will become safe after the following measures:
- Unscrew the valve to get rid of any remaining gas. You need to set aside a day, so the container is left to vent the gas in the open air or in a non-residential area with good ventilation.
- Then the container is turned over to drain the condensate (any unnecessary container with a lid will do - condensation has a pungent odor).
- At the end, the container is filled with water to the very top for several hours to displace residual vapors. After draining the water, the cylinder can be cut without danger.
Advantages and disadvantages
Like any other heating device, the stove has both pros and cons.
The undoubted advantages of a homemade stove are:
- Compact size.
- Use of any available fuel , you can burn peat, firewood, sawdust, wood chips, coal.
- Insignificant costs for manufacturing the device ; basically, you can get by with available materials.
- Installation of the structure does not require laying a foundation or a chimney.
The disadvantages of the stove include:
- Quite a large consumption of fuel material, the principle is this: while you heat it, it’s warm. To keep the room from cooling down, you need to add fuel more often, otherwise you may simply freeze.
- The walls of the oven become very hot; contact can cause burns.
- Do not allow coals to fall out of the stove, as this may cause a fire.
Installation safety rules
Any homemade heating device is designed to heat the room, making it more comfortable, but at the same time, such devices are far from safe and are fraught with ignition and fire.
When installing the structure, it is very important to follow safety rules:
- The stove must be installed on a surface that is resistant to fire, otherwise the floor may burn out. To do this, it is good to lay bricks and tiles on the floor.
- The walls of the stove should not overheat too much; for this purpose, special plasterboard or other non-flammable material is used in production.
- Highly flammable materials should not be placed near the firebox; they may catch fire.
- Take care of ventilation in the room where the potbelly stove will be located. Carbon monoxide must escape outside in a timely manner and not accumulate inside the room.
- only high-quality, fire-resistant material in production
A small country house, garage or workshop can be heated using a small compact metal stove called a potbelly stove. It can be made either from an old steel pipe, a gas cylinder, a barrel, or even an old flask, or welded from sheets of metal. The most important thing is that the metal used to make such a furnace is not too thin.
Potbelly stove made from a gas cylinder, an old flask, a barrel and a stove running on waste fuel
Main design features
Products using oil are, first of all, attractive because this type of fuel is incredibly accessible and cheap. It accumulates in large quantities in the garage of almost every car owner. Therefore, it is often possible to obtain the required amount of fuel completely free of charge.
A potbelly stove can be purchased or created independently. Most often, people who already have this wood-burning stove want to improve it with their own hands, as a result of which the waste itself will act as fuel, or the joint use of these types of fuel is allowed.
In an oil stove, you can regulate the combustion intensity, for which you use the neck cover located at the bottom of the structure. If there is a need to quickly warm up a cold room, this lid must be opened completely. To maintain the optimal temperature in the room, the lid must be opened a few millimeters.
A product operating in mining requires a specialized chimney, which has quite a lot of requirements. This is due to the fact that its height should be approximately 4 meters, and its diameter cannot be less than 10 cm. It is desirable that the pipe completely lack horizontal parts. To get good draft and prevent condensation from forming on the chimney, you need to insulate it outdoors with your own hands.
Materials and tools
To create a potbelly stove you will need: • metal with a thickness of 3±0.5 mm: thinner sheets will quickly burn out, in addition, under the influence of high temperature they can warp, and the stove will become shapeless; thick-walled metal will take a very long time to warm up; • chimney pipe; • rods 16 mm; • a sheet of metal with a thickness of 0.3 mm for constructing a box for collecting ash; • tape measure, ruler, chalk; • welding machine 140-200A; • grinder for cutting metal; to make round holes it is more convenient to use a gas cutter; • metal brush for cleaning welding areas; • emery wheel for adjusting doors; • drill and drill bits.
Schemes of potbelly stoves
The main advantage of a rectangular stove
, unlike oval products made from pipes or gas cylinders, lies in a larger heated surface area, so its efficiency will be much greater. The optimal size for a potbelly stove is 800x450x450 mm. A stove of this size will not take up much space and will easily fit even in a small room.
An important difference between the Loginov stove
is the presence of two plates (
reflectors
) in the upper part of the combustion chamber.
Since the path of gas movement
increases, the heat transfer of such a potbelly stove is significantly higher than that of a conventional metal stove.
Advice
. If you need to reduce the size of the Loginov oven, then it is advisable to change only its width. If the length and height of the structure changes, its efficiency may decrease significantly.
Detailed diagram of Loginov's potbelly stove
Poor hood - reasons
Before we talk about the use of forced draft devices for chimneys, let us dwell on the essence of the process, as well as the reasons for the drop in draft in the pipe.
The set of factors influencing the efficiency of chimney exhaust can be divided into three groups:
- Internal conditions in the house;
- Conditions for the movement of air flows indoors.
- Air temperature in the heated zone of a residential building.
- The total volume of air inside the rooms, which are connected to the combustion chamber of the furnace through the ash pan.
- The number of other oxygen consumers living in the house - people or animals.
The draft of the chimney can be influenced by side factors that depend on the design of the house, as well as the changes made to it. For example, installing double-glazed windows instead of conventional windows leads to a drop in traction force, since the latter are more airtight and reduce the flow of oxygen from the atmosphere into the house.
- External factors:
- Humidity and air temperature.
- The size of the atmospheric pressure.
- The activity and strength of rising air currents.
- The intensity of inversion air currents in the direction from top to bottom.
- Energy and direction of wind flows.
The combined effect of the above factors leads to constant changes in chimney draft; this process must be constantly monitored to ensure optimal removal of combustion products from stoves, fireplaces and other heating units.
- How do chimney design factors influence
- The location of the chimney is external (wall) or internal.
- The length of the chimney pipe and the number of elbows and transfers.
- Characteristics of the quality of the exhaust surface inside the duct - on a rough surface, soot accumulates more actively, which is the main reason for the deterioration of draft inside the chimney.
- The height of the chimney and the position of the top point of the chimney relative to the roof ridge.
- Chimney shape: rounded or oval shaped works best, square or rectangular shaped works worse.
- The intensity of heat exchange through the chimney body, the better the pipe walls are insulated, the better the hood.
The influence of the factors in the first section can be conditionally controllable when it does not concern a ready-made chimney. The factors indicated in the second section are absolutely independent, but you can easily adapt to them by using them to improve the hood.
The factors of the third section are completely dependent on the person and can be influenced starting from the design stage, and upon receipt of the finished hood, the shortcomings can be eliminated during repairs - installing a round liner inside the pipe, insulating the walls of the chimney, changing its external structure.
The main stages of making a potbelly stove
1. All the details are marked on a sheet of metal: 6 steel rectangles for the walls of the oven, 1 rectangle for creating a smoke reflector, plates for the grate and latch for the door. 2. Cut
sheet metal can be found at any metal depot. The guillotine, unlike the grinder, allows you to cut (chop) it more accurately. In this case, there will be no need to straighten the sheets. 3. The furnace body is made in the form of a rectangle. Their sides are joined together at an angle of 90° and welded together.
Welding the box
4. To avoid mistakes, the furnace box is first only tacked by welding in several places, and only then, after checking its horizontal and vertical positions, its seams are welded.
Important!
All connections in the body are thoroughly welded;
To check the seams
for leaks, you can coat the joints with chalk or kerosene.
5. Welding seams are cleaned with a wire brush. 6. The internal space of the potbelly stove is divided into three parts: the firebox, the smoke circulation chamber and the ash pan. To separate the firebox from the ash pan, a grate is laid between them, on which the fuel will be placed. To do this, at a height of 10-15 cm from the bottom of the stove, 5x5 cm corners
, on which the grille will be located.
Advice.
It is better to make the grate from 2-3 detachable parts. Otherwise, when replacing a burnt grate, it will be difficult to remove it from the firebox.
7. The grate is welded from thick steel rods or strips 30 mm wide. They are attached to 2 stiffeners - rods with a diameter of 20 mm. Since the grates burn out over time, it is better to make such a grate removable.
Manufacturing of grate
8. At a distance of 15 cm from the top of the box, two strong rods are welded, on which one or two removable reflectors
– thick-walled sheets of metal that will delay the flow of hot gases and send them for afterburning. However, they should not completely block the oven. To allow hot smoke to enter the chimney, an indent of about 8 cm is made from the front (for the first sheet) and back of the stove.
Chimney device
• To prevent precious heat from escaping through the pipe too quickly, it must have a special design. Such a device has two main parts: vertical
1.2 m high, installed at an angle of 90° above the stove and an inclined part, called
a hog
, 2.5-4.5 m long or more, in which the smoke burns out. It is the hog that provides up to 1/4 of the heat of the entire oven.
Chimney Hogs
• A tall person can touch the heated pipe, so the hog must have a protective mesh cover. To avoid burns, the distance from the floor to this pipe should be 2.2 m. The vertical part of the pipe coming from the stove is additionally wrapped with thermal insulation.
Important!
The pipe should be located away from plastered walls at a distance of 1.2 m. The distance from wooden structures is 1.5 m.
Advice.
Laying pipes through a wooden ceiling and roof is a rather labor-intensive process. It is much easier to bring it out through a hole in the wall or window.
Exhausting smoke through the window
Rules for safe installation of a metal stove
A potbelly stove heats up much hotter than a brick stove, so all flammable objects should be kept at a sufficient distance from the stove. If the floor in the room is wooden, it is installed only on bricks or metal sheets. The metal, in turn, is laid on an asbestos sheet with its removal 35 cm or more from the edges of the stove. In the front part in front of the firebox it should protrude 5.5 cm. Asbestos can be replaced with felt impregnated with clay. You can also install such a screen to reflect heat on concrete.
Important!
A working oven requires supervision. You should not leave the room where the potbelly stove is heated for a long time.
Installing a potbelly stove on a brick base
Double fan from FIREPLACE FAN
Price: from 5126.8 rub. (check price and discount)
Seller's reliability: excellent!
Delivery within Russia: free!
Be sure to order on the Aliexpress website with free delivery throughout Russia.
Fast delivery. The fans work perfectly, the curtains move from his work, being three meters away from him. Small but mighty. Corresponds to the seller's description. I recommend.
Darkshaper
Works great and quiet, fast delivery.
Ironfire
Fast delivery, well packaged and as described.
Valya
View on AliExpress:
We increase the efficiency of the furnace
A potbelly stove can heat a room in literally a matter of minutes. Moreover, you can throw whatever comes to hand into the firebox: since it does not have an extensive network of chimneys, and the smoke in it comes out “directly,” you don’t have to worry about them getting clogged.
But if a conventional heating stove installed in premises for permanent residence has an extensive network of chimneys that retain heat, in a potbelly stove it goes directly into the pipe, so its efficiency is not very high. That is why it is too “gluttonous” and requires a lot of fuel.
To reduce fuel consumption, you can use the following tips from experienced stove-makers: • door to the firebox and vent
in such an oven must be as airtight as possible;
otherwise, the air supply to the potbelly stove will increase, and the fuel will burn out too quickly; • to regulate the output of warm smoke in the chimney, it is advisable to provide a damper
;
• next to the stove, you can provide side metal screens
at a distance of 5-6 cm from the stove, in which case it will heat the room not only through heat radiation, but also through convection (circulation of warm air); • a potbelly stove, “clad” in a metal casing, will help retain heat much longer;
Potbelly stove in casing
Round furnace with afterburner and casing with heat gun
• to retain heat in the room, elbows should be built up in the pipe; however, soot will be retained in them, so it is advisable to create a collapsible structure; • the pipe can also be given a stepped shape: arrange the elbows in stages, making a 30° turn with each step; in this case, each of the elbows must be securely attached to the wall with rods;
Stove with chimney elbows
• chimney capacity
should be less than the productivity of the furnace itself, in which case hot gases will not go into the pipe immediately;
its diameter should be only 2.7 times larger than the volume of the firebox, for example, with a firebox volume of 40 l, the diameter should be 110 mm; • you can increase the efficiency of the stove by blowing the chimney with a fan
- this will turn the stove into a kind of smoke cannon;
• to reduce air circulation, firewood in the stove
should be stacked as tightly as possible;
if it is heated with coal, the resulting ash should be stirred up as little as possible; • to regulate the air flow, the door to the ash pit can be made adjustable by providing it with vertically located slots and a valve
that will block these slots;
• to increase the heating area, it can be ribbed, that is, strips of metal
;
• if you place a couple of buckets or a metal box with sand
, they will accumulate heat and store it even after the stove goes out;
sand backfill or a heat accumulator made of stones
can also be sewn inside the metal body of the furnace;
Scheme of a potbelly stove with sand backfill, the stove is made of a pipe with a diameter of 500 mm, its length is 650 mm
• oven lined with 1-2 layers of brick
, will retain heat much longer;
Brick screen
• the volume of the furnace also matters: the larger the area of its walls
, the more heat they will release into the room;
• bricks or metal sheets
on which the stove is installed will help not only protect the room from fire, but also retain heat.
Potbelly stove for a summer residence: principle of operation and design features
The science of heat engineering tells us that the combustion process of dry fuel in a closed space can be regulated in two ways: dosed access of an oxidizer (air, oxygen) and changing the rate of removal of combustion products by adjusting the cross-sectional area of the chimney. In practice, both methods are used simultaneously, and it is thanks to this that the maximum efficiency of fuel combustion is achieved.
Relationship between the volume of the firebox and the cross-sectional area of the chimney
In order not to go deep into theoretical calculations, we will use a ready-made proven engineering approach. According to it, the diameter of the chimney, expressed in millimeters, is calculated using the following formula:
Diameter = 2.7 x firebox volume (in liters)
So, for a metal chimney pipe with a running diameter of 110 mm, the firebox volume of a potbelly stove is slightly more than 40 liters. By the way, most inexpensive industrial stoves have exactly this volume, and their chimney outlet has a diameter of 110 mm.
Potbelly stove shape
Correct matching of the flow area with the volume of the furnace creates all the conditions for complete afterburning of the fuel, including difficult-to-burn products of its thermal distillation.
Limited by the cross-section of the chimney, gases circulate along the upper surface of the stove, where they cool slightly and again enter the combustion zone. By giving off heat, they provide heating to the top panel, which can now be used as a hob for cooking. In addition to increasing efficiency, afterburning fuel greatly reduces the amount of smoke and other unwanted emissions into the atmosphere.
Firebox geometry
Uniform circulation is impossible if the top surface is not flat but curved. Stoves made from gas cylinders have such a shaped surface. Under the cone-shaped roof, hot gases are bunched into a dense gas cord, which does not give off heat well and does not mix well with the incoming air for afterburning. Naturally, efficiency is lost in this case.
Content
This device is a small stove that runs on wood. Its main advantage is fast heat transfer. Heating of the room thus occurs in a short time. They are made of metal, so they cool almost immediately after the combustion stops.
The small potbelly stove looks quite neat and works efficiently
There are boilers of the following types:
- By type of material: stainless steel or cast iron.
- By type of design: with a hob and oven.
- By type of fuel: wood, fuel, peat or sawdust.
It is capable of operating using spent fuel. Due to the environmental friendliness of the fuel, such a stove will not pollute the environment. The simple design does not create any difficulties during operation. You can adapt the oven to any need (heating, cooking, drying clothes).
Advice: It is necessary to use the heating device with extreme caution, as there is a high risk of cinders falling outside of it.
Making a mini potbelly stove yourself
By assembling such a stove yourself, you can inexpensively heat any small room. A mini potbelly stove is easy to assemble with your own hands. To do this, you need a certain list of tools:
- level for construction, measuring tape;
- welder;
- Bulgarian;
- chisel;
- sheet metal for components;
- chimney duct;
- barrel (for a cylindrical model);
A common boiler option is wood-burning. Thanks to its high efficiency, this device can heat the room evenly as long as the wood is burning. Below are detailed instructions for assembling a wood-burning stove.
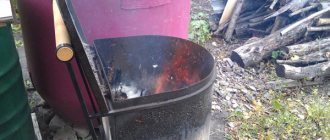
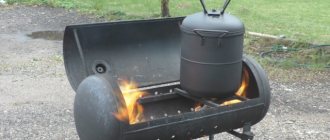
An example of a simple potbelly stove made from a barrel or an empty gas cylinder
Progress
The future oven should be a chamber divided into 2 compartments. The upper one is intended for fuel combustion, the lower one is needed for the accumulation of ash. The compartments are separated by bars. The finished product must have 2 doors, one for the combustion window, the other for the ash pan. At the top of the stove there is a pipe for removing combustion products. Below are several options for making a potbelly stove. We advise you to read in more detail the instructions for a long-burning potbelly stove on our website.
The container of the future furnace will stand horizontally. To do this, take an old gas cylinder. This is an almost finished mini-stove with wood. There is no need to divide it into 2 parts; instead, the ash chamber can be welded from below, which will save the working volume of the device. Next, you should cut out the firebox window.
Holes are drilled in the cylinder body through which waste fuel will enter the ash pan.
The fire door is purchased separately and fits into the prepared hole. When the ash compartment is welded, you can begin to make supports for the stove. To do this, metal pipes are attached to the bottom of the chamber using a welding machine. The length of the pipes is selected individually. A hole is made on the reverse side for the chimney pipe.
We advise you to read in more detail the article about a potbelly stove made from disks with your own hands on our website.
When there is little free space, you can construct a vertical model. It is necessary to divide the cylinder into 2 parts. Fasteners are welded to the inner walls of the cylinder; the grille will rest on them. The upper part is covered with a steel sheet. It can serve as a hob.
The vertical version of the mini-oven takes up less space and allows you to heat food
Tip: Do not make the bottom of the combustion chamber from thin, fusible metal. It will quickly become unusable. The ideal option would be to use an old cast iron grate. A cast iron pot is suitable as a plug, which can become a container for heating water.
A pot with a lid made a good plug
As a chimney, you can weld a 90 degree bend behind. The rest of the chimney is attached to it.
Readers found these materials useful:
Features of garage heating
Not every vehicle owner has a good, warm, durable box. Usually car owners have an iron box. This is the cheapest, fastest way to protect your car from bad weather. Such buildings protect only from precipitation and wind. But from a heat retention point of view, they are useless.
Hot air evaporates instantly from such a structure. How to solve a problem? How to weld a stove for a garage? There are several ways. When choosing, you need to understand that heating a residential building and a garage building is not the same task. The question is not even about insulating the room. According to the laws of physics, using the theory of the law of the square of the cube, we understand that it will take more fuel to fire a small box than to heat a house.
For example, for a cottage with 3 floors, we will spend 10 kW, and to warm the box it will take us about 3 kW. If we want to get a box temperature of 15 degrees, we need a 2 kW boiler. When we want to maintain an optimal temperature of 8 degrees, a power of 1.3 kW will be enough for us. Fuel consumption for a commercial building is more than 2 times greater than for heating the same area of residential buildings.
Heating the entire box, including the walls and floor, is an impossible task. Too much heat will be wasted. Even insulation will not save you. Because heat will be absorbed by the concrete floor and it will escape through the concrete roof. A reasonable option would be to warm up a specific work area. It is advisable to concentrate warm air in the center of the room. There will be a kingdom of cold air around this zone. It will be cold above, below, all around. This will create the best comfort for work.
The center of the areas will be warm, and energy consumption for heating will noticeably drop. This effect is called a warm fur coat. It occurs due to natural air convection. Hot air is squeezed on all sides by a cold flow. The heated air tends to rise, but it is not let in by the cold air, pressing down. Hot air masses spread evenly to the sides, warm up the walls a little, and descend into the inspection hole.
This effect can be created by low-power heat generators, which will be very economical in terms of money. Such devices create a fairly intense flow of warm air masses, which is enough to heat the workshop.
With the development of various technologies, such a method for heating outbuildings as infrared heaters has appeared. But they have a drawback. They are not suitable for metal buildings. The metal does not reflect this radiation, and the heat goes outside. Brick walls are also not suitable for these purposes. A DIY garage oven would be the best solution, while a DIY potbelly stove is a budget solution. Wood-burning garage stoves are self-contained, require little space, and operate on wood waste. You can see a lot on YouTube with your own eyes. We'll look at some options.
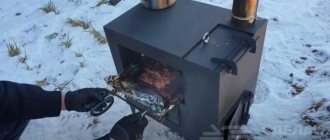
Option from a wood-burning receiver tank
The receiver tank is perfect for making a stove. There is no need to make a door for loading firewood. The hatch cover opens from above, through which firewood will be loaded. It is equipped with a handle for ease of use. A hole is cut at the bottom to collect the ash. We advise you to study in more detail the diagram of a wood-burning stove and find answers to your questions.
This is what the water receiver tank looks like
This option is easy to make, but requires caution when using. The disadvantage of this model is the inconvenience of cleaning the ash pan. But for use in the garage or at the dacha, this is an excellent option.
The tank sections are separated by a homemade grate, which can even be made from reinforcement
As an option, a small potbelly stove is made with your own hands from sheets of steel. Below is a drawing of a simple stove made from ready-made steel plates. The drawing contains all dimensions. Two partitions will allow you to extract maximum efficiency from the fuel, because thanks to the labyrinth inside the chamber, combustion products slowly leave it. We also advise you to study the drawings of a brick smokehouse with your own hands in addition to this article.
Using sheet metal you can give the stove any shape and size
The thickness of metal sheets must be at least 4 mm. The grate can be a metal plate with drilled holes or even reinforcement.
The body can be encased in a 2 mm steel casing. This will avoid the following problems:
- the hot surface of the oven will not cause burns or accidental fire;
- the amount of infrared radiation will decrease several times;
- an air gap between the casing and the surface of the stove will allow it to heat evenly and better heat the room.
Step-by-step instructions for creating a furnace from disks
Step-by-step instructions for creating a furnace from disks will help you make the design without any problems
It is only important to decide on the purpose of using the ready-made device. In particular, if you are making a stove for heating or cooking, then the design is quite simple
The base of such a stove can be refractory bricks or a section of an old radiator on which a metal sheet is mounted (its thickness should be more than 5-8 mm).
The design itself must be done following the following steps:
- Prepare four KAMAZ disks. They must be steel; aluminum will not work.
- Using a grinder, cut out the center portion of the three disks.
- Weld two disks together. In the lower disk, install a round plate of suitable size and cut from a steel sheet. If desired, this plate can be immediately welded to the metal base.
- Using a grinder, cut a small square hole on the side of the resulting workpiece. This piece should not be thrown away; it will be used to make a door. The door can be mounted to the body using welded bolts and nuts. Additionally, you can attach a latch and a handle. The result is a finished housing that will perform two functions at once - a blower (to increase the draft, you will need to slightly open the door of the lower chamber) and an ash pan.
- Next, weld the two remaining disks together so that at the bottom there is an element with an uncut core. Firewood will be stacked on it. On the side you need to cut a hole in the same way as described above and install the door.
- A plate should be mounted at the top of the firebox, and a round hole should be cut in it. A pipe will be installed in it.
- All that remains is to connect all the parts of the body together. Carefully lower the pipe into the upper hole and weld it so that the valve is at the top.
It is important to remember that the weakest point of the oven is the seams. That is why they need to be brewed with maximum responsibility.
If this is not done, smoke will leak through the cracks and enter the room. And if you do everything in accordance with the recommendations, the smoke will go up the chimney. Additionally, you can cover the cracks and seams with clay and sprinkle with dry sand, since the seams tend to become thinner during use.