A hand drill is a reliable drilling tool that has enjoyed great popularity half a century ago. When electronic drills appeared, the demand for hand-held devices decreased, but did not disappear completely. Now this popular rumor tool is probably gathering dust in the garage, and who wonders what is being done from an old hand drill. You can try to implement the tool, but don’t rush, the price for such a tool will be less than 100 rubles, but having made useful homemade products, you will get a unique unit. We will look at what to make of the tool in question with a detailed description.
Since its invention, the tool in question has been used intensively for drilling wooden and metal structures; this device is not intended for drilling concrete. This is due to the fact that the device does not have a shock function, therefore it is virtually impossible to drill a hole in concrete with such equipment. But home craftsmen found a way out of the situation. In the early days of drilling concrete, repeated blows were applied to the heel with a hammer, which allowed the drill to advance into the material.
The main drawback of the tool is known to anyone who has ever had to use it. It involves the need for physical effort. While drilling wood required little effort, when working with metal and concrete, it took at least hours to achieve results.
The mechanism of operation of the tool in question is conventional, and consists of transmitting rotational manipulations from the handle to the tool chuck through a pair of gear transmissions. Gears help to increase the speed of rotation of the cartridge, while at the same time reducing the torque. The simple and simple design makes the tool in question not only repairable, but also durable. What remains for our client to do to extend service life is to monitor the amount of lubricant on the gears of the tool.
Cool ideas and lifehacks for using a screwdriver at home
In addition to the listed mechanisms, a screwdriver can also be used to implement other ideas on the farm.
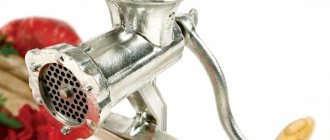
This hand-held power tool will help you automate the opening of an entrance gate, make a winch for a car, or make scissors for cutting metal. If you attach an attachment for cutting tin to it, you can turn an ordinary rubber boat into a motor boat, and modernize the process of drilling holes for ice fishing. In addition, everyone knows that a screwdriver is used as a drive for a mixer, meat grinder or juicer. After reading the article, the reader gained knowledge about the unconventional use of a screwdriver. Now he can use this hand tool to create carpentry equipment, improve children's vehicles and other useful things in the home.
Hand generator
To create an alternating current generator from a broken screwdriver, keep in mind that the motor and gearbox must be in working condition. Such a device is suitable as an alternative power source when traveling outdoors or during an unscheduled power outage.
From a screwdriver with an operating voltage of 18 volts or more, with a gearbox torque of 150 rpm, you can get 6-8 V. This is enough to recharge a mobile phone or a flashlight with a USB port.
Electric generator from a motor with a USB connector
In order to make an electric generator from an old screwdriver you need:
- disconnect the battery and disassemble the case;
- disconnect the button and the power element from the motor so that they do not interfere with the transmission of current;
- solder a parallel diode bridge in their place;
- the diode bridge must have a 220 mF electrolytic capacitor and Schottky diodes;
- at the other end of the diode bridge it is recommended to solder a USB port, which will be used as a charging connector;
Example of a handle for a generator
- make a handle from any convenient L-shaped part and insert it into the cartridge.
In some cases, you can do without soldering. To do this you need:
- connect two wires with alligator clips to the terminals inside the housing;
- Observing the correct polarity, supply power to the light bulb or USB port.
This method is simpler to implement, but it increases the likelihood of damaging the device that will be charged from it, and also reduces the efficiency of such a homemade product.
This video shows an example of assembling a generator from an old screwdriver
Screwdriver attachment
With a little thought, you can make an attachment for a screwdriver.
Such a simple nozzle in its design can be created without unnecessary complications.
The good idea is that there is no need to spend money on additional parts. Everything you need is already in the drill design. All you need is a lathe, an angle grinder, a welding machine and, of course, a screwdriver, which we will now attach to:
- Remove the two covers from the drill body. Unscrew the thrust part.
- We knock out the cotter pin from the small gear and remove it from the shaft on which the drill chuck is mounted.
- Using a sharpening machine, we bore the conical tip of the shaft to 10 mm.
- We insert the shaft back into the drill body, put on the gear and cotter it.
- On the right side, use a grinder to cut off the threaded shaft.
- We screw the rubber handle (improved version) into the body on the right.
- Cut off the threaded part of the large gear shaft.
- The head must be welded to the large gear shaft.
- Screw the two covers back to the body and lubricate the gears with special graphite lubricant.
- The nozzle is ready to use!
The DIY mechanism allows you to screw in and unscrew bolts and nuts in hard-to-reach places. Increases torque by 6-7 times. Since the attachment is longer than a simple screwdriver, the tool can be used around the house, for assembling furniture, or for car repairs, if the nut connection cannot be reached in any other way.
Key
For a “homemade key” we only need two gears, a small one and a large flat one, from an old hand drill.
Just be sure to make them steel, not cast iron.
Additionally, small materials are required, which every craftsman has in his home.
Of course, you can’t do without welding equipment, a sharpening machine, a drill and small tools. The entire technology for making a homemade key consists of the following steps:
- We disassemble an old hand drill. By knocking out the cotter pins, we will free the small and large flat gears. We will only need these parts from the drill in the future.
- Using a sharpening machine we make a short axis. We press it into a large flat gear.
- The parts are scalded using argon welding. If a conventional electrode is used, then after the welding process you need to clean and plan the seam.
- Let's prepare two tires for the key - short and long (flat strips of metal). In both tires we drill holes equal in diameter to the shaft axis. On both tires, using a machine and a hammer, we make an L-shaped double bend at right angles, after slightly softening the metal by welding. A longer tire has a deeper bend, a shorter tire has a slight bend. This is done so that the short tire goes around the flat gear, and the long tire goes around the small gear.
- Let's prepare a metal round timber (shaft) and two half-inch tubes. The round piece should fit into the tube and rotate freely in it.
- We grind one side of the round timber on the machine so that its diameter is equal to the internal diameter of the small gear. We put the above-mentioned gear on the made shaft. Using a drilling machine, we make two holes in the shaft and connect the round timber (shaft) and the small gear with a cotter pin.
- We assemble the key into one structure. We place the gears between the two tires so that the bent shorter tire is on the side of the large flat gear. And the long one goes around the small gear. In this case, the short gear is installed at an angle of 90 degrees to the axis of the large flat gear.
- The small and large gears of the drill must be in contact with the toothed parts, i.e. to put it more simply, to coincide in their stroke, thus transferring rotation to each other.
- We carry out welding, where we connect both ends of the long and short tire to a tube, inside of which there is a shaft with a short gear.
- All that remains is to make the handle. To do this, weld the second piece of tube to the shaft.
- On the side of the short tire, the shaft with a large flat gear is ground with a grinder into a square shape. This is done in order to put on the heads.
- The key is completely ready using an old drill!
The wrench is specially made to unscrew and tighten bolts and nuts in hard-to-reach places. At the same time, we save our time and effort.
Video
Video on how to make a key from an old drill with your own hands:
Carpentry workshop equipment
A few more interesting suggestions on how to make equipment for home carpentry using a regular screwdriver.
Wood lathe
When making wood products, it is difficult to do without a lathe. You can build it yourself. A flat wooden workbench is ideal for the bed. A screwdriver can be used as a headstock and rotation drive. You need to place the tool in a wooden bed made from a block in the shape of a screwdriver and secure it with a clamp. The block can be secured with a clamp, and if the machine is constantly used, screwed with self-tapping screws. A tooth mandrel must be inserted into the chuck. The tailstock is made of two bars with an adjusting screw, which is sharpened to a cone. It is installed opposite the fixed screwdriver so that the axis of the tool coincides with the axis of the tailstock adjusting screw. The back support structure is secured with a clamp. If you plan to process large parts, then the fastening should be more reliable. The tool rest can also be made from a block, securing it to the workbench with a clamp. A primitive lathe for the home workshop is ready.
Bench Drilling Machine
Another equally important piece of equipment is a drill. It can also be made from a screwdriver. To do this you will need a used screwdriver. From it you need to take a motor with a gearbox and a cartridge. Now you need to make two clamps from textolite, which will perform the function of fixing the drilling head of the machine. To achieve maximum alignment of all holes on the clamps, it is better to process them together, in one installation. Then you will be able to avoid distortions.
Bushings with internal threads are used as limiting posts. They must be the same size, corresponding to the distance between the clamps. After this, another clamp is made from textolite and two bosses from caprolon. They are drilled off-center, resulting in two eccentric bushings. The clamp is installed on the rod and the backlash is selected using eccentrics. After this, install a wooden lever on a spring so that the drilling head returns to its original position. To supply power, you must use a transformer with a power of more than 150 watts and an output voltage similar to the screwdriver you are using. After this, you need to install a diode bridge and a capacitor, and install the drilling head on the frame.
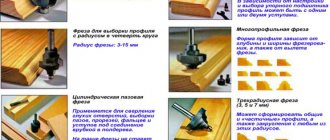
Manual router from a screwdriver: step-by-step instructions
It can be converted into a hand router. To do this, you do not need to purchase expensive materials. Everything you need can be found in the workshop or garage, practically under your feet. To make a manual router from a screwdriver, you will need pieces of thick plywood or chipboard, a clamp for attaching the tool, fasteners in the form of bolts and self-tapping screws, plumbing tools and a feather drill for wood. In the latter case, you can use a drill bit.
Assembling a homemade router is quite easy. To do this you need:
- From pieces of the selected material, cut out a base, a vertical stand on which a screwdriver will be attached using a clamp, a stop and a gusset to impart rigidity to the structure. The dimensions of the parts are chosen arbitrarily, in relation to the dimensions of the power tool.
- Using a pen drill, drill a Ø 40 mm hole in the base for free access of the cutting tool to the processing area.
- Make a clamp according to the diameter of the hand tool.
- Using a clamp, secure the screwdriver to a vertical stand so that its chuck is a few millimeters from the base.
- Install the stiffener.
- Secure the screwdriver with the stop on the vertical stand.
- Install the cutter into the tool chuck.
The screwdriver cutter is ready for use. Such a machine cannot become a full-fledged replacement for a manual milling cutter due to its low power and low spindle speed, but it will solve the problem of milling small parts in a home workshop.
Circular Saw
In addition, for your carpentry workshop you can make a circular saw from a screwdriver. To do this, you need to make a working surface using a sheet of chipboard or thick plywood. You need to make a cut in the tabletop to allow the circular saw to exit. The screwdriver must be securely fastened to the underside of the work surface using metal or wooden clamps. In the same way it is necessary to mount the shaft
It is important that the saw blade extends above the working surface of the table by no more than a third of its diameter
Wood lathe
Creating products from wooden blanks is impossible without a woodworking machine. As a working surface of the machine, you can use a workbench made of wood with a flat surface.
According to the dimensions of the tool, make a bed from a lath in which the screwdriver will be located and fixed. A regular clamp is used for fixation. The bed is attached to the base using self-tapping screws or a clamp.
A mandrel with teeth is placed in the screwdriver chuck. To make the tailstock, 2 bars with an adjustment screw, sharpened to the dimensions of the cone, are suitable. The headstock is attached opposite the screwdriver. In this case, its axis should be at the same level with the headstock adjusting screw.
Use a clamp to secure the back stop to the base of the future machine. A simple wood lathe is ready to use.
Method No. 1 – Second life for an old tape recorder
As you understand, the first version of a homemade mini drill will be made from a CD recorder forgotten by time. All you need from the former bestseller is a motor that will rotate the chuck with the tool. Since the device is powered by 6 Volts, you will additionally have to find an appropriate power supply or several batteries. You can use a USB adapter, but in this case the power will be slightly reduced. In addition, you need to buy a collet yourself (sold in any radio store or on the market, on the Internet on AliExpress, the price is low) and find a suitable housing for homemade work, although this is not necessary, you can hold the tool directly by the motor.
So, in order to make a mini drill from a motor yourself at home, you must follow these steps:
Solder two flexible wires to the contacts of the device, as shown in the photo.
Install a drill of a suitable size into the collet.
3. Place the finished nozzle on the motor shaft and secure the cartridge with screws
Please note that the collet hole must ideally fit the shaft diameter, which is usually 1.5 or 2.3 mm. Otherwise, it will be difficult for you to remove vibration when operating a homemade small drill. If the hole in the collet chuck turns out to be larger than the motor shaft, then you can try wrapping several layers of tape, thick paper, polyethylene or other material
This will compensate for the gap and reduce vibrations
If the hole in the collet chuck turns out to be larger than the motor shaft, then you can try wrapping several layers of tape, thick paper, polyethylene or other material. This will compensate for the gap and reduce vibration.
Carefully tighten all 4 bolts on the nozzle, then connect the wires to the power source and test the finished homemade product. For ease of use, it is advisable to add a button or switch to the power supply.
That's all the technology for assembling a device with your own hands. As you can see, making a microdrill from a motor is not at all difficult, even for a novice electrician. The only drawback of this device is the low strength of the thin drill. If you drill holes that are not at right angles, it will break immediately, so be careful and buy a few drills in reserve for practice.
A very important point that you should know about is that to make the drill spin in the other direction, just swap the wires! You can watch an interesting video instruction on how to make a simple drill below:
A simple drill made from improvised means
Shell options
If, in order to make a clamping device, you need to go to Aliexpress or another similar portal in search of a collet chuck, everything is much easier with a casing. To create it, you can use trash that is usually thrown away.
Let's look at several variations.
A bottle of antiperspirant deodorant. Individual plastic containers perfectly fit the dimensions of the motor from an audio recorder or CD player. In a situation where the engine is slightly larger in size, it should be inserted with slight tension. You need to cut a hole in the cap of the antiperspirant bottle to remove the collet cartridge. For greater practicality, at the very bottom you can put a socket for connecting a power source, and on the side there is an on/off button. This makes it possible to keep the drill away from the block.
Socket for connecting incandescent lamps. The option, of course, is of little use - it will not be possible to make a hole in such strong plastic, therefore, the power button will need to be fixed to the shell with glue.
Making a screwdriver attachment from a hand drill
Few people know what can be done from an old drill, so don't be in a rush to recycle or sell this invaluable tool. From it you can make a device for a screwdriver, which is designed for screwing and unscrewing various fasteners. These can be not only long self-tapping screws, but also bolts and nuts. The secret of this device is that you can make a very useful thing out of an old drill, which will allow you to get to hard-to-reach places and then unscrew the fasteners.
The principle of making an attachment or device for a screwdriver from a hand drill is to perform the following manipulations:
- First, we free the tool from unnecessary parts. To do this, remove the chuck from the tool, as well as the handle.
- The thrust heel is also dismantled, which will not be needed in the new device.
- The shaft on which the cartridge was located has a fairly large diameter. It will not be possible to install a shaft of this diameter into a screwdriver chuck, so let’s start grinding it down
- It is recommended to grind the shaft to reduce its diameter on a lathe. The use of an emery wheel or grinder for such purposes is not recommended, since the grinding will be uneven
- To grind a shaft on a lathe, it will first need to be removed from the tool. It's not difficult to do this. In the mechanism, near the bevel gear, which is mounted on the shaft, there is a hole with a cotter pin. This cotter pin must be knocked out, thereby disconnecting the gear from the shaft
- After grinding the shaft down to 8-10 mm on a lathe, it should be installed in place, not forgetting to pin it. The shaft is made of hardened steel, so before grinding it, it is recommended to do heat treatment (heat it with a blowtorch)
- The shaft is driven by a ball bearing, which can be lubricated to extend its life.
- The first part of the work is completed. The shaft that was ground off will be used as a transmission device on the new device. The working element on the device will be the shaft on which the handle is attached
- The second shaft has a specific hexagonal shape, which should also be machined so that socket heads or other attachments can be put on it. The simplest option is to make a square shape from the hexagonal shape of the end protrusion for securing the heads
- This can be done using a grinder and a cutting wheel. In this case, only heads for screwing and unscrewing bolted connections can be installed on such a shaft
- If you plan to use the device for other purposes, then threads can be cut on the shaft by first making it cylindrical and grinding it to the required size
- A drill chuck must be screwed onto the cut thread, into which you can install various attachments - bits, mixers, drills, cutters, etc.
- Please also note that to install the chuck on the secondary shaft of the device, you will also need to cut an internal thread for control fastening of the collet chuck
- To complete the manufacture of the device from an old hand drill, it is necessary to cut off the remaining part on which the thrust foot was attached
- After this, the homemade device is ready for use. All that remains is to fix it in the screwdriver chuck and test it
The advantage of such a device is that it increases the torque. The screwdriver drives a small diameter gear, which transmits force to the larger gear. A small gear is attached to the large gear, and the force is transmitted to the second large gear, on which the secondary shaft is located, thereby reducing the rotation speed, which means increasing the torque. As a result, the device allows you to unscrew and tear off stuck and rusted bolted connections. However, do not forget that the main role is played by the screwdriver, which must have the necessary power reserve, otherwise its engine may suffer.
How to release the keyless chuck
To release the double-clutch chuck, you need to turn the clutch so as not to break the ratchet.
To do this, you need to use various plumbing products. keys, otherwise you will have to completely disassemble the drill and unscrew the head. This means that you need to unscrew the screws on the body and, remembering the location of the parts, go through the drill. With a single-coupling structural element, the procedure does not change, that is, try to first unscrew it with the help of a plumber. key, and then simply disassemble the drill and remove the chuck, disassembling it.
If the drill is expensive, you need to make several cuts. Dirt that gets inside and causes the mechanisms to get stuck can also be a problem. It could be sand, soil with water or rust. In this case, you need to remove the insides of the drill and thoroughly clean it, and then start removing various pebbles and pieces of grass.
Rotating the double-sleeve chuck
How to do it yourself?
Finally, it remains to talk about making a simple hand drill on your own. The described method involves using an old umbrella, a dowel and a drill as components of the tool being created, as well as the simplest equipment - a hammer and a hacksaw. Practice shows that this problem can be solved in a few minutes by following the algorithm below:
- take an umbrella and saw off a fragment of the required length from its rod (along with the handle);
- bend the workpiece in two places at an angle as close as possible to a straight line;
- select a dowel of a suitable diameter and drive it into the tube to the maximum possible depth, and then securely fix the drill in it.
If the master needs a thinner cutting tool, he will need another dowel, which must be driven into the already installed one. Upon completion of this action, all that remains is to take a drill of a smaller diameter and secure it in the manner described above.
To summarize, we can state that hand drills deservedly enjoy their popularity. It makes sense to use them for anyone who values reliable and unpretentious tools that can ensure high quality of work performed.
You can see an overview of a hand drill and how it works in the following video.
How to use a drill?
To successfully solve problems using the described tool, it is enough to follow useful recommendations.
If a contractor requires standard hole placement, he should pay attention to the location of the drill. During operation, it should be at right angles to the surface, without deviations in any direction.
As for inclined holes, to obtain them you should position the drill at the required angle. When completing drilling, you need to reduce not only the rotation speed, but also the pressure - in order to avoid damage to the cutting tool. In addition, fulfilling this condition negates the likelihood of the master losing balance. To use a hand drill as a screwdriver, just fix a bit with a suitable tip in its chuck. The mixer is also attached there - in situations where the instrument in question performs the function of a mixer.
Upon completion of the work, the hand drill remains to be thoroughly cleaned of dust, shavings or sawdust.
Making a machine for winding coils from a drill
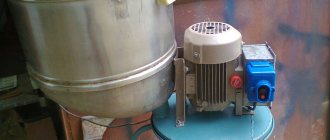
What else can be made from an old hand drill that has been gathering dust in the garage for more than 10 years? Of course, you can make a simple device that will allow you to wind coils. You can wind not only threads and ropes, but also wire, for example, when rewinding electric motors.
The design of such a machine is very simple, and to manufacture it you will need to use the following devices:
- Vice - a fixed handle or tool stop located in a horizontal position is attached to them
- A block of wood of the appropriate size, which is located near the cartridge. This block acts as a stop, holding the tool in a horizontal position
- A reel or other devices are attached to the tool chuck, onto which material is wound - wire, rope, threads, etc.
A photo of such a device is shown in the photo below. If you attach a sharpening wheel to the chuck, the tool can be used as a hand sharpener.
Homemade products from an old grinder
What other homemade products can you make from an old grinder? For example, you can simply design a grinding machine on rollers, which is very easy to use. To produce a grinding machine from a grinder, you will need two narrow strips of metal, a pin with a diameter of 8-10 mm, washers and nuts.
The photo of a homemade grinding machine shows that two rollers or bearings are attached to the bottom of the iron strips, which allow you to effortlessly move the grinder along the workpiece. With all this, the grinder is attached to strips of metal using a pin, which actually allows you to adjust the height of the grinder above the workpiece.
It’s quite easy to make a homemade garden mower out of an angle grinder. For these purposes, you will need to use an old wheelbarrow, at the bottom of which there is a grinder
with knives or fishing line for cutting grass. The only drawback of this homemade grinder will be that to connect the power tool you will need to use a rather long carrying case. In this case, it is even better and more convenient to use an old cordless screwdriver.
What else can be made from an old grinder? Here is a compact compass for cutting circles or, for example, a belt grinder, as in the photo. To do this, you need to take two square pipes of different diameters, insert a spring into the larger one to tension the tape. The shaft of a homemade grinder from an angle grinder is made of wood with a nut inserted inside to secure the shaft to the angle grinder.
You can also make a machine for sharpening twist drills from a grinder, as well as a full-fledged circular saw. It should be seen that the design of circular saws made from an angle grinder can be very different. The pictures below show perhaps the most common version of a circular saw.
It won't be too difficult to do
from an angle grinder, you will just have to work hard in advance to install 3-4 disks (depending on the appropriate width of the groove) on the angle grinder shaft.
READ Circular Saw How to Make a Stationary Saw
Wind generator
Using a screwdriver engine, you can design a small wind generator for a summer house or personal plot, and be independent of the power supply. It will also help during a power outage.
It will take a little time to create a wind generator. The rotor part is removed from the screwdriver. The motor shaft is attached with a bracket to a plastic plate. We attach the flywheel to the end gear with bolts and attach four blades made from PVC pipe to it. You can use a tea can for the body, carefully sealing the cracks with sealant. The wind generator is ready to provide electricity that costs you nothing.
Electric car or children's catamaran
To create an electric car for children you need:
- make a frame (frame) from a metal profile or PVC pipes. They need to be assembled together so that you get a small car or a tricycle;
- as an axle for the wheels, you can use a metal pipe or rod, on which you need to attach a large sprocket;
- on the frame under the seat, make fastenings for a screwdriver with a battery and a shaft with a small gear;
- put the chain on the sprockets;
In order for a car to brake, you need to make a gas pedal or handle. The first part can be constructed from a rod with springs, to one end of which a pedal will be attached, and to the second a metal part that will press on the button. This design requires welding skills and a lot of time.
Car made from a screwdriver
To make the job easier, the throttle handle can be made from a set of bicycle rim brakes. To do this, you will need to take a part of a bicycle fork that has mounts for the brakes or make an analogue of them yourself from a metal rod of the required diameter.
A children's catamaran is made according to a similar principle, but its assembly requires PVC pipes. Since the movement of the gears is provided by the motor from the screwdriver or the tool itself, additional protection should be provided for it from water ingress. If the structure is made from a broken screwdriver, then the gas button can be removed with separate wires through pipes, and only its motor can be used as a motor.
An example of a catamaran design made from pipes for children
Important! The motor of a drill or screwdriver is not designed for heavy loads, so this electric vehicle is designed only for light passengers. Also, from prolonged use in this mode, the screwdriver can quickly break.
pros
There are a sufficient number of advantages that fully justify the use of the described tools.
- Simplicity of design. Due to the absence of a large number of components, mechanical drills are easily repaired and do not require particularly careful maintenance. This allows you to significantly reduce the amount of time and money required to ensure the functionality of the tool used. The solution to this problem is not difficult: it involves timely application of lubricants and replacement of parts that have exhausted their working life.
- Reliability and durability. Experience shows that it is very difficult to break a hand drill even with regular and very intensive use. This is due to the high quality of the materials used in the manufacture of such instruments (especially those produced during the Soviet era). Many mechanical drills produced several decades ago still serve successfully, having repeatedly justified their original cost.
- Autonomy. The described tools do not require electrical power, and therefore they can be used anywhere. This advantage of hand drills is especially important for those who have to work far from the usual benefits of civilization.
- Reasonable price. Today, a new hand drill can be purchased for 600-1000 rubles, while a used mechanical “assistant” will cost even less (about half). In addition to the technical condition, the cost of the instrument is influenced by its dimensions, equipment, body material and the reputation of the manufacturer.
Most often, craftsmen give preference to drills produced in two-handed versions, using them to create small holes and grooves
Accurate performance of such work requires precise adjustment of the drilling depth and extremely careful rotation, for which the described tool is most suitable
Attachment with automatic screw feeding
Another attachment from Drillpro - for automatically feeding self-tapping screws - can turn a regular electric drill into something like a belt screwdriver.
The device is made of metal and literally consists of a couple of parts: a linen holder with screws and the feed mechanism itself. The attachment is attached to the drill using a mounting hole with a diameter of 44 mm and tightened with a clamp.
The nozzle mechanism is equipped with adjustment systems for screws of various sizes and screwing depths.
The screws are fed each time you press the wall of the tape holder.
You can purchase special tapes with self-tapping screws for use with this attachment, or simply insert new screws into the holes of the already used tape.
Price 1500 rub.
7
Budget option - we make a machine from a drill for 300 rubles
This is an unusual method, and you will need to spend about 300 rubles. This way you will get a device that drills at any angle, from 45 to 90 degrees.
So, let's look at the features of such a device:
- Tilt angle. In order to tilt the device to the required drilling angle, it will be enough to unscrew the two green levers on top and set the required degree on the scale.
- Drilling limitation. If you tighten the limit knobs to the desired height, you can limit the depth to which the drill can go.
- Fixation. The device can be fixed in absolutely any position on a vertical plane. For example, this is very convenient if you change drills so that the drill does not fall down.
- Fixing on the table surface. If you can fix the base of the device with four self-tapping screws, for example, to a table, be sure to use this opportunity. This function will be very convenient if you need to drill many similar parts.
- Sole. At the bottom there is a recess with a width of 6 cm to make it more convenient to install the device. The top of the sole has a 45 degree chamfer on both sides and may require drilling a hole into the edge of the square shaped timber.
This device is simple and convenient to use. This will greatly help make work in the workshop easier, and at the same time it costs mere pennies.
Self-refinement to a cutting machine
The simplest homemade machine is a machine made from a small angle grinder. The work will be accompanied by a minimum of costs, and manipulations will take a few hours. The exit structure will be a long metal pipe that serves as a handle and frame.
A metal transverse strip with two holes for fastening the tool is welded to one of the ends. On the same side, the pipe is fixed to a piece of angle on a movable shaft. The first one can be fixed to the desktop or to the floor in the workroom. If you are faced with the question of what can be made from an angle grinder, you can use a cutting machine using the described algorithm. According to it, on the opposite side of the fastening it is necessary to fix a spring, which will ensure the return of the structure to its original position. After completing this stage, you can use your homemade product. You just need to install the device correctly.
This version of the machine is the simplest solution for metal processing, while complex work will require precision, so the design for solving such problems must be made more stable, which means the work will have to be approached more thoroughly.
Armchair
The famous armchair, which was found in most Soviet apartments, is again at the peak of popularity today. Owners are captivated by its convenience, simple design and frame quality.
The owner of this specimen used foam rubber 8 cm thick for the back and 10 cm thick for the seat, also adding two layers of synthetic padding. Upholstery fabric with the effect of furniture screed in lemon color was purchased at the store. Rounded shapes were created by bending the foam overlapping the edge of the back and seat, as well as by stretching it tightly.
To paint the frame, inexpensive matte white enamel “PF-115”, tinted with black, was used. Painting was done with a velor roller in three thin layers.
After drying, it is recommended not to touch the chair for about two weeks - this way the composition will polymerize completely and will be stable in use.
Drilling machine, why is it needed?
Drilling through thin material is not a problem. All you have to do is pick up the drill, a few seconds, and the job is done. But what to do if you need a precisely calibrated hole in a thick beam? A hand tool will not work; there is a high risk of damaging the workpiece. The result will be a shift in the center of the hole, a change in geometry, and torn edges. A drilling machine will help you avoid such shortcomings and create a hole with the specified parameters.
Thanks to the reliable fixation of the workpiece and the centering of the tool, drilling accuracy is ensured, which cannot be achieved when working with a drill. Precision is a must when making furniture in a home workshop. To create a homemade furniture additive machine, you will have to slightly modify an already finished tool. Manufacturing does not require much effort or time.
Don’t forget about the versatility of this machine: by changing drills, you can work with any material, from soft wood to metal, easily drilling through sheet steel. Instead of a drill, you can use a milling cutter, then the device will replace a low-power milling machine. Among other things, a drilling machine will significantly facilitate the work of the master. It is easier to work with a stationary device; there is no need to hold a heavy tool suspended.
Self-refinement to a cutting machine
A more common homemade product is a machine made from a small angle grinder. The work will be accompanied by a minimum of costs, and manipulations will take a few hours. The exit structure will be a long iron pipe, which acts as a handle and frame.
A metal transverse strip with 2 holes for fastening the tool is welded to one of the ends. On the same side, the pipe is fixed to a piece of angle on a movable shaft. The first one can be fixed to the desktop or to the floor in the workroom. If you are faced with a question about what can be done
from a grinder, you can make a cutting machine using the described method. According to it, a spring must be fixed on the reverse side of the mount, which will ensure that the structure returns to its original position. After completing this step, you will be able to use your own homemade product. It will be necessary to install the device correctly.
This version of the machine is a more common solution for metal processing, while complex work will require precision, so the design for solving such problems needs to be made more stable, which means the work will have to be approached more thoroughly.
Cool ideas and lifehacks for using a screwdriver at home
In addition to the listed mechanisms, a screwdriver can also be used to implement other ideas on the farm. This hand-held power tool will help you automate the opening of an entrance gate, make a winch for a car, or make scissors for cutting metal. If you attach an attachment for cutting tin to it, you can turn an ordinary rubber boat into a motor boat, and modernize the process of drilling holes for ice fishing. In addition, everyone knows that a screwdriver is used as a drive for a mixer, meat grinder or juicer.
After reading the article, the reader gained knowledge about the unconventional use of a screwdriver. Now he can use this hand tool to create carpentry equipment, improve children's vehicles and other useful things in the home.
Basic drill malfunctions and ways to eliminate them
No matter how perfect the technology, sooner or later, there comes a time when the technological resource is exhausted, and one or another part requires replacement.
An electric drill is no exception. Here is a list of possible, most common problems:
- Motor malfunction (power supply is OK, but the motor does not rotate).
- Wear or burning of the carbon brushes (the brushes spark strongly when the device is operating).
- Failure of the engine support bearings (the hum of the motor is heard, but there is no rotation, or the cartridge rotates intermittently, with a grinding noise).
In addition, the reasons for the unstable operation of the electric drill may be related to the integrity of the power cord or a stuck start button. Such problems can be solved by replacing the cable and preventatively cleaning the button from debris and dust.
To repair a drill at home, you will need many special tools, including electrical ones. If they are not there, it is cheaper to send the drill to a service center for repairs. Replacing carbon brushes is within the capabilities of a home craftsman.
In all new drill models, the designers have provided quick access to the brush attachment point and easy replacement.
The brushes are hidden under a cover above the engine commutator.
New life for the sofa
You can repair not only small wooden objects, but also large items. This book sofa from 1974 was once reupholstered, but has worn out again. His mechanism broke and the bolts were bent. During the remodeling, the owner of the sofa saved not only the budget, but also the space: this model is very compact and takes up little space.
There is no foam rubber inside - only springs and a harsh canvas on a cotton backing, so the design is odorless. The frame is in satisfactory condition. The owner bought new hinges, a piece of furniture fabric and new bolts.
Thanks to the perseverance and patience of the craftswoman, the mechanism of the sofa was updated, and the soft part was reupholstered with new material. All that remains is to add a couple of decorative pillows.
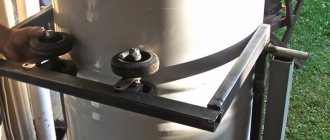
Making a garden shredder
A garden shredder for grass and thin twigs (less than 1 cm thick) can be made on the basis of a corded drill-driver.
Create an aggregate like this:
- choose a suitable container, for example, zinc boiler;
- a hole is drilled in the center of the bottom for the shaft on which a knife or several blades will be fixed;
- make a wooden or metal frame to install the container or place it on the edge of the table;
- a drill-driver is attached to the frame or bottom of the boiler, which is equipped with knives;
- install an on/off button;
- make a slot in the side of the container - cut out a rectangle 10 by 20 cm in front of the bottom;
- A sleeve is made from tin for disposing of crushed plants;
- attach it to the container;
- check the functionality of the unit.
Knives are easiest to make from hacksaw blades. They need to be installed with the point down. In this case, you can make several versions of blades for different grasses. If you make an attachment in the form of knives for a drill-driver, then you can simply chop the grass in a bucket or other suitable container.
Homemade products from an old grinder
What other homemade items can you make from an old grinder? For example, you can easily design a roller sander that is very easy to use. To make a grinding machine from an angle grinder, you will need two narrow strips of metal, a pin with a diameter of 8-10 mm, washers and nuts.
The photo of a homemade grinding machine shows that two rollers or bearings are fixed at the bottom of the metal strips, which allow you to easily move the grinder along the workpiece. At the same time, the grinder is attached to strips of metal using a pin, which actually allows you to adjust the height of the grinder above the workpiece.
It’s enough to simply make a homemade garden mower out of an angle grinder. For these purposes, you will need to use an old wheelbarrow, at the bottom of which there is a grinder with knives or fishing line for mowing grass. The only drawback of this homemade grinder will be that to connect the power tool you will need to use a rather long carrier. In this case, it is much better and more convenient to use an old cordless screwdriver.
What else can be made from an old grinder? Here is a small-sized compass for cutting circles or, for example, a belt grinder, as in the photo. To do this, you need to take two square pipes of different diameters, insert a spring into the larger one to tension the tape. The shaft of a homemade grinder from an angle grinder is made of wood with a nut inserted inside to secure the shaft to the angle grinder.
You can use a grinder to make a machine for sharpening twist drills, as well as a full-fledged circular saw. It should be noted that the design of circular saws made from an angle grinder can be very different. The pictures below show perhaps the simplest version of a circular saw.
It won’t be difficult to make a wall chaser out of an angle grinder, you just have to work hard in advance to install 3-4 disks (depending on the desired width of the groove) on the angle grinder’s shaft.