How to make a hole in a lamp?
It is better to work with gloves, take the light bulb in your hands and press the bulb against the sandpaper. We begin to rub the lamp on wet sandpaper, periodically add water (a couple of drops), after 5 minutes (depending on the intensity of work) a hole will appear in the bulb and, most importantly, it will be quite smooth.
Interesting materials:
What is a good alcohol, lux or alpha? What class is Ford Mondeo 3? What glue is best for metal and plastic? What kind of wrench is needed to unscrew a bicycle wheel? What kind of coffee in Dolce capsules is thick? What paint should I use to paint wallpaper without painting? What paint to paint the carpet? What paint to paint burlap? What paint are used to paint Gzhel products? What course of back massage?
How to drill a bolt straight along without a lathe or drilling machine with your own hands
- Impact-type serrated bits designed for drilling. When working with concrete, it is recommended to use varieties of separate soldering teeth made from stronger iron alloys. Probably the bits are equipped with SDS tails for installation in a drill with a keyless chuck. Drills are great for concrete walls, but upon contact with metal, they will of course begin to collapse, so before drilling into a reinforced concrete wall, you need to check that there is no reinforcement in the place of work used for reinforcement.
- Diamond bits designed for hammerless drilling of holes. Such nozzles are more modern, using them to make a hole
in a concrete wall easier. The edge of the crowns has an abrasive structure and special cutouts; during the production process it is treated with a spray of diamond chips or corundum. Before making a hole in the wall, you only need to select the appropriate length of the nozzle: in everyday life they use varieties with a diameter of up to 100-120 mm, in professional work larger crowns are used. A special feature is the ability to drill without the risk of destroying the fixture with fittings. - KS-crowns having a cutting edge with crystalline diamond particles. These bits are used for most hard walls , including drilling into concrete slabs, exterior walls and masonry structures.
Portal about construction
How to drill metal How to drill glass How to drill tiles How to drill concrete How to drill wood and chipboard
Small diameter holes (up to 10-12 mm) in wood and chipboard are most often drilled with ordinary metal drills. They cope with their task quite successfully. But if every millimeter is important for the position of the hole, then you need to use special drills.
When entering wood, a metal drill may deviate slightly to the side, even if a recess is made with an awl at the site of the future hole.
In general, drilling wood can be done even with an ordinary nail or a piece of wire with a flattened end. Special drills for wood have to be resorted to only when it is necessary to drill a hole of large diameter, or when increased demands are placed on surface cleanliness and accuracy. There are several types of such drills:
- spiral (a);
- twisted or single-spiral (it is sometimes also called spiral) (b);
- feather (in);
- annular (crown) (d);
- Forstner cylindrical drill (d).
Drills for drilling wood
Drills for wood are made from tool alloy and tool carbon steels; metal cannot be processed with them.
Twist drill
drill holes of small and medium diameter. It can easily be replaced with a metal drill bit, although the hole will be cleaner if you use a wood twist drill bit.
Single twist drill
It has a sharp cutting edge and a screw shape that removes chips well. It is used when you need to get an accurate deep hole with a clean surface of the walls.
Feather drill
They are usually used when drilling holes with a diameter of 10 to 25 mm, although there are drills with a diameter smaller than 10 and larger than 25 mm. This drill is the simplest in design and the cheapest, so it is reasonable to use it in all cases where high demands are not placed on the quality of the hole. The disadvantages of a feather drill include poor direction, low diameter accuracy, rough surface of the hole walls, and the need to periodically remove chips by stopping drilling and removing the drill from the hole. The advantages are simplicity and low cost.
Cutting holes of complex shapes
Using Loop Regularizer
Another way is to use the free Loop Regularizer script, which can be downloaded from the link. Download it, then drag the saved file into the open 3D Max window.
I’ll tell you how to use the script with an example. Create a rectangle, give it two segments in height and width. Convert it to Editable Poly. Go to the Edge editing level and double-click to select all the edges dividing the rectangle in half in the vertical plane.
Press the Chamfer button, set the number of segments (the more, the more rounded the hole will be), set the distance.
Now we will do the same for horizontal edges.
Go to the Polygon level and select all the polygons in the center on both sides of the rectangle.
Right-click on the screen and select the Regularize line that appears after installing the script.
The square has transformed into a circle. As I already said, it would have been smoother if we had specified more Chamfer segments.
Now press the Bridge button and get a through hole.
Using Boolean logical operations
This way to cut
We have already discussed the hole in the object in great detail in this lesson. The method is really good in its simplicity, but the mesh after manipulation with the Boolean may turn out to be “curve”. Sometimes using ProBoolean can help solve mesh problems.
GROOVE/TENK CONNECTION
Like the main groove, the groove/tenon connection (Fig. 5) can be made in several ways: on a circular saw and by milling. Regardless of the method, the proportions of the connection are as follows: the tenon is about 1/4-1/3 of the thickness of the part on which it is cut, and approximately 1/4-1/3 of the thickness of the part with the groove. To ensure a tight and good connection, it is necessary to cut the grooves slightly deeper than the length of the tenons.
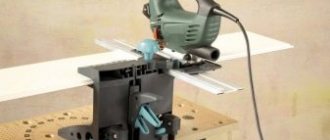
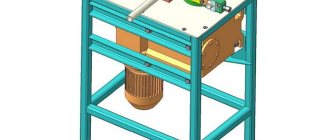
Let's consider the design of the device for recesses.
The gray square is the base, it can be any piece of plywood with a round hole. It is not necessary to do it extremely accurately, without gaps, it is better that the base rotates freely in it.
READ How to assemble a STIHL 180 engine
The two semi-rings of the base are connected to each other by brackets of arbitrary shape, which are necessary so that the outline of the base has the shape of a circle.
The trapezoid in the drawing is a sidewall. There are holes made in it that can be made arbitrarily. The smaller the pitch of the holes, the finer you can adjust the router and adjust the radius of curvature of the notch in the wood. It is advisable to make the side pillar thicker; it determines the rigidity of the structure. The trapezoid is attached with self-tapping screws and glue from below.
How to install the router?
We take the outer size of the ring arbitrarily. The main thing is that it does not extend beyond the sides of the pendulum. You can fasten it in any way you like, for example, with metal corners. A number of holes are also drilled in the sidewall, with a pitch of 10 mm.
The upper strut of the pendulum is an optional element, but provides additional rigidity to the structure.
Workplace requirements
Wood carving should be carried out in a prepared place, on a strong and stable workbench. Beginning craftsmen can use a tabletop, as long as its height does not exceed the belt line. The main requirement for the working surface is cleanliness and smoothness; if uneven surfaces appear, they must be removed immediately. The board on which the carving is made must be securely secured with clamps.
Under no circumstances should you sit on a stool, a wobbly chair, or work on your knees.
For beautiful and high-quality work on the work area, it is necessary to install good lighting in the form of 2-3 lamps or bright lamps. The placement of the light will be important; it should be set at different angles, above the carver’s eye level. In a well-lit and properly prepared workplace, even a beginner can learn more skills and quickly grasp the basics of mastery.
Geometric
Geometric carving is considered a more complex carving technique after contour carving; it differs in that the pattern is created not using lines, but by creating geometric shapes. Most often, beginning carvers use wedge-shaped notches in wood.
When performing geometric carving, it is necessary to select the optimal working material and prepare it, and then apply the desired design.
When drawing a sketch, a pencil, ruler and compass are used to ensure that all lines are straight and correct. If you can’t create a drawing on your own, you can use a ready-made sketch by printing it and using an awl to puncture the places where the lines intersect.
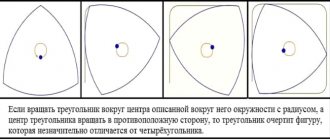
Sketches for geometric carving often consist of triangles that must have a notch, so the wood is cut at different angles, and the excess wood
cleaned up. Once all the triangles have been processed, you can move on to carving other elements. After the main work, it is necessary to clean the problem areas, for which a sharper tool is used. The finished pattern is sanded and covered with stain.
Wood carving for beginners
- Kinds
- Which tree to choose?
- Required Tools
- Workplace requirements
- Step-by-step schemes for beginners
- Common Mistakes
Each person has certain talents, some are acquired, others are given by nature. In their quest for beauty, people constantly try to make not only something new, unusual, functional, but also beautiful, aesthetic and wonderful. Working with wood is one of the oldest crafts, which remains popular and relevant today. Those who want to learn wood carving must master a lot of wisdom, understand the technique and gain experience, but this requires certain knowledge.
Wood carving originated in Rus', when, in addition to creating wooden pieces of furniture and utensils, craftsmen tried their hand at decorative and applied arts.
Due to the variety of variations in wood processing, it is worth highlighting the varieties of this skill. These include:
- through thread;
- deaf;
- brownie;
- sculptural;
- chainsaw carving.
In addition to this classification, there is also a division of woodwork into relief and volumetric sculptural carving. The technique of creating relief is considered the simplest, which is divided into the following carving options:
- geometric;
- flat-relief;
- openwork;
- blank with selected background;
- slotted contour;
- invoice.
Each technique has its own characteristics, so it is necessary to study each type in order to fully master the skill of working with wood.
Which file to choose
For manual jewelry jigsaws, standard universal files for metal and other materials are used. Selection principle: the more complex the profile, the narrower the canvas. A wide blade “maneuvers” in the slot less easily.
Which is better: heated floors or radiators?
Warm floorBatteries
The blade cuts metal accurately and does not tear the material, but it can cut too slowly. When speed is needed, files with larger teeth are selected.
In addition, craftsmen recommend purchasing Russian-made canvases. In extreme cases, not the cheapest “good quality China” under the brand of a respected corporation from the EU or the USA.
For manual electric jigsaws, Bosch T101AO files are recommended; they are made with straight teeth made of HCS steel. It is noteworthy that the manufacturer recommends other blades with oblique teeth for figured carving, but they tear the edges of the cut more strongly.
Read more about the types of jigsaw files and their choice in our detailed guide here.
Tapes and files for stationary machines are selected depending on the design, manufacturer’s recommendations and tasks. Sometimes you need to cut not just one, but a whole stack of blanks according to one template. The most suitable option for such tasks is selected during real work through trials.
Expert opinion
Strebizh Viktor Fedorovich, leading construction foreman
The use of linings made of more durable materials such as metal, plastic or fiberglass eliminates the need to frequently change the linings, the surface of which must first be polished. If you want to clarify something, please contact me!
Tool that can be used
Let's consider what devices can help you when carrying out work:
| Fraser | There can be two options here - either a full-fledged machine that can perform any work, or a manual milling machine, with which you can quickly perform some operations right at the construction site. |
The first solution is used by professionals, since the price of the machine is high; the second type of tool is also suitable for home use
Specialists use special machines for longitudinal profiling of timber
How to cut a circle from chipboard or a review of a circular saw with variable diameter Buttress (Ballerinka)
The other day I came across this folding shelving unit made of chipboard. So for it it was necessary to make about 15 nickels from the same chipboard with a diameter of 80 mm. And since I didn’t really want to cut such a number of pancakes with a manual jigsaw, and besides, there was no narrow file for a small radius. Then at the nearest tool shop I bought this circular saw, Buttress, popularly known as a “ballerina.” Judging by its appearance, it immediately became clear that this Chinese drill was practically disposable, and there was no need to look at it, because its cost of 300 rubles and change speaks for itself. But since there was no ordinary wood bit of a suitable diameter in the store, I grabbed this “miracle” in the hope that I would somehow cut 15 round timbers with it, and then I could throw this ballerina into a long box.
Portal about construction
How to drill metal How to drill glass How to drill tiles How to drill concrete How to drill wood and chipboard
Small diameter holes (up to 10-12 mm) in wood and chipboard are most often drilled with ordinary metal drills. They cope with their task quite successfully. But if every millimeter is important for the position of the hole, then you need to use special drills.
When entering wood, a metal drill may deviate slightly to the side, even if a recess is made with an awl at the site of the future hole.
In general, drilling wood can be done even with an ordinary nail or a piece of wire with a flattened end. Special drills for wood have to be resorted to only when it is necessary to drill a hole of large diameter, or when increased demands are placed on surface cleanliness and accuracy. There are several types of such drills:
- spiral (a);
- twisted or single-spiral (it is sometimes also called spiral) (b);
- feather (in);
- annular (crown) (d);
- Forstner cylindrical drill (d).
Drills for drilling wood
Drills for wood are made from tool alloy and tool carbon steels; metal cannot be processed with them.
Twist drill
drill holes of small and medium diameter. It can easily be replaced with a metal drill bit, although the hole will be cleaner if you use a wood twist drill bit.
Single twist drill
It has a sharp cutting edge and a screw shape that removes chips well. It is used when you need to get an accurate deep hole with a clean surface of the walls.
Feather drill
They are usually used when drilling holes with a diameter of 10 to 25 mm, although there are drills with a diameter smaller than 10 and larger than 25 mm.
This drill is the simplest in design and the cheapest, so it is reasonable to use it in all cases where high demands are not placed on the quality of the hole. The disadvantages of a feather drill include poor direction, low diameter accuracy, rough surface of the hole walls, and the need to periodically remove chips by stopping drilling and removing the drill from the hole. The advantages are simplicity and low cost. Feather drill
bits
used when drilling large diameter holes - up to 100 mm or more. The kits contain one mandrel with a shank and a centering drill and several bits that are inserted into the mandrel.
Drilling holes with
a Forstner drill
has a centering point and a sharp scorer. Thanks to the latter, it is distinguished by precise cutting geometry. Typically used for drilling blind holes to precise dimensions in softwood, chipboard or laminate for the installation of furniture canopies.
Forstner cylindrical drill
Forstner cylindrical drill
Forstner drill can be short or long pointed.
Forstner drills
It is more difficult to make a blind hole for a hinge in a thin door with a Forstner drill with a long point, since the point can make a through hole. But a drill with a short tip is more prone to moving to the side. In addition to differences in the length of the tip, the Forstner drills shown in the photo above differ in their maximum rotation speed. So a drill with a short tip has welded knives made of high-speed steel and is suitable for working at high speeds, and a drill with a long tip has a maximum rotation speed when working with soft wood equal to 1000 rpm.
There is another device for cutting large holes - this is a ballerina
, designed for cutting large (up to 300 mm) holes in thin pieces of wood, chipboard, fiberboard and other materials.
Ballerina
The ballerina consists of a centering drill and two cutters that are used to cut out a circle. The displacement of the cutters along the guide sets the diameter of the circle being cut. To rotate the ballerina, use a brace or drill with a low speed. You can also rotate it manually.
How to drill wood and chipboard
To prevent the drill from going to the side at the very beginning of drilling, you need to make a small depression in the center of the future hole with an awl. Drilling wood is carried out at low and medium speeds of the drill. The main problem when drilling through holes is chipping at the drill exit. There are two ways to deal with them. First drill a thin hole and drill along it from both sides of the part to the middle with a drill of the final diameter. In this way, it will be possible to avoid chips that occur at the exit. The second method is to firmly press a piece of wood onto the side where the drill comes out, which is removed after drilling.
To make the drill perpendicular, jigs are used. The latter are especially convenient for making holes in cylindrical parts.
Drilling jig
Drilling chipboard requires special attention due to its fragile structure. The presence of laminated or veneer coating complicates the task. To avoid their peeling, use drills with a sharp edge (in particular, a cylindrical Forstner drill) and a backing plate at the exit. To mark holes, be sure to use an awl.