Each of us associates absolutely any holiday with something bright, spectacular and certainly unforgettable.
In order to accomplish all this, it is necessary to create a truly festive atmosphere, as if in a cozy city apartment, country house, cottage, cozy cafe, school classroom or noisy office. In this article, we have prepared especially for you several simple and very original ways to create garlands with your own hands from colored, decorative or corrugated paper.
With ready-made garlands you can decorate anything: rooms, offices, shops and offices, entrances, assembly halls, etc. Any holiday or party will become much brighter and more fun if the room in which it is held is festive and beautifully decorated.
So let's get started...
To make your own garlands you will need the following materials:
- Colored paper, decorative paper or corrugated paper;
- Scissors;
- Strong thread;
- Glue.
Since our article contains a large number of all kinds of paper garlands, we will describe the production of each separately.
How to make origami - Spiral
Stasya will teach you how to make a spiral. There is nothing complicated in the work and the result will please you)
For the spiral you will need 4 square sheets of colored (optional) paper of the same size.
Stasya took 16x16 squares.
Take the first sheet.
bend the 2 ends of the square to form a triangle.
We do the same with the other two ends.
we got a cross.
Turn the sheet over with the white side facing you. If the paper is two-color, it doesn't matter.
then bend along the line of the cross, as shown in the figure.
We do the same with the opposite side.
Now we bend the remaining open white triangles according to the picture.
We do the same on the opposite side.
Now we add 2 obtuse angles together.
and unfold.
bend the left end along the middle line
we're turning this whole thing around
and we do the same.
So, you need to do this “machination” with the remaining three squares.
Now we take any 2 blanks.
bend them and make a rhombus, as shown in the figure.
Next, add the 3rd blank and place the honey in the first two.
We also add the last 4 blanks, in accordance with the picture.
then look carefully. we begin to bend the ends along the lines of the central cross.
and so we bend all the corners one by one.
to bend the last one, bend the first corner. and bend the last one.
and bring it back
Continue collecting like this until you reach the very ends.
So, now we turn our creation over.
and on this side we do the same thing we did just now. twist in a circle.
To prevent our creation from falling apart, we twist the remaining ends together on both sides.
So we got such a spiral.
I hope you liked it))
Lesson prepared by: Stasya
This material was prepared for you by the team of the site https://bakemono.ru
Tips on the topic
The simplest garlands can bring life to your home
Paper garlands are notable for the fact that they can be used to decorate a living space not only in honor of a holiday, but also for no reason. In this way, you can turn any of your ideas into reality, thereby introducing something new into your environment and lifting the mood of yourself and your loved ones.
Garland of 3D stars
Homemade garland models can be divided into those that are glued and sewn. The latter option is preferable in some cases, since machine stitching does not crumple the paper. In addition, it turns out much faster this way. Of course, you can sew by hand, but it takes a long time and the result does not always live up to expectations.
There are also ribbon and thread garlands
Any type is attractive in its own way, regardless of the complexity of execution. A garland made of threads looks more impressive, but it easily gets tangled during use. And strip displays require the use of high-quality glue, which determines their durability.
New Year's paper bunnies
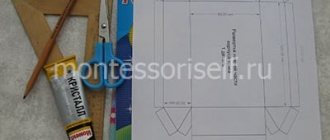
Some models require preliminary creation of cutting templates or assembly patterns. In order for crafts to fit harmoniously into the interior, you should first study the situation (color and texture of parts). The time of year is also taken into account. In accordance with this, the most suitable models are selected. How to make beautiful paper garlands will be discussed further.
Halloween themed garland
Volumetric New Year's garland
How to make lush snowflakes
Here is the first idea for creating a garland dedicated to the New Year - from snowflakes. This can be a Christmas tree or wall garland. I think everyone remembers how to cut out flat openwork snowflakes from a square of paper (you can use regular napkins).
This option will help out if you need to make garlands in the shortest possible time. If you have the time and desire to do something original, then you should pay attention to a more complex figured version of snowflakes.
Paper snowflakes
Step-by-step master class:
- You should prepare any paper (for example, office paper), pen or pencil, scissors, stapler, glue, double-sided tape and thread
- It is necessary to cut an A4 sheet into two identical strips
- Now fold each strip into an accordion shape.
- Cut one strip from your workpiece along the fold, bend it in half and draw a pattern on it. You will use it to cut out a snowflake
- Now fold the accordion in half and secure it with a stapler
- Attach the template to one of the parts of the workpiece, trace with a pencil and carefully cut along the lines. They continue to do this with regard to the other half.
- Next, fan out each side and glue the ends together
Next, fasten the resulting medallions to the thread and the delicate garland is ready.
Paper Christmas decor - rainbow garland for party decor
DIY paper garland for New Year or Halloween: diagrams, templates and step-by-step instructions | (100+ Photos & Videos)
Garland of 3d balls
3d garland
A garland of paper balls is suitable as a New Year's decoration or can simply transform the interior. It depends on the shades. To work, you will need any paper (for example, colored or for scrapbooking).
Step-by-step instruction:
- To make 1 ball, cut out 6 circles of the same diameter from paper. You can cut out more round blanks, then the ball will come out more voluminous
- Fold each round in half so that the front side is on the inside.
- Now start forming a ball by gluing the bent rounds with the wrong sides together
- Before connecting the last pieces, pass a ribbon through them
- Using this pattern, make the remaining balls and secure them all on a thread or clothesline. Refer to photo instructions
Step-by-step instructions for making a garland
If you have a sewing machine, the process can be made easier. To do this, cut the circles and arrange them in piles, each containing 6 pieces. Sew each group down the middle and then straighten out the half circles. Only double-sided colored paper is better suited for this.
Unusual hearts made of music paper
Using a similar technology, you can make garlands with other figures.
Flower garland made from egg cartons
Transformed LED garland
It turns out that cardboard egg boxes can be useful in decorating an electric garland.
A clear example of producing flowers from egg cartons
Step by step process:
- Prepare egg cartons (6-10 pieces), LED garland, acrylic paint, hot glue gun, scissors and knife
- Cut off the lid of the box and set aside for now. Using a utility knife, cut out egg nests (to make tulips for light bulbs)
- Cut out the walls of the cells like petals
- Having made all the flowers, start painting them. You can dry them on toothpicks stuck in the lid of the box.
- Then make cross-shaped holes at the base of each flower.
- Place buds on light bulbs
Making a decoration from flags
Yew paper flags
A classic of the genre is multi-colored flags on a rope or ribbon. Decorate a room this way for any occasion. But we offer a more interesting version - fringed flags made of tissue or tissue paper.
What to do:
- Fold the sheets of paper into a stack and draw a circle on the top using a plate or a triangular (rectangular) flag
- Using this template, cut out round blanks without disassembling the stack
- Then cut the circles in half. If you make flags, then they are left in their original form
- Now you need fringe, for which you simply cut the bottom of the blanks into strips. At the same time, do not reach the opposite edge by 1.5 centimeters
- Next, you need to glue each flag (semicircle) to the rope or use rainbow ribbons. You can sew them, which will speed up the process
Homemade tinsel
Homemade tinsel
If you have bright candy wrappers in stock, you can use them to make beautiful tinsel. How to proceed:
1 Cut the candy wrappers into many pieces (from 3 to 6, depending on the size of the candy wrapper). You can pre-make a template so that the blanks are the same.
Wrappers
2 Twist tubes from triangles.
Tubes made from candy wrappers
3 Take a needle, thread it and string the tubes on it sequentially.
Stringed tubes
4 When finished, make a knot so that the pieces of paper do not slip off
Ready garland
5 After all the tubes have been secured, turn them in different directions.
Garland for Birthday or New Year 2 in 1
Stencil
It’s easy to create a festive atmosphere by decorating your home with a flower garland. How to make this decor yourself:
1 Using stencils or freehand on colored paper, draw petals and a semicircle of future flowers
2 Cut out all the sketches and staple them together. To do this, twist each piece into a cone. Glue three such funnels together, the result is a bud. Glue a semicircle to the bottom tip.
Cut blanks
3 Cut out a round spiral from green paper - this is the base of the garland.
Garland base
4 Straighten it and stick the flowers along the entire length with the same indentation.
Ready garland
5 It will be great if at the end you coat the garland with glue and sprinkle it with glitter.
It should immediately be noted that attractive Christmas tree shapes will come out of the green spiral. It is enough to attach a loop to the top of the curl and hang the toy. TOP best slot machines for money https://www.elslots.site/igrovi-avtomaty/
Second option: Christmas tree on a Christmas tree
Garland of funny roses
Exquisite garland of roses
Another variation of the festive garland is made from cute roses. It's quite simple to do:
- To do this, draw a spiral on paper and cut it out
- Then twist dense flowers from the resulting blanks, fixing them with glue as you go.
- Make as many as you need for the garland (depending on length). Now we attach the buds to the twine
How to make a wavy spiral rose
You can cut the spiral into waves, then more attractive buds will come out.
Attractive hearts
Paper strips
A garland of hearts will look romantic and can be used to decorate a room for any event: a wedding, a birthday, a romantic evening, or just like that.
How this decoration is made:
1 Cut medium-sized paper strips. Make a heart out of two strips using a stapler.
2 Attach two more strips to the lower tip and form the next heart from them in the same way.
Heart
3 Continue moving in this manner until you get a long garland of many links.
Long garland of many links
You can use paper of the same color or different colors during the process. Regardless of this, the craft will turn out expressive.
Multi-colored hearts
Just checkboxes
Universal garland of flags
It will be no less elegant and festive in the house if you hang a garland of flags. This decor is most suitable for any children's party.
Making such a garland is not difficult and the whole process consists of just three steps:
1 Draw flags on colored paper.
Flag drawing
2 Cut them out according to the intended patterns, as in the picture.
Checkbox template
3 Fold the rectangle in half and glue it to the thread at the bend.
Flag on a thread
To make it bright, use paper of several colors to make templates to alternate flags. Can be made from postcards.
If you have the time and desire to create, then you can do something more complicated. For this, in addition to paper, you will also need fabric. So, we’ve already figured out how to make paper flags. At what stage should you add fabric?
Everything in order:
1 Cut many flags (triangles or rectangles) from colored sheets.
Lots of checkboxes
2 Make a pattern from fabric (you can use felt) and cut out similar parts, but smaller in size. Now they can be glued to paper blanks or sewn.
Fabric flags
3 You can add a button on top. We also decorate with sequins, beads or beads.
Decorated flags
4 Sew the prepared flags to the ribbon or braid (by hand or on a machine).
Flags sewn to ribbon
Involve children in this activity, they will love it. For kids, this activity will help develop fine motor skills.
Garland chain
How to make a garland in the form of a chain
The easiest way is to make a garland chain. For it, take multi-colored paper to alternate links.
The execution algorithm is simple:
- Cut strips of different colors, with arbitrary width and length
- Then glue the first ring, thread a new strip through it and fasten again
This continues until you get a long chain of rings.
Paper lanterns
Paper lanterns
A decoration that we have known since childhood is lanterns. These can be just toys for decorating a Christmas tree or in the form of a garland. It is preferable to take corrugated paper, then the crafts will look more beautiful.
Master Class:
- Cut out a rectangle measuring 10x7 cm from paper
- Bend it horizontally in half
- Make many cuts vertically from one edge, not reaching the opposite edge 1.5-2 cm
- We roll and glue the lanterns to make them look like cups
- Make holes at the bottom and top using a hole punch
- Insert the wire and secure it with loops on both sides. Then the required number of lanterns is strung on a ribbon of a certain length
This is how easy it is to make garland lanterns that will become a worthy decoration for your Christmas tree and room.
Visual instructions for making lanterns
Paper garlands are sure to bring joy to your home, no matter where you hang them. They can be used to decorate walls, stair railings, a New Year tree, windows, or make a banner under the ceiling. In the case of windows, this will be an original alternative to the notorious curtains.
Of course, paper garlands are not particularly durable and will only be useful for a maximum of 2 uses. But the process of making such crafts is simple, exciting and does not take much time. So, if necessary, you can do something new. Be creative and don't be afraid to imagine. And you can take whatever material is at hand.
Simple and easy paper garland for a party / how to make a paper garland
DIY paper garland for New Year or Halloween: diagrams, templates and step-by-step instructions | (100+ Photos & Videos)
Mini-MK spiral decoration for home | Country of Masters
I made a mini-MK on making these spiral decorations for the home. I’m not sure that someone hasn’t already posted something similar before me, but I really want to share.
We will need thick two-color cardboard. draw a spiral of a derivative size on it - if desired.
Then we cut out our spiral along the contour
Now we’re making the blanks to decorate our spiral. In this case, I made hearts using the quilling technique from wide strips of colored paper.
I strung the largest heart on a thread, which I secured at the very top of the spiral. I left the end of the thread - it will be needed to secure the spiral to the ceiling or window.
The hearts can be secured to the spiral with a stapler, PVA glue or double-sided tape - whichever is more convenient for you. I sewed some of the hearts with threads to the spiral, just like the first main one, so that they hung from the spiral.
This is the spiral I got. If a light breeze blows, it spins.
In addition to the first one, I also made this spiral with butterflies.
I also made this spiral with stars of happiness. I kept thinking about where to attach them and decided to try it.
My collection of spirals hangs above my bed. I apologize in advance for the not very successful and clear photos - I was in a hurry to share quickly.
DIY garland “Rain”
Small children will really like this homemade paper garland, because it resembles real rain. Make a large number of small caps from blue and light blue colored paper. Thread each cap onto a strong thread.
Attach the finished garlands to the ceiling, because they should hang freely to look like rain.
Origami spiral - origami assembly diagram step by step
Home » Various origami » Origami spiral
I don’t know why it’s needed, but nevertheless it looks pretty decent on my shelves
I recommend everyone to assemble this wonderful origami spiral.
Similar origami:
Green crane
Today we will make one of the most popular origami figures - the Crane.
Magic Ball of Paper
A wonderful magic ball that changes shape when pressed.
Volumetric letter "A" origami
Robert Lang recently made a collection of 3D origami letters.
Boomerang
We invite you to assemble such an excellent origami boomerang from a square sheet of paper
Easily
We will need
- Thick colored paper.
- Pencil.
- Scissors.
- Glue.
How to do
- Draw a spiral on a square of paper. Don’t strive for perfect lines: the more arbitrary the drawing, the more interesting the finished flower will be.
- Cut a strip of paper along the marked outline.
- Roll the strip tightly, starting from the center of the spiral. For structural strength, add a little glue to the base.
- The paper rose is ready! You can add a leaf of green cardboard to it and plant the bud on a dry twig found in the yard. You can also make a whole bouquet of paper of any color and size.
infoniac.ru
Origami volumetric Spiral
The magnificent three-dimensional origami model “Spiral” is very popular due to its appearance. Anyone who has ever seen this fake will want one for themselves. Today we will tell you the secret of how to make it yourself!
Please note that the paper squares must be larger, as they will shrink during assembly!
To assemble you will need 4 square sheets of paper (22 cm) of different colors.
First we need to make blanks for the craft:
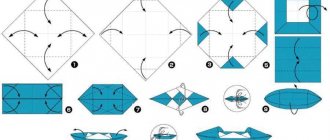
Step 1. Lay a square sheet of paper in front of you like a diamond.
Step 2. We bend the sheet so that the corners match, do not forget to look at the detailed step-by-step instructions.
Step 3. Then simply lay it out.
Step 4. Again, fold the sheet so that the other corners of the square match, as in the photo:
Step 5. Now you just need to expand the sheet. And now we see the intended bends.
Step 6. Bend the bottom corner of the diamond to the right. Let's smooth it out. Look like in the photo.
Step 7. And fold the top corner of the diamond down in the same way. We have a rectangle.
Step 8. Take the bottom corner (right) and bend it towards the center.
Step 9. Fold the upper left corner towards the center.
Step 10. And now we bend our resulting rhombus along the floors.
Step 11. Turn the craft over with the corner facing up as in the photo.
Step 12. Bend the left corner down.
Step 13. Redesign the craft.
Step 14. Fold the right corner down. Now we have the first preparation ready.
Step 15. We need 3 more.
When we have all 4 blanks made, then we can start assembling the spring itself:
Step 1. Take two blanks and place them in front of you, on the table, as shown in the photo - parallel to each other.
Step 2. Between these two blanks we insert a third blank, pay attention to the photo!
Step 3. Also, perpendicular to the third workpiece, we plant the fourth one.
Step 4. Next, we place the multi-colored parts along the intended bends in order. Place the pink part up.
Step 5. Take the yellow piece and point it to the right.
Step 6. And the blue one is angled down.
Step 7. Fold the light green part so that it is in the middle of the pink and blue parts.
Step 8. If you get a figure that looks like a pinwheel, then you are doing everything right!
Step 9. It's time to put all the pieces together. We do this as described above (the lower part on the right - up, the lower part on the left - to the right, the upper part on the left side - down, the upper part on the right side - to the left)
Step 10. We follow the assembly diagram and finish the assembly on this side of our craft.
Step 11. Turn the figure over and use the same principle to assemble all the parts of the workpiece, only from the reverse side. Now your origami Spiral is ready!
When assembling origami, be careful and don't take your eyes off the step-by-step instructions! Also, don’t forget: like the creation, like the creator! Give it your all and get satisfaction not only from the result, but also from the process of assembling origami!
And at the end, as always, we post a video lesson to consolidate your knowledge!
Difficult
We will need
- Colored paper.
- Scissors.
How to do
- Cut a sheet of paper into longitudinal strips 1–5 cm wide (from 4 to 20 roses can be made from one sheet).
- Bend the strip diagonally following the instructions in the photo. It's not as simple as it seems - try it yourself.
nyaskory.ru
Spiral Diagram PowerPoint Templates Archives
Do you want to grab your audience's attention and make your presentation memorable? One of our spiral PPT templates will help you with this. This section contains unique, bright, eye-catching slides. Rest assured, a presentation with such slides will attract your audience and make your speech more memorable.
Here you will find different types of slides. They all have different styles, structures, shapes and color themes. There are slides resembling DNA chains, funnels, flowers, etc. Each shape is unique and designed by our developers. Most slides have one or more text blocks. All slides are multi-colored; so rest assured that they will add sparkle to your presentations.
A professional spiral template will help you clearly explain any topic and simplify even the most complex questions. Other benefits of the slides provided include:
- Excellent quality;
- A set of built-in tools for convenient user experience;
- Clear and improved functionality;
- Multi-purpose slides suitable for a wide range of business presentations;
Our free spiral chart template will become your employees' favorite work tool, as it will help you handle work tasks faster and easier.
.
How to Make a Spiral Chart in PowerPoint
Creating a spiral design in PowerPoint can help you create stunning spiral diagrams that can be used to represent different business concepts and consulting models or present your data.
PowerPoint does not have a SmartArt graphic on which we can get a spiral design, at least with PowerPoint 2007, 2010 and 2013. However, we can create a spiral chart from shapes, specifically using the Block Arc shape.
Here we'll show you how to create a simple spiral chart design and spiral shapes that you can use in your PowerPoint presentations.
Insert multiple block arc shapes onto one slide and adjust them to create concentric circles. You can add a horizontal line as a guide or landmark. Once the diagram is ready, we can remove the horizontal line.
Now you can duplicate all the inserted shapes and rotate them 180 degrees.
Then start reducing the size of each block arc shape above the horizontal line and adjust the end of the arc according to the following design.
As you can see, we have created a simple spiral chart. Now we can group or connect the shapes together. This will help us add special effects to the entire object. We recommend using the Unite tool as it will help you treat the shape as a single object.
If you don't have time to create this shape from scratch, you can download a free spiral diagram template for PowerPoint.
.
Spiral Chart PNG Images | Vector and PSD files
- arc arrow vector diagram
1200 * 1200
- science and technology digital lines line curve spiral
1200 * 1200
- metal mesh fence with steel spiral barbed wire
1200 * 1200
- rose gold spiral element
1200 * 1200
- three dimensional spiral auxiliary element with red ribbon
1200 * 1200
- spiral with colorful handprints made by children
6250 * 6250
- spiral gradient 3d twisted brush element
1200 * 1200
- spiral notepad vector spiral notepad blank layout for your design vector illustration
5000 * 5000
- circle infographic design vector for workflow layout diagram presentation web design
1200 * 1200
- spiral ascending magic ray
1200 * 1200
- purple spiral 3d brush element
1200 * 1200
- golden flares spiral particle elements
1200 * 1200
- spiral notebook icon
1024 * 1024
- hand drawn family tree family tree loving family relationship diagram
1200 * 1200
- realistic note template empty spiral and blank paper layout for your design open notebook for and taking notes vector illustration
5000 * 5000
- business infographic design vector can be used for annual report workflow layout diagram
2000 * 2000
- stock chart logo currency trading chart success concept Forex free logo design template
5000 * 5000
- 901 22
spiral magic golden ray of light1200 * 1200
- hand drawn family tree family tree family tree family tree diagram
1200 * 1200
- business information schematic diagram
1200 * 2244
43
- infographic timeline template with icon options or steps infographics business infographics for presentations process diagrams workflow layout banner flowchart information graph
1200 * 1200
- golden spiral ascending magic ray
1200 * 1200
- spiral blank notepad blank mockup set template for advertising branding corporate identity 3d realistic laptop mockup blank notebook with blank cover
5000 * 5000
- infographics set of elements diagrams graphs diagrams 1 2 3 4 steps presentation idea cycle eps 10 vector
4000 * 4000
- 9017 1
spiral blank notepad blank layout template for corporate identity branding advertising realistic vector illustration5000 * 5000
- blue hazy dark purple spiral celestial galaxies
1200 * 1200
- spiral 3d glass trophy
1200 * 1200
- golden spiral magic light effect
1200 * 1200
- graph analytics business chart marketing statistics training
5556 * 5556
- circle infographics design vector for workflow layout diagram presentation web design
1200 * 1200
- spiral coffee liquid 3d element
1200 * 1200
- colorful blue spiral nebula
1200 * 1200
- creative technology lines circuit diagram
mother circuit
2000
- 9 0004 blue-green hazy diffuse spiral galaxy
1200 * 1200 - blue spiral nebula galaxy
1200 * 1200
- purple spiral galaxy universe galaxy
1200 * 1200
.Funnel diagram
LiveInternetLiveInternet
Quote from novaya_skazka
Read in full In your quotation book or community!
Paper art. Quilling
I really liked this lace art and wanted to know more about it) Thanks for the idea TPABKA
In English, this craft is called
“quilling”
- from the word
“quill”
or
“bird feather”.
Unlike origami, which originated in Japan,
the art of paper rolling
originated in Europe in the late 14th and early 15th centuries.
In medieval Europe, nuns created elegant medallions by twisting paper with gilded edges onto the tip of a bird's feather. When viewed closely, these miniature paper masterpieces created the complete illusion that they were made of thin gold strips. Unfortunately, paper is a short-lived material and little has survived from medieval masterpieces. However, this ancient technique has survived to this day and is very popular in many countries around the world. Paper rolling quickly spread in Europe, but because paper, especially colored and high-quality paper, was a very expensive material, paper plastic art became an art for ladies from wealthy sections of society.
Nowadays, paper rolling is widely known and popular as a hobby in Western European countries, especially in England and Germany. But this art became most widespread when it “moved” to the East. The richest traditions of the finest graphics and plastic arts, papermaking and working with it have given the art of paper sculpture a new life.
In South Korea, there is an entire Association of Paper Art Lovers, uniting followers of various areas of paper art.
In the 15th century it was considered art. At 19 - ladies' entertainment. For most of the 20th century it was forgotten. And only at the end of the last century quilling began to turn into an art again.
In England, Princess Elizabeth was seriously interested in the art of quilling, and many of her creations are kept in the Victoria and Albert Museum in London. We associate paper with the idea of fragility and fragility. But quilling refutes this statement - you can put, for example, a cup or a heavy book on a filigree volumetric stand, and not a single curl of paper lace will be harmed. You can assemble a candy vase from paper elements and safely use it for its intended purpose - it will not fall apart or break. In general, quilling is an opportunity to see the unusual possibilities of ordinary paper.
It should be noted that the Korean school of quilling (they call it paper rolling) is somewhat different from the European one. European works, as a rule, consist of a small number of parts; they are laconic, reminiscent of mosaics, and decorate postcards and frames. Europe is always in a hurry, so it loves fast technology. Eastern masters create works that resemble masterpieces of jewelry. The finest voluminous lace is woven from hundreds of small details.
Tools for quilling also come in different varieties. In Europe, a plastic or metal stick with a split end is used to twist the strips. Some people make a similar tool themselves, for example, from a ballpoint pen refill with a slot at the end. I didn’t really like this idea, because when twisted, it turns out to be a part with a large and uneven hole in the center. However, this instrument is suitable for children.
Masters of the Eastern school prefer to perform twisting using a thin awl. A replacement can be made from a thick needle and cork. Also, children are good at winding on a toothpick.
To master the paper rolling technique, you do not need any special tool. At the initial stage, a visit to a regular department store is quite enough.
Here is a short list of what you need to start learning:
Awl
. It is advisable to purchase an awl with a diameter of about one millimeter. Usually the awl has a cone shape, which can be inconvenient. In this case, you can use any hardened rod of suitable diameter. An awl (rod) is used to wind a spiral from a paper strip. In this case, it is necessary to control the tension force of the paper; the handle of the tool should be comfortable for this purpose.
Tweezers
. The tips should be sharp and aligned exactly. To perform high precision work. Notches at the end are undesirable because... may leave marks on paper. The squeezing force should be comfortable for your hands, providing a secure grip with the least amount of pressure.
Scissors. Like tweezers, they must have pointed ends. For maximum precision cutting of fringes. The blades must be sharpened evenly at a certain angle to the very tips. In this case, the scissors work flawlessly along their entire length.
Glue
. There are no special recommendations. However, it should dry quickly enough and not leave marks. Try starting with PVA.
To work, you will need to use original Korean paper . Firstly, it has certain unique properties that manifest themselves in the process of giving it shape. Secondly, this paper comes conveniently cut into strips of various colors. The widest range of products is produced in Korea. Of course, you can try to practice with strips of regular paper, but working with it will be very problematic. The packaging contains strips of paper 27 centimeters long. The width varies from 2 millimeters to 3 centimeters. One package can contain either one color of paper or a whole rainbow of colors. The thickness and the material itself do not vary in any way, at least within one manufacturer.
Technique
At first glance, the paper rolling technique is simple. A strip of paper is twisted into a tight spiral. It will be convenient to start winding by twisting the edge of the ribbon onto the tip of a sharp awl. Sometimes, instead of an awl, students use a special tool that has a forked tip that is convenient for gripping paper. Having formed the core of the spiral, it is advisable to continue working without using a tool. This way you can feel with your fingertips whether the roll is being formed uniformly and adjust your efforts during the process. The result should be a dense spiral less than a centimeter in diameter. It will be the basis for the further variety of all forms. After which the spiral unfolds to the required size, and then the required figure is formed from it. The tip of the paper is grabbed by a drop of glue. There are many standard shapes, but you can always come up with new ones yourself.
Works performed using the Quilling technique
And a small master class.) On the eve of the New Year, I want to make something unusual, airy lace)
Snow quilling (c) author Tatyana Prosnyakova
What technique can better convey the airiness and lightness, the openwork lace pattern of snowflakes, than the quilling technique? Making snowflakes from paper, or rather from twisted strips, resembles a mosaic or a kaleidoscope with a huge number of options. The prepared parts can be glued to the base, making cards or panels, or they can be glued together to hang amazing lace decorations on the Christmas tree.
To make a snowflake (pendant or applique) you need to prepare various shapes from twisted strips. The forms can be closed, that is, glued together, or open, where no glue is used. Both are suitable for applications. And for a snowflake pendant, you can only use closed molds.
- Take a strip. Using your fingernail, pull it slightly and round the end. Place a skewer on it. Wind the strip, trying to make the first turns tighter
- When the paper “grabs” with the stick, you can only rotate the stick until the very end of the strip
- Twist a flat washer. To remove it, slightly rotate the stick.
- Now loosen the workpiece so that you get a ring with a twisted spiral. The diameter should be 12-14 mm. Sometimes this is enough to simply release the workpiece. If it was twisted very tightly, then you need to lightly squeeze it with your fingers to open it. Glue the tip with a small drop of PVA glue.
- To get the “Drop” shape, pull the middle of the spiral in one direction, squeeze several layers on the other side to create a sharp end.
- "Eye" shape. Squeeze the round piece from both sides at the same time.
- Shape "Square". Make the “Eye” shape, turn it vertically and squeeze the sides again.
- "Rhombus" shape. Make it out of "Square".
- Triangle shape. Make a “Drop”, grab a corner and flatten the base of the triangle.
- Arrow shape. Make a “Triangle” and use the end of your index finger to press the middle of the short side inward.
- Crescent shape. It is performed almost like the “Eye”, but in a curved shape. And the corners are not pinched opposite each other, but with a shift.
Open forms:
- "Heart." Fold the strip in the middle. Screw both halves inward.
- "Horns". Fold the strip in the middle. Screw both halves outwards.
- "Curl". Lightly mark the middle of the strip without making a fold. Twist the ends towards the middle, but in different directions.
- "Twig". Bend the strip in a ratio of 1:2. Twist the ends in one direction.
Assembling snowflakes.
A snowflake pendant can be made consisting of 1, 2, 3, 4 rows. First you need to come up with a pattern so that adjacent parts have sufficient contact area for gluing. For each row you need to make 6 identical elements
For example, this combination. First row. Glue six “Drops” together with their sides
Second row. Glue in six “Arrows”.
Glue six “Squares” to the “Arrows”.
And here is another option, consisting of “Eyes”, “Crescents” and “Drops”.
Glue the applique together. Any form can be used here. Before gluing, align the open curls so that they are the same size. Apply glue to the curl itself in two or three places. Press firmly onto the base and hold for a while.
And one more snowflake) will look very beautiful on a Christmas tree branch)
made according to this scheme)
I think it’s worth trying) it doesn’t require a lot of expenses, but it will bring so much beauty and joy to you and your children)
for PowerPoint - download for free!
A funnel diagram allows you to visualize a linear process that has sequential, connected steps. The shape of the funnel clearly shows the state of the controlled process. The Funnel Chart Template section of PowerPoint includes a number of slides featuring these types of diagrams, which are widely used in marketing and business. Each stage of the funnel represents a proportion of the total. Thus, in most cases, the diagram is shaped like a funnel: the first stage is the largest, and each subsequent stage is smaller than the previous one. Funnel chart is most often used for the following purposes:
, when the data is agreed upon and goes through at least four stages; , when the number of “elements” in the first stage is expected to exceed the number in the last stage; to calculate and monitor performance and retention indicators; for step-by-step calculation of potential indicators (income, sales, transactions, etc.); to track the progress and success of advertising and marketing campaigns; to identify bottlenecks in a linear process;
The ready-made slides collected in this section will help you cope with these tasks, simplify your work, and make the presentation clearer and more accessible.
.