Are you fed up with your neighbors' loud music or just want to make some interesting electrical equipment yourself? Then you can try to assemble a simple and compact electromagnetic pulse generator that is capable of disabling electronic devices nearby.
An EMR generator is a device capable of generating a short-term electromagnetic disturbance that radiates outward from its epicenter, thereby disrupting the operation of electronic devices. Some EMR bursts occur naturally, for example in the form of electrostatic discharge. There are also artificial EMP bursts, such as a nuclear electromagnetic pulse.
This material will show you how to assemble a basic EMP generator using commonly available items: a soldering iron, solder, a disposable camera, a push-button switch, insulated thick copper cable, enameled wire, and a high-current latched switch. The presented generator will not be very powerful in terms of power, so it may not be able to disable serious equipment, but it can affect simple electrical appliances, so this project should be considered as a training project for beginners in electrical engineering.
So, first, you need to take a disposable camera, for example, Kodak. Next you need to open it. Open the case and locate the large electrolytic capacitor. Do this with rubber dielectric gloves to avoid getting an electric shock when the capacitor is discharged. When fully charged, it can show up to 330 V. Check the voltage on it with a voltmeter. If there is still a charge, remove it by shorting the capacitor terminals with a screwdriver. Be careful, when shorted, a flash will appear with a characteristic pop. After discharging the capacitor, remove the circuit board it is mounted on and locate the small on/off button. Unsolder it, and in its place solder your switch button.
Solder two insulated copper cables to the two terminals of the capacitor. Connect one end of this cable to a high current switch. Leave the other end free for now.
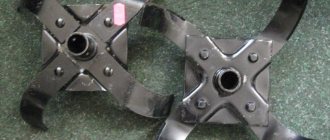
Now you need to wind the load coil. Wrap the enamel-coated wire 7 to 15 times around a 5cm diameter round object. Once the coil is formed, wrap it with duct tape to make it safer to use, but leave two wires protruding to connect to the terminals. Use sandpaper or a sharp blade to remove the enamel coating from the ends of the wire. Connect one end to the capacitor terminal and the other to a high-current switch.
Now we can say that the simplest electromagnetic pulse generator is ready. To charge it, simply connect the battery to the corresponding pins on the capacitor circuit board. Bring some portable electronic device that you don't mind to the coil and press the switch.
Remember not to hold down the charge button while generating EMP, otherwise you may damage the circuit.
From short distances. Naturally, I immediately wanted to make a similar homemade product, since it is quite impressive and demonstrates in practice the work of electromagnetic pulses. The first models of the EMR emitter had several high-capacity capacitors from disposable cameras, but this design does not work very well due to the long “recharging” time. So I decided to take a Chinese high voltage module (commonly used in stun guns) and add a “punch” to it. This design suited me. But unfortunately, my high-voltage module burned out and therefore I could not film an article on this homemade product, but I had a detailed video on the assembly, so I decided to take some points from the video, I hope the Admin will not mind, since the homemade product is really very interesting.
I would like to say that all this was done as an experiment!
And so for the EMR emitter we need: - a high-voltage module - two 1.5 volt batteries - a box for batteries - a housing, I use a 0.5 plastic bottle - a copper wire with a diameter of 0.5-1.5 mm - a button without a lock -wires
The tools we need are: - soldering iron - hot glue
And so, the first thing you need to do is wind a thick wire of about 10-15 turns around the top of the bottle, turn to turn (the coil greatly affects the range of the electromagnetic pulse; a spiral coil with a diameter of 4.5 cm has shown to work best) then cut off the bottom of the bottle
We take our high-voltage module and necessarily solder the power supply through the button to the input wires, having previously removed the batteries from the box. We take the tube from the handle and cut off a piece 2 cm long from it: We insert one of the output wires of the high-voltage device into the piece of the tube and glue it as shown in the photo: C using a soldering iron, we make a hole on the side of the bottle, slightly larger than the diameter of the thick wire: We insert the longest wire through the hole inside the bottle: We solder the remaining high-voltage wire to it: We place the high-voltage module inside the bottle: We make another hole on the side of the bottle, with a diameter slightly larger than the diameter of the tube from handles: We pull out a piece of tube with a wire through the hole and firmly glue it and insulate it with thermal glue: Then we take the second wire from the coil and insert it inside the piece of tube, there should be an air gap between them, 1.5-2 cm, you need to select it experimentally, lay the whole electronics inside the bottle, so that nothing short-circuits, does not dangle and is well insulated, then glue it: Make another hole along the diameter of the button and pull it out from the inside, then glue it: Take the cut bottom and cut it along the edge so that it can fit on the bottle, put it on and glue it: Well, that's all! Our EMR emitter is ready, all that remains is to test it! To do this, we take an old calculator, remove valuable electronics and preferably put on rubber gloves, then press the button and bring the calculator up, electric current breakdowns will begin to occur in the tube, the coil will begin to emit an electromagnetic pulse and our calculator will first turn on itself, and then begin to randomly write numbers on its own !
Before this homemade product, I made an EMR based on a glove, but unfortunately I only shot a video of the tests; by the way, I went to an exhibition with this glove and took second place due to the fact that I showed the presentation poorly. The maximum range of the EMP glove was 20 cm. I hope this article was interesting to you, and be careful with high voltage!
Scientific and technological progress is developing rapidly. Unfortunately, its results lead not only to the improvement of our lives, to new amazing discoveries or victories over dangerous illnesses, but also to the emergence of new, more advanced weapons.
Throughout the last century, humanity has been racking its brains to create new, even more effective means of destruction. Poisonous gases, deadly bacteria and viruses, intercontinental missiles, thermonuclear weapons. There has never been a period in human history when scientists and the military collaborated so closely and, unfortunately, effectively.
Many countries around the world are actively developing weapons based on new physical principles. The generals very carefully observe the latest achievements of science and try to use them to their service.
One of the most promising areas of defense research is work in the field of creating electromagnetic weapons. In the tabloid press it is usually called an “electromagnetic bomb”. Such research is very expensive, so only rich countries can afford it: the USA, China, Russia, Israel.
The principle of operation of an electromagnetic bomb is to create a powerful electromagnetic field, which disables all devices whose operation is related to electricity.
This is not the only way to use electromagnetic waves in modern warfare: mobile generators of electromagnetic radiation (EMR) have been created that can disable enemy electronics at a distance of up to several tens of kilometers. Work in this area is actively carried out in the USA, Russia, and Israel.
There are even more exotic military uses of electromagnetic radiation than an electromagnetic bomb. Most modern weapons use the energy of powder gases to destroy the enemy. However, everything may change in the coming decades. Electromagnetic currents will also be used to launch the projectile.
The principle of operation of such an “electric gun” is quite simple: a projectile made of conductive material is pushed out at high speed over a fairly large distance under the influence of a field. They plan to put this scheme into practice in the near future. The Americans are working most actively in this direction; there is no information about the successful development of weapons with this operating principle in Russia.
How do you imagine the beginning of World War III? Blinding flashes of thermonuclear charges? The groans of people dying from anthrax? Strikes from hypersonic aircraft from space?
Things could be completely different.
There will indeed be a flash, but not very strong and not incinerating, but rather similar to a clap of thunder. The “interesting” part will begin later.
Even turned off fluorescent lamps and TV screens will light up, the smell of ozone will hang in the air, and wiring and electrical appliances will begin to smolder and sparkle. Gadgets and household appliances that contain batteries will heat up and fail.
Almost all internal combustion engines will stop working. Communications will be cut off, the media will not work, cities will be plunged into darkness.
People will not be harmed; in this regard, an electromagnetic bomb is a very humane type of weapon. However, think for yourself what the life of a modern person will turn into if you remove from it devices whose operating principle is based on electricity.
The society against which a weapon of this kind will be used will be thrown back several centuries.
Electronics Destroyer - DIY
Discussion with an engineer from an NPO
I wish you good health! I found a video with technology that may help us disrupt the offensive of the Armed Forces of Ukraine and take advantage of the moment to go on the offensive and again drive the bastards into the cauldron. Unfortunately, my knowledge is not enough and I am trying to find out from the author and my friends how to increase the range of this gun. I would be grateful for any information. I’m ready to solder and assemble such installations if they really help. Write specific proposals in a personal message, without water. The author of the video logged into his account twice during this time from different devices, but did not respond to the requests. Let's wait. A friend (possibly an ex-friend) answered. I won’t go into all the discussions about politics and the rest of the water, that they will strangle us, etc. (This is understandable to a moose too). I will publish only its technical part. No matter what, I will solder the circuits and try to help the Brothers (even though I’m a simple electrician, I don’t forget that I’m a reserve worker). We listen and Help if possible. Publication of communication: Andrey, hello! The range has already been increased. Repeatedly, up to tens of kilometers. More than a hundred years ago, Professor Mikhail Fedorov lit light bulbs in Tsarskoe Selo from a laboratory in St. Petersburg. Nikolo Tesla did the same thing in Western Europe at the same time.
Nowadays, radars with active antennas work - essentially the same as in video recording, but many times more powerful. They consume huge amounts of electricity. Airplanes are irradiated at a distance of many tens of kilometers. But they cannot burn electronics at such a distance. By the way, the box from the video recording also cannot burn anything metal or electronic. It can only burn the internal organs of a person, they are much more sensitive - there are quite a lot of accidents at radar stations, and quite a few fatalities. And the guys also forgot to tell us that after each “impulse” they need to recharge their toy.
It is easy to check the effect of this “toy”. — Place some electrical appliance you want to burn inside the microwave and turn on the microwave. (The stove door must be closed. - Nothing will happen to the metal, but I feel sorry for you.) For the guys, the impulse lasts for a split second. You can irradiate for at least a minute, to be sure. “Then tell me what metal you burned.”
Is it possible to defend yourself?
After the first tests of nuclear weapons and the identification of electromagnetic radiation as one of its main damaging factors, the USSR and the USA began to work on protection against EMP.
The USSR approached this issue very seriously. The Soviet army was preparing to fight in a nuclear war, so all military equipment was manufactured taking into account the possible impact of electromagnetic pulses on it. To say that there is no protection from it at all is a clear exaggeration.
All military electronics were equipped with special screens and reliably grounded. It included special safety devices, and developed an electronics architecture that was as resistant to EMP as possible.
Of course, if you get into the epicenter of a high-power electromagnetic bomb, the defense will be broken, but at a certain distance from the epicenter, the probability of damage will be significantly lower. Electromagnetic waves propagate in all directions (like waves on water), so their strength decreases in proportion to the square of the distance.
In addition to protection, electronic means of destruction were also developed. They planned to use EMP to shoot down cruise missiles; there is information about the successful use of this method.
Currently, mobile systems are being developed that can emit high-density EMP, disrupting the operation of enemy electronics on the ground and shooting down aircraft.
digital electronics computing embedded systems
How to make an electromagnetic pulse generator with your own hands
Are you fed up with your neighbors' loud music or just want to make some interesting electrical equipment yourself? Then you can try to assemble a simple and compact electromagnetic pulse generator that is capable of disabling electronic devices nearby.
An EMR generator is a device capable of generating a short-term electromagnetic disturbance that radiates outward from its epicenter, thereby disrupting the operation of electronic devices. Some EMR bursts occur naturally, for example in the form of electrostatic discharge. There are also artificial EMP bursts, such as a nuclear electromagnetic pulse.
This material will show you how to assemble a basic EMP generator using commonly available items: soldering iron, solder, disposable camera, push-button switch, insulated thick copper cable, enamel-coated wire, and a high-current latching switch. The presented generator will not be very powerful in terms of power, so it may not be able to disable serious equipment, but it can affect simple electrical appliances, so this project should be considered as a training project for beginners in electrical engineering.
How it works
How can you create such a powerful electromagnetic field that can have a similar effect on electronics and electrical networks? Is the electronic bomb a fantastic weapon or can similar ammunition be created in practice?
The electronic bomb has already been created and has already been used twice. We are talking about nuclear or thermonuclear weapons. When such a charge is detonated, one of the damaging factors is the flow of electromagnetic radiation.
In 1958, the Americans detonated a thermonuclear bomb over the Pacific Ocean, which led to a disruption in communications throughout the region, there was no communication even in Australia, and there was no light in the Hawaiian Islands.
Gamma radiation, which is produced in excess during a nuclear explosion, causes a strong electronic pulse that spreads over hundreds of kilometers and turns off all electronic devices. Immediately after the invention of nuclear weapons, the military began developing protection for their own equipment from such explosions.
Work related to the creation of a strong electromagnetic pulse, as well as the development of means of protection against it, is carried out in many countries (USA, Russia, Israel, China), but almost everywhere they are classified.
Is it possible to create a working device based on other less destructive operating principles than a nuclear explosion? It turns out that it is possible. Moreover, similar developments were actively carried out in the USSR (they continue in Russia). One of the first to become interested in this direction was the famous academician Sakharov.
It was he who first proposed the design of a conventional electromagnetic munition. According to his idea, a high-energy magnetic field can be obtained by compressing the magnetic field of a solenoid with a conventional explosive. Such a device could be placed in a rocket, shell or bomb and sent to an enemy target.
However, such ammunition has one drawback: its low power. The advantage of such shells and bombs is their simplicity and low cost.
Electromagnetic pulse generator (EMP gun) or how to make a weapon with your own hands
EMP (electromagnetic pulse) is quite popular in the world of science fiction. Wouldn't it be cool to have your own EMP gun rig? That's what I thought before I started assembling the electromagnetic emitter with my own hands.
I wanted to make an EMP generator that was portable and could be hidden under my sleeves. If you have the right components, you can assemble it in no time.
WARNING: This project is not for children.
Seriously speaking, you might get a shock. Capacitors are really powerful and therefore please be careful when handling the circuit.
I take no responsibility if you destroy anything with this weapon.
Steps
1 Creation of an elementary electromagnetic emitter
- 1 Gather the necessary materials.
To create a simple electromagnetic emitter, you will need a disposable camera, copper wire, rubber gloves, solder, a soldering iron and an iron rod. All these items can be purchased at your local hardware store.- The thicker the wire you take for the experiment, the more powerful the final emitter will be.
- If you cannot find an iron rod, you can replace it with a rod made of non-metallic material. However, please note that such a replacement will negatively affect the power of the pulse produced.
- When working with electrical parts that can hold a charge, or when passing electrical current through an object, we strongly recommend wearing rubber gloves to avoid possible electrical shock.
- create an electromagnetic pulse 2 Assemble the electromagnetic coil.
An electromagnetic coil is a device that consists of two separate, but at the same time interconnected parts: a conductor and a core. In this case, the core will be an iron rod, and the conductor will be copper wire.- Wrap the wire tightly around the core, leaving no gaps between turns. Don't wrap the entire wire, leave a small amount at the edges of the winding so you can connect your coil to the capacitor.
- create an electromagnetic pulse 3 Solder the ends of the electromagnetic coil to the capacitor.
The capacitor, as a rule, has the form of a cylinder with two contacts, and it can be found on any circuit board. In a disposable camera, such a capacitor is responsible for the flash. Before unsoldering the capacitor, be sure to remove the battery from the camera, otherwise you may receive an electric shock.- While you are working with the circuit board and capacitor, rubber gloves will protect you from electrical shocks.
- Click the camera a couple of times after removing the battery to use up the accumulated charge in the capacitor. Due to the accumulated charge, you can get an electric shock at any time.
- 4 Find a safe place to test your electromagnetic emitter.
Depending on the materials involved, the effective range of your EMP will be approximately one meter in any direction. Be that as it may, any electronics caught by the EMP will be destroyed.- Don't forget that EMR affects any and all devices within the affected radius, from life support machines like pacemakers to cell phones. Any damage caused by this device via EMP may result in legal consequences.
- A grounded area, such as a tree stump or plastic table, is an ideal surface for testing an electromagnetic emitter.
- 5 Since electromagnetic fields only affect electronics, consider purchasing an inexpensive device from your local electronics store. The experiment can be considered successful if, after activation of the EMP, the electronic device stops working.
- Many office supply stores sell fairly inexpensive electronic calculators with which you can check the effectiveness of the created emitter.
- 6 Insert the battery back into the camera.
To restore the charge, you need to pass electricity through the capacitor, which will subsequently provide your electromagnetic coil with current and create an electromagnetic pulse. Place the test object as close to the EM emitter as possible.- The presence of an electromagnetic field is generally impossible to determine by eye. Without a test object, you will not be able to confirm the successful creation of the EMP.
- create an electromagnetic pulse 7 Allow the capacitor to charge.
Allow the battery to charge the capacitor again by disconnecting it from the electromagnetic coil, then, using rubber gloves or plastic tongs, reconnect them. If you work with bare hands, you risk getting an electric shock. - create an electromagnetic pulse 8 Turn on the capacitor.
Activating the flash on the camera will release the electricity stored in the capacitor, which, when passed through the coil, will create an electromagnetic pulse.- The created electromagnetic field will affect any electronics, including those that are turned off. If you have chosen a calculator as the test object, then after turning on the capacitor, and if an EM pulse is successfully created, the calculator will no longer turn on.
2 Creation of a portable EM radiation device
- 1 Gather everything you need.
Building a portable EMR device will go more smoothly if you have all the necessary tools and components with you. You will need the following items:- AA battery
- Matching battery compartment
- Copper wire
- Cardboard box
- Disposable camera (with flash)
- Insulating tape
- Iron core (preferably cylindrical)
- Rubber gloves (recommended)
- Simple switch
- Solder and soldering iron
- Radio antenna
- 2 Remove the circuit board from the camera.
Inside the disposable camera there is a circuit board, which is responsible for its functionality. First, remove the batteries, and then the board itself, not forgetting to mark the position of the capacitor.- By working with the camera and capacitor in rubber gloves, you will thereby protect yourself from possible electric shock.
- Capacitors are typically shaped like a cylinder with two terminals attached to a board. This is one of the most important parts of the future EMR device.
- After you remove the battery, click the camera a couple of times to use up the accumulated charge in the capacitor. Due to the accumulated charge, you can get an electric shock at any time.
- 3 Wrap the copper wire around the iron core.
Take enough copper wire so that evenly spaced turns can completely cover the iron core. Also make sure that the coils fit tightly together, otherwise it will negatively affect the EMP power.- Leave a small amount of wire at the edges of the winding. They are needed to connect the rest of the device to the coil.
- 4 Apply insulation to the radio antenna.
The radio antenna will serve as a handle on which the reel and camera board will be attached. Wrap electrical tape around the base of the antenna to protect against electric shock. - 5 Secure the board to a thick piece of cardboard.
The cardboard will serve as another layer of insulation, which will protect you from unpleasant electrical discharge. Take the board and secure it to the cardboard with electrical tape, but so that it does not cover the paths of the electrically conductive circuit.- Secure the board face up so that the capacitor and its conductive traces do not come into contact with the cardboard.
- The cardboard backing for the PCB should also have enough space for the battery compartment.
- 6 Attach the electromagnetic coil to the end of the radio antenna.
Since electrical current must pass through the coil to create EMI, it is a good idea to add a second layer of insulation by placing a small piece of cardboard between the coil and the antenna. Take electrical tape and secure the spool to a piece of cardboard. - 7 Solder the power supply.
Locate the battery connectors on the board and connect them to the corresponding contacts on the battery compartment. After this, you can secure the whole thing with electrical tape on a free section of cardboard. - 8 Connect the coil to the capacitor.
You need to solder the edges of the copper wire to the electrodes of your capacitor. A switch should also be installed between the capacitor and the electromagnetic coil to control the flow of electricity between the two components.- You should remain wearing rubber gloves during this stage of assembling the EMP device. The remaining charge in the capacitor could cause you to receive an electric shock.
- 9 Attach the cardboard backing to the antenna.
Take electrical tape and firmly attach the cardboard backing along with all the parts to the radio antenna. Secure it over the base of the antenna, which you should have already wrapped with electrical tape. - 10 Find a suitable test object.
A simple and inexpensive calculator is ideal for testing a portable EMR device. Depending on the materials and equipment used to construct your device, the EM field will either operate in close proximity to the coil or cover a distance of up to one meter around it.- Any electronic device that comes within the range of the EM field will be damaged. Make sure that there are no electronic devices near your chosen test site that you would not want to damage. All responsibility for damaged property will rest with you.
- 11 Test your portable EMR device.
Make sure the device switch is in the OFF position, then insert the batteries into the battery compartment on the cardboard backing. Hold the device by the insulated antenna base (like a proton accelerator from Ghostbusters), point the coil towards the test object and turn the switch to the "ON" position.- If you are unsure of your knowledge and skills in connecting electronic components, wear rubber gloves when handling the device as an additional precaution.
- If the experiment is successful, the object under test, along with other electronics that are in the effective range of the EM field, will stop working.
- Depending on the capacitor involved, the required voltage to charge it will also be different. The capacitance of the capacitor in a disposable camera is somewhere between 80-160 uF, and the voltage should be between 180-330 volts.
- The size of the copper wire and the length of the coil will determine the strength and radius of the electromagnetic pulse. To be on the safe side, before you build a larger, more powerful emitter, start with a small device to test the effectiveness of your design.
Low impedance models
Low impedance devices operate at a voltage of 12 V. Many models have two capacitors. To assemble a device that generates ultrasound with your own hands, you will need a 10 cm rod. In this case, the capacitors are installed on the emitter of the wire type. The winding is wound last. It should also be noted that to assemble the modification you will need a terminal. In some cases, 4 micron field capacitors are used. The frequency parameter will be quite high. It is more expedient to install the magnet above the terminal.
Electromagnetic generator made of permanent magnets and bifilar windings.
An electromagnetic generator made of permanent magnets and bifilar windings is designed to generate electricity. The electromagnetic generator can operate in autonomous mode and generate electricity with a power of 10 kW.
Technology awaits funding!
Description:
The electromagnetic generator is small in size compared to other generating systems with the same power output.
The initial startup is performed by the battery or any other external power source. After approximately one minute, when the device reaches the required rpm, external energy sources can be turned off.
The electromagnetic generator can operate in autonomous mode and generate electricity with a power of 10 kW/hour. Its rotation speed is maintained in an optimized mode by an asynchronous motor with special software that controls the number of revolutions per minute.
The power output depends on the rotation speed. 50% of the generated energy is used by the engine, while the remaining 50% can be used by the consumer.
The electromagnetic generator can be made for any type of output voltage with a frequency of 50-60 Hz: 110, 220 or 380 V.
Advantages:
– the manufacturing cost is cheaper than the production of wind turbines or solar panels;
– on average, depending on the region, the generator will pay for itself in 1-2 years;
– small size compared to other generating systems with the same output power;
– no special installation required;
– mobility. Easy transportation.
Specifications:
120
| Characteristics: | Meaning: |
| Dimensions, mm | 500x300x400 |
| Weight, kg | |
| Output voltage, V | 110, 220, 380 |
| Output power, kW/hour | to 10 |
| frequency Hz | 50-60 |
self-oscillating generator of undamped electromagnetic oscillations what are the parameters of a high-frequency electromagnetic generator electromagnetic torque of a direct current generator generators with electromagnetic excitation electromagnetic pulse generator generators on the electromagnetic field of the earth electromagnetic generator buy price perpetual electromagnetic engine generator electromagnetic generator from permanent magnets and bifilar windings of current oscillations waves of frequencies of field pulses radiation induction moment power excitation with your own hands interference noise oscillations relay device 8th grade notes
Source
Antenna
In order for the microwave gun from a microwave oven to operate purposefully with your own hands, Kreosan recommends making an antenna. Now you will need a coffee can. You will need to cut a hole in it.
Cannon with antenna
The slot diagram is as follows:
- With a can height of 175 mm;
- Diameter - 75mm;
- We make a hole with a diameter of 20 mm, on the side wall, retreating from the bottom - 37 mm.
All that remains is to remove the magnetron from the microwave. We simply extend the wires connected to it, and attach the antenna to the body of the product using wire. Our microwave gun is ready and made by hand!
How to use a directional microwave emitter
A powerful microwave gun can be used for the following purposes:
- Destruction of beetles and other harmful insects. Microwaves turn liquid molecules into steam - this way you can exterminate bugs gnawing on wooden buildings. The wood itself does not suffer from microwaves.
- Melting of non-ferrous metals.
- Drying and sterilization of cereals (kills bugs and bacteria).
- Disabling listening devices. Microwaves interfere with the operation of any “spy” devices.
- There is interference from the neighbor's TV, which is turned on at full volume - you can easily turn down the volume. Please note: telephones hang up 10 meters from the gun, and sound distortion occurs in computers and televisions. Do not use these devices for long periods of time as they may explode.
- Ignition of fluorescent lamps from a long distance.
- Boil a small amount of water.
Designing a microwave cannon
Today we will tell you how a microwave gun is constructed from a microwave oven, described by Kreosan on YouTube. So, we will need:
- Microwave oven (working).
- A coffee can or tin can, or even better, a loudspeaker housing (bell).
- Wire.
- Necessary little things.
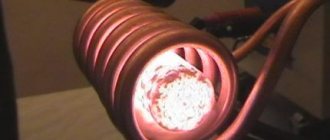
The main element found in a microwave is the magnetron. Its purpose is to generate waves of ultra-high frequency and enormous power. We must remove the required device. For those who don't know, it looks funny. A pin sticks out from the top of the iron thing, which is a high-power radiator. It is a microwave emitter. The radiation power is about 700–800 W.
Magnetron gun diagram
Therefore, it is necessary to work with extreme caution. Once in the focus of radiation, this power can harm health, especially the eyes. I am glad that the radiation emanating from the pin is diffuse and more or less safe. In any case, you should not take risks and come very close.
How to protect yourself from EMP: first steps
It is highly likely that small systems will not be affected by EMP if they are isolated from the mains. Therefore, if you receive a warning about an impending EMP, unplug all appliances and devices plugged into the electrical outlet. Don't forget ventilation and thermostats. Disconnect the solar panels and the entire house from the mains, open the shut-off switches between the solar panels and the inverter, and between the inverter and the power distribution panel. With coordinated action, this will take a few minutes.
What you will need
- Copper wire (EM emitter)
- Disposable camera (EM emitter)
- Iron rod (EM emitter)
- Solder and soldering iron (EM emitter)
- AA battery (portable EMR device)
- Battery compartment (Portable EMR device)
- Copper Wire (Portable EMR Device)
- Cardboard box (portable EMR device)
- Disposable camera (with flash; portable EMR device)
- Electrical tape (portable EMR device)
- Iron core (preferably cylindrical; portable EMR device)
- Rubber gloves (recommended for both devices)
- Simple electrical switch (portable EMI device)
- Solder and soldering iron (handheld EMR device)
- Radio antenna (portable EMR device)
The principle of operation of the shredder
The principle of operation is vaguely reminiscent of the operation of a Tesla transformer and a stun gun. The battery powers an electronic high-voltage boost converter. The load of the high-voltage converter is a series circuit of a coil and a spark gap. As soon as the voltage reaches the breakdown level of the spark gap, a discharge occurs. This discharge makes it possible to transfer all the energy of the high-voltage pulse to a coil of wire. This coil converts the high voltage pulse into a high amplitude electromagnetic pulse. The cycle is repeated several hundred times per second and depends on the operating frequency of the converter.
Devices for echo sounders
For echo sounders, a magnetostrictive ultrasound emitter is often used. How to prepare a model with your own hands? Homemade modifications are made with a conductivity of 5 microns. their average is 55 ohms. To make a powerful ultrasonic rod, apply 1.5 cm. The solenoid winding is wound in small increments.
Experts say that it is more advisable to select stands for emitters from stainless steel. In this case, the terminals are used with low conductivity. Capacitors are suitable for different types. for emitters it is at around 14 W. Rubber rings are used to secure the rod. Electrical tape is screwed onto the base of the device. It is also worth noting that the magnet should be installed last.
General protection against electromagnetic radiation
Suggested protective actions:
Turn off electronic devices when not in use. Unplug electrical appliances when not in use. Do not leave components such as printers and scanners in standby mode. Use short cables for work. Install protective induction around the components. Use components with self-contained batteries. Use loop antennas. Connect all ground wires to one common ground point. Whenever possible, use smaller devices that are less sensitive to EMR. Install MOV (Metal Oxide Varistor) transition protectors on portable generators. Use a UPS to protect electronics from EMP surge. Use device locking. Use hybrid protection (for example, a bandpass filter followed by a lightning arrester). Keep sensitive instruments and devices away from long cable or electrical runs, antennas, guy wires, metal towers, corrugated metal, steel fences, and railroad tracks. Install the cable underground, in shielded cable ducts. Build one or more Faraday cages.
You should think through the protective system in advance. For example, a backup generator would likely not be damaged by a solar storm, but EMP could damage sensitive electronic controllers, so shielding is advisable. Conversely, a device such as an uninterruptible power supply (UPS) can be useful in its own right as a protection component. If EMP occurs, the surge may destroy the UPS, but it will most likely protect connected devices and components from destruction.
How to build a Faraday cage
A Faraday cage can be made at home from metal containers such as a trash can or bucket, a closet, a safe, or an old microwave oven. Any three-dimensional object that has a continuous surface without gaps or large holes will do. A tight-fitting lid is required.
Install non-conductive material (cardboard, wood, paper, sheets of foam or plastic) on all interior sides of the Faraday cage to keep the contents away from metal. You can also wrap each item in bubble wrap or plastic. All devices that are inside must be isolated from everything else and especially from the metal container.
What to put in a Faraday cage
Place inside the cage the entire electronic and electrical arsenal that is included in the NC, and those components that were purchased for future use. It is also necessary to place there everything that may be sensitive to EMR in case of receiving a warning signal. Including:
Batteries for radio. Walkie-talkies. Portable TVs. LED flashlights. Solar charger. Computer (laptop or tablet). Cell phones and smartphones. Various light bulbs. Charging cords for mobile phones, tablets, etc.
How to protect important information from EMP
Keep in mind that an electromagnetic pulse can disrupt infrastructure for a long time, and in this case, permanently. Therefore, it is worth preparing in advance and backing up important files and placing them on different media in different Faraday cages.
Possibilities of a homemade microwave gun
How can you use the device? It turns out that a magnetron gun has a serious effect on household appliances:
- It has the same frequency as wi-fi. Therefore, you can easily reset your neighbor’s Wi-Fi router.
- Two walls will not be an obstacle to turning down the volume on your deaf neighbor's TV. But be careful with your devices, because 10 m from the gun the phone may freeze, and the sound in the computer and TV will be distorted. Do not operate the devices for too long - an explosion may occur.
- You can entertain your friends with fluorescent lamps, which, under the influence of a gun, light up at a great distance.
- Wood-boring beetles living in wooden buildings are easily destroyed by a microwave cannon.
- You can also sterilize cereals from bacteria and get rid of beetles using a microwave cannon that grow inside bulk products.
- The power of the magnetron is enough to melt non-ferrous metal.
- You can boil not too much water.
Device diagram
One switch will be used as a spark gap - it will not need to be pressed. And the other is for switching.
What is needed for assembly?
— 3.7 V batteries — — Housing — — High voltage converter — — Two switches — — Super glue. - Hot glue.
Assembly
We take the case and drill holes for the switches. One from the bottom, the other from the top. Now we make the coil. We wind around the perimeter of the body. We fix the coils with hot glue. Each turn is separated from each other. The coil consists of 5 turns. We assemble everything according to the diagram, solder the elements. We insert an insulating gasket between the contacts of the high-voltage switch so that the spark is inside and not outside. We secure all the parts inside the case and close the case cover.
Safety requirements
Be especially careful - very high voltage! Perform all manipulations with the circuit only after turning off the power source. Do not use this electromagnetic shredder near medical equipment or other equipment on which human life may depend.