Differences between concrete mixers by type of action
Having found out about the mechanism of operation of concrete mixers and their parameters, you will be able to choose the right design for a particular construction site. You don’t have to make your work difficult if you can use a simple mechanical device.
In addition, if you load the concrete mixer to the very top, it will not be possible to complete pouring the foundation faster, as this will cause overload of the motor and rapid breakdown.
When choosing the design of an apparatus for mixing a solution, you need to take into account the principle of its operation:
- Mechanical models. Driven by hand crank. When it is necessary to mix a large amount of concrete, you will need two people to rotate the handle;
- Electric options. They operate from the mains, and connecting the motor will require good knowledge of auto mechanics.
DIY construction mixer
The repair process is very labor-intensive and sometimes you can’t keep track of everything. For example, you need to mix a concrete solution, everything has already been purchased and ready, when suddenly it turns out that the construction mixer is out of order or is not there at all. What to do in such a situation? Run to the store? But extra expenses cannot always be foreseen and there may simply not be funds for such a purchase. You can get out of this situation by making a concrete mixer yourself. For this mixer you will need:
- Drill.
- Hairpin 8, 40 cm long.
- Four metal plates.
- Nuts and washers.
So, the work begins with the hairpin. It needs to be sharpened in such a way that it is convenient to screw on the nut. On the other hand, you need to grind down the pin for the triangle. This is necessary in order to properly attach it to the drill.
Next we get to work on the plates. Using an 8 mm drill, you need to make one more hole from the edge on each. Now you can proceed to assembling the mixer. A nut, a washer, and then a plate are installed along the length of the stud. The distance should be at least three centimeters. The top and bottom plates need to be bent according to the principle of blades.
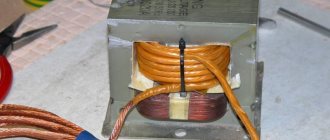
It should look something like this
The second end of the pin is attached to the drill, that's it, the construction mixer is ready. However, this type of homemade construction mixers will only handle small volumes of mortar.
Such a mixer will not cope with large volumes of work.
For mixing more liquid substances, for example, paint, this option is also suitable
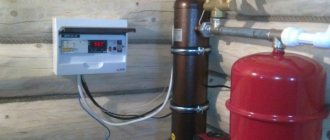
For a large amount of mortar, you will need a concrete mixer, which you can also make yourself, but this will require much more time and materials, so it will be easier to borrow from friends or use rental services. Moreover, such a device brings more benefits when it is completely independent than when it requires constant supervision. In this case, it is better to choose the gravitational method of mixing the solution.
An example of a self-made concrete mixer
The main thing to remember is that when assembling any mixer, you must follow safety precautions, and if you do not have confidence in your abilities, then it is better not to take on such painstaking work, but to go to the store and buy a decent product.
Manual and electric models
When there are 2-3 strong people at the construction site, it is possible to settle on a handmade product. The components of the mixture are immersed together or one by one.
One disadvantage of a design with a moving barrel, rather than a shaft moving in the middle, is the inability to add water while mixing.
- You will need to stop the barrel, open the hatch and add water. The hatch is screwed in and mixing of the mixture continues.
- Electrically powered concrete mixers make it possible to mix large volumes of mortar in a short time.
- The work process can easily be controlled by one person.
It should be taken into account that high-power motors require a three-phase line, so when selecting the capacity of the tank, you need to calculate the motor power in advance. If a 220 volt line is connected to the site, then it will not be possible to create heavy solutions.
A few tips on how to avoid getting caught
Even though you will assemble the apparatus yourself to help mix concrete, this does not mean that you can neglect basic safety rules. Yes, they have already set everyone’s teeth on edge, and yet, traumatology statistics show that not everyone follows them. Remember them well, or better yet, write them in bright paint on your concrete mixer:
- Do not, under any circumstances, climb inside a spinning barrel.
- If you have assembled a unit with an electric drive, make sure that the power cord is in good condition.
- Keep small children away from even a non-working machine.
- If you have made a mobile structure, put a support under the wheels before you start using it.
- When mixing concrete, strong vibrations occur. Therefore, monitor the condition of the screw connections and tighten them in time.
- If possible, wear work gloves or gloves. Cement can cause an allergic reaction to the skin of your hands.
- And never leave switched on equipment unattended.
Remember that you are responsible for your health and the safety of those around you! So, making a concrete mixer with your own hands is not at all difficult. In this matter, the main thing is the availability of all the necessary tools, materials and, of course, desire. But you will have an inexpensive and excellent tool that can be useful to you more than once. By the way, you can rent out your concrete mixer to your neighbors and get a good increase in your salary from this.
- Author: Manager Andrey
Rate this article:
- 5
- 4
- 3
- 2
- 1
(1 vote, average: 4 out of 5)
Share with your friends!
Variety of options
Apparatuses for mixing concrete are divided according to the principle of operation, and from this the type of construction emerges:
- Compulsory products. They are characterized by a stationary container in which blades mounted on a shaft rotate.
- Gravity models. The concrete is mixed by rotating the container, in which the blades are attached to the walls.
- Vibration options. They do not have great productivity, but they provide a high-quality and homogeneous mixture without air bubbles.
- Periodic species. They are characterized by low power, so they require frequent stops. For private construction this is an acceptable option.
- Gear or crown type.
- Permanent action. These concrete mixers work without interruption and are used for large volumes of work.
All of the above types of concrete mixers come in both mechanical and electric models. The difference is that a forced-action mechanical stirrer has a horizontal axis, while an electric one can accommodate a vertical axis.
The design of any concrete mixer allows you to evenly mix cement with different components in the form of: gravel, sand, crushed stone, expanded clay with water. Due to this, the pace of construction is greatly increasing.
DIY construction mixer
The repair process is very labor-intensive and sometimes you can’t keep track of everything. For example, you need to mix a concrete solution, everything has already been purchased and ready, when suddenly it turns out that the construction mixer is out of order or is not there at all. What to do in such a situation? Run to the store? But extra expenses cannot always be foreseen and there may simply not be funds for such a purchase. You can get out of this situation by making a concrete mixer yourself. For this mixer you will need:
- Drill.
- Hairpin 8, 40 cm long.
- Four metal plates.
- Nuts and washers.
So, the work begins with the hairpin. It needs to be sharpened in such a way that it is convenient to screw on the nut. On the other hand, you need to grind down the pin for the triangle. This is necessary in order to properly attach it to the drill.
Next we get to work on the plates. Using an 8 mm drill, you need to make one more hole from the edge on each. Now you can proceed to assembling the mixer. A nut, a washer, and then a plate are installed along the length of the stud. The distance should be at least three centimeters. The top and bottom plates need to be bent according to the principle of blades.
It should look something like this
The second end of the pin is attached to the drill, that's it, the construction mixer is ready. However, this type of homemade construction mixers will only handle small volumes of mortar.
Such a mixer will not cope with large volumes of work.
For mixing more liquid substances, for example, paint, this option is also suitable
For a large amount of mortar, you will need a concrete mixer, which you can also make yourself, but this will require much more time and materials, so it will be easier to borrow from friends or use rental services. Moreover, such a device brings more benefits when it is completely independent than when it requires constant supervision. In this case, it is better to choose the gravitational method of mixing the solution.
An example of a self-made concrete mixer
The main thing to remember is that when assembling any mixer, you must follow safety precautions, and if you do not have confidence in your abilities, then it is better not to take on such painstaking work, but to go to the store and buy a decent product.
When mixing putty, resins, concrete and plaster, as well as when tinting paint, a whisk attachment is indispensable, which is attached to a hammer drill or drill and speeds up the mixing process. The mixer allows you to mix the solution efficiently or tint acrylic, while it costs a penny and requires parochial school-level knowledge to use. Below, the Stroyremontiruy blog will tell you how to choose an attachment taking into account the purpose of use and the features of the hammer drill.
What is a concrete mixer made of?
Many people are interested in the question: what can a concrete mixer be made from? Let's take a closer look at this issue, taking into account the available products: barrels, cans, you will also need pipe cuttings and other scrap metal, which will be useful in creating a homemade concrete mixer.
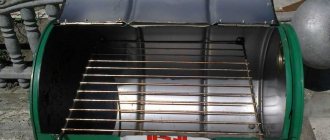
Making from a barrel
This design has an unusual line of movement. In it, the rotation axis passes obliquely through the container. Therefore, the solution in it turns over from one wall to another. The design is simple and effective.
The important thing is that there are no difficulties with welding joints of different types of metal.
Consists of elements:
- Metal barrel;
- Base made of metal corner;
- Pipe shaft;
- Bearings;
- Handle with handle;
- Manhole cover;
- Locks, seals.
In the upper section of the frame, bearings are mounted in the center, into which the handle is threaded. Thanks to them, a 200 liter barrel rotates with ease.
It is advised to select a barrel with thicker walls, then it will last longer.
- In the middle, the additional blades are not welded: they are able to hold the ingredients, preventing mixing and making unloading difficult.
- The device contains a loading hatch in the bottom.
- This is a section cut off by 1/3, secured with loops to the bottom, equipped with a sealing elastic band along the plane and closed with 2 locks.
- To load the barrel, turn it in such a position so that the hatch is on top.
- For unloading, it turns with the hatch down.
- The solution itself is dumped into the container located below, and the adhering material is removed by hitting the barrel with a sledgehammer.
Making from a milk can
A simple manual concrete mixer can be made from the usual metal flask in which milk was sold. You will also need to cut pipes and metal. The design is simple and such an apparatus for mixing concrete can be made in 2 hours, the main thing is to weld the frame.
It will take 20-30 minutes to assemble the concrete mixer structure.
The steps for the work stages are as follows:
- The bed is prepared, a handle is bent from a round pipe.
- In the upper half of the frame, two couplings from the water supply are welded. Their internal diameter should be slightly larger than the cross-section of the tube.
- The pipe is pulled through the flask and welded to the body.
- In order for the barrel to spin easily, you need to find the center of gravity. To do this, you need to put it on some object and move it back and forth to determine this center. A handle stretches through it.
- By extending the handle, it is then attached to the walls of the case. Difficulties may arise here due to the fact that the barrels are made of aluminum and the handle is made of steel. It will not be possible to combine them by welding. An accessible solution is to do cold welding. It's really applicable. Another option is to weld plates onto the handle, which can then be riveted to the sides of the can.
- To prevent large play of the handle, nuts are welded to it on both sides of the coupling.
At this stage, the design is ready for use. 1 mixing in a 40 liter can can yield 2.5-3 buckets of solution. For use on a summer cottage or near a private house, without construction, this is quite enough.
How can you replace a mixer at home?
An electric mixer is especially necessary when preparing baked goods. With its help, recipes advise whipping cream, egg whites and other ingredients with a light airy structure. But if a kitchen appliance is not at hand, you have to look for alternative options that can replace it.
Is it possible to replace the mixer with a whisk?
A typical hand whisk consists of several thin curved arcs spaced apart from each other. Its design features ensure the same high-quality whipping as when using an electric appliance. Technically, the device can really serve as an analogue.
A regular whisk is designed for simple mixing of ingredients until relatively homogeneous.
However, the mechanical device has a major drawback - you have to beat the egg whites and cream manually. This requires the application of physical strength for a long time, and it is impossible to achieve an ideal result. The mixer operates at an average speed of about 2000 rpm - it is impossible to provide the same intensity of movement with a manual device. Therefore, the quality of whipping still remains conditional.
How can I replace a mixer for whipping cream?
If the recipe requires whipping the air cream until it is as smooth as possible, you can use two options:
- Blender. The kitchen appliance is designed primarily for chopping food and cannot fully replace a special beater. But when used as an analogue of a mixer, the result will be as close to ideal as possible. And if the blender is equipped with a special whisk attachment, the cream processing will be even better. The whisks in many blenders are too thin and low-powered - they cannot compare with a mixer
- Glass jar . It is necessary to place the ingredients in the container, and then close the lid tightly and shake the contents for several minutes as quickly as possible. The container should be filled no more than 1/4 of the total volume. When shaking the jar, your hands get tired, but much less than when rotating the whisk
How can I replace a mixer for whipping egg whites?
Beating egg whites until smooth and foamy is much more difficult than stirring soft cream. In this case, you can replace the mixer in two ways:
- Forks. Two cutlery are placed opposite each other and secured with rubber bands. Then beat the whites by hand, trying to move your hand as quickly as possible. The foam when using forks is less fluffy than after automatic processing, but the components manage to give an airy structure.
You need to fold the forks so that their curved tines form a kind of miniature whisk - Drill or screwdriver. If you have a power tool at home with the ability to replace attachments, then insert a regular whisk into the chuck hole instead of a drill. Then you need to make sure that the fixation is secure and put the unit into operation. The disadvantage of this method is the large mass of the tool. It is difficult and awkward to hold, especially if you need to do it with one hand. The drill must be wiped clean to remove any dirt before using it in the kitchen.