Master class on making watches with your own hands for interior decoration or for gifts.
Nowadays, electronic watches with luminous numbers are sold at the price of electronic-mechanical watches, but electronic-mechanical watches have the disadvantage that the clock readings are not visible at night.
Let's eliminate this misunderstanding - make a homemade wall clock with backlight. The presence of such watches in stores was not found. You can't buy it - you can just make it yourself.
How to make a backlit clock with your own hands
Step-by-step instructions for making an illuminated watch
1. We buy or make ourselves a round plexiglass blank with a diameter of 240 mm and a hole in the center with a diameter of 9 mm. It is possible to produce blanks of square, rectangular or triangular shape.
- Download the file and print the dial on the printer. File.
- Attach the dial to the workpiece with pieces of tape.
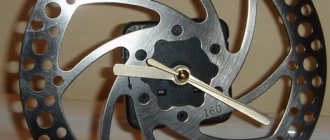
Dial engraving
- And as shown on the website page, we use an engraver to engrave numbers and marking lines on plexiglass. Unlike glass, it is better to use a carbide bur for engraving. If you work carefully, engraving will take 30-40 minutes. You should not try to make the engraved surface very smooth; the more irregularities, the better the numbers will glow.
- For illumination we use either a super-bright LED or an LED that smoothly changes its color. The wider the LED beam angle, the better. It was not possible to buy an LED with color tints in stores. But, such an LED can be extracted from Chinese night lights powered either from the mains or from batteries. The donor for the LED was a trinket for 36 rubles (2013). Look at the photo.
- We solder extension conductors to the removed LED and carefully insulate them.
Chinese donorBack side The desired LEDExtend the conductors
- Using aluminum tape with an adhesive layer (used in ventilation), carefully paste the dial from the end and along the outer edge with such a reflector.
- At the bottom of the dial, using a round file, we make a U-shaped recess that follows the contours of the LED. The edges of the notch should be made as smooth as possible. We will clear the walls of the recess by wiping with cotton swabs soaked in nail polish remover.
- The LED is powered from an old cell phone charger. Since the operating voltage of the LED is 3.5-4 volts, we will apply the voltage through a resistive divider. After assembling the divider, we check the functionality of the circuit. See photo.
Aluminum tape Covering with reflector Electrical circuit Power supply and divider
- We install the LED in the recess and secure it with transparent tape, and then additionally cover it with aluminum tape.
- The clock mechanism must be selected with either a built-in or overhead bracket for wall mounting.
Install the LED Cover with tape Mechanism with an overhead bracket Mechanism with a built-in hinge
- Tests of the dial showed the difficulty of reading the watch at night - the hands are not visible.
Clock with mirror layer
To do this, a piece of thin plastic with a mirror coating is installed on the back of the dial. With such a reflector, the time could be determined by the reflection of the back sides of the hands.
In the second version, instead of a mirror, slightly crumpled foil was attached and the readings could be read by the shading of the foil. You can also engrave on the free part of the dial. The watch fulfills the role of a night light no worse than the Chinese donor.
When using reflectors at night, the arrows are visible and it is possible to determine the time. Unfortunately, the video does not fully convey the ability to read the arrows.
How to make an illuminated wall clock with your own hands / Crafts Sekretmastera
The clock has been modernized. It was possible to provide power from a 220-volt network, and the standard battery became a backup source for the clock in the event of a power outage. Watch the video.
Illuminated wall clock - finalization of the circuit / Electronic homemade products / Sekretmastera
Another example of working with engraving:
I liked the idea, you can thank the authors!
Source: https://sekret-mastera.ru/masterim/samodelnye-chasy-nochnik.html
Tritium watch backlight
Tritium (super-heavy hydrogen) is a radioactive isotope of hydrogen that is actively used in the production of nuclear weapons. Surely, such a characteristic sounds at least alarming, but the fears are in vain - the radioactive element is securely enclosed in sealed borosilicate glass containers. Even if the container is damaged, the substance is not capable of causing harm to health due to its small amount. It is only important to remember that under no circumstances should you swallow or inhale tritium!
Tritium flasks
If the LED backlight depends on a battery, and the accumulative backlight, although it lasts a long time, requires mandatory contact with the light source, the tritium backlight of the watch does not need external recharging and lasts about 25 years. This explains the frequent use of tritium in the creation of night vision devices for the army, aviation and navy.
Trigalight
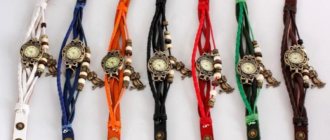
Trigalight (GTLS, trigalight) is a technology of self-activated tritium backlight for wristwatches, developed by the Swiss company Mb-microtec. The concern has been developing tritium light sources since 1968. The first wristwatch with a trigalight of the Traser brand was released in 1991 by order of the US Department of Defense. The US Army ordered 60,000 watches for units participating in Operation Desert Storm. The debut model Traser P6500 Type 6 was released until 2003.
Classic milatari watch Traser with trigalight
Today, Traser watches with tritium backlight are worn by military personnel in 59 countries. The brand has also become a favorite among lovers of extreme tourism.
Illumination of the clock on a VAZ car
Needless to say, a watch is a useful thing. But this element of the interior of the VAZ of the tenth family was not ignored by the designers. The fact is that the illumination of the dial is not uniform, only certain parts are illuminated, and the hands are difficult to see. We are studying the question of how you can improve the clock lighting with your own hands . The easiest way to make the backlight of the watch uniform is to replace the light bulbs in the watch with LEDs . If instead of two light bulbs you install LEDs in the standard sockets, the backlight will become more uniform, the result depends more on the diffusion of light from the diodes. You can achieve a better result if you install only one instead of two LEDs and place it in the center. For comparison, the first photo shows the standard clock backlight, the second photo shows the clock backlight with an LED in the center.
G-Shock watch backlight
The Casio G-Shock collection is notable not only for its fantastic durability. Bright backlighting has been a constant element of G-Shocks since the classic DW-5600E from 1996. A year earlier, the Casio concern presented its development of the Casio Illuminator, which was called Foxfire for the domestic Japanese market. The powerful LED backlight subsequently received the Super Illuminator modification, which is used today in all new watch series and, as we have already written, is activated automatically in low light conditions.
Rangeman - a model with fashionable intuitive lighting
Also, Casio watches, for example in the Baby-G series, came out with models with neon lighting. An LED built into the case illuminates the dial markers with a bright glow that imitates ultraviolet light.
Neobrite
To make the Casio G-Shock series watches impeccably functional, the masters of the Casio Corporation have developed a special light-accumulating composition for the indexes and hands. A fluorescent coating with a green glow, used in combination with LED backlighting, is called Neobrite. A striking example of a watch that combines both lights is the stylish model in a camouflage case, the Casio G-Shock GA-700CM-2A.
Military-tough GA700 Camo Series with neoshaved backlight
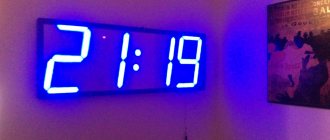
DIY electronic watch
For those who have at least a little knowledge of microcontrollers and also want to create a simple and useful device for the home, there is nothing better than assembling a digital clock with LED indicators.
Such a thing can decorate your room, or it can be used as a unique handmade gift, from which it will acquire additional value.
The circuit works like a clock and like a thermometer - modes are switched with a button or automatically.
Electrical diagram of a homemade clock with a thermometer
PIC18F25K22 microcontroller takes care of all data processing and timing, and the ULN2803A is responsible for coordinating its outputs with the LED indicator.
DS1302 chip works as a timer of precise second signals, its frequency is stabilized by a standard quartz resonator of 32768 Hz.
This complicates the design somewhat, but you won’t have to constantly adjust and adjust the time, which will inevitably be delayed or rushed if you get by with a random untuned quartz resonator of a few MHz. A watch like this is more of a simple toy than a high-quality, accurate timepiece.
If necessary, temperature sensors can be located far from the main unit - they are connected to it with a three-wire cable. In our case, one temperature sensor is installed in the block, and the other is located outside, on a cable about 50 cm long. When we tried a 5 m cable, it also functioned perfectly.
The clock display is made of four large LED digital indicators. They were originally common cathode, but changed to common anode in the final version.
You can install any others, then simply select current-limiting resistors R1-R7 based on the required brightness.
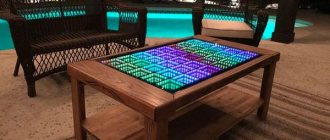
You could place it on a common board with the electronic part of the watch, but this is much more universal - suddenly you want to put a very large LED indicator so that they can be seen from a long distance. An example of such a design of a street clock is here.
The electronics themselves start at 5V, but to make the LEDs glow brightly you need to use 12V.
From the network, power is supplied through a step-down transformer adapter to the 7805 , which generates a voltage of strictly 5 V.
Pay attention to the small green cylindrical battery - it serves as a backup power source in case the 220 V network is lost. It is not necessary to take it at 5 V - a 3.6 volt lithium-ion or Ni-MH battery is sufficient.
For the case, you can use various materials - wood, plastic, metal, or integrate the entire structure of a homemade watch into a ready-made industrial one, for example, from a multimeter, tuner, radio receiver, and so on. We made it from plexiglass because it is easy to process and allows you to see the insides so that everyone can see - this watch was assembled with your own hands. And, most importantly, it was available