how to make a table with lighting
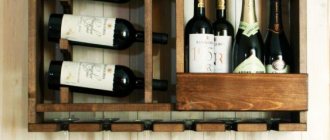
-Have you seen a light table with an infinity effect , but not in the photograph? It's really cool, like a fairy tale. In fact, making a backlit table with your own hands is quite simple. There are different options, here you will learn ways that will help you make your own glowing table with your own hands with different effects. LED tables are great for creating interesting decor in your home. They will immediately create a festive atmosphere anywhere - a great thing for a party. Check out this selection of ten tables; there isn't a single example you couldn't make yourself. These are mainly backlit coffee tables , but there are also practical options for backlit desktops , on which you can draw, sketch, solder and do many other useful things. Check out all these wonderful projects and today, with the help of the instructions and step-by-step photos presented here, you can start making your own light table .
Solid wood table top
Material selection and tools
The selection of materials will be small, but, nevertheless, it is better to do this in advance so as not to be interrupted from the work process:
- in this case, to make the tabletop we will use a pine board 100x2500x30 mm. Even though there are 9 of them in the top photo, only 8 will be used for the final result;
- strips for temporary fastening of any thickness (3 pieces) and self-tapping screws;
- wood glue or PVA;
- nitrovarnish for impregnating wood (colorless of any brand);
- parquet varnish for finishing the surface (in this case “Alpina” varnish will be used).
From the tool we will need:
- tape clamps (they can be replaced with strong rope);
- electric or cordless drill (you can even use a screwdriver);
- disc or belt sander;
- brush for applying glue;
- brush for applying varnish.
Rough work - making furniture panels
Apply glue to the ends of the boards
To create a furniture panel we will need:
- determine the future width of the tabletop relative to the width of the boards that are available;
- choose the best of them (without fungal infections and rot, wane and cracks);
- lay them out on the surface, selecting the front side according to the quality of the material;
- there will be large gaps at the joints, but don’t be upset about this - all the unevenness will be leveled out when you tighten the shield with clamps.
When you have laid out the boards and are sure that they are completely suitable for you, place them on edge (as in the top photo) and generously spread glue. In this case - PVA glue. Don't worry if the glue starts to bleed - it won't matter as you will still have to sand the surface.
Despite the fact that drips are acceptable, it is undesirable for the PVA to be too sparse, since it will practically not linger on the surface.
Layout of boards for the shield
The boards are smeared with glue on one side only, and as soon as we do this, we immediately place them flat, forming the future tabletop. If during installation you notice that it is better to unfold or turn over any of the boards, do this, just make sure that all joints are coated with glue. Also now you can still add or subtract the number of boards on the shield, that is, while it has not yet been pulled together.
The shield is tightened with tape clamps
After approximately shaping the tabletop (moving the boards and trimming the ends), stepping back half a meter from each edge, we put band clamps on the backboard. This is a very powerful tightening agent that can leave a dent on the board, and to prevent this from happening, a board is placed on each side, laid on edge - they are clearly visible in the photograph.
Then the structure is gradually tightened - the tape clamps have special handles that rotate the worm gear, tightening or loosening the tape.
When screeding, the boards should be aligned relative to each other.
Since we are using a non-profiled board, it is quite natural that the plane of the shield, when tightened, will have differences, that is, one board will turn out higher than the other, especially at the edges. Therefore, as you tighten the clamps, you need to align them by pressing your hand on the tubercle. But if that doesn’t work, then you can knock out the protrusion with a mallet or a plumber’s hammer, only through some kind of lath or board, so as not to damage the surface.
Additional homemade clamp
But for such a long board, two clamps are usually not enough - of course, it largely depends on the board, however, most often this is the case. Therefore, the missing clamps can be replaced with a sling or a nylon or mylar cord. Everything is very simple here - a loose loop is made around the tabletop, tied at the top, twisted in a figure eight and a stick is inserted into the top hole, which serves as a collar for the tie - this is shown in the photo above.
For PVA, it is advisable to keep it at room temperature for a day for complete drying. But if necessary, the clamps can be removed after 5-6 hours.
Final stage
If you think that the glue has already dried, you can free the shield from the clamps for further processing.
Temporary fastening of the shield from the back side
But if less than a day has passed, then it’s better to play it safe and screw three planks on the back side of the tabletop, securing each board. But screwing screws into the edges of the plank is risky, as it will split, so you need to drill holes there first. Make sure the length of the screws is correct so that they do not come out on the front side.
No matter how you level the boards, the surface will still remain rough, and in some places there will even be mismatched edges. Therefore, the glued shield should be sanded using a disk or belt machine. The edges around the perimeter are also subject to grinding and rounding.
The ends will also be uneven, therefore, using a construction square (you can even use a school triangle), draw lines along the edges on both sides. Then the excess is cut off with a hand-held circular saw and sanded.
Surface coating with nitro varnish
It is best to use nitro varnish as the first layer - it is cheaper, and wood absorbs this composition into the pores very well, therefore, much less paintwork and varnish will be spent on the second layer.
Sanding after varnishing
In addition, after the varnish dries, and this will happen in 40-60 minutes, the wood fibers will rise and you need to sand the surface again, but this time by hand. After this, cover the tabletop with parquet varnish 2-3 more times, only here the drying of the layer lasts for 4-4.5 hours.
After each layer of parquet varnish, check the surface for roughness and, if necessary, repeat the manual sanding cycle.
Table with infinity effect – 50 photo ideas:
Previous
TablesHow to make a table from cut wood with your own hands.
Next
TablesDo-it-yourself carpentry table
Formwork
After installing the diagonal braces and horizontal lintels, you can begin assembling the formwork and base for the table.
It must be remembered that after pouring the concrete solution, the formwork will need to be removed, so it should be made taking into account the fact that the canvas must remain intact. For the same purpose, you can cover it with polyethylene, which will also prevent concrete leaks onto the floor.
Making a countertop
Preparing and pouring the solution
Our formwork is ready - we can start making the base for our tabletop:
- We place reinforcing bars connected to each other into the formwork. The better the quality of the fittings, the more reliable our tabletop will be.
- We prepare the solution by mixing cement, sand and crushed stone in a ratio of 1:2:2. To improve the quality of the solution, add a plasticizer. Dilute the solution with water until a creamy consistency is obtained - the solution should spread quite easily.
- If we decide to make a countertop from imitation marble or granite, we add a special pigment to the solution. Such pigments can be purchased at almost any hardware store.
Pigments for concrete
Advice! To obtain a beautiful granite texture, we first dilute the pigment with water, and only then add it to the solution itself.
- Pour the finished solution into the formwork to the required height, controlling the level of the horizontal surface. We level the solution, cover it with film, and then leave it to dry for 7-10 days.
- To make the tabletop as durable as possible, you need to prevent it from drying out when the solution hardens. To do this, we periodically check the surface of the tabletop and, if necessary, moisten it with a spray bottle.
After the solution has completely hardened, you can remove the formwork and begin finishing the countertop.
How to make a corner countertop for the kitchen, read the article on the website.
Countertop finishing
The final stage of production is finishing the countertop. Here we will describe two finishing methods - tiling and polishing decorative concrete. The process of finishing the countertop is shown in detail in the video.
Tiling is done as follows:
- Using a float, apply tile adhesive to the countertop. We distribute the glue evenly and form grooves on it for more effective gluing of the tiles.
- We lay the selected tile (preferably quite durable, smooth, with a matte textured surface) on the adhesive layer and press it, carefully leveling it on the plane.
- Using plastic crosses, we align the width of all the seams between the laid tiles.
- After laying the tiles, wait until the glue has completely dried and grout the seams.
Tiled countertop
- At the same stage, we install the profile on the ends of the tabletop, fixing it with tile adhesive or liquid nails. To ensure that the profile is securely fastened, we fix it using clamps.
The advantage of this finishing method is that repairing a kitchen countertop with your own hands will involve removing the damaged tile and replacing it with a similar one.
Making a countertop whose surface imitates natural stone is somewhat more difficult:
- First, we grind the surface of the concrete with added pigments using a coarse-grained grinding machine attachment, achieving a perfectly smooth surface.
- Then we repeat the operation using a disk with a finer grain.
- We remove dust from the surface and treat it with a special impregnation - sealing. This impregnation is often sold under the name "concrete filler".
- Putting suede on the disc of the grinding machine, we polish the tabletop at low speeds, achieving a mirror shine.
Sealing for concrete
The advantage of this finishing method is that you don’t have to rack your brains thinking about how to update your kitchen countertops with your own hands. A worn-out countertop will simply need to be sanded again - and it will be as good as new!
Making your own countertop
Since an epoxy countertop can be made with or without a base, we will consider both options - each has its own characteristics.
The tabletop, made only of epoxy resin without a base, looks very impressive due to its transparency and inclusions of decorative elements. With certain skills, such a tabletop can be made with the most intricate outlines and an original 3D pattern in an array of hardened resin.
Make a transparent tabletop using glass as a mold:
- glass of the required size and shape is thoroughly cleaned, dried and degreased with acetone;
- before pouring, the surface of the glass is rubbed with wax mastic, which, after hardening, is polished with a dry rag;
- polished aluminum corners are used as sides for the mold, the inner surface of which is treated with a paraffin-turpentine mixture - this will allow you to easily remove the frozen tabletop from the mold;
- The corners are attached to the bottom surface of the glass using window putty.
Another option is possible, when a tabletop made entirely of epoxy resin is then inserted into a frame made of a material that matches the style of the product.
In order for the filling to harden properly, it should take 2-3 days. Before this, you cannot remove the tabletop from the mold.
To avoid having to drill holes in the hardened resin to attach the legs, plan for this in advance by marking the locations of future fastenings and securing small sections of pipe of the required diameter in the mold. After hardening, the sections are removed, and the fasteners for the legs are screwed into their place.
Wood-based countertops are easier to make because the countertop resin is poured onto an already prepared surface. In this case, as in the case of a glass form, sides are made along the edges of the tabletop - they can later be removed. Or you can use the option when the wooden sides are part of the tabletop, and the resulting “bathtub” is filled with resin.
The process of pouring epoxy resin with your own hands is not so difficult, but it requires care when working
The countertops look very nice, where wooden parts alternate with transparent inserts. To do this, you can also use glass as a base, on which wooden fragments are laid out, and the distances between them are filled with epoxy fill.
If you plan to use an old board as a base, then the work must be carried out in two stages: first, existing cavities and cracks in the board are slightly deepened, which are then filled with tinted liquid epoxy resin. After the first layer has hardened, the entire tabletop is poured, while the previously filled recesses stand out beautifully on the transparent surface.
After the pouring work is completed, it is necessary to protect the surface from moisture, dust and insects during hardening - they can significantly ruin the entire work. To do this, stretch polyethylene over the tabletop, mounted on a pre-prepared frame.
After complete crystallization of the material, the surface is polished and coated with a protective varnish.
What to look for when choosing
A table with an LED strip is easier to assemble, but the item will need a power source.
There is a feeling that in the center of the table there is a bottomless pit or well, illuminated by many lights and lamps.
The option with a garland will require additional fixation of the light bulbs, but the table with the infinity effect will work from a regular outlet.
A table with lighting will look perfect in office spaces, as well as at home.
You should choose a table based on the color of the lamps. The best infinity effect for this item will be given by red. But cheerful blinking lights, like a Christmas tree garland, will help this piece of furniture create a festive atmosphere.
Such a table will look very beautiful in the living room; it will bring a lot of pleasure to your family and set the mood for intimate conversations.
What to make a table for a 3D printer with your own hands?
Types of heating tables:
- Textolite. This is the most affordable option. A textolite table consists of a textolite plate with copper tracks applied to it. Most often, they are supplied with 12 or 24 V power. Direct printing on a textolite sheet will not work, since it is quite flexible and deforms during heating. Glass is attached to the top to provide rigidity and level the surface.
- Aluminum. Aluminum tables also use textolite, but instead of glass, an aluminum sheet is placed on top.
- Silicone. Can be flexible or rigid, depending on the design. It consists of a heating element, which is filled with heat-resistant silicone.