Computer mouse
is an electronic manipulator designed to remotely control the operation of computer programs by activating a cursor that moves across the monitor screen following the movement of the mouse across the surface. For control, at least two keys and a wheel are installed on the mouse body, allowing you to scroll pages in the vertical direction.
Depending on the method of connecting to a computer, mice can be wired (connected using a flexible cable with a PS/2 or USB connector) and wireless.
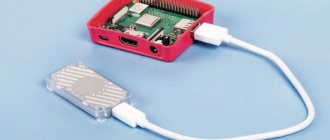
The photo shows a wireless mouse. As you can see, it does not have a wire to connect to the computer. In wireless mice, information is exchanged using radio frequency. A transceiver is inserted into the USB port of a computer, laptop or tablet, providing two-way communication between the mouse and the device over the air.
Wireless mice have the following disadvantages: - they are more expensive, heavier and require additional attention, since it is necessary to periodically replace dead batteries or charge the batteries.
Optical computer mice are very reliable and can last for many years. But over time they break, and you have to replace the mouse or repair it yourself, since repairing it in a workshop will cost more than the cost of a new one.
Wired mice fail, in the vast majority of cases, due to chafing of the wire at the point where it exits the case, and wireless mice due to the discharge of the battery, accumulator or failure of contact between its terminals or contacts in the container due to their oxidation. Over time, any mouse fails due to wear and tear on the buttons, usually the left one, which is the most frequently used. To repair the mouse, you need to disassemble it.
How to disassemble a computer mouse
In order to disassemble the mouse for repair, you need to unscrew the mounting screws from its bottom side. Usually there is one, but there may be several. In this mouse model, the halves of the body are fastened with one screw.
If the screws are not visually visible, then most likely they are covered with a label or hidden under the thrust bearings. You need to lightly press the label over the entire area. If, in any place, the label bends in the shape of a circle, then most likely there is a screw hidden there. This mouse has a screw hidden under a label that had to be partially peeled off.
In the model, for example, TECH X-701, the fastening is made using two screws, one of which is also hidden under the label. When I tried to peel off the label, it began to tear, so I had to unscrew the screw and make a hole in the label. The place where the label was pierced with a screwdriver in the photo below is indicated by a blue circle.
If the screws could not be found under the labels, then they are definitely sealed with thrust bearings. To gain access, you need to carefully remove the thrust bearings with a knife. Upon completion of the mouse repair, they will need to be glued in place, since without the pads it will slide worse on the mousepad.
After unscrewing the screws, you need to move the halves of the mouse body from the side of the unscrewed screw in different directions and remove the upper part on which the buttons are located.
The mouse's printed circuit board is usually not fixed with screws and is installed with holes on plastic rods protruding from the case. But there are computer mice in which the printed circuit board is screwed to the case with small screws. If, when you try to remove the board, it does not give in, you need to find and unscrew all the screws that secure it. An example of this is the TECH X-701 computer mouse, which is secured to the case with a screw that simultaneously secures the additional printed circuit board of the side buttons.
To remove the board, you need to pry it from below, while simultaneously removing the wheel axis from the bearing retainers of the housing.
When disassembling the mouse, remember how the parts are located relative to each other. Pay special attention to the wheel ratchet spring (if there is one). It is similar to a clothespin spring, only small in size and can easily get lost. If you don’t like how the ratchet works when rotating the wheel, you can slightly bend the tip of the spring that comes into contact with the teeth of the wheel. The pressure will decrease and the wheel will rotate more smoothly.
When disassembling and repairing the mouse, you need to be careful not to let your hands touch the surfaces of the optical prism and other optical elements. If you accidentally touch it and traces of sweat and grease remain on the surface, you must remove them with a cloth soaked in a special composition for wiping optical parts. Under no circumstances should any solvents be used for cleaning. If you don’t have a special napkin at hand, simply wipe off any traces of dirt with a soft, clean cloth.
Common computer mouse problems
First, let's look at possible problems with the mouse that owners of this device often encounter. Not only the choice of type of repair, but also the final result will depend on how correctly you determine the cause of the problem.
IMPORTANT! Carry out a thorough inspection of the device to make sure that the breakdown is in the exact part where you think it is. If you carry out incorrect repairs, you may not only achieve no result, but also permanently break the mouse. That is why it is also important to study the sequence of all actions in advance.
There are several main types of breakdowns, which in most cases occur among ordinary users of office mice. Eliminating them is not so difficult, so even a beginner who does not have special skills and knowledge in the field of technology can cope with the task if he spends a little time and effort.
The cause of the problem may be:
- cable break;
- button failure;
- wheel breakage.
You can try to disassemble the mouse and carry out the repairs yourself. But for this it is important to understand the internal structure and principle of operation of the mouse. All the necessary information can be easily found on the Internet, so there is no need to worry about a lack of knowledge.
Wireless mouse repair
The main reason for the complete inoperability of wireless mice is dead batteries (accumulators) or poor contact of their terminals with the electrical circuit of the mouse. Since the lasers of many mouse models operate in the light range, to determine the condition of the batteries, just turn on the mouse and look at it from below. If a red glow is emitted, the batteries are good. Otherwise, repairs must begin with checking the batteries and the quality of their contact with the electrical circuit of the mouse.
In order to get to the batteries, you need, for example, like in this mouse, to press the “Open” button, after which the battery compartment cover will release and it will open.
If the mouse's laser operates in an invisible zone, then you can only check the condition of the power supply by replacing or measuring the voltage at the battery terminals.
In a mouse that has been in use for a long time, the contacts on both the battery terminals and the contacts in the mouse may oxidize. In this case, they need to be inspected and, if oxides are found, remove them with a rag soaked in alcohol or simply wipe thoroughly until shiny. It is not advisable to remove oxide from the mouse contacts with sandpaper, since the thin protective galvanic coating will be removed from them.
Why might a wireless mouse not work on a laptop?
Most laptops are equipped with a touchpad that performs navigation and control functions. This is not always convenient, so owners of mobile computers continue to use the mouse. And the question of why a wireless mouse does not work remains relevant for them. Problems can be different: from a dead battery to a complex technical malfunction. A modern computer mouse is a simple and reliable device. Therefore, before you get upset about a breakdown, you should check the simple causes of failure:
- Dead battery
- Poor contact between batteries and board
- Software error
- Broken or unconnected transceiver
- Not working USB connector
- Clogged Bluetooth or Wi-Fi channel
- Losing pairing if the mouse is connected to a laptop via built-in Bluetooth
- Frozen or crashed driver
- Windows Update
Consistently eliminating the listed reasons why a wireless mouse stops working, we can assume that the device itself is broken.
How to repair a frayed wire in a wired mouse
If, when working with the mouse, the cursor begins to move spontaneously, jump to any place on the monitor screen, or freeze, then we can say with greater certainty that the integrity of the wire at the point where it exits the housing has been compromised. It’s easy to check, you need to press the wire against the body and if the functionality is temporarily restored, then it’s definitely a problem with the wire.
If, upon inspection of the wire at the point where it exits the computer mouse body, physical damage is detected, then the reason for the malfunction is obvious. Here is an example of such damage. The photo shows that the double outer shell of the wire is damaged, and some of the tinsel-type conductors are frayed.
If you have soldering skills with a soldering iron, it is not difficult to repair a computer mouse with a frayed wire, doubling its service life. The repair consists of removing the damaged section of the wire and sealing the newly prepared ends of the surviving part of the conductors into the printed circuit board.
How to repair a frayed mouse wire by soldering
The wire connecting the computer mouse to the connector comes in two types - made of ordinary thin stranded copper wire and tinsel-type wire. Tinsel type wire is more elastic, therefore it has high bending resistance and lasts longer.
Entering the mouse body, the wire runs along and connects to the printed circuit board. There are two types of connections: a detachable connection or a press-fit connection into a block that is soldered into the board. The photo shows a block soldered from a printed circuit board with conductors pressed into it.
Regardless of the method of connecting the wires to the mouse’s printed circuit board, in order to know how to solder during repairs, you need to photograph or sketch what color wire is connected to which contact. Then unsolder the connector from the board (it’s better not to disconnect it, it’s easier to unsolder) or the block. There is no international standard for the color scheme of mouse wires, and each manufacturer chooses the wire color at its own discretion. I had to repair many computer mice and everywhere the wires from the same connector pins came in different colors. Obviously, this is due to the fact that the mouse is considered a consumable item, and manufacturers do not provide for repairs after the end of the warranty period.
After desoldering the old wires from the mouse circuit board, you need to clear the solder holes to seal the new wires. This job can be easily done with a toothpick or a sharpened match. It is enough to heat the solder at the location of the hole on the side of the printed conductors of the board and insert the tip of a toothpick into it, remove the soldering iron, and when the solder hardens, remove the toothpick. The hole will be free for installing a conductor into it.
To prepare the wires for installation, it is necessary to cut off a 15-20 mm long piece of wire coming out of the mouse body that has become unusable. Remove the insulation from the wires and tin the ends of the conductors with solder. You need to tin the wires by placing them on a wooden stand, while rotating them in one direction so that the tinned ends of the wires are round in shape. Otherwise, it will be impossible to insert them into the holes on the printed circuit board.
Insert wires into the printed circuit board of the mouse in accordance with the sketched color scheme and solder them with a soldering iron.
Wires of the tinsel type cannot be tinned using ordinary rosin flux, since the tinsel ribbon conductors are covered with a layer of insulating varnish. Acid flux cannot be used as it will saturate the inner strand of the tinsel wire and eventually destroy the conductors. The best flux in this case is an aspirin tablet.
All that remains is to insert the tinned ends of the wires into the holes of the printed circuit board and solder them with solder.
Sometimes there are mice in which the printed circuit board is double-sided with holes for wires of very small diameter, and it is very difficult to free them from solder. In this case, you can simply solder the conductors to the contact pads. Since physical stress is not applied to the wires when the mouse is operating, the connection is quite reliable.
Now you can install the printed circuit board into the base of the case and secure it with a screw, lay the wire and close it with the top cover. When installing a cover with buttons, you need to make sure that the wire does not get under the pushers of the buttons, between the mating protrusions of the housing and does not touch other moving parts. Before assembling the mouse, it is imperative to remove dust and hairs, which over a long period of use quite a lot gets stuffed through the gap between the wheel and the body. The repair is completed and the computer mouse is ready for use again.
How to repair a frayed mouse wire by twisting it
It’s safer than soldering to repair a wire, but not everyone knows how to solder, and even if they do, they don’t always have a soldering iron at hand. You can successfully restore the operation of the mouse without a soldering iron by twisting the wires. The mouse is disassembled and a section of the frayed wire is cut out.
Next, with a slight pressure with a knife blade, the outer insulation of both ends of the wires is cut lengthwise by 5-6 cm.
The conductors are carefully removed from the cut wire sheath. The wire sheath is not cut, it will still serve.
The length of the conductors is adjusted so that when twisting, the twisting points are shifted relative to each other by 8 mm and the ends of the conductors are stripped of insulation to a length of 5-8 mm.
The ends of conductors of the same color are twisted tightly together.
The resulting twists are bent along the conductors, and the conductors are tucked into one of the previously cut wire sheaths. When refueling, you need to pay attention so that the twists do not touch each other.
Next, the second part of the wire insulation, cut lengthwise, is applied to the resulting connection.
A couple of turns of insulation will prevent the twists from accidentally touching the parts on the mouse board and will give the connection sufficient mechanical strength.
All that remains is to insert the wire connector into the mating part on the mouse’s printed circuit board and lay the wire in the case.
Close the top cover, tighten the screws and you can start working on the computer. The wire repaired in this way will last another period. Sometimes the system unit is installed far from the workplace, and the mouse wire is not long enough to work without tension. Using the technologies proposed above, you can successfully extend the wire to the required length by taking the wire from an old mouse. Since there is no single color standard for wires, you must first determine by dialing which color wire is connected to which number in the connector.
To increase the service life of the mouse, it is necessary to ensure that the wire at the point where it exits the mouse body does not bend too much when manipulating it.
If the mouse wheel becomes difficult to rotate
Sometimes when you rotate the mouse wheel, the page scrolls jerkily or does not move to one side. One of the reasons is the ingress of dust and hairs between the photo sensor and the photodetector of the wheel optocoupler. Dirt enters the mouse body through the gap between its body and the wheel and sticks to the wheel axles, as they are coated with lubricant to improve gliding.
After removing the dust and hairs, the functionality of the mouse wheel was restored.
Mouse button repair
If when you press the left or right mouse button the reaction does not always occur or does not occur at all, then there may be two reasons. The button is worn out at the point of contact with the microswitch pusher or its failure. In order to understand the reason, it is enough to disassemble the mouse and inspect the place of the button in contact with the pusher. If there is a millimeter deepening, then perhaps this is the reason.
When you press your finger on the pusher of a working button, you should hear a clear and loud click. If the sound is dull, then it may be the switch. To check, you need to connect the mouse with the top half removed to a working computer and press the microswitch pushers with your finger. If it works normally, then it will be enough to eliminate the wear on the button in any available way, for example, by melting the plastic or a drop of epoxy resin. If the problem is with the microswitch, you will have to replace it.
The vast majority of mice use microswitches of standard sizes. The microswitch is designed and operates as follows. Three brass plates of complex configuration are pressed into the plastic case, which end with pins for sealing into a printed circuit board. The left (pictured) plate is the midpoint of the switch. An additional thin brass plate with a U-shaped hole is fixed on it in a spacer.
The left side of the thin brass plate engages the protrusion on the left side of the left contact plate, and the right, curved arc, engages the right protrusion of the left contact plate. The thin flat plate is installed in such a way that its right end always pushes up, and it contacts the right thick plate, which has an L-shape.
When you press the button, the button pusher transmits force to a thin plate, it moves down, moves away from the upper contact and comes into contact with the lower one, the terminal of which is located in the middle of the button. After the pressure ceases, the thin plate returns to its upper original position and again connects the outer contacts of the microswitch. Thus, when the button is not pressed, the outer contacts coming out from the bottom of the button are connected to each other, and when pressed, the left and middle ones are connected to each other.
Over time, the metal accumulates fatigue, the arc-shaped spring is deformed and partially loses its springing properties. This is where the button stops working. You can try to repair the microswitch by disassembling it, removing the arcuate spring and straightening it a little. But having a supply of old mice, I didn’t have to resort to such repairs. Although the buttons on keyboards were repaired many times at the dawn of computers, each button in them worked on the same principle as microswitches in mice.
Therefore, if you have an old ball-type one lying around, it would be more advisable to remove the microswitch from it to replace the faulty one. It is best to solder the one that is installed under the wheel. It is rarely used and is generally in good working order.
If there is no wheel, then take the microswitch of the right button. Before unsoldering the microswitch, pay attention to how it is installed. In microswitches, the pins are located symmetrically and it is easy to make mistakes during installation. If there is no old mouse, then it is permissible to swap the microswitches in the mouse being repaired, from under the left button to the one installed under the wheel. And if the situation is completely hopeless, then you will have to start repairing the microswitch.
Wireless mouse is broken
When an inexpensive office computer mouse breaks down, as a rule, there is no question of repair. It's easier and faster to buy a new one. It's a completely different matter when the device costs a lot of money. In this case, there are two options: repair it yourself or use the services of a specialist. The latter option is preferable, since inept repairs, without skills and special tools, will almost certainly lead to the “final death” of the device. The troubleshooting time depends on the reason why the wireless mouse broke, as well as the experience of the technician.
The table below provides a list of breakdowns that users most often encounter and the approximate time to fix them.
| 1 | The mouse does not respond to connection at all | Broken or chafed wires; violation of the integrity of the printed circuit board; controller failure |
| 2 | The sensor is acting up. The cursor jumps or moves jerkily | Optical sensor clogged; LED fault |
| 3 | The scroll wheel does not work or the scrolling area moves jerkily when scrolling | Loosening of the scroll mechanism; drying of the lubricant inside the mechanism; encoder defects (scroll sensor) |
| 4 | A specific button gets stuck or double pressed | Loosening; failure of the button mechanism; problem with settings or mouse driver |
| 5 | A specific mouse button does not work | Failure of the button mechanism |
| Main causes of failure | Fault complexity | Correction time | How often does it occur? |
| Batteries are dead | Lightweight | 1 hour | Often |
| Stuck | Lightweight | 1 hour | Often |
| Faulty receiving unit | Average | 1 day | Rarely |
| The mouse just broke | Complex | 1-2 days | Often |
The computer or laptop does not see the mouse.
Separately, it is worth considering the situation when the device, by all indications, is in working condition, but is not detected by the system. Then, first of all, you need to check the USB connection. The port or transceiver may be broken. We cannot exclude the possibility that wireless mice do not work on the laptop at all.
To make sure, just connect another wireless mouse or keyboard. If the laptop does not see other devices connected to different ports, then we can assume that there is a problem in the laptop itself.
Malfunctions.
The first common malfunction is when you move the mouse, but the cursor stands still, moves jerkily, or you have to move the mouse several times for the cursor to move. This malfunction occurs when the USB cable at the entrance to the mouse body frays due to repeated bending of the wire.
It can be removed simply and easily
. Using scissors or a knife, cut off the damaged section of the USB cable, indicated by the dotted line.
To make it convenient to work, remove the board from the case. To do this, you need to bend the two latches that secure the board at the back. We remove the top insulation of the cable and strip the ends of the wires. Who has a soldering iron, the ends of the wires.
Now we connect all the wires of both ends of the USB cable to each other. We take two wires of the corresponding color, for example, red, and twist them, and if you have a soldering iron, then solder them. I had heat shrink, and to insulate the connection, I first put it on the ends of the cores. If there is no heat shrink, then you can use electrical tape, tape or any other flexible insulating material.
The next step is to isolate the twists or solders of the cores, and then evenly lay them in one line to create a large twist. As shown in the bottom of the picture.
Now we cover the twists with insulating material. I used heat shrink again to make it look nice. Although this is not important, since this beauty will still hide inside. But still.
If you do a little soldering, then there is another option where you don’t need to do any twisting or soldering. Here the damaged section of the USB cable is simply cut off, stripped, tinned and soldered under the connector on the side of the tracks. When soldering, the sequence of colors of the wires that go into the upper part of the connector is repeated.
Second common problem
- this is when you have to click the left mouse button several times to perform some action. And it also happens: you click once, and the click occurs twice. The culprit for all this is the microswitch, which is pressed on by the left key.
In this case, we will already need a soldering iron. Here we do this: we unsolder the microswitch of the left mouse button and the “wheel”, and swap them in places. The majority of people use the wheel only to scroll pages, and very few people use it as an additional button. Therefore, we install this microswitch instead of the worn left one.
The microswitch is easy to solder, although it has three pins. Using the soldering iron tip, we simultaneously touch the middle and any of the outer terminals, while trying to lift this edge with our finger. There is no need to press hard.
You should get something like this:
Now we intercept and solder the opposite side of the microswitch, where we also lift it with a finger and heat the two terminals with a tip.
If it didn’t work the first time, that is, the microswitch remained on the board, then we repeat the desoldering procedure again: first we solder one side, and then the other. When both microswitches are soldered off, we swap them and solder them back.
Very often situations arise when part of the solder remains in the hole into which the leg of the radio component is inserted.
If necessary, this can be eliminated this way: take a regular needle or a needle from a disposable syringe and insert it into the hole on the side of the radio components, and on the side of the tracks this hole is heated with a soldering iron. When the solder warms up, the needle will enter the hole and push the solder out.
Now all that remains is to assemble the repaired rodent in reverse order and enjoy its work. When you put the top part of the case back in place, first insert it into the grooves and lightly push forward so that it fits all the way.
I think now it won’t be difficult for you to make minor repairs to your computer mouse.
. Good luck!
Computer mice, as well as computer keyboards, are among the cheapest input devices. Quite often, users who have noticed problems with these devices have the idea of simply throwing this outdated junk in the trash and instead purchasing new high-tech wireless input devices. To be fair, it is worth noting that not all modern wireless mice are highly reliable. Sometimes even the most expensive products from well-known manufacturers refuse to function normally. Lack of response to pressing the left key, inaccurate cursor positioning and many other typical faults of wireless mice can and should be repaired yourself. Within the framework of this publication, a typical problem with the Logitech M205 wireless mouse will be solved - poor response of the left key.
First, the characteristics of the AA element must be measured. This AA battery must have a nominal voltage of 1.5V. If this value is greatly underestimated, then replace the AA element.
Secondly, check the functionality of the optical transmitter-receiver. It's no secret that the M205 wireless mouse emits infrared waves, so the operation of its emitter can only be seen in a video shot on a mobile phone. Cheaper mice emit red light, which is visible to the human eye.
And thirdly, check the quality of operation of the right and left keys. If the sound of pressing the right key is significantly louder and clearer than the sound made by pressing the left button, then this clearly indicates severe wear of the microswitch of the left key. It is because of the defect in the microswitch that you have to press the left button harder and harder. Why does it fail completely?
Useful tips
As practice shows, disassembling a computer mouse is not difficult. It is enough to follow the basic rules:
- perform all actions carefully so as not to inadvertently damage the fragile elements of the device;
- make sure that none of the parts are lost;
- if there are legs, be sure to install them in place, otherwise it will be difficult to work with the manipulator;
- If there are latches, please note that there should be a click when they are secured.
Before disassembling a wireless mouse or device with a cord, evaluate your own strengths and skills. Perhaps the best option would be to take the device to a repair shop, where it can be repaired by experienced specialists.
Considering the widespread use of computers that is observed today, the instructions “How to disassemble a mouse” will be useful in various situations.