general review
Computer CDs are an excellent material for creativity not only alone, but also with the family. There are often many disks, they are perfectly cut and divided into layers. They can be used to make watches, crafts for the dacha, unusual applications and much more. Car rims can turn into a table or something similar.
Craft lamp from CDs
Since the surface of the disk refracts light and sunlight very beautifully, it can be used to make a lighting device. Such a lamp will look beautiful and unusual. In this case, you can give it any shape you want.
In addition to this, you also need the base itself, preferably a fluorescent lamp with a working mechanism. It will either stand on a table or be suspended from the ceiling.
- You also need to think about safety so that when the lamp heats up, a fire or short circuit does not occur.
- The disks must be fastened together with wire, connecting in such a way as to form a frame.
- Holes must be drilled quite carefully, because the material may crack due to its fragility.
- You will get a so-called sphere, inside which you will need to place a light bulb.
You can also make things simpler. Take a round rim as a base and tie several ropes of different lengths to it, stringing threads on them.
Some cut the disks and make lamps from their fragments. This is how imagination and desire will work.
Stand
The easiest way to make crafts from computer disks with your own hands is a hot stand. The complexity of the work performed will depend on your desire and availability of free time.
A household item is always needed, since almost all tables, with the exception of steel and glass, react poorly to heat. The varnished surface begins to peel, the wooden surface absorbs moisture and changes color, so you should not neglect the stand.
We restore old chairs
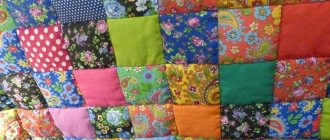
There is nothing surprising in the fact that furniture usually ends up in the dacha after it has lost its attractive appearance and there is no longer a place for it in the apartment, but one does not dare to throw it away. Our incredibly simple but effective restoration method will help you breathe new life into old chairs. The resulting result will surprise not only you and your guests, but will also help complement the unusual table from the point above. So, we will need:
- Old scary chair - unlimited quantity;
- Lots of CDs;
- Sharp scissors;
- Beautiful paper napkins with patterns or a glossy magazine;
- PVA glue;
- Grout for joints;
- Sandpaper;
- Varnish.
It will take about 50 discs to restore one standard size chair. We'll step away from the mirror surface and try to create something that looks like an old fresco. To do this we need to get rid of the mirror coating.
- Using fine-grained sandpaper, you need to wipe off the foil and rinse the transparent plastic under water.
- Choose the picture you like from the pages of a magazine or other sources; you can use regular colored paper. Use what you like and suits the interior of the room.
- Spread a decent layer of PVA glue on the surface of the disk and glue it to the selected page. This must be done with all disks, so you will also need a lot of images.
- When the glue is dry, trim off the excess paper;
- Cut the disk into small squares 1.5 x 1.5 cm. Why such a small size? Everything is very simple. The seats of old chairs are often warped and have a dent in the middle. If you make the parts larger, they simply will not be able to fit tightly to the curved surface and accurately follow its contour. Thus, after some time, the squares will simply disappear, since there will be emptiness underneath them.
- For the convenience of further work, you can arrange the squares by color or image style into disposable cups. This will make it much easier to follow the order and lay out the drawing.
- Before pasting, the surface of the chair must be sanded, remove any remaining dust and degrease.
- Start gluing the squares on PVA or any other glue, moving from the outer contour in a circle.
- To make the chair look more harmonious, cover the back with mosaics;
- Leave the chair until the glue has completely dried;
- It's time to fill the voids between the tiles. Regular construction putty is suitable for this. Choose the color at your discretion.
- Apply putty to the mosaic and spread it with a rubber spatula, carefully filling the joints;
- Without waiting for it to dry completely, remove excess with a damp cloth. It is very important to do this right away, otherwise difficulties may arise later;
- After the grout has completely dried, hide the back and seat with acrylic varnish. It is better to apply two layers. This will extend the life of the decorative surface.
Our new unusual chair is ready. Don't forget that you don't have to limit yourself to these recommendations. You can paint the chair legs in the same way, or just paint them.
The simplest option
For the first method of making crafts from old disks, we will need acrylic paint, since it is highly wear-resistant and is not affected by a humid environment.
In order not to overpay, it is best to use paint purchased in specialized stores for creativity. An old tulle, which will create an interesting and unique ornament, or a pre-prepared stencil, is suitable for applying the design.
Once the paint is dry, if you have a cardboard stencil, you can use a permanent marker. To ensure that the stand serves you for a long time, we recommend that you coat the finished model with clear varnish.
Hanging seed organizer
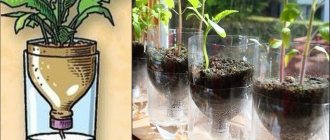
Where do you store the seeds purchased for the planting season? Probably in some box, tied with an elastic band. Not the most convenient option. And after the seeds are sown, where do you put the packaging? Many people put it on a stick and insert it into the ground at the beginning of the bed, so that in case of successful germination and a rich harvest, they remember the plant variety and buy the same one next year. The option is not bad, but the scorching sun and rain quickly make the bright packaging unrecognizable. So that you can remember exactly what grows and where, we suggest you make an organizer. For this we need:
- Large piece of fabric;
- Lots of small patches;
- Lots of disks;
- Hot melt adhesive;
- Thick paper.
The idea is to create a diagram of your garden with pockets that will indicate the planting area for a particular vegetable, and seed packaging will be placed in them. In this way, you can remember not only the variety, but also record the planting date. This basic technology can be supplemented or simplified as desired, the main thing is to understand the principle:
- The edges of the large cut need to be folded and hemmed;
- A thin stick must be inserted into this seam from above and below. This will allow you to hang the organizer on the wall;
- To make pockets, circles are cut out of paper according to the size of the disk, then semicircles from beautiful fabric of a larger diameter are cut out;
- Their smooth edge is folded and stitched or glued with double-sided tape;
- Now the semicircle is applied to the paper circle, glue is spread on the protruding edges of the fabric and folded onto the back side of the paper;
- The resulting paper circles with fabric pockets are glued to the disk, and the disk to the fabric.
Your organizer is ready. You can simplify the design and connect the pockets together with fabric ribbons, and then hang them on a wooden plank.
Complicated version
Here, in a craft made from CD discs, we no longer need acrylic paint, but we will need beads, pebbles, seed beads and everything that can be glued to the surface. You should use a glue gun, applying a drop to each part and pressing it to one side of the disk.
When the workpiece is finished, apply a colorless varnish to its surface and let it dry. Beads and other materials can be purchased at specialized craft stores.
You can also use regular sewing or knitting thread as a replacement for pebbles. Apply colorless super glue to the surface, spread it with a brush or piece of paper, and then start making turns.
Remember that the threads must be pressed tightly against each other. This can be done with a needle or toothpick. Once everything is ready, apply a colorless varnish so that the structure of the threads does not become wet when exposed to moisture.
Fish
Because the discs are quite strong and quite large in size, they are great as a base for children's crafts, such as disc fish crafts for kids.
The disk will serve as the body of the fish; decorate it depending on your child’s skills. You can glue multi-colored scales made of cardboard or velvet paper on top of the disk, apply glue and sprinkle with semolina or salt and decorate with watercolors, apply plasticine.
Cut out the fins, tail, and lips of the fish from thick cardboard and glue them to the disk.
Complex option
In a more complex version, fabric itself is used to make crafts from CDs. How this will be played out is up to you, but we offer several options.
Sometimes you can find cross stitch kits on sale. If you have such old works, then take a sheet of thick paper, or better yet cardboard, trace the disc with a pencil, cut out a circle and sew the embroidery to the paper. Using a glue gun, secure the design to the disc.
You can find an old square oven mitt in the kitchen. Trace the disc with a colored pen, cut it out and you should have two layers. Place a disk in the middle, which will serve as a frame, and sew it in a circle with regular thread.
Note!
Quilling crafts: features of the working technique, step-by-step instructions and clear diagrams for beginners + ideas for creative crafts (150 photos)- Crafts made from corrugated paper: 100 photos of creative solutions for crafts + step-by-step diagrams and instructions for making your own
Crafts from foamiran: ideas for creating crafts and interesting patterns for making flowers
Candlestick
For this craft you only need one CD and a lot of glass balls. Using hot glue, the balls are glued along the outer contour and then on top of each other. The result is a glass textured wall.
A candle is placed in the center on the melted wax. If you light a candle, the room is filled with romance and comfort, and the flickering sparkle from the balls captivates the eye.
Scarecrow for the garden
Garden or vegetable garden owners know the damage birds can cause. Most often, homes are disturbed by corvids, which, having a more intelligent mind, are able to obtain food in the most incredible way.
A DIY craft made from CDs will help scare away uninvited guests. The principle of its operation is extremely simple, as is the production itself.
To achieve a beautiful result, buy a shovel handle at a hardware store, stick the tip into the ground, and attach a small stick or a plastic lid from any bucket to the round part using a self-tapping screw.
Tie a strong rope to each disk and hang it on the prepared mechanism at different heights. In fact, you can simplify the task if the object of attack is a tree - an apple or pear tree, then you can attach disks directly to the branches. Maintain proportionality so that everything looks harmonious.
Scarecrow for the dacha
It would seem that a CD is the most useful item that can decorate a room and attract the attention of others.
But you can use it outside the home as a garden scarecrow. After all, bright glare will easily scare away birds, and therefore these plates can also be adapted for the garden.
It is enough to build a structure on which you can attach the disks so that the glare is visible from all sides. You can secure the CDs themselves with anything: paper clips (you will have to make holes along the edges), fishing line, thread, and so on.
Disco ball
Have you seen such balloons at someone’s house or at some celebrity’s? Do you think production will be difficult and expensive? In fact, the task is not so much difficult as it is painstaking, requiring a large number of repetitive actions.
Note!
- Crafts made from polymer clay | Step-by-step master class on creating beautiful crafts
- DIY epoxy resin crafts - options for original crafts, step-by-step instructions for pouring and making them yourself
- Lego crafts: step-by-step master class on creating simple DIY crafts + original versions of Lego products (photo + video)
Whether you make it for a children's party or birthday, it doesn't matter; a New Year's craft made from disks will decorate your holiday and create a good mood.
Lamps
Lamps play an important role in the design of the site. They create a warm and cozy atmosphere. And if you decorate them with disks, you will get very beautiful color shifts. Thanks to the sunlight, they will shine all day long.
Simple option
A simple option is to glue the rubber ball with a glue gun. The ball should be made of durable rubber, so a fitness ball would be an excellent option.
Cut the disks into square pieces, tie the rope to the base in advance. Using a glue gun, let the glue cool slightly so that the rubber is not damaged by the heated paste.
4. Disco ball
Who said that a summer cottage was created only for grueling planting and harvesting work? Sometimes you need to relax and create a cheerful mood for yourself. Evening gatherings can develop into a small party, which will become more colorful with a disco ball. It's very easy to make. There are several options:
- The simplest one is to cover an old rubber ball with fragments of a mirror mosaic. To do this, the surface of the ball must be thoroughly washed and degreased. Using sharp scissors, the discs are cut into strips and then into squares. Now stick the pieces onto the ball with the mirror side facing out using superglue. Don't forget to include a loop. For greater security, take a long, flat rope and tie it directly on the ball. By gluing the disc pieces to the rope, you will secure it permanently. In the end, all that remains is to tie the ends together.
- A more complex method involves gradually assembling a structure from solid disks. True, its shape will only vaguely resemble a ball. In each disk you need to make 5 holes at an equal distance almost at the very edge. For a small ball you will need about 12 discs. Place one disk on the table and place 5 disks back to back around it. One of the holes on their edge should be located opposite the hole on the central disk. Now use plastic clamps to connect the side discs to the disc in the center. Do not tighten until the very end, while the structure should “move”. Now fasten the side discs together. You will get a flower. Between the disks, place 5 more disks in a checkerboard pattern and connect. Use the last disk to close the structure, tighten the clamps, giving the “ball” shape and cut off the edges.
Now all that remains to worry about is a light source and rousing music.
Complex option
This DIY craft from CD discs will require you to be careful. Take 12 disks and mark five dots with the tip of a felt-tip pen at a distance of 3 millimeters from the edge. If you mentally connect them, you should get an isosceles pentagon.
Next, use an awl or self-tapping screw to make holes in the designated places. Place one disk, shiny surface down, in the center, and five disks at the edges, using a piece of copper wire or thick thread to tie the holes.
Note!
Christmas crafts - how to make them yourself? 150 photos of the best themed crafts- Crafts made from stones: creative options for crafts made from stones + step-by-step instructions for making your own, methods and schemes of work
Crafts from salt dough: the best options for dough products, step-by-step instructions for making them yourself (photo + video)
Repeat the same with the other six disks, after which you can begin to combine the structure into a single whole.
Christmas decorations
Necessary materials:
- Discs
- Christmas balls
- Glue
We cut the disks into small pieces of any shape and glue them to the balls. Bright garlands reflect beautifully on the shiny surface of the disc.
- Crafts from glue: 150 best ways to use glue to create crafts + simple diagrams and photos of finished works
- DIY crafts from matches: step-by-step master classes and DIY craft ideas + simple and quick photo diagrams
- Crafts from tubes - unusual ideas, step-by-step master classes for beginners + photo reviews of ready-made DIY crafts
You can use old Christmas tree balls, or buy the most inexpensive ones. Disco balls are made in a similar way; in addition, you will only need a ball that fits in size.
Flower vases and urns
Have you ever seen a beautiful garden urn for sale? What if she has already lost her original gloss and appearance? DIY CD crafts for the garden are the perfect solution to this problem.
You can use a used round container for a flower garden or decorate home pots with disks. The essence of the method is extremely simple in its implementation.
Think in advance what kind of ornament or design you will depict using mosaics. Whether it will be a flower or something else is up to you.
You need to cut the disks into various pieces, then degrease the surface of the object that will be used, and then apply construction glue to it.
Next, the craft from the disc is decorated with a mosaic with your own hands, and when the surface is dry, if desired, painted with acrylic paint. Only it is capable of holding firmly to the back side of the disc, and as soon as everything is dry and ready, a colorless varnish is applied.
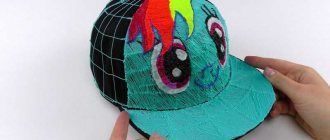
Original ideas for using disks
Discs that have fallen into disrepair can be usefully used for original decoration of a bag from last year's outdated collection or a headdress. Of course, last year’s item in your wardrobe that has lost its freshness can be updated with the help of rhinestones, beads of different sizes, and multi-colored crystals.
The collar of a blouse in light shades can be decorated with freely arranged geometric shapes of regular shape and various sizes. First you need to cut out the shapes using scissors. These can be squares, triangles, rectangles, circles of different sizes.
Now you should evenly place the figures on the surface of the fabric, and then use glue to attach them to the collar. A small gap should be left between the figures so that they do not touch each other. Even if one figure falls off, you shouldn’t rip your nerves into bandages; well, the connection between plastic figures and fabric cannot be very strong.
Decorate the headdress with CD discs in the same sequence. The location of the figures may well be the rigid part of the cap visor. You will really be able to attract the attention of wide sections of the population of your city and learn a lot about yourself in the comments.
Decorating the table
Some CD crafts for the garden may have more useful uses. For example, you can give a second life to a coffee table or other old table that you are about to write off.
It is important to understand that discs have different shades of the recording surface. For Blu-ray it is dark blue; discs from some game consoles are black.
Little things like this will help you make your mosaic more interesting and brighter. Take the table and sand its lid if varnish has been applied to it - this will allow the adhesive base to adhere better.
Next, to make crafts from disks, we will need a large amount of consumables, which should be cut into uneven pieces of different diameters, some triangular, some square.
Then, using construction adhesive, apply it with a brush to the surface of the table, and then proceed to decorating. When everything is dry, apply clear varnish to make the mosaic more durable.
Options for practical crafts for the home
Interesting ideas for using CDs can be implemented when designing a site for country house construction. This option will be acceptable if there are a lot of disks. A practical craft could be arranging the roof of a children's gazebo or garden swing, a well, or a small shed for a yard dog.
This practical use of discs in a courtyard interior will not only provide protection from direct sunlight and rain, but will also create a familiar atmosphere. The total number of discs is determined on the basis that approximately one hundred and twenty discs are consumed per square meter of roof.
Step back one centimeter from the edge of the disk and make a hole three millimeters in diameter on each disk. Decide which side of the CD disk will be the front one for the future roof, and draw longitudinal lines for the convenience of parallel arrangement of the disks.
You should start attaching the disks from the bottom using small nails or screws. It is important to ensure that the central holes are overlapped by the top and side disks. Gradually overlapping each row, move up to the ridge. The ridge structure can be made from a strip of aluminum sheet.
Such a roof will be a good purchase and decoration for the yard of a country house. It has sufficient strength and will serve you for a long time.
Another table option
You may have seen exotic DIY crafts from CDs in photos, when entire pieces of furniture are made from them.
You will need a large number of “blanks”, which your neighbors, acquaintances or someone will agree to give away for free. The discs are made into neat stacks, gluing each layer, after which they are allowed to dry and varnished.
There should be four stacks, one for each leg. After that, wooden blocks are driven into the hole of the legs. Next, lay a sheet of chipboard on top and secure it with self-tapping screws - the table is ready.
Manufacturing: step-by-step instructions
The manufacturing process is quite simple; no special knowledge or skills are required. And if you have already had to deal with a drill, then you can make curtains from disks with your own hands right now.
But first, determine the place where the future curtain will be located; the design, size and amount of material depend on this.
For a window, a static curtain is suitable, in which the discs will be connected to each other on 4 sides. It can be either long and short, or of different sizes, where long and short pendants are located in a chaotic order or diagonally.
The design of the record curtain depends on your imagination. Before you move on to creating a curtain, let's calculate how many records we need for work, because it will be a shame if during the manufacturing process it suddenly turns out that we do not have enough disks.
- We measure the length and width of the door or window for which the future curtain is intended.
- Based on the fact that the diameter of the disk is 12 cm, we calculate how many of these plates will fit in the width of the opening. Don't forget about allowances for gaps between rows. If the opening width is 1 meter, then 7 pendants with disks will freely fit into it (7 pieces * 12 (diameter) = 84 cm + 16 cm for gaps.
- In accordance with previous calculations, we calculate the length of the pendants, taking the height of the desired curtain as a basis, let’s say we need 9 discs per row. 9*7=63 CDs in total.
Mounting disks
Selection of materials and tools
So, for work we will need the following tools and materials:
- Old discs, and it doesn’t matter to us what’s on there: photos, videos or music, because it doesn’t affect the appearance in any way. It is important that they are free of chips, cracks and other visible defects. If you have already decided on the quantity, then our advice to you: prepare discs with a reserve, since during the work the disc can be damaged and it will no longer be suitable for further use as decoration.
- Paper clips. They will be needed to connect the CDs to each other. To prevent the curtain from puffing up and look like a solid canvas, the discs need to be connected on four sides: first along the length, and then in width with neighboring pendants. With staples, the curtain will be durable; using a satin ribbon will create a delicate and romantic option. If you don't have paper clips and tape, you can use strong thread.
- Drill and small drill bit. So that the diameter of the hole in the disk is not very noticeable to the eye.
- Hooks or paper clips to secure the curtain to the curtain rod.
Preparing Disks
Before making curtains from old discs with your own hands, prepare the discs, wipe them and separate them by color. If the front side of the CDs differs in color, then when making curtains they can be laid out in a chaotic or checkerboard pattern.
Any writing made with a marker should be erased. This is done with ordinary soft rags and sunscreen ointment. Apply the product to the disc, spread evenly over the marker and wipe with a cloth. If it doesn't help the first time, repeat the procedure again.
If the records have scratches, they are not suitable for decoration. You can actually try to restore it. For this you will need technical Vaseline. Apply the oily product liberally to the disc, leave it in this position for a few seconds, then wipe thoroughly. Often these manipulations are enough to not only restore the record externally, but also be able to read it on a computer, restore photos or music.
Assembling the curtains
- Before making curtains from disks, you need to determine the size. Then we arrange the plates in a certain order. Next, take a marker and mark the locations for the holes. The number on each CD may vary. It depends on where the plate is located: if in the middle of the composition, then we make 4 holes, if on the side, then 2.
- After we have marked the holes, take a drill and install the drill. We lay the plates on a wooden plank and drill. You need to work with the drill carefully. A compact disc is a fragile thing that can become deformed under the influence of force.
- We take paper clips or tape and connect the plates. Curtains need to be drawn up gradually, without rushing. First we connect the plates into pendants, and only then into a solid panel. A rectangular shape is not the only possible option for a curtain. It will look attractive if you make it diagonal, triangular or stepped.
When you hang the curtain, try to point the mirror part towards the room. In the light it will look interesting and playful.
httpv://youtu.be/Bv9o706Tn0I
A DIY disc curtain is an original decorative element. It shimmers and illuminates the room with new colors. Eliminates gloominess from a gloomy interior, gives joy and positive emotions.
Picture frame or mirror
An excellent decoration for an old mirror or painting, as well as your photographs, will be crafts made from CD discs. If you are decorating the frame of a mirror that already has a base, then simply cut the “blanks” into uneven pieces of different sizes and use a glue gun to attach them to the frame.
Choose the distance between the mosaics yourself; there may be none at all, which will result in a very interesting effect. You should leave a gap in case you want to fill it with colored glue or transparent glue from a gun.
Framework
Frames for mirrors, collages and photos will look great. This is especially true for mirrors that can harmonize with the surface of plastic products.
To make a frame, you need to have:
- Large supply of starting material;
- Cardboard or other frame that can be cut;
- Tools for cutting, gluing, as well as painting and varnishing.
Frame creation process:
- Cut out the frame of the required size (any shape);
- Cut discs randomly;
- Place the cut out pieces on a frame so that the resulting composition is as pleasing to the eye as possible;
- The pieces are glued to the frame;
- If there are gaps between the details of the composition, you can paint them with any color of your choice;
- Cover the entire product with varnish and leave for sufficient time for the entire composition to dry completely;
- Insert a mirror, photograph or illustration into the frame.
It looks unusual, but very beautiful.
Options for children
Pampering your child with beautiful work, what could be more enjoyable? Crafts made from CDs for children can serve as an excuse to spend time with your family doing an interesting activity. Below we have presented several options for such work.
Buy transparent glass Christmas balls from the store and decorate them with pieces of disks using a glue gun. Use just a drop of glue so that it does not stain the toy itself.
From “blanks” you can make snowflakes for windows or walls. You don't have to cut anything out of them, just stick your blanks onto the disk and you're done.
Crafts from the disk can serve as the basis for cartoon characters such as Smeshariki.
Various animals can be made from discs, such as fish, turtle and others.
“Blanks” can be used in children’s appliqués; they are easy to cut and can be formed into any shape using glue.
New Year's toys
Moving on from fairly everyday things, one cannot fail to mention the possibility of making New Year's toys. Their surface shimmering with bright colors just begs to be made into a New Year's toy.
Cutting any figure from a disk is not difficult. It is best to decorate the resulting garland with something. For example, draw something or glue a decoration.
You can glue disks pre-cut into small pieces, like fragments, onto New Year's balls.
Such crafts should be treated with varnish - such small fragments can pose a high danger to others if they come off the toy for one reason or another.
With the help of a large number of unnecessary disks and a glue gun, you can always make a Christmas tree that can attract attention no less than a real and decorated Christmas tree.
Storage organizer
You may have seen that DIY CD crafts in the photo are turned into unique pockets for storing things. Making them is quite simple, just follow the instructions.
Take thick cardboard and trace on it as many disks as you need in your household, then carefully cut them out.
On old fabric or other material, also circle disks, the number of which will be half as many as the cardboard blanks. Use a ruler to divide each circle in half and cut out the halves.
Next, to make crafts from disks with your own hands, we need to carefully sew the fabric to the cardboard. For decoration, you can use a thick thread; it will add a slight carelessness to our work, which will look very appropriate.
Cut out strips of cardboard one and a half centimeters wide, our pockets will be located on them.
Take a small stick or even a thick, straight branch and tie a rope to the edges.
Glue the strip to the cardboard circles that already have pockets. Remember that the edge should be long enough to wrap around the stick and adhere to the back of the strip.
Next, glue the disks to the cardboard round bases and secure the resulting result on a stick - your work is ready.
Crafts for kindergarten
Kindergarten teachers encourage parents to prepare themed crafts at home with their children. In the process of making crafts, trusting relationships between two generations are built, parents get the opportunity to better understand the inclinations and abilities of the child.
Children develop fine motor skills, reveal their creative potential, and show their imagination in making independent decisions when making crafts. Let's take a closer look at the technique of making a painting depicting a seascape from plastic on a CD.
To do this you need to prepare: one disk, multi-colored plasticine, double-sided tape, thick cardboard, thin rope. Ask your child to prepare it himself and check that he has everything he needs to make the craft.
Let the child apply blue plasticine to part of the disk and spread it with his fingers in a thin layer over the surface. The surface can be made in relief to imitate sea waves.
The free part of the disk will symbolize the endless sky. On it, in the upper part, place a flat circle of a bright sun made of red plasticine and several seagulls of a different color above the surface of the sea.
Let your child choose the color scheme of the painting himself. This way he will learn to see the world around him in colors and shades. Now glue a sheet of cardboard and a rope along the contour to the back side of the disk. The child will proudly demonstrate their joint creation in kindergarten.
Important Note
Crafts made from DVDs are similar to those made from CDs, since the recorded part is practically no different from each other.
Manufacturers tried to show the size of their “blank” with the color of the shiny base, but this solution is extremely rare, so as a rule there is no difference and in your creativity you can combine CD and DVD.
Decorating flower pots
Many garden areas are decorated with large flower pots and hanging flowerpots. Why not make them more colorful and unusual. To do this you will need:
- A large number of CDs;
- Sharp scissors;
- Super glue;
- Paint gun;
The essence of the method is to cover the surface of the pot with pieces of disks. If you approach the issue more creatively, you can first paint the surface of the disk with multi-colored felt-tip pens, let them dry and get a translucent colored material for creativity. After giving the discs the desired colors, you need to cut them into fragments. You can maintain proportions and choose the correct geometric shapes, or you can cut them into arbitrary pieces. Both options will end up looking beautiful. It’s just that selecting suitable “puzzles” for random cutting will take a little more time. The surface of the flowerpot must be clean, dry and grease-free.
- Apply glue to a small area and begin placing the pieces. You can even arrange them in a certain sequence and end up with a characteristic pattern.
- When the work is finished you need to let the glue dry.
- You will be left with noticeable gaps that need to be covered with paint. The most convenient way to do this is with a pistol.
Rims
In fact, due to the similarity of problems, we cannot even touch on crafts made from car wheels. They are also either stored in the garage or thrown away because they are no longer needed.
If desired, a car disk can be turned into a barbecue or a country table for lunch, and even an original ceiling lamp in the garage.
Useful tips
Often, when working with old disks, they have to be cut to use a variety of fragments with the required sizes. This operation will be facilitated by preheating the disk.
It is necessary to hold them in hot water for some time, and then, using special tongs, take them out and easily cut them with scissors. Follow safe labor requirements, wear gloves and safety glasses.
If you want to get CD fragments of different sizes, hurry up and use the following advice. Keep the disc in the freezer for twenty minutes. Now you should wrap it in an old towel for safety and chop it into small pieces with a hammer. This option will greatly simplify the task and make it safe for health.
Photos of crafts made from disks
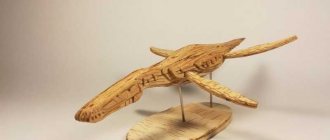
Fish craft
The mirror surface imitates shiny scales well, so this craft always looks believable.
- The work will require two disks, blue and red paper, glue, and a pair of plastic eyes.
- A tail and upper fin of any shape are cut out of blue paper.
- From red - sponges and lateral fins (which will close the holes on the disks).
The craft is “assembled”.
- Between the discs you need to glue the tail, upper fin and lips.
- Glue two compacts together so that the fish is shiny on both sides.
- Assemble the side fins like an accordion and glue them, closing the holes.
Glue on the eyes. The fish is ready!
Photo frame made from disk fragments
You will need: 2 discs, glue, black stained glass paint with a fine tip, thick cardboard, scissors.
Master Class
- Cut out a cardboard frame of the desired size.
- Cut the disks into pieces.
- Glue the disc pieces to the frame, leaving small gaps.
- Color in the spaces.
I recommend watching the video master class!
★ How to make a frame with your own hands ♫ CD DISCS ★