Nowadays, technology is developing by leaps and bounds.
Even in the century before last, people had little understanding of what electricity was. Today it is generally impossible to imagine life without this phenomenon. And various kinds of lamps are directly connected with it.
But 150 years ago, the best and most reliable source of light in homes was an ordinary kerosene lamp.
If someone thinks that this is an absolutely useless thing in a modern economy, then they are mistaken. Some people still keep such devices in their homes as a backup lighting source.
History of the kerosene lamp
Until the second half of the 19th century, animal or vegetable fats were used as fuel in household lamps. They were set on fire in oil lamps and received a dim, smoky, but still reliable source of light.
Kerosene did not exist then. His invention immediately reduced the formation of soot, but most importantly increased light output and brightness.
Thanks to the evaporation of kerosene, the device has become much simpler. There is also no need to pump fuel into the lamp under pressure.
Historically, it is believed that the kerosene lamp appeared in 1853. Austrian pharmacists in Lviv were the first to use kerosene as fuel.
There is quite an interesting story connected with this. At that time, Pyotr Mikolyash lived in Lviv, who owned one of the city pharmacies. Two businessmen from another city offered him a lucrative deal - the pharmacist buys distillate from them at a cheap price, and he distills it into alcohol.
The profit was promised to be astronomical. The distillation process was carried out by a pharmacy laboratory technician named Jan Zech. It was he, together with his colleague Ignatius Lukasiewicz, who, in pursuit of profit, began to spend all their days and nights in the pharmacy.
At the same time, in the process of their work, they actively experimented with petroleum products. Having obtained some semblance of kerosene, they tried to use it in a modernized oil burner. The result exceeded all expectations.
The owner of the pharmacy first put a copy of such a lamp on display, and after a while they began to actively illuminate the streets of Lviv. Rumors of the use of revolutionary lighting reached Austria.
It was there that Rudolf Ditmar's company, having filed a patent, began mass production of a similar product for home use. Kerosene became cheaper and more accessible every year. It was then also called coal oil.
Gradually, the invention reached our open spaces. Initially, all sizes of glass and wicks for kerosene lamps were indicated in “lines”. This tradition has been preserved to this day.
What it is? One line is 1/10 inch (10 dots), which equals 2.54mm. For example, the diameter of the lamp glass at the bottom is 20 lines (50mm).
The wick was also measured in the lines. A lamp with a wick width of 7 lines is about 18mm. Based on this size, it got its name - a seven-line kerosene lamp or seven-line.
The wider the wick, the brighter the lamp shines. One seven-line at maximum brightness is equivalent to a 35W incandescent light bulb.
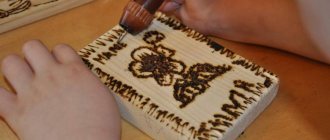
Master class decoupage of a kerosene lamp | Country of Masters
I got a lot of ideas from the “Country of Masters”; I took it from Nastya’s grandmother to make artificial aging without craquelure (we don’t have specialized stores), and she herself figured out how to do it without a hairdryer. 1. This lamp was ancient, dating back to my grandmother’s, so first I washed it, degreased it (by the way, formic alcohol degreases well, is freely available in pharmacies and is inexpensive), and then primed the bronze with acrylic paint and PVA glue. At the same time, I decorated a wooden board.
2. After drying for a day, I covered the surface for decoupage with PVA glue from top to bottom and let it dry slightly so that only a light film would set on top. I applied white acrylic paint, but already across the varnish application. And she immediately began to hold it over the flame of a gas burner (the flame is weak), twisting it in different directions so that it dries evenly and cracks form. Using the same technique, the board turned out very well. I didn’t make the whole lamp at once, but in certain parts (it’s more convenient).
3.Next, glue on pieces of napkins, sand and tint the protruding edges, and varnish everything. I tint the lamp burner. I also paint the glass with contours (so that there is a beautiful smooth transition), but only from below, where there is no heat from the fire.
4. Several more options for lamps made in the same way.
5. Here the glass is painted with bronze enamel and white marker paint.
3.Next, glue on pieces of napkins, sand and tint the protruding edges, and varnish everything. I tint the lamp burner. I also paint the glass with contours (so that there is a beautiful smooth transition), but only from below, where there is no heat from the fire.
stranamasterov.ru
Lamp "Bat"
To protect the flame from the wind, special models were produced - “Bat” lanterns.
This popular name comes from the German company FlederMaus, which in the 19th century launched the production of wind-resistant lanterns.
This name has firmly taken root in everyday life. It’s like with a Primus (Primus is primarily a company, not a product) or a Xerox.
Although at first there was an alternative name for such products - a storm lamp.
Among the branded manufacturers of kerosene lamps, the most popular now are Petromax and Feuerhand Baby Special.
The protective kerosene stove is capable of trouble-free operation in wind conditions of up to 15 m/s!
It should be noted that this is a very strong gusty wind. If you have a poorly secured electric light on your porch, then such gusts can easily shake off and damage even a modern incandescent light bulb.
Meanwhile the kerosene stove will burn!
Kerosene lamps occupied a special page in history during the Great Patriotic War. At the front, of course, there was no electricity.
Meanwhile, dugouts, headquarters, and medical battalions needed to be illuminated with something. In this connection, a number of factories were quickly converted to mass production of such products.
Even today, military warehouses maintain a supply of kerosene lamps.
How it works?
The principle of operation of a kerosene stove is very simple. A flammable substance is poured into the lower container - most often kerosene. From the container, fuel is dosed through the wick into the combustion zone.
In this case, a sophisticated burner can be equipped with means of air supply, removal of harmful combustion products and additional flame protection.
In addition to its protective functions, glass also provides traction.
How to refill a kerosene lamp?
Modern liquid for kerosene lamps is called “Svetal”. It is odorless, does not smoke and is fireproof.
It may not be strange, but for many nowadays finding clean kerosene for refilling lamps is not such an easy task. That's why someone advises buying lighter fluid instead.
Just remember that in the cold such liquids can turn into porridge or slush. Even when purchasing factory-made kerosene, always read the composition on the label.
There are solvent liquids with only a small addition of kerosene. These cannot be used for lighting fixtures. You need to take normal lighting kerosene of a special brand - KO-25.
Original approach
You can be creative in restoring an old kerosene lamp. At the first stage, the product must be completely cleaned of grease and dust; for these purposes, you can use gasoline or pure alcohol.
The lamp can be coated with fireproof or acrylic paint . To add additional elegance, the kerosene tank can be covered with a mosaic or multi-colored decoupage. If the master understands electricity, you can replace the internal parts of the lamp with electric ones, then the modified design can be turned into a real masterpiece, without requiring the use of kerosene.
The restored product will fit perfectly into any interior. Therefore, when you find an old lamp, there is no need to rush to throw it away.
If the owner of the rarity does not want to do such work, then he can simply sell the item. Kerosene products are in great demand among collectors.
Types of kerosene lamps
Several types of kerosene lamp designs are common these days. First of all, this is a traditional lamp with a flat or ring wick.
In it, liquid kerosene rises into the combustion zone due to the capillary effect. In this model, the wick often burns and requires frequent adjustment and trimming.
The brightness of the glow is adjusted by the height of the wick.
To avoid soot, its tip should be not just smooth, but semicircular, ideally repeating the shape of the slot from which it emerges.
In this case, you will get an even flame, without tails around the edges.
To prevent the lamp from smoking, craftsmen offer several life hacks. For example, add a teaspoon of fine table salt to kerosene, or initially soak the wick in vinegar and then dry it.
In order to improve the characteristics of the simplest design, more advanced models were produced:
- with air heating system
- with reflectors
- explosion-proof
Fighting soot
Soot usually appears when the flame height is too high. If normal adjustments do not produce results, the wick may be slightly bent. Fixing the flaw is quite simple. Using sharp scissors, you need to cut off a strip of the wick so that its top is as even as possible. Otherwise, you will have to replace the kerosene.
The system may smoke after restoration if it has not worked for a long time before. You can pour a little table salt (just a few grams) into a container with a flammable liquid.
In order for the updated product to work properly and safely, you must adhere to the following recommendations :
- Do not place a working lamp on the edge of a table.
- You should not experiment with flammable products. Experts recommend using only kerosene and lamp oil.
- The hanging product cannot be placed closer than 80 cm to the ceiling.
- Do not close the hole in the glass, which serves to remove generated gases.
- It is forbidden to carry the product with a full tank of kerosene, as even a spilled drop can cause a fire.
Original ideas for using old records
Fireproof kerosene stoves
Even miners actively used kerosene lamps. The most famous model is Devi Miners.
Its ignition was carried out without the use of open flame. The design included a flint on a ratchet mechanism, which struck a spark.
An interesting effect was used in miners' lamps to ensure safety. If you place a metal mesh on a regular burner, you will see that the flame does not spread beyond the mesh.
It's all about the thermal conductivity of the metal. It takes the temperature away from the flame so quickly and reduces the speed of gas movement that you can even put cotton wool on top of such a structure and it will not ignite.
The more powerful the burner, the smaller the cells should be in the grid. Here's an interesting trick that you can easily demonstrate in front of your friends.
Open the burner, place a metal mesh in front and light the propane behind it, not in front of it.
The picture will please you. Modern analogs of Devi Miners lamps are used as capsules for transporting the Holy and Olympic flames.
glow lamp
In addition to the simplest wick lamps, incandescent lamps are also produced.
In their design they resemble a primus. In them, kerosene is in a container under pressure, which is pumped by a hand pump.
Further, the fuel rises through the tube into the combustion zone. There it heats up and evaporates. These vapors flow to the burner, where the fuel burns and heats the glow grid.
This type is more perfect. Firstly, because of better brightness.
Secondly, kerosene burns faster here and without unnecessary soot residue.
Models with a cap made of mesh or Auer mesh were also produced. In fact, it was some kind of design of gas jets.
If ordinary kerosene lamps have a luminous intensity of tens of candles, then with an Auer grid it reaches 300 candles!
How to increase the brightness of a lamp?
To increase the brightness of an ordinary kerosene lamp, you can make a similar cap with your own hands. To do this, take wire d=3mm and height 70mm.
A thread is cut at the end of the wire. This pin is secured to the lamp through the drilled hole. And then you put a homemade Auer cap on it.
In the last century, such caps were made from cotton fabric. Next, they were soaked in nitric acid salts of aluminum, magnesium or rare earth metals. When the lamp was heated, the fabric burned away, but a “mineral” skeleton remained.
It was he who gave that very bright light. In modern conditions, the cap can be made of fiberglass. Sew the fabric with nichrome thread from an old heating tile.
The finished cap is soaked in oxides. Here is a table of the brightness of the glow depending on the type of oxide. Here it should be noted that an ordinary kerosene stove gives a luminous intensity of 10-15 units.
However, do not expect much effect from such modernization. A kerosene lamp initially does not produce a flame at the required temperature. And for a bright glow it must be transparent and hot.
Of course, all gas lamps, especially modern analogues, are significantly brighter than kerosene stoves. Here is a visual comparison of the maximum illumination level from the “Bat” and the Kovea gas lamp from a distance of about 15 meters.
Kerosene lamp
Gas lamp Kovea
However, a huge disadvantage of gas is the operating temperature. At -10C and below, you will have problems with starting and stable operation of the flashlight.
Option #1
Before you start decorating, you should pay special attention to the preparatory work, namely cleaning the lamp from carbon deposits, kerosene, dust and dirt. This work is not easy, but the result is worth it.
Read this: DIY decoupage from napkins for beginners: decorating monotonous household items
Decoration materials:
- acrylic paint;
- special napkins for decoupage or simple decorative ones for table setting;
- any product containing alcohol;
- PVA glue;
- foam sponge;
- brushes;
- colored acrylic paints.
Having everything you need at hand, you can safely get to work.
- The first step will be to paint the entire surface of the lamp with the main tone. But in order for the paint to adhere well and last in the future, it is recommended to degrease the lamp with any alcohol-containing product.
When this work is done, use a sponge to apply white acrylic paint in several layers.
- We separate the top decorative layer from the napkin, only this is needed, and with our hands we tear off those parts of the design that we will need.
- Next, prepare the glue. You can use special glue for decoupage, but for a budget option, PVA glue diluted with water in a 1:1 ratio is quite suitable.
- Now let’s get down to the most interesting part, namely the decor itself. We place the motif on the lamp and carefully apply the adhesive solution on top with a brush. We do the same with other motives. Take your time in this matter, make sure that the thin paper does not tear. Then cover the entire base again with a thin layer of glue and leave until completely dry, preferably for a day.
- In principle, our beautiful lamp is ready, but if you want to preserve the result for a long time, then open it in several layers with acrylic transparent varnish.
Read this: DIY savings book for newlyweds
As you can see, there is nothing complicated in this technique; all you need is a little imagination and, most importantly, desire. This technique can be used to decorate any lamp of various designs.
We offer some more photos for inspiration.
The kerosene lamp stinks - what to do?
Many consider the unpleasant odor during operation to be one of the main disadvantages of such lamps. But it’s not the smell that’s scary here, it’s the carbon monoxide. Liquid paraffins (Svetal), lighter fluids, technical and aviation kerosene, when burned, produce a large release of CO.
Therefore, there should always be good air circulation in the room when the lamp is operating (according to the instructions, 5m3/h). If your device stinks when it just sits idle, then there may be several reasons:
- no seal in the filler cap
- the wick channel is larger than the wick itself
Evaporation comes from there. Buy a wider wick or make your own.
- poor rolling of the lower tank
Nothing can be fixed here. You will have to keep the lantern outside or in an outbuilding. Or switch from kerosene to another fuel.
Liquids like lamp oil or Vaseline oil, of course, do not stink, but as many write in reviews, they burn out the wick very quickly.
Second way
Another interesting technique in decoupage is shabby chic.
This technique received its name due to its abrasions that imitate the effect of antiquity. It looks very gentle and beautiful, and is very simple to create.
So, we will need:
- acrylic paint of two colors (dark and light);
- sandpaper;
- decorative napkins;
- PVA glue
- acrylic lacquer;
- candle.
- As always, first of all, the old lamp must be thoroughly cleaned of various contaminants.
- We cover it in several layers with acrylic base paint of a dark color, you can use black or any other color, in our case it will be dark brown.
Please note that each layer must dry thoroughly.
- Rub the candle on the places where you plan to create a worn effect.
Read this: DIY Textured Paste: Four Easy Recipes
- We also apply light-colored acrylic paint in several layers.
- When everything dries well, use sandpaper to go over the places where the candle was applied.
- At this stage, we proceed directly to decorating using napkins. We do all the work as in the previous master class.
Don't forget to coat with acrylic varnish. Try, create, transform your home. Good luck.
Electricity from a kerosene lamp
With the advent of electricity, kerosene lamps arose a serious competitor, whose triumphant march completely ousted all such lamps from the lighting market in one fell swoop. It was impossible to stop the technological revolution.
However, inventors have already come up with the reverse process in our time. The point is that, under certain conditions, electricity can easily be generated from a kerosene lamp.
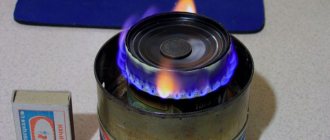
Such a thermogenerator was produced in the USSR after the war in the 50s. It was called TGK-3.
It was designed to power household tube receivers. Most often used in remote settlements in the taiga and at weather stations.
You can learn more about the operating principle of the TGK-3 thermoelectric generator from here. And here is a clear example of how such a device works live.