What party or Halloween can take place without the presence of a vampire. The black coat and pale look have faded into the background in modern cinema, so you can match the look in regular jeans. But what you really can’t do without is the main attribute of any vampire, his fangs.
Prices for this element of a fancy dress costume are often unreasonably high, so you should think about making them yourself. There are many different ways to make teeth or jaws like a real vampire, the five most popular materials for making them are:
- Paper;
- Plastic fork;
- Artificial nails;
- Cotton wool;
- Clay or plasticine.
Soothe the pain
In order to clean the cavity of the hole from bacteria and thereby soothe the pain, purchase the drug “Santedents”. It is easy to use, and the results in the initial stages of caries can be pleasing. Finding this drug in a regular pharmacy is quite problematic. But you can buy everything on the Internet.
- Santedents powder is sold complete with a special solvent. Following the instructions, mix both components until you obtain a mixture that resembles clay in consistency.
- Brush your teeth thoroughly with regular toothpaste. Pay special attention to the location of the future filling. It will be better if you clean them several times.
- After this, brush your teeth with a mixture of baking soda and toothpaste.
- Place a small amount of mixture into the hole to close its cavity. Gently compact it with your fingers or a special spatula.
- In order for the product to stick and not be influenced by harmful microorganisms, cover the “sealed” tooth with thick petroleum jelly or vegetable oil.
- Now the hardest part awaits you. You will need to walk with your mouth open for 30 minutes. This is not very easy to do, but the result is worth it. During this time, the mixture is compacted into the tooth.
- After 6-8 hours, the “seal” can be removed. You cannot eat during this time. Therefore, we recommend performing this procedure at night.
- If after using Santedents the pain subsides, you have done everything right. It happens that after a while she returns. Then put the “seal” again.
Now you can give yourself a permanent filling. We will discuss below how to fill a tooth at home.
Is it possible to grow a tooth yourself?
Do human teeth grow? Yes, of course, they grow, because children no longer have “adult” teeth erupting. By this logic, it is quite possible to grow a tooth on yourself. But it was not there! Let's turn to the facts that the science of biology provides us.
In humans, tooth growth stops at 15-17 years of age. This process is genetically determined. Every person's teeth contain stem cells from which teeth could be re-grown. However, for reasons unknown to science, these cells “sleep”. Unlike sharks, camels, mice, beavers and other animals, whose teeth regenerate (grow) throughout their lives.
Only in 2022, biologists discovered the DLK1 protein in mice, which activates dental stem cells. Perhaps further study of it will answer the question: “Is it possible to regrow teeth?” So far, it is impossible to even “revive” a tooth again after removing the pulp (nerve), and science has not even begun to grow it again.
Installation of a permanent filling
If you decide to put a filling yourself, then you can use the Acrodent tooth filling material. The set includes 3 tubes and 2 bottles of cleaner. It should be remembered that if a tooth hurts, you cannot work on it without first cleaning it. In addition to Acrodent, you will need:
- hair dryer;
- dental spatulas (they are often included with the material, but can be purchased separately);
- cotton swabs.
Making a filling
- We brush our teeth in the same way as in the first case.
- Mix the components of the kit as written in the instructions. You should get an elastic mixture that resembles dough. You need to work with it quickly enough: after 5 minutes it will polymerize and harden like stone.
- Using a spatula, seal the bottom of the hole. To make the mixture more dense, tamp it with your finger.
- Use a hairdryer to dry the filling. We wipe away any drool with cotton swabs.
- We repeat the procedure with applying the material. Now you need to walk around with your mouth open for 10 minutes. During this time, the unpleasant odor of the acid contained in the solvent will completely disappear.
- After just 10 minutes, the filling will harden, but the hardening process will continue for up to 6 hours. During this period you will have to refrain from eating food.
- The filling is ready. If this tooth starts to hurt in a couple of weeks or months, a visit to the dentist is inevitable. Otherwise, you can pay at least a tooth.
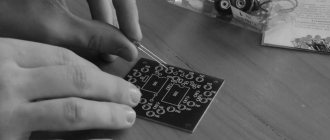
Chemistry molecule made from plasticine and toothpicks
A very convenient fake for those who study chemical elements. This makes it much easier to remember the structure of a molecule and understand various chemical compounds. To make a fake you just need balls of plasticine and toothpicks.
After looking online or in a textbook to see what the molecule looks like, simply repeat the pattern by threading a toothpick into the ball of plasticine. The design is very convenient for modular modeling and study in chemistry and physics lessons.
Precautionary measures
Unfortunately, the manufacturers of these products cannot guarantee a successful result. After all, the lion's share of success lies in correct dental diagnosis. By filling an insufficiently cleaned tooth, you create a place in its middle for various infections that multiply very quickly. An inflamed nerve cannot be saved in this way either. Therefore, it is best to monitor your dental health and have regular dental examinations. Then there will be no neglected problems and exorbitant expenses.
Demonstration model “Teeth” made from waste material
Inga Shcherbakova
Demonstration model “Teeth” made from waste material
Authors of the visual layout : Govorova Natalya Vadimovna, Shcherbakova Inga Aleksandrovna.
Good afternoon, dear colleagues! We would like to bring to your attention a model of teeth made with our own hands from waste material .
Goal: to form children’s ideas about the elementary structure and purpose of the oral cavity, teeth, tongue; instill love for your body, a desire to take care of it.
Using this model, the teacher shows what the oral cavity, teeth and tongue . He also tells us that teeth help us grind food, our tongue allows us to feel
the taste of the foods we eat.
The teacher offers to name and show the parts of the oral cavity on himself and on the model . Emphasizes that any parts of the body, including teeth, need to be monitored and cared for so that they are healthy and do not hurt. (brush your teeth , wash your face, eat healthy foods, etc.) Using the layout , you can also tell and at the same time show how to brush your teeth .
A suit made from waste material. To complete the task of making a “Suit from waste material”, many different ideas were proposed, including a dress. Use of waste material. What if it comes in handy? I am sure that every teacher who comes across some kind of box, interesting jar, etc., before. Master class on making visual counting material from waste material Good afternoon, dear colleagues! These are the carrots I made for my kids. Let me start by saying that one of my mothers works in a furniture shop.
Methodological development of educational activities White teeth are needed, strong teeth are important Age of children Children 5-6 years old senior group Form of OD Game - travel Priority educational areas “Cognitive development”,.
A tutorial from waste material “Emotions” Quite recently I started making cute little faces on the lids of plastic buckets and jars. Used to decorate the face and hair. Crafts from waste material Natalya Svintsova CRAFTS FROM WASTE MATERIAL Environmental pollution will always be one of the main problems of the world. The earlier the children. Photo report “Crafts from waste materials” It so happened that after my vacation I was temporarily working outside of my group. There are only five of my children left after graduating from school this year.
Source
Methods of dental restoration: how to make dentures at home
Prosthetics is a popular dental service that helps restore the beauty and charm of a smile. Insufficient care, non-compliance with doctor's recommendations and mechanical damage lead to the formation of cracks and chips. Of course, you need to immediately contact a dental technician, but false teeth can be damaged during vacation or a business trip. It is not surprising that many people wonder how to make dentures at home.
Repair of a dental product is carried out using dichloroethane glue, which is applied to the split lines to glue the parts together. This stage is not final, but preparatory, intended for performing precise subsequent manipulations - preparing the plaster casting and connecting the parts.
Professionals use acrylic plastic and special resins to glue the prosthesis, which can only be purchased at a dental store. Some craftsmen seal it with wax extracted from a slightly melted prosthesis. This approach is recognized by dentists as incorrect and unreliable - most likely, the repaired product will not last even a week.
When restoring false jaws at home, it is better to rely on the work of masters. What is the process of restoring a prosthesis?
1. Sanding. There should be no unevenness or roughness on the surface of all parts of the product. This is done using carborundum stones or discs.
2. Cleaning. Each element of the prosthesis is removed from contamination and disinfected.
3. Assembly. All parts of the product are arranged in the correct order close to each other -
so that there are no gaps.
4. Gluing. This stage requires maximum care and concentration - an unsuccessful attempt to connect parts will lead to the fact that the product will finally become unusable.
If the prosthesis is repaired incorrectly, it is usually necessary to replace it with a new one. This is due to the fact that fresh lines by which the master could identify the break disappear and restoration becomes impossible. Buying a new prosthesis is much more expensive than repairing it. Therefore, before preparing to repair it yourself, it is better to think several times: is it worth the risk? Still, high-quality restoration of such a product can only be done by professionals.
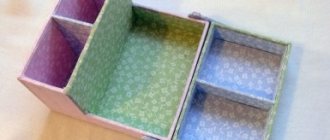
Box of toothpicks
For this fake we will need about 100 toothpicks, multi-colored threads, a cardboard base, and, if necessary, plasticine. The essence of the workpiece is to make a form for the base from cardboard. It could be a heart, a cat's face, or just a regular circle.
Next, we insert toothpicks along the edges of the cardboard; if necessary, you can seal the frame with wire or plasticine. Next, we simply tie the thread onto one of the toothpicks.
We lower the knot to the very bottom of the structure and wind the rope, intertwining it with a “snake” between the twigs. As soon as the base is ready, fasten the thread or wind it with a new color.
For a stronger density of the structure, you can coat the threads with a layer of PVA glue, which will give it additional strength. You can attach beads or beads to the tops of toothpicks by first lubricating the tips with super glue.
To decorate the box, you can use stickers, rhinestones, stones or embroidery over threads.
So you can “sign” the work by embroidering words of wishes on the box, which will be very original both for the holiday of March 8, and for Valentine’s Day, or a birthday.
Is it possible to fill a tooth yourself: how to make a filling with your own hands at home?
A limited budget often prevents filling a hole in a tooth in a dental clinic on time. The longer the hole remains open, the higher the risk of complications. The cavity and area of carious lesions increase in size, and dental tissues are completely destroyed over time.
If you don’t have enough money to go to the dentist and there are no concomitant oral diseases, you can solve the problem at home. Ready-made products from the pharmacy help you fill a tooth with your own hands at minimal cost.
Zoo and animals made of toothpicks and plasticine
If you need an original and interesting fake for kindergarten or elementary school, then with just toothpicks and plasticine you can create a whole zoo!
Crafts made from toothpicks and plasticine for children are very popular and allow you to show maximum creativity.
For the little ones, you can simplify the work by making animal body blanks in the form of plasticine balls. So, for example, you can make a white ball with a layer of black stripes.
Mix the colors by layering, and then simply cut the ball into two parts and you will have a ready-made zebra head, body and hooves. You can add fur, manes and eyes using a cut in the plasticine.
For younger children you can make a very simple and fun hedgehog craft. To do this, we just need a ball of plasticine, which we form in the form of a drop, and 10-15 pieces of toothpicks. Toothpicks need to be cut in half.
Everything else is simple. Take the blank peg and string it, with the sharp end up, onto the base of the hedgehog’s back. For additional decoration, you can use a plasticine apple, pear or cherry, which will then be put on the hedgehog’s needles.
Filling teeth at home: benefits
In the absence of pain and carious lesions, you can fill a tooth at home without going to the doctor. Self-installation of a filling helps:
- Reduce waste of time and money. A “homemade” filling is much cheaper than one placed by a doctor in a clinic. The procedure takes no more than an hour and does not require changing your usual schedule.
- Save the damaged tooth. There are dentists who still prefer radical methods to modern treatment. By filling the hole yourself, you can avoid removal and subsequent costs for prosthetics.
- Prevent infection. Regardless of the level of the clinic, there is no complete confidence in the quality and compliance with instrument processing techniques. The devices used at home are absolutely sterile.
- Avoid stress. The need to visit a dentist simply frightens most adults. The home filling method helps eliminate the problem without discomfort.
Teeth are filled at home if there are no contraindications to the procedure. If it is possible to obtain advice from a competent specialist, it is advisable to use the services of a professional dentist.
conclusions
As you can see, you can really create fun and interesting miniatures using plasticine and toothpicks. You can create a whole flower bouquet, make an original collection of insects or cars, and a lot of other interesting things.
Try and start with a simple idea, developing the idea and improving the technique. We are sure that you and your child will enjoy this activity, and you will not want to stop at one job!
Contraindications
Before self-treatment, it is recommended to make sure that the source of pain is the tooth, and not the soft tissues of the oral cavity or neoplasms. The latter means:
- abscess;
- cysts;
- tumor formations;
- granulomas, etc.
If the dental nerve (pulp) is inflamed and there is intense pain, it is prohibited to close the hole with a filling. Absolute contraindications to the procedure are dental and systemic diseases.
Installation of filling material is allowed if there is mild pain and a deep cavity without darkening. The initial stages of caries are regarded as a contraindication, along with advanced carious processes. Otherwise, under a permanent filling, the disease develops faster, affecting dental tissue, dentin, and nerves.
If intense pain occurs, it is recommended to apply hygienic paste with fluoride to the chewing surface of the tooth before the procedure. Its composition has a calming effect and fills microcracks. It is prohibited to instill alcohol solutions into a carious cavity. The drug causes destruction of the nerve and soft tissues, provokes decomposition and necrosis.
If the hole is small, the filling must be placed by a doctor. It is impossible to fill the hole completely on your own. This allows food particles to become trapped and bacteria to grow in the open cavity.
Fake house and well made of toothpicks
Toothpicks are very easy to use and actually do not require secondary processing, so you can immediately begin the creative process after purchasing the material. Now let's look at a simple example of how to make a house and a well.
The essence and structure of the model remains the same, only the size changes. Place two parallel toothpicks and place two more on top of them. As you rise each level higher, do not forget to secure the structure with glue, which will add strength.
Then, when our fake has reached the desired height, simply fasten a row of toothpicks together to form a roof and connect it with the letter “L”. With a well, things are exactly the same, only your task is to place the top of the “L” on two supports.
Additionally, you can decorate the fake with various utensils and even make a whole miniature farm from toothpicks.
Tsivinsky method
The Tsivinsky method is the fastest and most affordable way to place a temporary (therapeutic) filling in a damaged tooth. It involves the use of the patented Santedex powder, which is freely available for sale in pharmacies. To seal a tooth with the mixture:
- Prepare the solution according to the instructions. The product is mixed with a small amount of liquid from the kit to form clay.
- Clean the oral cavity and the filling area. The teeth are cleaned with hygienic paste, and the carious canal is additionally treated. To prevent saliva from entering and increase the strength of the filling, Vaseline or vegetable oil is applied to the installation site.
Within 30 minutes, the paste will be absorbed into the tissue and distributed along the carious canal. It is more convenient to place a filling before going to bed so that the powder performs its healing function overnight. In the morning, the material is removed and a permanent filling is placed in the hole.
The procedure can be repeated several times if pain reappears. User reviews show that temporary fillings using the Tsivinsky method help to significantly improve the condition of teeth recommended for removal. More details about the effectiveness of the drug are described in specialized literature.
According to the creator, Santedex powder can be used for any degree of tooth decay. The product provides a double effect:
- relieves inflammation;
- disinfects the area.
After removing the temporary filling, the cavity must be immediately filled with a permanent one if there is no pain. Painful sensations accompany inflammation of the nerve (pulpitis) and require treatment of the disease in a dental clinic.
Making an original gift for a dentist
So, we will need:
- a vertical cream jar;
— insulated wire;
- food foil;
- salty dough;
- plaster, putty or plastic (or undercooked cotton).
1. Cut the wire into four parts (not necessarily equal)
2. On each piece we bend the end into a loop into which we insert a ball of foil and form such “batons”.
3. Cover the top of the batons with dough and dry.
4. Now we take our jar and glue our “batons” to it
5. The frame of the tooth stand is ready.
6. We begin to gradually fill the voids in the frame with salt dough:
Don't forget about the bottom...
Paste over the roots
To ensure that the tooth takes the correct shape and a relatively flat surface, we build up the mass with dough, smoothing it with water.
Now the most difficult thing is to shape the top of the tooth, this is done simply, like this:
Fill in the holes and smooth gently
This is how it should turn out
Here is our tooth, it’s almost ready
Option 1. A properly dried tooth with self-hardening clay (it can be smoothed with water to an ideal surface and then ground)
Option 2. Coat the tooth with undercooked cold porcelain (even without smoothing it gives an amazingly smooth surface)
Option 3. Seal the hole in the jar and dip it several times in not very liquid plaster, naturally drying each layer (gypsum is polished even better than plastic)
Well, then we paint it with acrylic and varnish it.
My tooth has yet to get one of these options, it’s not yet dry, but I really wanted to share!
And this is the second order, also from the dentist:
It was supposed to be the Tooth Fairy, but it turned out to be a FAIRY!
Well, that's all, I promise to post the completed tooth soon!
Source
Application of Acrodent
In addition to the drug mentioned above, the drug Acrodent is also actively used. It is advisable to use it as a permanent filling. For the procedure you will need: a household hair dryer, cotton swabs, Chlorhexidine, a special spatula. The kit includes detailed instructions that describe the entire procedure, which consists of several stages:
- Brushing your teeth with toothpaste.
- Treating a diseased tooth with antiseptic and cotton wool.
- Drying the area.
- Then you need to apply an oxidizing agent and dry the area again.
- To prevent saliva from entering the open cavity, pieces of cotton wool should be used.
- Now a special mixture is being prepared, which will be used as a filling.
- The bottom of the cavity needs to be filled with a small volume of solution.
If the cavity is large, it will require two fillings to completely fill it. Such work is unacceptable for advanced caries and acute toothache.
Master class on making an educational game “Dentist” with your own hands
Elena Olegovna Roo
Master class on making an educational game “Dentist” with your own hands
Purpose: Introduction to the dental profession.
- introduce the structure of teeth and oral cavity;
— teach children how to use dental instruments correctly and monitor oral hygiene;
— instill knowledge about the benefits of fruits and vegetables for dental health;
- learn to display adult activities familiar to children;
- to develop the skill of performing various roles in accordance with the plot of the game, using attributes, to encourage children to independently create the items and details that are missing for the game.
If I had such a toy as a child, I would definitely become a dentist... Just look at this toy. This guy's teeth are bad. He doesn’t brush his teeth and now they need to be treated. This is a lovely educational toy for our children, easy to make with your own hands. The basis of production is the papier-mâché method, accessible to anyone and everyone.
To create the jaws, we will need pressed egg cells, dissolve them in a basin using hot water, squeeze them out and add PVA glue (a dough-like mixture is obtained).
We cut off the top parts from a round plastic bottle and sew them together using a wide elastic band. We attach the entire structure to a stand using self-tapping screws (this could be an old game).
First we try to apply the first layer (it needs to dry). It will be difficult to do this; he will slip and fall. But we endure all difficulties.
Each layer must be dried. Depending on the thickness of the layer, it may take a different amount of time. Up to a week for each layer. Then we begin to sculpt the gums with holes for the teeth.
When this layer is completely dry, apply primer, sand it with sandpaper, paint it with acrylic paint (you can use gouache) and varnish it. In this case, varnish can be coated in several layers.
We decorate our patient. You can draw eyes or insert ready-made doll eyes.
We mold the teeth themselves (and this is the main thing for us) from salt dough. Don't forget to draw holes and caries using gouache! We have a set of healthy teeth and a set of diseased teeth. To keep the tooth in the gum well, you can glue magnets.
We prepare tools - this can be the entire arsenal of a dentist for dental treatment and oral hygiene: a toothbrush, toothpaste, tongs and mirrors from toy sets, wires, pens, dough for fillings.
Master class “Do-it-yourself didactic domino games” How to help children remember our Tsarskoye Selo sights? I thought and thought and decided to do it to everyone already in the group. DIY layout for the game “Animals”. Master class I bring to your attention the idea of making a model for games with small educational toys “Animals”. Required for its manufacture. Master class for parents “Do-it-yourself fun games” Good afternoon, dear colleagues! I would like to share with you my experience of working with parents to create a developmental subject-spatial environment. Master class “Do-it-yourself toys” (games with water) I have a little son growing up and I want to come up with as many games, hobbies and tasks for him as possible. Once again, while bathing my son. Master class on making an educational game “Let's help the janitor” out of paper Master class out of paper on making an educational game “Let's help the janitor” for a lesson on the topic: “Introduction to the profession of a janitor” Paper –. Master class on making a flannelgraph with your own hands For work we will need cardboard, a terry towel or drape, beautiful pictures cut out of the material with the help of adults. We take the usual one. Master class on making an educational game-aid from felt “Finger Theatre. Four fairy tales" Master class on making and using educational games made from felt: "Finger theatre. Four tales" Compiled by: Paderina. Master class on making a game with your own hands. "Cat-magic tummy." Didactic game for children 4–6 years old Dear colleagues! I would like to present to your attention a didactic game made by myself. Making it won't cost much. A step-by-step master class on making a do-it-yourself game “Tic Tac Toe” A didactic game is an activity, the meaning and purpose of which is to give children certain knowledge and skills, and the development of mental abilities.
Source
Which dental prosthetics should you choose?
The choice of dental prosthetics method depends on the specific situation, the condition of the oral cavity, physiological characteristics, individual preferences and financial capabilities. If the teeth have external defects, but healthy roots, then it is possible to install veneers or crowns.
If 1-2 teeth are lost, they can be restored with a bridge or implants. If most of the dentition is lost (or cannot be restored), then there are 2 main options - acrylic removable dentures or complete dentures on implants using the All-on-4 system (i.e. “all on four”) or All-on -6 (i.e. “all on six”).
Why is it dangerous to leave a tooth root in the gum?
- The inflammatory process in it has not stopped, the danger of inflammation of the jaw tissue increases;
- Caries can spread to neighboring teeth;
- ENT diseases may develop.
The root of the damaged tooth must be removed. This is a complex procedure that requires the use of antibacterial drugs and anesthesia. It should be performed by an experienced doctor.
Removing tooth roots on your own is dangerous, as it is difficult to remove them completely. In addition, there is a high risk of infection of the hole.
You can solve this problem yourself only under certain conditions:
- The damaged tooth is very loose;
- It’s impossible to get to the dentist’s office, and the tooth hurts unbearably.
What risks exist:
- Inflammation may develop;
- The root can only be partially removed;
- Possible heavy bleeding.
Do not use the door handle for removal. Safe removal is possible only after systematic loosening.
To do this with minimal risk of tissue damage and infection, you need to follow a number of recommendations.
- Assess the situation - whether you can cope with the task. If the tooth is tightly fixed, is it worth starting extraction? A tooth that is tightly held cannot be removed.
- A loose tooth should be further loosened with the tongue. Perhaps it will fall out on its own.
- Before attempting to extract the root, wash the flour, brush your teeth with toothpaste, and rinse your mouth with a disinfectant (rinse) to ensure maximum disinfection. You can use special solutions. It is important that they contain alcohol.
- Use of painkillers. The painkiller should not cause side effects. For the drug to take effect, you must wait at least half an hour.
Advantages and disadvantages of implantation
To install implants, you need to go to a clinic that specializes in this. The service life of the new tooth will directly depend on the qualifications of the doctor and the quality of the equipment. An implant is a metal rod screwed into the bone and placed in place of the extracted tooth. It acts as a root, onto which a crown is then placed.
Contraindications
There are cases when dental implantation cannot be performed. There are relative and absolute contraindications. In the first case, the procedure can be carried out if the factors are eliminated, in the second - it cannot be done under any circumstances.
Absolute contraindications for implantation:
- Malignant tumor - intervention can provoke the disease.
- Blood diseases - during the procedure, bleeding may occur that cannot be stopped.
- Diabetes mellitus and adrenal diseases.
- Schizophrenia, psychosis, dementia.
- Tuberculosis.
- Pathologies of immunity - thymic hypoplasia, lupus erythematosus.
- Chronic stomatitis.
Relative contraindications for implantation:
- Dental caries.
- Arthritis of the jaw joint.
- Periodontal diseases - marginal periodontitis, gingivitis.
Non-surgical dental implantation is not recommended during pregnancy. People who abuse cigarettes, alcohol, or coffee cannot undergo the procedure. But if these factors are eliminated, then there will be no obstacles to installing artificial teeth.
The advantages of implantation include:
- long service life of prostheses;
- restoration of a lost tooth without harm to neighboring teeth;
- restoration of several teeth at the same time or a whole dental row.
Disadvantages of the procedure:
- quite expensive;
- there are many contraindications;
- long duration of treatment;
- the possibility of getting a number of complications in the body.