Useful tips
To decorate a Christmas tree, home or office, it is not necessary to purchase a large number of New Year's balls.
You can make beautiful balls with your own hands at home from various materials.
Just stock up on a few simple tools to create Christmas balls, take the time to make crafts, and be patient.
All New Year's balls are made quite simply, and even children can be involved in working on them.
On our website you will also find:
- How to wrap a gift in 15 seconds using the Japanese method
- What crafts to make for the New Year: Christmas trees, snowmen, New Year's balls
- Original DIY crafts for the New Year
Volumetric balls for the New Year: a ball made of foam and fabrics
You will need:
- foam ball
- skewer
- PVA glue
- glue brush
- ribbon
- scissors
- beads.
1. Using a skewer, make a hole in the center of the foam ball.
2. Now take the ribbon and use a skewer to thread it through the hole. Pass the end of the ribbon through a small bead and tie the ribbon in a knot.
3. Pass the other end of the ribbon through another bead and also tie it in a knot. You can secure the knots with PVA glue.
4. In a bowl, dilute PVA glue and a small amount of water.
5. Cut the fabric into several pieces of different shapes and sizes.
6. Using a brush, apply glue to the ball and begin carefully gluing pieces of fabric.
*Do not apply too much glue.
Properties of polyurethane foam
The scope of application of polyurethane foam is quite extensive. Now it has spread to the landscape design of the site. Garden figures created with your own hands from polyurethane foam are no worse than specimens made on a production scale, and are often superior in decorativeness to crafts made from tires or plastic containers.
The special properties of polyurethane foam allow you to create crafts of complex shapes. Ease of processing makes creative activity accessible to weak women's or children's hands. In the process of forming a garden figure with your own hands, removing an extra fragment or adding a missing part will not be difficult. With proper decoration, the craft looks very presentable and does not show traces of recycled materials, as is the case with plastic containers.
Attention! Garden figurines made from polyurethane foam are resistant to precipitation, but require protection from ultraviolet radiation.
An obstacle to creating crafts with complex configurations may be a lack of experience working with three-dimensional figures. Creating something new from scratch, focusing only on a flat image, is a problem for some. Therefore, it is initially recommended to practice on simple garden figures. A mushroom, turtle or ladybug will be an excellent start for demonstrating the abilities of a sculptor.
Depending on the volume of foam used in the manufacture of the craft, it may take considerable time for it to dry completely. Usually the process lasts for a week. You should be prepared that polyurethane foam in the process of forming a garden figure can pollute the surrounding area, so it is recommended to organize work in an open area.
Colorful examples of do-it-yourself polyurethane foam figures are presented in the photo:
How to make a New Year's ball: Golden Snitch
You will need:
- thin wire
- thin paper (papyrus paper)
- PVA glue
- glitter
- scissors
- self-hardening modeling compound
- acrylic paint
- paint brush.
1. On paper, draw a pattern of wings for your Snitch. Use this pattern to model thin wire wings. Twist the ends of the wire.
2. Place a sheet of thin paper on the table and place wire wings on it.
3. Apply a little glue to the wire on several sides and carefully bend the paper.
4. Carefully trim the paper around the wire to create wings.
*You can paint the wings using acrylic paint.
*You can also apply glitter. To do this, coat the wings with PVA glue and sprinkle with glitter.
5. Glue the wings to the ball using self-curing modeling compound.
* You can also use a foam ball instead of a glass ball. In this case, the twisted ends of the wire wing are simply screwed into the ball. The foam ball will also need to be decorated with paint, for example.
Working with the frame
After the figure is ready, it can be painted with acrylic paints.
Since polyurethane foam is very light, it requires a load, which is precisely what the frame serves. Depending on what kind of figure will be made, it is necessary to prepare one or another base. For those who have not done such work before, it is best to work from a sketch.
As for the materials for the frame, here you can pay attention to:
- wire or metal pipes of small diameter;
- plastic bottles, iron or glass jars, bowls, pans and even cups;
- wooden blocks or planks.
All these elements need to be connected. For stability, it is recommended to place a small plastic bottle with sand inside the figure. After preparing the base, they begin to decorate it with polyurethane foam. The material is evenly applied to the frame layer by layer. As noted above, each level should be applied after the previous one has dried (approximately 10-15 minutes). If you don’t have a special gun at hand, it’s better to use a small trowel, as it will allow you to create the correct relief of the figure.
As soon as the polyurethane foam has completely hardened (after 12 hours), the craft is sanded using an ordinary or stationery knife, cutting off all excess protrusions. If there are deep recesses, they can be filled with polyurethane foam. Then, once the shaping is completed, a layer of putty is applied to the surface. It creates protection from external destructive factors.
Using sandpaper, the surface of the figure is made smooth. The final stage is painting the figure. For such crafts, it is better to use acrylic paints, as they are not afraid of either water or temperature changes. To keep the color of the craft longer, it is recommended to paint it in 2 layers.
To extend the service life, the figure is varnished. Firstly, such a layer is additional protection, and secondly, the glossy coating looks very impressive.
If desired, such garden elements can not only be painted, but also decorated with stones or colored jewelry. If the craft stands in the sun, then everything around will be filled with colorful lights.
Christmas balls made from chewing candies for the New Year
You will need:
- foam ball
- ribbon
- pins
- hot glue
- small chewy candies or marmalade
- scissors.
1. Take a foam ball and use glue to glue a piece of ribbon to it and thread it with a pin on top so that you can later hang the ornament on the Christmas tree.
2. Start adding glue drop by drop and gluing the candies or marmalade (or pieces of marmalade) to the ball.
* Instead of sweets, you can glue almost any decorations: buttons, sequins, small tinsel, etc.
General algorithm
Preliminary familiarization with the instructions for using polyurethane foam will reduce the likelihood of undesirable situations developing. Crafts should be made outdoors at above-zero temperatures. If work is carried out indoors, it is worth taking care of quality ventilation. Polyethylene film will prevent surface contamination; polyurethane foam will not stick to it.
Shake the can before use and keep the cap down when working. Otherwise, the gas will escape and the material will not be completely consumed. The polyurethane foam gains initial strength within an hour and completely dries in 10 hours. It all depends on the applied layer.
It is not recommended to apply a large amount of material in one go; the liquid substance can fall off. The optimal way to organize the work of forming a garden figure is as follows:
- position the frame of the craft horizontally;
- apply a small layer of foam;
- give the material time to dry;
- turn the craft over and repeat the steps.
When the foam dries again, the voids and missing fragments are filled in accordance with the selected outlines of the garden figure. Excess fragments are removed with a sharp stationery knife. To achieve a smooth surface of the craft, it is sanded with sandpaper attached to a block.
Advice! Putty can protect a garden figure from rapid destruction under the influence of sunlight. This technique will provide additional leveling of the surface.
After the composition has completely hardened, the decorating stage begins. Usually it consists of painting a figure from polyurethane foam. Acrylic-based paints, which are applied in 2 layers, are optimal for the job. Additional decorations include buttons, cords, mustache wire, and pieces of glass to create a mosaic.
A ball of acorn caps for a Christmas tree for the New Year
You will need:
- acorn caps
- acrylic paint and brush
- foam ball
- jute rope
- thin wire (floristic, for example)
- thin tape
- glitter (optional)
- PVA glue
- hot glue.
1. To paint the foam ball, choose a color close to the color of the acorn caps. You can skip this step. It is only needed to hide the white color of the ball.
2. Start adding hot glue drop by drop and attaching the acorn caps. You can pierce the foam ball a little with these caps. Glue the hats as close to each other as possible, but don't worry too much - there will still be gaps, and that's normal.
3. Make a loop from the wire, twist the ends and screw them into the ball. Now you can cut the rope and thread it through the loop to hang it on the tree.
4. You can also make a bow out of ribbon and hot glue it to the top of the balloon.
5. You can apply PVA glue to the outer parts of the acorn caps and sprinkle glitter on the glue.
Why do you need to create it yourself?
Why know how to make a ball out of polystyrene foam? After all, now in any craft store you can buy ready-made plastic balls. But there are advantages to doing them yourself:
- The cost of making a craft is reduced. You can confidently say that you will make a craft from start to finish. Styrofoam is used, which ultimately should have ended up in the trash.
Of course, there are also disadvantages:
- It takes more time to create a craft. The balls may not turn out as perfectly smooth as store-bought ones. You end up with a lot of garbage.
DIY New Year's crafts: balls decorated with thread
You will need:
- knitting thread (the thicker it is, the easier it will be to secure it)
- foam ball
- PVA glue
- scissors
- wire or pin.
1. Bend a piece of wire into a U shape and insert it into a foam ball. The wire will then help you hang the ball on the Christmas tree.
You can use a pin to pierce the thread and then insert it into the foam ball. In this case, you will need to leave a small tail on the thread (which you will then glue onto the ball) in order to hang the ball on the Christmas tree.
2. Cover half the ball with PVA glue and begin to carefully wind the thread around it.
3. When you have almost reached the center of the ball, turn it over, apply glue to the other half and continue wrapping the ball with thread.
Available materials
The list of available materials varies depending on the garden figure chosen for making, but the constant set consists of the following items:
- Polyurethane foam. It is better to replace a regular can with a tube with a pistol, which is much more convenient to work with.
- A stationery knife for trimming unnecessary elements.
- Latex gloves to protect your hands. Fabric products will quickly become unusable.
- Sandpaper for sanding the surface.
- Brush with paints intended for external use.
To create the frame of a craft, they usually use plastic containers and tin cans, rigid wire, planks, hoses and double-sided tape. If foam gets on your skin during work, a special cleaner or kerosene will help get rid of the dirt.
Advice! A garden figure made using polyurethane foam is lightweight, so at the formation stage measures are taken to make it heavier. Plastic containers can be partially filled with sand or small pebbles. The wire protruding from the paws of the animals will help to fix the craft on the ground.
Do-it-yourself volumetric balls for the New Year
You will need:
- cardboard (white or colored)
- scissors
- printer (to print the template)
- a thread
- scotch.
*You are asked to print two versions of templates for two balls of different sizes.
* Each ball is made from 12 paper pieces of the same size.
Paper ball templates for the New Year
Small
Big
1. Print the templates and cut them out, making cuts in the indicated places.
2. Make a small hole in one cut out flower, thread a thread through it, tie its end into a knot and secure it on the back with tape.
To make it easier to assemble the ball, consider the part with the thread to be the “north pole” of the ball. Add details to it until you reach the “south pole”.
3. Use the cut lines in each cut out element and fasten all the pieces together to form a ball.
Jewelry making
Knowing how to make a ball out of foam plastic, you can make a lot of useful and original decorations for your home.
For example, create a set of exclusive New Year's toys, decorate the interior with hanging balls or decorative trees of different sizes. There are plenty of options for use and decoration. This is fertile ground for the development of creative abilities.
Balls can be decorated using quilling, kanzashi, and decoupage techniques. Buttons, sequins, beads, ribbons - everything that is stored in the needlewoman's basket can be used.
Polystyrene foam is an easy material to process, so working with it will be interesting for both children and adults. Date: 02/11/2015 Views: 634 Comments: Rating: 38 The New Year holidays are approaching, and many are already beginning to think about how to decorate the Christmas tree and what gifts to give to their loved ones. There is a large selection of gifts in stores, but handmade toys are becoming more popular. To make many of them, you may need a ball-shaped blank, which you can also make yourself from different materials. Foam balls are quite easy to work with: they can be easily cut, painted, and at the same time they are durable and resistant to any deformation.
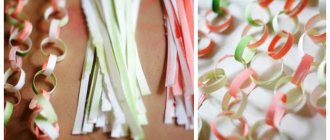
Beautiful balls made of paper strips for the New Year.
Option 1.
You will need:
- colored cardboard
- scissors
- stapler
1. Cut a sheet of colored cardboard into several identical strips.
2. Fasten all the strips with a stapler. First, cross two strips at right angles and fasten them, then add two more strips diagonally and also fasten (you can use glue).
3. Bend each strip in turn and secure the ends.
The ball can be decorated with tinsel by cutting off a small piece and gluing it.
Review of original ideas
The choice of garden figures that you can create with your own hands using polyurethane foam is unlimited. Here is a modest list of original ideas:
- A small artificial pond or waterfall will be perfectly decorated with a funny frog or turtle. Someone might want to become the owner of a crocodile or a monitor lizard - it all depends on preferences.
- If children are relaxing on the site, they will like the presence of a craft in the form of a cheerful SpongeBob.
- Bright ladybugs always attract attention.
- Polyurethane foam will not require sanding if a lamb is chosen as a garden figure.
- Sometimes a wire with which plastic containers are braided and then gradually filled with foam helps to create a frame with a complex configuration.
- The craft does not need to be coated with paint. Some masters of working with polyurethane foam offer to create a real mosaic on a garden figure from small pieces of mirrors or tiles.
In the process of creating any craft, it is important to let each applied layer dry thoroughly. This applies not only to polyurethane foam, but also to primer, putty and paint. If technology is violated, a garden figure can quickly become unusable.
Any summer resident or amateur gardener wants not only to enjoy being in nature, but also to receive aesthetic satisfaction from a garden and country house decorated with his own hands. Then things are used that, it would seem, are no longer suitable for household use: empty plastic bottles, tires, broken tiles. Crafts made from these materials will no longer surprise anyone, and summer residents want variety and amazing things for their dachas and gardens, so garden sculptures made from polyurethane foam are appearing more and more often.
Country crafts made from foam have long been of interest to land owners, because they perfectly transform the garden and allow you to play the role of a sculptor.
Christmas balls for the New Year
Option 2.
At the end of the text instructions you will find video instructions.
You will need:
- colored cardboard (multi-colored magazines)
- scissors
- ruler
- cocktail straw
- pencil
- needle and thread (or wire)
- awl or screwdriver
- beads
- various decorations (optional).
1. You need to cut out 6 strips of colored cardboard. The stripes should not be too wide.
2. Using an awl, make a hole at the end of each strip.
3. Lay out all the paper strips as shown in the image, and use an awl to make a hole in the center.
4. Prepare a thread, a needle and a bead, which will need to be attached to the bottom of the future ball.
Cut the thread to the required length so that you can hang the ball.
Pull the first bead all the way through.
Pull the needle and thread through the hole in the center of the strips, leaving a bead at the bottom.
5. Cut off approximately half of the cocktail tube (its length is 1/4 the length of the paper strip), insert it into the center of the workpiece and thread a thread and needle through it.
6. Start bending the strips at the top and pull a thread and needle through the hole at the end of each strip. It is also better to secure a bead on top.
Video instruction:
*You can use wire instead of thread.
Advantages
Why is this material so popular in crafts? The answer is simple: it is light, can be processed well with simple tools, and is easy to work with. Foam plastic is not afraid of dust and mold. In addition, there are a lot of options for decorating balloons. You can attach decoration elements with needles or glue them with different types of glue. Knowing how to make a ball out of polystyrene foam, you can prepare a lot of blanks at home from which to make various crafts. They can become an original gift for loved ones or the basis for interior decoration.
Sculptures and garden products
Below are a few examples of different figures that even a beginner can create on their site. The main thing is to strictly follow the sequence of all operations. And in a few hours you will definitely feel like a real creator, from whose hands comes an excellent decoration for your summer cottage!
Read more about crafts made from tin cans.
Christmas tree
Making a Christmas tree from polyurethane foam is as easy as shelling pears. To do this, you need to collect twigs and attach them to an iron pipe. This can be done with tape or wire.
After this, you need to wet the workpiece with a spray bottle so that the foam “sticks” to the base more firmly.
Green acrylic paint is perfect for creating a New Year's mood using such simple things as scraps of sticks, twigs, polyurethane foam and fishing line.
You will find all the information about paths made from plastic bottle caps.
Ball
The ball is the easiest figure to make. It is recommended to start your creative experiments with it, and only then move on to more complex decorations and sculptures.
- Take a paint can and fill it with sand;
- Layer by layer we apply polyurethane foam;
- Upon reaching the required size and more or less spherical shape, remove excess parts with a knife;
- We coat the product with varnish;
- We choose paint for our decoration depending on our preferences;
- If it is a bun or the head of some animal, we make eyes, a nose and a mustache from buttons, fishing line and wire.
It is possible that you will find the material about .
Ram and ewe
Making a ram and a lamb:
- First we make the frame. We take several plastic bottles and fasten them with tape. The result will be something like a “skeleton” of an animal. The lower “limbs” can be filled with sand to make the figure more stable.
- Next, you can apply foam. But to save it, it is better to wrap the frame with isolon or other polymer material. The first layer of polyurethane foam - you can already roughly imagine what the end result will be!
- We make ears from pieces of leather. You can also make them from plastic bottles by preheating and bending them.
- We process the muzzle with a knife, carefully giving it the necessary features.
- We coat the product with varnish.
- We paint the eyes, mouth and other “features” of our sheep or lamb with paint!
Scheme for making a sheep.
Goat
Step by step how to make a goat:
- We make a frame from thick wire, which we wrap around several plastic bottles.
- It is better to use metal pipes as a frame for the legs (bones). They can be welded to a pedestal, dug into the ground, or secured with bolts. Your figurine must withstand wind and rain, so take the time to securely secure the base.
- Apply one or two layers of polyurethane foam.
- We make horns and a tail from wooden sticks or plastic cuts and secure them.
- After applying the last layer, we cut off all excess and wrap the product with sickle or fishing line.
- Cover the surface with primer and paint. You can choose any color, because it is completely your creation!
- Making eyes from buttons.
- We place our goat next to a pond, in a clearing, in the company of other decorations, etc.
In total, this sculpture will take one to two weeks to complete, as each layer of foam must harden. As a result, from unnecessary pipes, plastic bottles, wire scraps, other “garbage” and several cans of polyurethane foam, you get an excellent decoration for your summer cottage!
What a plastic border for paths is will tell you.
Crafts for the New Year
Even with nothing on hand other than wire and a can of polyurethane foam, you can create excellent decor for the New Year. Various ornaments, Christmas tree decorations, simple and complex figures - all this is accessible and simple!
For example, you can make a snowflake. We take a wire of such thickness that it can be bent without effort. We make the frame of a future snowflake out of it. Carefully apply one or two layers of foam. Before it hardens, we achieve even and smooth surfaces. If something goes wrong, you can always add a little foam and cut off the protrusions with a regular stationery knife.
The Christmas ball is made even easier. The tennis ball is covered with a layer of foam
. After hardening, we apply a layer of paint and decorate our New Year's toy in bright and positive colors!
A simplified version of the Christmas tree is made using cardboard or isolon, wound on a rigid base in the form of a cone. Even a child can apply several layers! We level the surface, paint it and place it in a visible place.
How to make a swan from a tire is described.
Basic rules for working with polyurethane foam
- Shake the container periodically.
- The ideal temperature for work is room temperature.
- Polyurethane foam does not like direct sunlight. Therefore, it is necessary to work in the shade and coat the finished product with paint.
- The hardening time of the foam varies depending on the manufacturer, temperature and operating speed.
Important points
- The paint used to coat the finished product should not contain nitrocellulose. Otherwise, the polyurethane foam will soften and the decoration will lose its shape.
- Gloves are a mandatory element of the work. Without them, washing your hands will take much more time than the process of making the craft itself.
- Polyurethane foam is a very lightweight material. Therefore, heavy objects must be placed inside any product made from it. This could be a jar of sand, a plastic bottle filled with water, an iron base, metal pipes held together with wire, and other massive things.