Children's headband - how cute and elegant it is! This decoration is suitable for girls of all ages: from toddlers to teenagers. Before making a headband for a girl, let’s decide on the material of the decoration.
It can be a headband made of lace, felt, satin ribbons, fabric, knitwear. These headbands for girls are made by mothers with their own hands before a photo shoot or a princess’ birthday. A headband for a girl, made with love by a mother or grandmother with her own hands - what could be better and more original. Flower stencils are included.
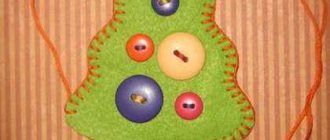
Felt headband
Felt is a material that is perfectly suited for the job. It does not wrinkle and has neat edges. You can make very beautiful flowers from felt to decorate a headband, and not just flowers.
This work uses different flowers, which can be made from felt using glue or a needle and thread. After the flowers are made, they are sewn on with a wide elastic band. You can take any sizes of flowers, from 4 to 10 cm. It all depends on the age of the girl and the purpose (holiday, photo shoot). Flower stencils are located at the end of the article.
Flowers are easy to make. You only need to print or draw a few stencils by hand. Anemones turn out delicate and beautiful, roses and hyacinths are great for decorating a DIY headband.
Rose and hyacinth. For hyacinth, cut out a strip 20 cm long, height - from 10 to 15 cm. Bend the strip in half and make cuts without cutting 1.5 cm to the end. Roll the workpiece into a tube and secure the leg.
For anemones you will need 6 petals, cut in 2 places and a black cut fringe - the middle detail. Don't forget the leaves for the flowers. It is better to take an elastic band that matches the color of the princess’s hair.
And here are anemones with different leaves and centers. Choose which ones you like best.
- We often throw away bright T-shirts, T-shirts, knitwear, not knowing that we can make an interesting accessory out of all this - DIY headbands for girls.
- Try it, show your imagination - and you will get beautiful children's headbands and decorations for your little fashionista.
- To work you will need:
- 3 strips of fabric of different widths, length - 65-70 cm.
- Threads to match the color of each strip or white.
- Sewing machine.
- Glue gun or needle and thread.
- A piece of green jersey or felt (optional).
- Elastic band or braid (the braid must be tied at the back).
- Cut out 3 strips from T-shirts of different colors.
- Next, using a sewing machine or by hand, use small running stitches to make zigzag stitches.
We carefully tighten all the threads. We begin to tighten from the beginning of the workpiece. If the thread breaks, carefully tie it together.
- This is what the final product looks like.
- We twist the workpiece, starting from the center of the flower.
- We do the other 2 flowers in the same way.
- We glue or sew the reverse side by hand to an oval base made of felt or thick fabric.
- You can decorate our flowers with knitted or felt leaves.
At the end we glue or sew on an elastic band. The bandage is ready.
Headband made from Solokha fabric - master class
The Solokha headband for a little girl can be called universal. This headband is suitable for any hair, especially convenient in summer. A DIY solokh headband is a great solution for summer hair.
We make a pattern for OG = 48 cm. At the top are the main 2 parts, at the bottom is the part for the elastic band.
To work you will need:
- 2 pieces of fabric: 58/12 cm and 20/12 cm.
- Elastic band 10 cm.
- Sewing machine or needle and thread.
- Centimeter, scissors, paper.
- Tailor's pins.
We make a pattern on paper. For a head circumference of 48 cm, we will cut out a 20/12 cm rectangle for the elastic band and 4 more rectangles - 29/6 cm - for the main bandage. Measuring 10 cm from the end of the main part, we make 2 cuts at the top and bottom (this will be a bow). We pin the pattern to the fabric, add 1 cm seam allowances on all sides and cut out 5 parts.
- We put the 2 main parts with the right sides facing each other - we will grind them down.
We sew it down, leaving a small hole through which we will insert the part with the elastic band. We sew, retreating 1 cm from the edge of the part.
We turn the main parts with the “ears” onto the face. We take a piece 20/12 cm and sew it along the length. Turn it inside out. Then use a pin to insert the elastic inside this part.
We secure the elastic band on both sides with two lines. You should have an assembled part. It is advisable to stitch this part along the entire length - in the middle.
Next, take 1 part with “ears” and insert the part with an elastic band into the hole that we left. We combine the edges and sew on the machine. We do the same with the 2nd part with the “ears”.
- We sew up the remaining holes using a blind stitch by hand.
- All that remains is to iron it and tie the “ears” into a knot.
- In the video - how to sew a solokh headband with your own hands, a master class for beginners:
How to sew a cotton headband. How to sew a “solokha” headband
Using these stencils you can make all kinds of flowers for headbands made of felt, organza, lace, leather, and so on.
Ideas for baby headbands
- In the video - an organza headband for a baby:
DIY: Baby Headband | la.mansh
Source: https://StranaHandmade.net/podarki/povyazka-na-golovu-dlya-devochki
Sewing steps
This stylish item will take very little time to make. Before starting work, you need to decide on the model and choose the appropriate fabric. Then you should measure the circumference of your head to find out the size of the product. Depending on the material and the chosen model, you need to make a pattern or draw a diagram. But in many cases this is not required.
Next, you need to cut the fabric to the desired size.
It is important to allow seam allowances. Typically, a strip is cut 2 times the width of the finished product.
Sew it on the wrong side and turn it inside out. After this, the women's headband needs to be decorated with the selected decorative elements, and if necessary, secure the elastic band. At the last stage, we sew the ends and process the edges.
Headbands with elastic band
A scarf is considered the best option because it can be tied in different ways. But for greater convenience, it is better to sew a similar model with an elastic band. It goes well with sporty and casual clothing and is suitable for women of any age. The easiest way to make it is to fold it in half and sew a strip of fabric into which the elastic is threaded.
This model looks original due to its soft folds, and it is comfortable and easy to put on. Another option is a type of scarf like a bandana. This is a wide strip of fabric, most often a single layer of thin material. At the ends it is gathered into a bun with an elastic band.
What you need to make it:
- cut a rectangle for the scarf itself measuring 25 x 45 cm;
- tuck the edges and stitch;
- prepare a second rectangle for elastic 5 x 25 cm;
- make a drawstring out of it, insert a wide elastic band 10-15 cm long;
- put the end of the scarf into the drawstring, after tucking the edges, sew;
- repeat the same on the other side.
Cut out three parts Sew two long edges on a large part Fold two small parts wrong sides and sew along the long sides Turn them inside out, iron them and turn both short sides inward by 2 cm Sew in the center, not reaching the edges 1.5 cm Gather the short edges of the large part into cute folds and sew in an elastic band. The folds on both sides should lie in one direction. The finished product
Overlap knit
To make this you will need two pieces of knitted fabric of different colors. A pattern is not required, but when cutting you need to take into account the size of the head. For a child 3-7 years old, you need to cut two strips 15 cm wide and 47 cm long. Older girls and young women will need to increase the size. To determine the length of one part, you need to add 4 cm to the volume of your head. Sewing such an original hair decoration is very simple, and for those who do not have experience, you can use step-by-step instructions. How to make a headband for a girl from knitwear with your own hands:
- Cut out two parts.
- Fold each one in half lengthwise and stitch.
- Finish the seams and turn them inside out.
- Place the seam in the middle and iron the stripes.
- Place the pieces together crosswise in the middle.
- Bend them in half to create an overlap.
- Align all 4 edges of the strips and stitch.
We fold the two patterns with the wrong side inward, lengthwise in half and sew them on a machine or by hand with a “back needle” seam. We turn both patterns right side out. We lay both parts on top of each other with the seams facing up. We fold the parts as shown in the photo. You will get a so-called “loop” Fold the 4 ends together , mark the volume of the head, baste along the drawn line. If the strip is not too tight, you can grind these 4 ends and trim off the excess. The bandage is ready.
With a bow for a girl
A headband for a girl will look beautiful if you decorate it with a bow. It’s not difficult to make even without a pattern. All you need is a bright fabric. It’s better to choose knitwear, then you won’t have to insert an elastic band. Sequencing:
- Cut out a rectangle whose length is slightly less than the circumference of your head. The exact size depends on how the jersey stretches; The width is determined as desired.
- The second rectangle from which the bow will be made should be the same width; its length when folded in half is approximately a third of the size of the headband.
- The parts need to be stitched along the long side from the wrong side and turned inside out.
- Sew up the ends to form a headband.
- Fold the second piece into a simple bow and attach it to the front.
- Use a small piece of the same fabric to fasten both parts.
The easiest way to sew a headband - 10 steps
Today I will show you how to sew a headband in 30 minutes. After sewing it, I realized how comfortable and practical this headdress is. How did I ever manage without her? After all, it is suitable not only for summer, but also for warm autumn, when it is still hot in a hat and it is desirable to cover your ears. I’m also terribly lazy in terms of figuring out how to beautifully tie a scarf on my head, but with this headband I don’t need to waste time, everything has already been thought of and I just put it on my head and voila, an instant beauty)!
To sew a headband, you don’t have to buy fabric; look in your closets, you might have scraps of fabric lying around. For example, I took my neckerchief, which I don’t wear, but now it has found its use.
What did I need to sew a headband?
- cotton or viscose fabric - 30 cm.
- elastic band wide 3 cm - 14.5 cm.
- thread in color 1 spool
- sewing tools - scissors, measuring tape, safety pin
How to sew a headband step by step
The headband consists of three parts - these are two upper parts that cross each other and a lower part with an elastic band.
1. I cut out the upper parts of the bandage - two rectangles with sides 27*50 cm.
2. I fold the parts in half one by one and sew them together using a sewing machine.
3. I iron it at a low temperature so that the seam is in the middle of the parts.
4. I cut out the bottom part of the bandage for the elastic band.
5. I sew the bottom piece along the side seam, retreating from the edge by the width of the foot. To turn the part out, I attach a safety pin to one edge and draw it along the entire length from the inside to the other end. I iron it.
6. I push the elastic band inside using the same pin.
7. I fix the elastic band inside. To do this, I sew it on a sewing machine to the fabric on both sides.
This is what should happen in the end. Using an elastic band, the headband will fit any head circumference.
8. I tie the upper parts of the bandage together as shown in the photo.
9. I place counter folds at the ends of the upper parts of the bandage.
- So that the width of the upper parts with folded folds is equal to the width of the lower part with elastic.
10. I place the piece with the elastic on one of the top pieces of the bandage, so that the seam on the top piece is at the bottom. I sew them together.
- Then I do the same with the second top piece.
What should happen in the end? The end with the elastic band remains inside the upper parts. Now I do the same on the other side of the bandage.
- Ready!
This is such a beautiful headband I got. I’m so happy and looking forward to summer soon) In the meantime, I put on my headband while cleaning the house, and don’t look like an aunt with a scarf on her head.
Now you know how to sew a headband and can repeat this master class. Did you like the material? It's easy to say thank you! I would be very grateful if you share this article on social networks.
- You might be interested:
- How to sew a headband for a girl with your own hands
- An easy way to sew a headband with a bow for a bath
Source: https://dnevnikbeloshveiki.ru/samyiy-prostoy-sposob-kak-sshit-povyazku-na-golovu-10-shagov/
Simple Solokha
The standard headband is created from strong fabric without the use of any auxiliary materials. The bow can be made in two ways: in the form of sharp or round ears. To create this beautiful headband, you need to take fabric with a bright polka dot or flower pattern. To create a solokh on your head with your own hands you will need:
- high density cotton fabric;
- quality threads;
- sharp scissors, special chalk, pins, needle;
- sewing machine.
Stages of work:
Calculate the dimensions of a piece of material. The width should be equal to twice the selected width of the item plus the width of the allowances. The length should correspond to the circumference of the head and the selected length of the ears along with the knot. It is best to make a seam allowance of at least 1 or 2 cm. Cut out a strip of material of the selected size, fold it lengthwise with the outside in. Make the ears using a pattern. Sew the bezel completely using a machine, leaving one part with a 4 cm long hole through which you will need to turn the part to the outside
Carefully turn the straw inside out and sew up the hole. All that remains is to steam the bandage and tie it on your head, giving the ears the necessary shape
If you take material with a low elastane content, you won’t have to straighten the product every time: it will stay perfectly on your head. To properly make a solokh headband, it is better to use a pattern.
DIY headbands for girls
In today's master class we will look at 2 options for how to make headbands with kanzashi petals from grosgrain ribbons and flowers (roses).
The first hair band is more suitable for girls. To create it we will need:
- Rep ribbon, 4 cm wide,
- Rep ribbon with a pattern 2.5 cm,
- Satin ribbon, 5 cm wide,
- Hair band,
- Felt,
- Hot-melt gun, hot-melt glue, scissors
To create one petal, take a piece of grosgrain plain ribbon 4x10 cm and a ribbon with a pattern 2.5x8 cm.
We fold a plain grosgrain ribbon into a petal.
We make the same petal from a piece of 2.5x8 cm and place it on the first one.
Make a fold on the petal on the right side.
Now fold the fold in the center.
And we make the third fold on the right. We sew the base of the petal.
You will need 10 such petals.
For the base of the decoration for the headband, take a satin ribbon, 5 cm wide and 10-12 cm long.
Glue the first three petals of the future bandage onto the base
We make an indent of about 4 cm and glue three petals in a mirror image.
Now we glue 4 petals into the gap, creating a flower.
Now we will make the basis for the future headband. We cut out a piece of felt that will cover all the “not beautiful” areas of the back of our decoration. Round off the edges. I chose a wide headband and cut it.
We make two holes in the felt base and thread the bandage through both sides. We try on the reverse side of the jewelry.
Now all that remains is to glue the finished base with the bandage to the decoration.
All that remains is to glue the cabochon or a beautiful center.
Such beautiful headbands for girls can be made in any color, for example, I also got this headband.
The second headband with roses is more suitable for girls. To create it we will need:
Cut a circle out of cardboard with a diameter of 5 cm. A total of 3 circles will be required.
We make a hole in the central part and thread a thread through it.
We stretch the thread 7 times, evenly distributing the threads in a circle. We thread the ribbon from bottom to top. The tape is approximately 1 meter long.
We pass the ribbon through the threads one at a time, that is: under the thread, over the thread, under the thread, over the thread, and so on.
Since there are an odd number of threads, weaving the linen in a circle will overlap the previous circle, overlapping each other like rose petals.
Ready flower for headband. We make three such roses
We glue the “tail” of the tape to the cardboard.
Sew beads into the center of each rose.
Now let's make organza petals. Using a metal template (a Coca-Cola can) with a soldering iron or burner, we cut out the petals.
We put them on top of each other.
and sew at the base.
We make petals from beads and wire.
We make the base for the felt headband, trying on the roses and adjusting the base.
We cut the bandage and glue its edges to the wind base through the cut hole.
Base and dressing.
Glue the leaves.
We also glue petals with beads to the bandage.
Now all that remains is to glue the roses and the bandage is ready.
I hope you want to make such beauty with your own hands and my master class will help you with this. But if you still have questions, ask them.
Source: https://alidiy.ru/povyazki-na-golovu-dlya-devochek-svoimi-rukami/
What substances does a cotton-gauze bandage or mask protect against?
A cotton-gauze bandage or mask is a special device for protecting the respiratory system. Let's look at the main situations when a bandage can be useful.
VMP can perform several functions:
- Protects against viruses that are transmitted by airborne droplets, such as influenza, whooping cough.
- Protects against dust, smog or smoke.
- It is an excellent protection during a fire, when toxic combustion products are released and there is a lot of smoke in the room for a long time.
Instructions for making a cotton-gauze bandage, face mask.
Used during a bacteriological attack, if poisonous gases are sprayed around. Useful during an accident at nuclear power plants. VMP perfectly filters dust that contains radioactive substances. Protects if the air is contaminated with ammonia or chlorine
In this case, the bandage must be additionally soaked in a solution that contains citric acid in the first case and a soda solution in the second.
It is important to know how to make a mask with your own hands and to be able to do it quickly. Let's say there is a fire in your building, but you cannot quickly leave the house. Of course, you can buy it at the pharmacy, but making it is very simple.
Yes, and it costs much less. For a cotton-gauze bandage, it is important to purchase high-quality material. It will be described a little below.
How to make a headband with your own hands?
Today, handmade products are increasingly gaining popularity and becoming a stylish addition to any look. This is especially true for accessories. Therefore, a headband made with your own hands will not only meet all individual wishes, but will also attract the admiring glances of others.
The idea of getting an original and beautiful accessory on your head can be inspired by inspiration or arise from looking at a picture in a fashion magazine or a photo of your friend. Before you start constructing a bandage, you should:
- Adequately assess your strengths and creative potential. For those who are not particularly friendly with the world of art, it is better to select detailed descriptions for making an accessory using the simplest methods or seek help from a needlewoman who will make a custom-made accessory. Often, manual work is very painstaking, and not everyone has the patience for it.
- Choose a material that suits your taste for the base of the bandage - whether it will be sewn or knitted and from what. The imagination of handmade craftsmen is limitless, which allows you to choose the components of the base from a huge number of materials.
- In addition, you should carefully consider the decor - its appearance and components should reflect the internal state of the hostess, without taking her out of her comfort zone. The decoration of the headband should also correspond to its purpose. If the accessory is for special occasions or photo shoots, then the decor can be abundant and bright, but for sports headbands any decoration may be superfluous.
- For clarity, it is recommended to create a sketch of the future product, which will help you adhere to the intended dimensions and other details when working.
- And finally, you should make a list of all the necessary tools and parts to create the accessory so that you don’t forget anything at the store. Don’t forget about the methods of attaching the decor: sewing beads require thread and a needle, and rhinestones require glue.
Materials
The choice of bandage material is varied, depending on the style and purpose. Summer models for girls are made from textiles (cotton, linen, knitwear, velvet, nylon, stretch, tulle, guipure, organza) and fine yarn. Textile headbands can be openwork, lace, knitted, or elastic. The design can be anything.
Knitted models are made from cotton, linen, acrylic and wool threads. If the choice of fabric has no restrictions, the use of yarn implies its own rules:
- Yarn models are not an alternative to a hat, no matter how beautiful they look. There is no need to risk the child’s health; the head should be covered completely, and not just the ears and forehead. The only possible exception is a wide model in the form of a turban, which has practically no open areas, so it will reliably protect the girl’s head from bad weather, cold and wind.
- Newborns should not wear bandages made of acrylic or wool: it is impossible to know in advance what the skin's reaction to the fiber will be. Synthetics are excluded in infancy, and wool is not suitable for every child.
- On a summer day, it is better to decorate the girl’s head with a bandage made of thin threads: this way the head will not sweat, which means the bandage will not create discomfort.
When creating an accessory, not only the base (the headband itself) is used, but also various additions that are pleasing to the eye. It is worth noting that decorative elements must correspond to the baby’s age, be securely fixed and not have a piercing or sharp edge.
Foamiran can be used as decoration in fashionable and elegant headbands, as well as felt, fabric, polymer clay, beads, brooches, feathers, rhinestones, sparkling crystals, sequins, beads, lace braid, ribbons, buttons.
Knitted patterns
Accessories knitted with knitting needles or crochet are in no way inferior to textile options. Sometimes they resemble light lace, and due to patterns of different density and volume, they add many beautiful styles to the design treasury.
Decorative techniques for knitted accessories include many elements. These include layered flowers, ruffles, ruffles, contrasting stripes, modest and lace knits, braids, all kinds of weaves, bows, knots and much more. Depending on the type and thickness of the yarn, such headbands can be decorated with beads, brooches, rhinestones, sequins, ribbons, buttons and even beads.
DIY headband 7 ideas with master classes and template with diagram
Girls, hello! Our summer is in full swing, today it was +31 in the shade. And I have another portion of useful things for you. In this heat, it’s kind of hard to have long hair, I speak from my own experience, I myself have very thick and long hair, so so that my hair doesn’t get in the way and doesn’t seem like a warm fur coat, I suggest creating a headband for yourself.
The ideas are quite popular, and the principle of creation is very easy, you can make it in literally 10 minutes.
Quite recently, at a sewing course, we sewed aprons, and we had to sew scarves to go with them, but ordinary scarves are somehow not in trend now, so many decided to make their own headbands.
They can be made in different ways, with rounded tips or sharp ones, with or without frame wire, so that the seam is on the inside or outside.
In general, there are a lot of variations, choose the one you like best! I have collected 7 options for hairbands for you at once.
Salokha headband MK
To make it we will need: Fabric, I have 100% cotton, but you can take another one. Approximately 105 cm long, 10 cm wide. When finished, I got 102 cm long and 4 cm wide.
Although these sizes are approximate and you can change them at your discretion. These sizes are suitable for tying a headband on a bow; if you plan to insert frame wire, then the length will be needed less.
Measure the circumference of your head and add the required length of the tips, and a couple of centimeters for allowances. Everything can be cut out.
The width is folded in half, the corners are folded on both sides and cut off. You can sew it from the wrong side, leaving a hole for turning it inside out and then sew it up with hidden stitches. Or iron the allowances inward and stitch from the front side 0.1 - 0.2 mm from the edge.
The second option is made in the same way as the first, only the corners are made round.
The third method is similar, only the corners are made into an acute triangle.
How to sew a headband with a bow
The fourth method It is better to make it from knitwear. A rectangle is cut out in length slightly less than the girth of the head, if the fabric stretches well, then 1/3 or 14 of the head girth can be removed, if not, then a couple of centimeters and without allowances, in general it depends on the stretchability of the knitwear. To check, you should apply the fabric to your head and pull it around the circumference and feel how comfortable it is, choose the width at your discretion. Decided on the sizes and cut them.
You also need to cut a rectangle for the bow; the width can be the same as the headband, and the length is about 1/3 of the length of the headband in two layers.
And a small rectangle or square to hold the bow and headband together.
I also recommend watching a selection of master classes “How to make bows from different materials”
How to make a large, lush, beautiful bow from ribbon, fabric and lace? How to properly make a bow from a wide, narrow and thin ribbon with your own hands? How to make a beautiful simple bow from nylon, paper ribbon and satin, grosgrain hair ribbon?
And the fifth idea, a headband with a wide bow that can be tied.
Pattern of a headband with a bow + master class
Diagram of how to tie a bow headband correctly
Source: https://bantomaniya.ru/master-klassy/povyazka-na-golovu
Twisted bow
To make an original lush bow, you should adhere to the following rules during production:
- Take several ribbons of the same length. Fold one to form crossed loops. Secure the ends at the bottom. Repeat this action with all ribbons. the more of them there are, the more magnificent the bow will be. To avoid chaos, you should not take more than 5 tapes.
- It is worth paying attention that twisted tapes will overlap one another. Each subsequent one should be smaller in size than the previous one.
- When everything is done, they need to be placed one inside the other and secured with a needle and thread.
- Wrap in the middle with a separate ribbon and secure at the back. Attach it to the hairpin either with the same ribbon that collects the bow in the middle, or place it on a glue dot.