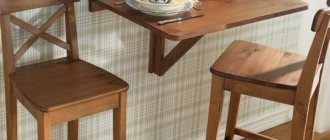
table for a sewing machine
Happy owners of sewing machines cannot always enjoy their happiness to the fullest. It gets boring every time you take the typewriter out of the closet and set it on a table - a dining table or a desk, well, if not on a coffee table. But don’t rush to buy a special table; this article clearly shows that it’s a sewing table with your own hands . Limited space or budget or lack of experience will not be a hindrance. Here are the most affordable, low-cost options for tables for a sewing machine , as well as several examples of how to make a cutting table . Having your own sewing corner in an apartment is the dream of every housewife, but in modern small-sized apartments such a dream is unlikely to be realized. This article offers solutions for small spaces and modest budgets. Moreover, the tables were not made by professionals; most of the authors are very far from carpentry. This means that you will also definitely find here exactly your version of a table for sewing equipment .
Original ideas for organizing workspace in the home
To date, based on the requests of people involved in creativity, a large number of cabinets for needlewomen have been created. Depending on the purpose, transformable cabinets and tables are designed. Such furniture can embody all the whims of needlewomen. Pull-out cabinets, shelves, folding doors, etc. can help systematize the placement of certain creative items.
The assembled craft cabinet occupies a small living space and does not spoil the aesthetic appearance of the room. This furniture can be transformed into a work area in a short time.
DIY transformable furniture: tips, drawings and assembly diagrams
The modern furniture market offers furniture of various styles to suit every taste and budget.
In the exhibition pavilions you can find luxurious, royal-like beds, armchairs, chests of drawers, which can be placed in a huge room. You can also find more modest, but tastefully decorated, elegant sets. There is also very simple and cheap furniture.
The transforming cube can serve as a bedside table, a table with poufs, an armchair and a full-fledged bed
A special feature is the transformer, which demonstrates extreme compactness, versatility of use and extreme simplicity. It fits perfectly into rooms decorated in a minimalist style and allows you to increase your living space, filling it with air and light.
A double bed in the living room will not take up much space during the day and will become a comfortable bed at night
Wall organizer
Those who sew professionally and have dozens of skeins available can make a wall organizer for spools of thread with their own hands. To do this you will need a sheet of plywood, a hammer, long nails, a baguette for decorating the frame, and paint.
The size depends on the number of threads. Cut a rectangle out of plywood, make markings on it, drawing a grid with cells whose size is slightly larger than the diameter of the coil. Using an awl or nail, make notches at the intersections of the lines, where the nails will subsequently be driven in. Make a frame from foam ceiling fillets or a baguette and insert a plywood blank into it.
Paint or decorate in any other way. You can decoupage or burn a picture. After this, drive in the nails. For best results, they should be positioned slightly at an angle to the base. In this case, the coils will not slip off and will be clearly visible.
At the back you need to attach a hook for hanging or other fastening system.
Filling
If you build or purchase a cabinet with built-in drawers, great. They can be small or large, with or without partitions inside. However, there is always a possibility that such a product may not be available for sale. If it is not possible to create such a product yourself, you can purchase a cabinet with regular shelves. In this case, the role of storage boxes can be played by boxes (for example, from shoes), plastic containers (glass can also be used, but they are too heavy), and bags.
To make maximum use of the useful area of the cabinet, it is necessary to calculate the height of its shelves so that you do not have to “store” air in it. This is still more convenient to do if you make it to order or yourself.
It is very convenient if the container where you are going to store consumables is transparent.
In this case, you won’t have to take it out again and check the contents. This way you will simply save your time. It is convenient to use tapes if they are placed on cylindrical elements that are located horizontally.
In order not to look for suitable containers for storing handicraft accessories, you can purchase them in the store . Today, stores offer a wide range of different containers, containers and entire storage modules that may well come in handy.
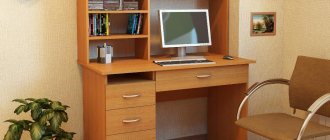
Craft table
Transformable furniture is great for a small apartment. For a needlewoman, it is important to have an organized work space. I like the handicraft table that folds out of the closet for its convenience and spaciousness. When unfolded, the table has the same capacity as a regular desk. It can be used for cutting and preparatory work before you start sewing. For seamstresses, it will be convenient to place a sewing machine or overlocker at the table. After all the work, you can easily put all the accessories back in their places.
An option when the machine and overlocker are on the shelf, it feels like everything is in its place. But a very excellent option would be if heavy machines could be pulled out or raised to the level of the table.
Suspension
A hanging table for needlework is a great idea, but you need to take into account the mounting height of such a table.
The needlework itself suggests that there will be a large number of small parts (needles, pins, buttons), it is important that they do not fall apart. To do this, the cabinet must hang at the level of the desktop, otherwise it will be uncomfortable to work at the table and everything will get in the way.
Standing separately
One of the types of cabinets for handicrafts is the “magic cabinet”, which is usually free-standing. For convenience, they are made with installed rollers, which allows this small sewing workshop to move when necessary. This work corner can be placed along the wall, but take into account how it will stand when opened.
Seamstresses, as mentioned above, have a lot of different sewing accessories. For the convenience of storing small accessories, you can buy ordinary plastic containers. These models also provide space for convenient storage of bobbins and larger spools of thread. An important element in a seamstress’s closet is good light and a convenient location of sockets.
Built-in
Compared to a free-standing cabinet, built-in furniture for handicrafts has a number of advantages. For example, it does not take up space in the room. If the doors are hinged, you can place sewing accessories, ribbons, laces, threads, etc. on them on the reverse side. With compartment doors, the work area is divided into two parts, this also has its own conveniences, the doors do not interfere, but at the same time it is necessary that everything necessary for work is accessible.
A built-in wardrobe looks very similar to a wardrobe, but it has many design features. The table can be used both sliding and folding. There are many ideas from needlewomen, everyone determines for themselves how it will be convenient. There are many master classes on forums where different experts share advice.
The main thing is the concept of a built-in wardrobe; you can answer a few questions for yourself; they will help you choose the right wardrobe:
- What will be the height of the shelves;
- Folding or built-in wardrobe;
- Dimensions of the machines and where to place them;
- Where will the threads be stored, will it be convenient to get them out?
- Where to hang the lamp;
- Where will it be convenient to place the sockets;
- Where to store fabrics.
Organization and storage of embroidery needles
It is important for needlewomen to organize and store needles - these irreplaceable helpers. As you know, embroidery needles come with both blunt and sharp tips.
A variety of needle beds are perfect for storing them, including improvised ones, as in the photo below:
And also branded and homemade, magnetic or just magnets.
Magnetic pincushion and magnet
Handmade needle beds
Each needlewoman should have several needle cases: for general storage and separately for embroidery processes.
MASTER CLASSES ON CREATING NEEDLE CASES WITH YOUR OWN HANDS
A variety of crooked pincushions are also great as handmade pincushions.
It is worth special mentioning the branded magnetic needle beds-tubes, which are especially indispensable for the embroidery process on the road.
Some needlewomen make similar needle cases in empty lipstick cases.
Pincushion tubes with magnet and rotating body from Prym
And here's an example of how you can organize and store spare needles.
A small organizer-container was used as a basis, the needles were sorted by size and labeled, stuck into cells with material from the packaging of computer components. Needles are also stored here in branded packaging.
How to care for needles
There are many ways and possibilities to keep needles suitable for work for a long time.
Devices for sharpening and polishing needles and special needle beds will help you cope with cleaning needles.
The tomato is a pincushion filled with soft material, and the berry is intended for cleaning and polishing the needles and is filled with the appropriate filler.
“Pomodoro” and “medallion” for polishing and cleaning needles
The well-known GOI paste (invented at the State Optical Institute, where it got its name) will also serve you as a good grinder and needle polisher.
A piece of GOI paste
Some needlewomen recommend using more inexpensive household items, such as old polishing nail files, to clean needles. Or regular dishwashing sponges (use the hard side of the sponge).
By organizing your floss threads and embroidery needles in one or more of the ways listed above, or in any other option convenient for you, you will not only put things in order in your needlework corner, but you can also easily maintain it in an attractive, neat aesthetic appearance and - most importantly - you will save your time more than once when searching for the right materials for your embroidery processes
The author of the article and photographs is Tatyana Pozhidaeva (Podsolnushek)
Bobbins for floss
Small but necessary helpers in organizing and storing floss are bobbins. It is on them that you need to rewind the threads for storage in container organizers.
Cardboard bobbins are significantly inferior in quality and durability to plastic ones, so they are best used for infrequent use, or as a one-time use for one separate embroidery process, or for storing leftover threads on them.
One bobbin is intended for one standard (8 m) skein of floss. A bobbin with thread from two skeins will take up more space in the organizer and is not so convenient to use: when pulling it out of the box or, conversely, placing it in a container, the “extra” threads cling to adjacent bobbins and slide off.
Plastic bobbins with thread from two skeins (8 m DMS floss and 20 m PNK floss)
From the video from Lelya Lee you will learn how to make exclusive bobbins in the form of pinkies with your own hands.
Oksana Dereza in her video gives a detailed comparison and review of organizers-containers and bobbins for floss from different manufacturers, indicating their advantages and disadvantages.
Device for winding floss onto bobbins
A bobbin thread winder is a great addition to your craft accessories. Using this device, threads are wound onto bobbins easily, quickly and accurately. These special devices are produced by different manufacturers and are relatively inexpensive, and their help is quite significant, including in the form of significant savings in precious time spent on rewinding threads from a skein.
Device for rewinding floss onto bobbins
The floss rewinder is easy to use, but let’s take a closer look at some of its operating points.
It is most convenient to mount the device on the side wall of a free cell of a container for storing floss.
The gap between the wall of the box and the device is somewhat large, so for the stability of the winder it is necessary to fill the space, for example, with a piece of cardboard, paper folded in several layers, or by placing three cardboard bobbins for floss there.
Having prepared the winder in this way, we insert a bobbin into a special hole, having previously pasted on it or signed by hand the number of the thread that we will wind, secure the bobbin with a pin, fasten the beginning of the thread in special slots on the bobbin and with pleasure, easily and quickly, rewind the threads from the skein onto the bobbin, we also fasten the end of the thread into the slot.
It happens that when winding quickly, the pin falls out of the hole, so it is recommended to initially insert it all the way and press it harder with your finger, as if securing it in place.
When winding floss onto a bobbin, it is more convenient if the skein of thread hangs from the table, unwinding under its own weight, guide the thread by hand and, if necessary, straighten the paste.
We do not pull the thread onto the bobbin tightly to avoid strong creases, although during the embroidery process with threads stored wound on bobbins, all creases on the floss are smoothed out.
If you want to show your imagination and immerse yourself in creativity, you can make a similar universal device with your own hands and an interesting video from Dunyasha Cross-stitch will help you with this.
https://youtube.com/watch?v=-4nTjZb1fVg
Stickers with thread numbers
Indicating the floss number is fundamentally important for proper storage and use. Everything here is extremely simple: some people prefer to use special branded stickers, others sign by hand, while others find it more convenient to use numbers from the skein labels cut out and glued to the reels.
One working moment on branded stickers. VHI in sets with such stickers, in addition to the square stickers with the indicated floss numbers, has blank sticker squares.
Stickers with numbers and blank squares
What are the blank sticker squares used for? You can write the numbers you need on them yourself!