Everyone likes pine cones. The love for this beneficial material begins in early childhood, in kindergarten, and is reinforced in elementary school during labor lessons. Adults, walking among the fir trees or pines, cannot resist the temptation not to pick up a cone or two and bring them home. Decor made from pine cones, a material gifted by nature, can be very varied in design, but it will always lift your spirits and make your home more comfortable.
Gifts are ready Source sxodim
What can be made from pine cones
Many people associate this material exclusively with crafts for children. With the same hedgehogs and bears that parents make every year for exhibitions in kindergarten and elementary school.
But, in fact, it is a universal material from which you can create amazingly beautiful interior decor elements. Atmospheric Christmas wreaths, baskets, decorations for the festive table and much more.
Preparing cones for work
It is better to collect material in mid-autumn or spring. The autumn harvest is suitable for crafts from unopened cones. And by spring they are fully ripe, freed from seeds and acquire a permanent shape.
The main difficulty in the work is that they need to be properly prepared. Otherwise, the source material and the product itself may be severely deformed.
Drying
Even if the cones look dry and open, otherwise the craft may not be successful, before use they must be dried in one of the following ways:
- natural drying. You can use wicker baskets or lattice boxes as containers. It is important that the container is not airtight and does not create a greenhouse effect. Lay paper (newspaper) at the bottom of the container, and then lay the prepared material. Closed young pine fruits are dried in one layer. Already opened specimens can be stacked in 3 tiers. The box is installed in a well-ventilated and dry place for 2-3 weeks;
- in a frying pan. In an open cast-iron frying pan, lay out the cones (in one layer) and, gradually turning them, dry them until they are completely cooked;
- roasting in the oven. The prepared material is laid out in even layers on a baking sheet lined with foil. The oven is heated to 250 degrees and the prepared raw materials are placed in it for 40-50 minutes. The oven door should remain ajar.
Some craftsmen recommend drying pine cone crafts in the microwave. This is the fastest way to evaporate moisture. At maximum power, it will take only one minute to dry completely. Before placing in the microwave, the pine cones are placed close to each other on a plate lined with a paper towel. To avoid unpleasant situations, the process must be controlled.
Treatment
Before drying, it is necessary to carry out processing, the choice of which depends on the purpose of the collected material:
- to get closed cones, before drying, they are dipped in wood glue or PVA for 30 seconds;
- To give the workpieces an unusual shape, the cones need to be kept in boiling water until elastic, and then shaped and secured with electrical tape or rope.
It is also recommended to treat the collected material against insects before use. To do this, prepare a solution of 6% vinegar: 1 glass of vinegar for 1 glass of water. The workpieces are kept in this solution for about 30 minutes and then dried.
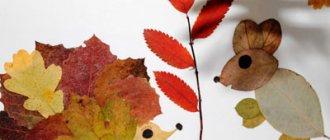
Leaf Man
This craft can be entrusted to children in the middle group of kindergarten. Four-year-old children already know the structure of the human body well and understand how to arrange details on a sheet of paper to create a beautiful applique of pine cones and leaves. In this work, a small cone or a cone cut in half is used as a nose. The remaining parts are assembled from leaves.
The rounded parts - the head and body - are assembled from poplar leaves. Elongated parts need to be selected for the legs and arms of the figure. To do this, you can look for the foliage of willow, ash, and walnut. For eyebrows, collect small acacia leaves. All parts are glued with PVA glue. It should be thick, not diluted with water, especially for pine cones.
Pine cone decoration
What could be more interesting for a child than Christmas tree decorations made with his own hands? Moreover, they can be made in a matter of minutes. For crafts, decorative elements, fir branches, artificial greenery, lace, mini-gifts, beads, etc. are used. You will also need paint, twine and hot glue.
The entire decor is attached to the base of the cone, which must be painted or covered with glitter in advance. Most often, golden or white paint is chosen for Christmas tree decorations. Along with the decor, a piece of twine folded in a loop or an open paperclip is attached.
Unusual flowers from pine cones
Every child can please his mother or teacher with a bouquet of bright and unusual autumn flowers. To create a craft you will need: straight twigs or brushwood, acrylic paint, brushes, green foamiran or colored paper, hot glue.
Leaves made of foamiran or colored paper are attached to the branches using glue, and then covered with green paint. The cones are painted in different colors and attached to the branches with the wide end using hot glue. The bouquet is ready, all that remains is to put it in a vase.
Support for flowers
For work we will need:
- cones;
- thin wire;
- plastic bottle;
- varnish
We begin to make the bottom of the vase by tying the cones with wire. First we wrap one cone, the central one, then we glue it to it and also wrap six more cones with wire.
We fasten the second row with the same wire, not forgetting to fasten the cones together with thermal glue for strength, attach them at a slight angle to the bottom, forming the walls of the vase, as in the photo.
Related article: Sliding crochet loop for beginners with diagrams and videos
We weave the third and subsequent rows and glue them perpendicular to the bottom, raising the walls of the vase upward to the height you want the vase to be.
If you want to give the vase the shape of a ball, then, starting from the 5th or 6th row, tighten the wire and add additional cones. For the very last row, it would be better to choose small cones and tie them together as tightly as possible with wire.
We place a cut bottle of water inside the finished vase, and place a beautiful bouquet in the water! The vase is ready!
Of course, if you don’t put an additional container of water in a vase of pine cones, it will be problematic to put fresh flowers in it. But for dried flowers or ornamental plants, such vases are perfect.
In addition, if you have a tin can or an unnecessary tall container that can serve as a vase or basket, you don’t have to throw it away; you can use hot glue and cones to give it an interesting look: cover the outside of the can with cones, add ribbons or twine, and the original vase is ready!
Small tree made of pine cones
You can make a beautiful indoor Christmas tree in a few minutes. For this craft you will need: cardboard, glue, paint, beads for decoration.
The cardboard is rolled into a cone and covered with paint or glitter. Subsequently, the cone is covered in a circle with cones in a random order. The main thing is not to leave large gaps and ensure the symmetry of the cone. You can decorate the finished spruce according to your own taste.
Most often, such beauties are decorated with beads on a string or beads are glued directly to the scales.
Christmas tree
Homemade miniature Christmas tree with pine cones
Another decoration for the New Year 2022 can be a homemade miniature Christmas tree. To make it, you will need the following materials:
- small pots for a stand;
- acrylic paint (preferably bright color);
- glue;
- large open pine cones;
- beads, ribbons and a small star for decoration;
- glitter glitter.
Paint the material with bright acrylic paint
The first step is painting the natural material. The most commonly used color is green, and glitter can be applied on top, it will add additional brightness. Next, after drying, you can start decorating. A red star is placed on the top, and beads and ribbons are glued to the blades.
Beads or ribbons are glued to the blades
Now you need a pre-prepared small pot or other item that can serve as a stand. If necessary, you can glue it to the pine cone so that the items are always together and not lost until the next New Year.
Such trees will look beautiful on a New Year's table, shelf or windowsill.
Big spruce
To make a large Christmas tree, you will need a lot of raw materials and a base in the form of a pointed cone.
To make a large Christmas tree, you will need a lot of raw materials of different sizes. First, you need to make a base in the form of a pointed cone out of paper.
The cones need to be glued in a circle, gradually moving from bottom to top. The higher, the less natural materials should hit. You can even hang a garland on such a craft and decorate it with rain.
Garland of cones
Do you want to create a truly New Year's atmosphere in your apartment with decorations in the popular Scandinavian style? Then you can safely make crafts from pine cones in the form of a garland. For this you will need: white acrylic paint, glitter, twine, hot glue, two brushes.
The blanks are coated with white acrylic paint. If desired, you can dust them with sparkles or choose other colors that match the interior. After the paint has dried, melted hot glue is dripped onto the base of the cone and attached to the twine.
What kind of decorations can you make?
This natural material can make the most spectacular decorations that will decorate your home for the New Year and give it comfort.
Decor of jars with flowers
They make excellent Christmas tree toys and individual elements. These could be balls, wreaths for the front door, candlesticks, small Christmas trees, vases or garlands.
New Year's bouquet for interior decoration
Each of the crafts is additional materials, so in the fall it’s worth taking care of this variety and collecting as many items as possible. Next, we will consider the most popular products that will bring maximum New Year's atmosphere and joy to your home.
Snowflake made of cones
The easiest way to decorate for Christmas that always looks stylish. To make this craft you will need: hot glue and decorative materials. The cones are glued together in a circle at the base. Lace and a finished wooden snowflake are glued into the center of the resulting circle. You can decorate the finished snowflake with paint, glitter, etc.
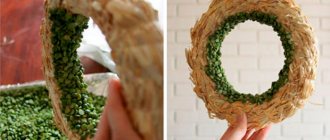
Christmas wreath made of pine cones
Creating a Christmas wreath with your own hands is not difficult. To create a craft, just cut out a ring of the desired diameter from thick cardboard and decorate it with pine cones. Before starting work, you need to clearly think through the design, determine the color scheme and set of decorative elements.
To create a wreath, lace, bunches of rowan berries, spruce branches, ready-made floral preparations, etc. are often used. You can give the wreath a more delicate and homely look with the help of light dyeing or decorating with sparkles.
Ball of cones
The ball is based on a foam blank, but the problem is that it cannot be pasted over. The foam will simply shrink. Therefore, to decorate the ball you will need: pliers, hot glue, copper wire, decorative paint.
A small piece of wire is inserted into the base of the cone and the area is glued for strength. The remaining “tail” of the wire is twisted clockwise to form a spiral. Then the workpiece is screwed in and the procedure is continued until the foam is completely hidden. You can paint the ball both before starting work and after, in the finished product.
Decorative candlestick made of pine cones
A fairly simple craft to make that can create the atmosphere of a real Christmas miracle. To implement the project you will need: a wooden cut of the required diameter, lace, paint or artificial snow, glue, spruce branches for decoration.
The cones are glued with hot glue along the edge of the wooden base, covered with paint (preferably through a sprayer) or snow, sprinkled with glitter (optional) and tied with lace. Additionally, the structure can be decorated with rowan berries, spruce branches, etc.
Candlestick for floating candles
Small vertical candle holders for floating candles can be made in a couple of minutes. To do this, take small wooden cuts, pliers, glue and decorative elements that match the general style.
Apply glue from a gun to the base of the cone and glue it to the cut. Use pliers to remove the middle and insert a candle in a metal candlestick there. Decorate the finished candlestick at your discretion.
Gift decor with pine cones
The wrapped gift can be decorated in a “winter” style. Attached to the arch is a composition of a spruce branch and one or two seeds, which traditionally decorates the top part of the presentation. The latter are pre-painted, sprinkled with glitter or decorated with cotton wool. Gather a mini-bun with a simple thread: it connects the “cuts” of the cones and the tip of the twig.
Complete the arrangement with a star or a shiny cardboard Christmas tree with the name of the gift recipient written on the back. The ribbon itself can be decorated with cones; they are simply glued to its ends.
In such a “bun”, miniature balls made of woolen threads will look original. They are pre-wrapped onto an airy “relative” coated with glue. Once dry, the ball is pierced and the residue is removed from the “wire frame.”
Making topiary from pine cones
What the topiary will be like is determined by the chosen foam blank. In addition, before starting work, you need to stock up on: a ceramic pot, a stick of the required length, floral foam, floral pins, hot melt glue, and decorative materials. Progress:
- a stick is placed in the center of the ceramic pot and secured with glue;
- the rest of the space is filled with floral foam;
- put a foam piece on the free end of the stick;
- Pins are glued to the base of each cone, and then they are strung on polystyrene foam, placing them tightly together.
Floral foam in a pot can be covered with moss or covered with decorative stones. The trunk and crown are painted as desired.
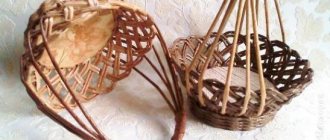
Basket of pine cones
A craft can be not only beautiful, but also useful. For example, a basket of pine cones assembled with wire and fishing line can be used as a fruit vase, and even carry small things in it. Such a basket will be especially in demand at the dacha. To make a durable basket you will need: pliers, scissors, fishing line, copper wire, needle. Progress:
- the cones are sorted, leaving the largest for the bottom, the smallest for the walls;
- the wire is passed between the scales and twisted;
- The next one is screwed as close as possible, trying to ensure that the scales cling in the form of a lock. Place the cone with the narrow side inward;
- the assembled chain is closed into a ring of the required size;
- the bottom ring will be small, the widest ring will be placed at the top;
- the twisted rows are connected to each other using fishing line and a needle, sewing the resulting blanks together.
After the base of the basket is assembled, a handle assembled according to the same principle is attached to it with wire. You can decorate the basket with lace, artificial leaves, flowers or berries.
The forest gives us enormous opportunities to express our creative potential. Just a little imagination, and unique things will begin to appear from scrap materials that you won’t be ashamed to keep for yourself or give to friends. In addition, children can be involved in all crafts with natural materials. After all, this activity brings joy to kids at every stage, from collecting material to the appearance of their first independent masterpieces.
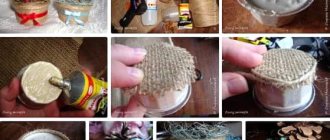
What you need
In order for the work to progress, you need to prepare for it. To create the decor, in addition to pine and fir cones, you will need the following materials:
- Glue. Carpentry is better, but for simple (and not heavy) crafts, PVA or silicone is suitable. Hot-melt adhesive is very easy to use - the pine cone can be carefully attached to any surface: wire, burlap, tape, glass.
- Gypsy needle, scissors, awl, tongs.
Preparing for work Source thesprucecrafts
- Strong threads, fishing line. You can take threads and cords used in scrapbooking for decorative finishing and as fastening material. They come in different textures and colors.
- Multi-colored glitter powder (sparkles, powder), decorative tape with ornaments - in the departments for creativity.
Hot melt adhesive is especially convenient to work with Source modernplace
- Rhinestones, beads, beads, sequins.
- Velvet and fiber (felt) paper, cardboard, pieces of polystyrene foam (packaging can be used).
- Artificial snow (loose and spray), cotton wool.
- Paints, aerosol and regular (with a brush), varnish with glitter.
- Optionally - wire, burlap, decorative ribbons and cords.
Applying glitter Source driedflowercraft
See also: Catalog of companies that specialize in the installation of fireplaces and stoves