For true connoisseurs, not a single meal goes without a glass of wine. This magical drink has long gained wild popularity and still has no plans to lose its position. But what to do when a large number of bottles of wine have accumulated at home, and there is nowhere to put them for a long time? There is an exit!
An original, home-made wine rack will not only add extra zest to the interior, but will also make your life much easier by freeing up a lot of space.
A wine rack is a functional element of your home, which can also be decorative.
All you need is a few elements: imagination, tools, a little free time and some money.
The following couple of ideas for homemade shelves will help you decide on the choice of design for your own, original, unique shelf.
The simplest option of all is a wine rack made of plastic pipes.
For this you will need:
- PVC pipes (with a diameter slightly larger than the diameter of the bottle);
- old bedside table.
Process:
We start by upgrading the old cabinet. In order for it to look attractive, you need to sand the edges of the bedside table and cover them with the color you like or just varnish.
Then we cut the pipes to the appropriate size. We treat the resulting “nests” for wine with acetone and also paint them in the color we like, but using paint sprayed from an aerosol can.
You can fasten the pipes using any available means: rope, tape, chain, glue and much more.
We make it with our own hands
To decorate your kitchen, you don't have to spend money on a new wine stand. This is an item that you can make yourself if you wish. The main thing is a little time, concentration and implementation of all steps gradually. Only through complex work can you get a great result. We will look at interesting options for wine stands that are easy to make with your own hands.
The simplest model of a corner holder
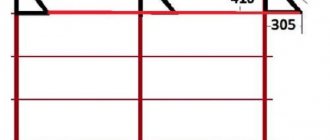
This stand is similar to the one that was presented earlier among design ideas. It captivates with its simplicity and practicality. To create it, just select a suitable wooden blank and cut out a corner-shaped figure from it according to the dimensions shown in the drawing below.
Important! A pen drill is used as a tool to create a hole with a diameter of 35 mm.
When cutting the product, it is important to leave a small allowance for the necessary sanding. The stand blank is polished, its upper corner is rounded. If desired, the finished product can be coated with wax, stain, varnish or oil.
Balancing stand
This interesting holder allows you to achieve the effect of a bottle floating in the air due to its horizontal position. Due to the simplicity of the design, it is easier to implement than the previous version of the stand.
For manufacturing, you will need a sanded piece of board with a thickness of 2 cm. The product must be cut to the dimensions given in the drawing and processed with sandpaper. Again, if desired, a finishing layer of varnish or paint is applied to the stand.
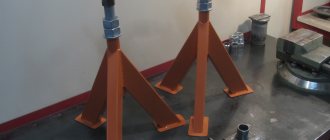
Balancing stand - half moon
Thanks to its unique geometric shape, this wine stand is capable of holding a bottle efficiently, without the risk of it falling. To make such a holder, you will need a blank measuring 260x140x48 mm. It is cut out using a jigsaw or band saw strictly to size, leaving an allowance for grinding. Using a feather drill, a hole with a diameter of 35 mm is drilled. Finishing includes finishing with sandpaper, applying varnish and, if desired, any engraving or paint design.
Oriental wine rack
This seemingly complex piece of kitchen furniture can be completed independently if you stick to the drawing and have a little experience in creating tenon products. The bottle stand is installed from standard elements, which makes it easier and faster to assemble the structure.
Advice! To make the product more impressive, you can use dark and light wood.
Wall mounted wooden holder
Such a stand, mounted on the wall, can accommodate a large number of bottles of wine, which is very convenient when wine in the house is not only a drink for large celebrations, but is also consumed at dinner.
Elegant hinged stand
For it you will need two plywood sheets measuring 26*38 cm, hinges, and a cord. And also be sure to prepare a ruler, a drill for holes, a pencil, sandpaper with a grit of 150. On sheets of plywood, you need to mark the places for holes for bottles in the amount of 12 pieces, and cut them out. The edges of each resulting hole must be carefully sanded.
After this, you need to install the hinges. It is better to take decorative items rather than massive ones so that the stand is elegant. For maximum stability, the holder is equipped with two loops. The last step is to attach the prepared cord to secure the stand in its intended position. To do this, a hole is drilled in each lower corner of the plywood sheets, through which a rope is threaded so that the free edge can be tied.
Metal stand
From the remaining parts of metal pipes and pieces of leather, you can make a unique stand that will delight you with its appearance and practicality. If there are no metal components, they can be replaced with wooden ones.
The stand can be of any shape that the master wishes. The parts can be connected using metal adapters or self-tapping screws if wood is used. The leather inserts themselves are fastened with decorative threads or staples.
Hook holder
From an ordinary board and several hooks you can make not only a clothes hanger, but also a unique-looking stand for wine bottles. The main thing in this idea is to creatively design the base board and choose interesting hooks.
Advice! Long nails can be used instead of hooks.
Forged coasters
If the craftsman has experience in forging or the product is ordered from a specialist in this matter, then the result will be an amazing thing that will take pride of place in the house. Moreover, this model of wine stand is suitable for both the kitchen and the living room.
There are a huge number of design options for such a holder, and they are not limited to any boundaries. At the hand of a blacksmith, a piece of metal can turn into a stylish bottle holder with sharp peaks, a vine with space for a bottle, a fancy flower, or any other image that the customer desires. What’s interesting is that this wine stand can even be painted to blend as harmoniously into the kitchen interior as possible.
Another way to create a simple shelf is a wine rack made from two crossed planks
For this you will need:
- Two identical wooden planks.
Next, we will consider two options for the location of such boards:
Letter "X"
To do this, you need to saw through each of the boards to the middle so that the width of the cut is equal to the width of the board.
Snake
This type of arrangement is suitable for rectangular structures. In this case, the planks are fastened together with glue using clamps.
This option for shelves is suitable for placing them independently, for example, on the wall, as separate furniture, as well as for placing them in existing furniture: You can create an entire mini-bar from a kitchen sideboard. To do this, however, you will have to sacrifice space inside ready-made cabinets, sideboards and other furniture modules.
Wall racks
Not everyone is lucky enough to have extra space for a built-in wine rack. However, everyone will definitely have a free wall. So why not use the empty space for a minibar? This project from Shanty 2 Chic was brought to life using a few pieces of wood and large hex screws. Light wear and marked title stickers give the shelf an elegant look, turning it into an antique piece.
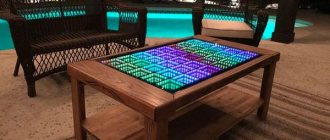
An unusual option is offered by the designers of Hart's Desire Photography. This wooden shelf allows you to store your drink at an angle of 45 degrees. It looks a little dangerous, but in fact, the design is very reliable!
If you prefer versatility and multifunctionality in everything, then the project from The Kurtz Corner is what you need! By attaching special threaded trays to a regular hanging box, you will accomplish two tasks. This will be a shelf for storing both wine and glasses.
Our next idea comes from Erin's Lane/Etsy. Everything is extremely simple: all you need is a massive wooden board and a few cast iron bolts from the railway. Combine all this and you have a rustic wine rack in your home! A quick but very stylish DIY project.
Another simple option for a wooden wine rack is a round shelf made of plywood sheets
For this you will need:
- Two sheets of thick plywood.
Process:
We take two sheets of plywood and make round holes in them in the same places. The diameter of these holes should be slightly larger than the diameter of the bottle itself - 10-12 cm. Then we fasten two plywoods at a distance of 15-20 cm from each other.
The holes can either be scattered across the entire area in chaos, or they can be arranged in any specific order. It's up to your discretion. Also, if desired, the shelf can be painted or some accessories can be added: additional carved elements, artificial fruits, etc.
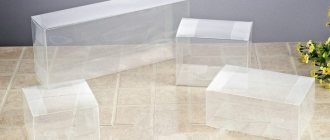
Miracles under the glass dome
If you still have one or several unnecessary glasses/glasses on the stem, you can make a very original candlestick. Turn the existing container upside down. Now its leg is on top - and it is on it that the candle will be installed. The bowl of the glass magically turned into a container for placing decor. Take a fairly thick piece of cardboard, draw a circle around the edges of the glass and cut it out. If desired, the “plug” can be painted or even painted. Now you can start the most interesting part - decorating. Degrease and rub the inside of the bowl well. You can place any small figurines, souvenirs and simply beautiful little things in it. These can be sea pebbles and shells, artificial flowers, multi-colored beads or buttons. Using this technique, you can make candlesticks from glasses for the New Year with your own hands. Just choose the decor you need - voluminous snowflakes, miniature Christmas trees, a Santa Claus figurine, or just a mountain of gifts.
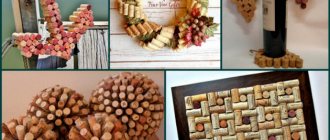
Bottle stand made from newspaper tubes
For this you will need:
- Newspapers;
- Ruler;
- Knife;
- Paints;
- Cardboard;
- skewers for mini kebab;
- PVA glue.
Process:
First we need to make newspaper tubes. We take kebab skewers and wrap pieces of newspaper pages around them. We make the edges of the stick with a bevel.
Next, we lay out the made newspaper tubes in a row so that they touch each other as tightly as possible. We evenly apply PVA glue to them and fix the tubes as accurately and efficiently as possible. We wait until the product dries.
The next step is to cut out polygons measuring 30mm*30mm*33mm*16mm. We glue the edges together and secure them with a folding clamp.
When the polygons are dry, you need to cut out a circle, the size of which should correspond to the size of the bottom of the stand.
We secure the bottom and, at the end of the work, coat the stand with wood varnish. Apply it in at least two layers. If you want to make the stand for your wine bottle brighter, you can paint it with acrylic paint.
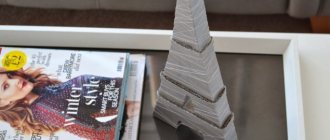
Christmas stand
Any girl (woman) can decorate the New Year's table with such an original homemade champagne stand. Moreover, no work experience is needed for this. And it is done very simply. The main thing is to buy materials for creativity. This stand is not made in the kanzashi style, but to make it you will need the material that needlewomen use to make flowers.
For the stand we need:
- Thick cardboard;
- Chinese white foamiran 1 mm thick;
- Blue glitter foamiran 2 mm thick;
- Pom-poms on ribbon;
- Single pompoms with a diameter of 1 cm – 5 pieces;
- Blue snowflake sequins with a diameter of 3 cm;
- Silver snowflake sequins with a diameter of 1.5 cm;
- 11 chameleon half beads with a diameter of 8 mm;
- 13 half chameleon beads with a diameter of 6 mm;
- Rhinestone silver tire.
Step-by-step description of the work:
1. Take a computer disk and trace it onto thick cardboard. Since my cardboard is about 5 mm thick, I draw and cut out another part (Photo 1).
2. I glue the two parts together using hot glue (you can use PVA). Then I cut out two circles from white foamiran. We make them, just in case, larger than a computer disk. Then we glue them on both sides and trim off the excess. We cut out a blue glitter strip about 12 mm high and about 40 cm long. Since the glitter sheet is 30*20 cm in size, we cut off a strip of 30 cm and 10 cm. Do not cut two strips of 20 cm!!! For the stand we need a piece of 30*4 cm, if we cut 2 by 20, then we won’t have enough for the stand itself (Photo 2).
3. Glue the blue stripes (Photo 3).
4. Now we will glue the pompoms onto the braid. Apply hot glue to the braid in small sections (Photo 4).
5. This is what the back side of the stand looks like (Photo 5).
6. Then glue the pom-poms on the front side (Photo 6).
7. We make a frame for champagne. Take a sheet of white 20*30 cm. We round the edges on both sides. You can fold the form in half and trim two corners at once. Glue a glitter strip measuring 30*4 cm to the bottom part (Photo 7).
8. Glue the two edges of the blue glitter together (Photo 8).
9. Apply hot glue to the bottom of the frame and glue it to the stand (Photo 9).
10. Trying on a bottle of champagne (Photo 10).
11. Now we continue to decorate the bottom of the stand. Glue another row of pompoms. Next, we cut out single strips and a double strip from the rhinestone tire. We glue the single ones in a circle and the double one - to the place where the two edges of the glitter foamiran are glued (Photo 11).
12. Glue blue and silver snowflakes all over the stand in a chaotic order. We glue half beads with a diameter of 8 mm into the center of large snowflakes, and 6 mm into small ones (Photo 12).
13. This is what our product looks like from all sides (Photos 13 and 13-1).
14. Decorate the central part with a bow. Draw a bow in the shape of a trident (Photo 14).
15. We transfer cardboard blanks to foamiran. We do this from the reverse side with a toothpick. Then we cut it out with nail scissors (Photo 15).
16. First glue the sides of the trident to the center, then the main one. We do the same on the other side (Photo 16).
17. To prevent the bow from merging, we draw another smaller blank from white foamiran. And a strip 5 cm long and 15 mm wide (Photo 17).
18. Glue all the parts together and our bow is ready (Photo 18).
19. Now we glue small single pom-poms (they will connect the two parts of the white fom and hide the junction) Photo 19.
20. All that remains is to glue the bow and our Winter stand is ready to decorate the New Year's table!
In order not to forget the address of the page and share with friends, add it to your social networks:
Do you want to know news about competitions or master classes?
Tags: Bottle decoration
Attention! It is better to write urgent questions in the comments on the website (form at the bottom of the page) or, better yet, directly by email. There are no notifications about comments from the VKontakte form! This form is more for feedback. 
Stand for wine bottles made from tin cans
For this you will need:
- glue;
- spray paint;
- fabric (so as not to smear everything around with paint);
- canning knife;
- cardboard;
- tin cans 8-12 pieces (absolutely any cans will do: peas, corn, beans, etc.).
Process:
First of all, we clean the jars of labels: soak them in warm water, as this will help remove the paper from the surface quickly and will not allow small shreds to remain. Next, dry the clean jars.
Then you need to cut out the bottom of the can, and process the sharp edges and bend them inside the can.
Place the jar on a stand and apply paint first to the inside and outside. When the jar is dry, start applying paint to the outer edges and leave to dry again.
The number of jars used depends on how many tiers in the stand you planned to make.
After all the jars have dried, we begin to assemble the structure. We make the first row and fasten the jars together with superglue. We fix this row with clothespins, glue the subsequent rows and let it dry.
Ready!
Wine rack
For this you will need:
- Sanded birch plywood sheet (1.5m*1.5m);
- Propylene black rope;
- Dowels (thickness −4mm);
- Sanding paper (120cm and 220cm);
- Acrylic impregnation for wood;
- Brush;
- Old laminate (for template).
Process:
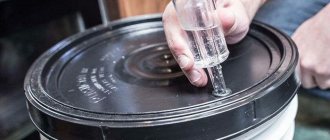
We cut the plywood lengthwise so that you get 5 vertical elements. Then we cut out a round hole with a diameter of 10-12 cm from a piece of old laminate, which we will use in the future as a template.
Using this template, we measure and draw circles on vertical sheets of plywood. Next, we make a hole inside each circle so that we can freely insert a jigsaw into it and then cut out holes for bottles with it. But it’s worth making these holes a little smaller than you originally drew.
Next, using a cutter, we bring the circles to the finished form, that is, we adjust them to your template.
The next step is to cut out the top and bottom covers of the shelf-rack and, again, using a cutter, make grooves so that their thickness is the same as the thickness of the plywood. This is necessary so that the vertical sheets fit into the grooves as tightly as possible.
After this, we make a 6mm rounding on all holes and edges of the parts using a router. At this stage, your wine rack is already starting to look like an almost finished product.
At this point in the process, you can give your imagination a reason to run wild. What can be done to prevent bottles from falling out? As an option - a mesh of rope on the holes in the outermost vertical wall.
We mark the holes, then drill holes where we will subsequently insert the rope and treat them with a sanding attachment so that the rope does not catch and does not break off pieces of the plywood sheet. We sand your almost finished product using a sanding machine.
Now you can paint the wine rack in the color you like along the grain with a regular brush.
To complete the process, we drill holes for dowels in the top and bottom covers, glue them in and in this way connect all the vertical and horizontal parts of the shelf-rack.
Let the glue dry. This will take at least a day. Then we lace up the holes in the back wall with rope, ribbon or whatever you like best. Your wine rack is ready! You can arrange the wine.
Questions and answers
What if I can’t?..
Don’t worry, the Internet is full of detailed instructions with photos and videos that will help you create a unique thing from scratch, even if you are a beginner!
What is better: buy or make it yourself?
If you are limited in time and not very limited in funds, then purchasing a ready-made option is important for you. If you want a unique thing with a touch of your own imagination, then make the thing yourself.
Does the material from which the shelf or rack is made matter?
Without a doubt! Not every resource can withstand the required weight and last for many years.
Does the choice of varnish for furniture matter?
It definitely does! A properly selected coating will extend its service life and will not spoil the appearance of the product over time.
I hope you found this article helpful with the tips you need to get started. I wish you success and the implementation of bold ideas!