How to make a crossbow with your own hands
In addition to the tools to create this small weapon, you will need a piece of wood measuring 900 mm in length and 30 mm in thickness. In this case it will do:
- yew;
- ash;
- hazel;
- poplar.
- oak;
- birch.
First of all, you need to prepare a wooden blank. To do this, cut the branch to the required size and paint over the cuts. This must be done so that the liquid comes out of the wood slowly and evenly. Please note that the wood must lie in a dark place for at least a year, only in this case the weapon will fire with special power. After this, the bark is removed from the workpiece and left to dry for another week. Next, the log is sawn into two parts and the crossbow itself is made from the northern part - the strongest.
Draw the stock of the weapon on the board and cut it out using a hacksaw or grinder, then make a small groove for arrows on the top of the workpiece. On the front side, cut a groove in which you will attach the arc. If knots or chips appear on the stock during the process, remove them with a knife and treat the area with sandpaper.
General description of the design
This type of weapon is designed to fire short arrows or bolts. Its advantages are compactness, noiselessness, and relative ease of manufacture. The latter is the main driving factor for making crossbows with your own hands. You don’t need a set of professional tools for this – it’s enough to have basic tools for woodworking and metal.
But before you make a crossbow with your own hands, you need to study its design:
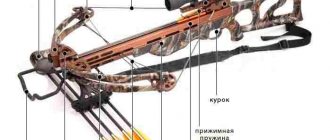
- Bed. All mechanisms and components are installed on it. It is made of hardwood, you can use a multi-layer base. The shape is as close as possible to a rifle, ensuring ease of holding and loading.
- The shoulders are needed to draw the bowstring. You can make a crossbow from a spring, but due to the strong tension force it will be inconvenient. In addition, its power will be higher than permitted. The shoulders are made of spring steel or ordered ready-made for a specific power rating. An alternative is to make a spring crossbow.
- Cross for attaching the shoulder. It is made of wood or steel, there is a mechanism for quickly dismantling the tension plates.
- The crossbow trigger locks the bowstring and releases it after the trigger is pressed. It is recommended to consider a safety mechanism.
- Tensioner. Necessary to bring the device into working condition. The mini crossbow is not equipped with a similar mechanism due to the weak drawing power.
It is important that the tension force does not exceed 43 kg. Crossbows higher than the specified value are prohibited in Russia
Which carbine is better to buy for hunting - an overview of options and tips for choosing
Scheme, or How to make a mini-crossbow from what you can easily find at home
- We take wooden skewers and cut off the sharp ends from them. After that we tie them together at the edges. This will be the crossbow bow.
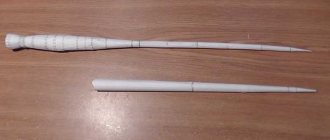
- We take a glazing bead and mark two segments on it equal to the length of the bow of our miniature weapon. Then we cut off these two parts and connect them together with tape. This is the crossbow stock. We wrap the onion with tape in front.
- After this, we pull the bowstring onto the crossbow.
- We pull it back and see at what distance to install the hook. They will use a clothespin, or rather, its spring and one half of the wooden part.
- We cut out the necessary grooves on the crossbow stock so that it replaces the missing part of the clothespin. Let's assemble our hook.
- The crossbow is ready, press the clothespin on top, thereby opening it, pull the string together with the arrow and clamp it. To shoot, press from above again.
We figured out how to make a mini crossbow, and now we can go further and create a weapon out of pencils.
Lesson #2
In this tutorial we will talk about how to make a mini crossbow from items that can be found in every home.
1. Boil water in a saucepan, then reduce the heat and place two wooden toothpicks into the hot water. Leave for 45 minutes.
2
After 45 minutes, carefully remove the toothpicks from the water, place them together and gently bend them so that they form a crescent shape. If you have clamps, secure the toothpicks in a bent shape and leave to dry
If you don’t have clamps on hand, you can simply glue the bent toothpicks to the cardboard using tape. Next, using tape, glue the toothpicks together - one above the other.
3. Fold 4 chopsticks as shown in the picture and wrap them with tape.
4. Cut a groove several centimeters deep and one toothpick wide.
5. Place toothpicks in the groove.
6. At a distance of about 7 mm from each end of the toothpicks, attach a string by wrapping it around the toothpicks and gluing it using a hot glue gun.
7. Measure a piece of fishing line equal to the distance between both ends of the toothpicks, and make a loop at each end. Apply hot glue to the ends of the toothpicks and place the loops on them.
8. Tape a clothespin to the chopsticks with the pinch end towards the stretched fishing line, and wrap this end with tape so that you can hardly press the opposite end of the clothespin.
9. Make arrows from toothpicks using paper fletching.
Crossbow made from rulers, sticks, old toy bow
It is not always possible for a master to have four pencils at hand at once. Then there are other options. For example, ordinary school rulers can serve as a good replacement for pencils. You can fasten them together with glue or even tighten them together with a screw and nut.
It may be difficult to attach the rubber band to launch the arrow. The craftsman will need to make cuts at the ends of the ruler, for which the elastic bands will be attached.
If you decide to use a sewing elastic band for starting, then you need to drill holes at the ends of the transverse ruler. It is easy to make holes in plastic rulers using a heated needle, awl or knitting needle.
Since you can make a home crossbow not only from pencils or rulers, you cannot help but think about other materials. For example, an old bow can also be transformed into a new toy. It is enough to attach a school ruler or double pencils perpendicularly to the middle of the bow. Next, the algorithm for making a crossbow repeats the one described above: a tube is attached, and a launching band is tied to the ends of the bow.
If you have to make a crossbow in nature, where there are no old toys, rulers, or pencils at hand, then even sticks carved from twigs can serve as material for the toy. The manufacturing algorithm exactly repeats the master class, which describes working on a crossbow made from pencils and rubber bands.
Drawing of the guide and trigger mechanism of the crossbow:
A crossbow sight must consist of a rear sight and a front sight. You can also install an optical sight on the crossbow, providing a mount for the aiming bar. Vertical adjustments are made entirely, mounted on the cover of the trigger mechanism, and horizontal ones - with a front sight mounted on the bracket of the elastic element.
There can be many design options for sights and sighting devices for a crossbow, depending on the possibility of manufacturing, the availability of ready-made sights from conventional weapons (air rifles), etc.
It should be borne in mind that the flight path of a crossbow arrow (crossbow bolt) is quite high, so the rear sight must be installed significantly higher than the front sight. The angle of elevation of the aiming line depends on the weight of the arrow, the tension of the string, the shooting distance, etc. In our crossbow at a distance of 50 m it is approximately 6°.
Convenient are the designs of the rear sight, which allow it to be removed or folded during transportation. It will also be convenient if the rear sight can be adjusted manually by raising or lowering the bar. Thus, you will be able to target the crossbow under different conditions (distance to target, weight of the arrow).
The crossbow, the manufacture of which is described above, is designed for shooting bolts with a diameter of 8 mm and a length of 450-470 mm. You can easily make them yourself from a duralumin tube with a wall thickness of 0.5 mm. The tip and liner are attached to the bolt in front, and the feathering is attached to the back, just as they do for archery. It should be borne in mind that the shank of a bolt for a crossbow, unlike an arrow for a bow, should not have a cutout for the bowstring; it should be flat. It can be carved from wood in the form of a cork and inserted into the end of the tube, having previously been lubricated with glue.
Crossbow decor
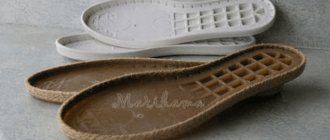
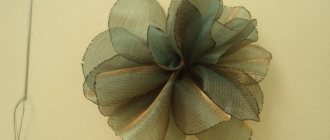
Particular creativity will be given by covering the finished crossbow with a layer of salted dough - then there is the possibility of applying a relief ornament on top of the coating. The product will become very beautiful if beads, rhinestones, and beautiful buttons are used in the decor. Of course, in this case you should let the toy lie until the dough dries completely.
The dough for the coating is quite easy to make, just mix equal parts by weight of fine salt and plain flour (no additives). Gradually adding water to the mixture, the dough must be thoroughly kneaded. The consistency of the mass should resemble stiff dumpling dough.
It is best to let the product dry in the open air or in a warm place, for example, on a heating radiator. Of course, this will take some time. But after the coating has hardened, the master can paint the toy, covering it with paint, paint the product with silver or gold paint, applying a beautiful ornament.
If the decor is made using plasticine, then it is possible to make the crossbow as similar to the real one as possible. However, the decor of the finished product will then not be so stable, and if handled carelessly, it may be subject to some damage.
Making a bowstring
You need to take a board and insert pegs 1 cm thick. They should protrude 3 cm. From one to the other, we wind a nylon thread in a circle. When the thickness of all the threads is approximately 5 mm, you need, without removing them from the pegs, to wrap this skein once in a circle so that all the threads are tightly wound. After this, near the peg, we collect the two halves of the bowstring with our fingers and wrap it again, but much tighter, until the next peg. So, we will get a bowstring with two loops. A diagram on how to make a crossbow will help you understand everything. Everything is very clear on it.
Crossbow string, what is a crossbow string made of at the factory and what material should be used?
To make crossbow strings I use natural and synthetic materials. It can be natural rawhide, nylon, nylon, lavsan, Kevlar, fast-fit, dacron and even propylene with winding.
Bowstring manufacturers do not hide what they make a crossbow bowstring from; in addition, you can buy the same materials and weave it yourself. These are usually special bowstring threads, for example, CY 452X and BCY Formula 8125. The only difference between the bowstring that comes with a crossbow and a homemade one is the quality of workmanship, because factories use special machines and devices.
photo. crossbow string
Making a crossbow string
To make a bowstring for a crossbow, you will need a special device, as in the photo below. It is a wooden strip with a longitudinal slot where you can fix a threaded rod at the required distance. Attached to the other side of the plank is a plywood V piece with two rods.
If it is not possible to make such a device, you can simply drive two nails into a wooden block at the required distance.
Take the string thread and wrap it from nail to nail in a circle
It is important to tension the thread well and evenly. After about 8 turns have been made, cut the thread and tie it with the other edge in a counter knot.
Move the knot closer to the center of the bowstring and burn the edge of the thread with a lighter. The manufacture of the base for the crossbow string is completed, you can begin winding the bowstring.
How to make an arc
For this part you will need a flat board with a length of at least 750 mm, a width of 200 mm, and a thickness of 60 mm. We dry the workpiece well and let it stand for several days, and level it. The width of the part in the middle is 40 cm, and at the edges it narrows to 15 cm.
At a distance of 100 mm from the cut groove for this part, we create a through hole through which we stretch the rope - it will become the main fastener for the crossbow arc. Then we insert the part into the groove and fasten it firmly with a rope, as shown in the bottom figure.
Create a crossbow from pencils
To do this you need to take:
- Four pencils.
- Seven rubber bands.
- Ballpoint pen body.
- Scotch.
Shall we get started?
- First you need to take pencils and connect them two at a time. You can use rubber bands or tape. This will be the bow and crossbow stock.
- In the front part of the bed we wrap the bow from below.
- On top of the stock we tape the body from the handle, this will be a guide for the arrow. It can be made from the shaft of the same pen.
- Now we put one elastic band on the ends of the bow, and tie their edges with thread or tape to make a solid bowstring. Now we grab the bowstring with the inserted arrow, launch it into the guide from the handle body and release it.
Here's how to make a crossbow out of pencils that shoots great.
Safety precautions
Particular attention should be paid to crossbow arrows. Ready-made arrows with a rubber tip from toy bows are best suited for this purpose. Although you can use used pen ball refills. The main thing is to make sure that the guys do not take sharp objects to use as arrows.
It is also necessary to explain to the children that they should never shoot at people or animals, so as not to injure them, even if non-sharp objects are used as arrows: getting into the eye or temple can be fraught with major troubles.
Moreover, children should also be explained the fact that it is impossible not only to shoot at living beings, but also to simply aim at them from any type of weapon. There is always a chance that the hand will tremble and the shot will occur against the shooter’s desire.