The apron has long and firmly entered into people's everyday life. Not a single housewife can do without it. It is needed at work and at home to protect clothes from stains. And in some cases, even parts of the body from harmful effects (in the X-ray room or in laboratories).
In factories, all kinds of aprons are sewn, but for domestic needs (for the kitchen and garden) it is quite possible to sew this item yourself.
What types of aprons are there?
If we list them by purpose, then we can conditionally divide products into the following types:
- kitchen household;
- medical protective;
- for work in production (including with chemicals);
- special or corporate (for waiters, kitchen workers, salespeople, hairdressers, cleaners).
By appearance they are divided into the following:
- breast aprons (cut or one-piece);
- aprons (without bib);
- Japanese sundresses with straps;
- vests.
Chest models and products without a bib can be made with different hem shapes.
Mom is calm, the child is happy...
So, what exactly is a children’s apron for creativity? How is it different from a regular apron, and what is its purpose? This accessory is designed to serve as a reliable barrier between the child’s clothes and the art materials with which he works. Aprons vary in structure:
The main feature of a product intended for working with paints, clay or plasticine is the material it is made from. In specialized stores, sellers offer various waterproof children's aprons for creativity made from raincoat fabric or from rubberized or oilcloth fabric. But it is not at all necessary to buy it, especially since the price for one such product is quite impressive. An apron for creativity with sleeves (for children) and Velcro fastening on the back will cost about 600 rubles, simpler models on average cost 250-350 rubles.
Drawing class for a child
A student needs protective clothing for art school or labor lessons in general education - an apron. It is absolutely easy to sew.
You can use a ready-made template pattern, or you can make your own drawing.
To work you will need:
- any suitable fabric (cotton, chintz, calico, satin, denim) - 1 sq. meter;
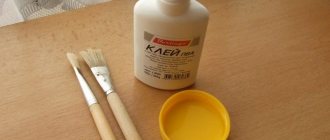
- a piece of soap or chalk;
- sharp scissors;
- bias tape - 2 meters;
- measuring (centimeter) tape;
- sewing machine (or needle and thread to match the fabric for hand sewing).
Manufacturing stages:
- The cutting is done directly on the fabric or first on paper, and then transferred.
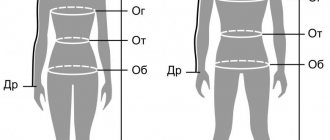
- Using a soft “centimeter” measure the length of the entire product, hem and bib.
- The width of the bib should be approximately 1/4 of the width of the skirt.
- The fabric is folded in half and the measurements taken are drawn with chalk (soap), taking into account the folded material.
- Therefore, if the width of the bodice is 16 cm, and the waist is 40 cm, then measure 8 cm and 20 cm from the fold line accordingly (measurements for a child 6-10 years old).
- Connect the outer edge of the bib with the outer edge of the hem with a curved smooth line (if it’s difficult, then first draw a diagonal from the center of the waist line up and put a dot, and then connect the three dots).
- On the contrary, the hem is formed using a semicircle.
- Cut the workpiece along the marked lines.
- Cut two long sections of 25 cm from the fabric for ties or make them from binding (stitching).
- For convenience, the ties can be made with Velcro, then they will be shorter (you need to measure them).
- They begin to sew on the trim from the binding. Work begins at the top edge of the hem, where the tie will be located. But first, they leave the binding (25 cm) in free “flight” (that is, they retreat from the edge and sew it to the fabric only after 25 cm). If there are no sewing skills, then the binding is first basted, and at the end of the work these threads are removed.
- Hem with an edge seam in the direction of the bib.
- When reaching the top, leave the binding (20 cm) unsewn. This will be a strap to put on your head.
- And again they are hemmed down to the waist. Cut again with an allowance of 25 cm (or less, it all depends on individual measurements).
- Sew the binding at the top and sides.
- Now all that remains is to process the skirt.
- If desired, sew on a rectangular pocket. It can also be edged with trim. Or just fold the edges and sew.
The apron for classes is ready. To go with it, a set of the same fabric is used to sew sleeves with elastic bands and a headscarf (for girls).
A simple pattern for arm ruffles
The amount of material depends on the size of your child. Let's say the circumference of the forearm (the widest part of the arm) is 20 cm. You need to multiply it by 2 and add 2 cm for the allowance. The total width of the future pattern is 42 cm.
The length is determined just as easily - you just need to measure the length of your arm by applying a measuring tape to your wrist and extending it to the middle of your forearm. Then add 3 cm to the free bend of the arm and 4 cm to form the drawstring for the elastic bands. On average, 45 cm is enough. It turns out to be a pattern of two rectangles with side lengths of 42 * 45 cm. This means that in total you need a piece of fabric measuring 84 * 45 cm.
That's all - the pattern is ready! Before sewing sleeves for labor, you need to transfer it to fabric.
Sewing will not be difficult even for those who do needlework very rarely.
For gardening
An old raincoat will make a wonderful apron.
How to do it:
- The sleeves, collar and front are cut off from the jacket.
- Fold the fabric in half.
- Draw the outline of the apron with chalk and cut it off with scissors. If bias tape is not used, allowance is left for folding the edges.
- Finish the edges.
- To sew the ties, cut 50-60 cm of ribbon 4-5 cm wide from the front side of the raincoat (vertically) and 40-45 cm for the top strap through which the head will be inserted.
- Sew the double ribbons together along the edges from the wrong sides and turn them out through the hole left. It is folded and stitched.
- Fix the ties to the apron.
- A pocket or pockets are sewn at the bottom for a cell phone or small items.
Instead of ties, they use old belts or leatherette belts that have lost their original appearance. But with a tight belt, working “bent over” in the garden will probably not be very comfortable.
Arm sleeves with cuff
Children are often very picky; they love convenience and comfort. Therefore, rough seams really bother them and spoil their mood. This can be easily avoided if you create arm ruffles without a bottom elastic band by simply sewing on the cuff. In this option, another rectangular piece is cut out of fabric, having a width of about 6-7 cm and a length equal to the circumference of the wrist plus 4 cm (in our case - 14 cm + 4 cm = 18 cm).
This part is folded lengthwise in the middle with the wrong side out, the edges are stitched. Then everything is turned inside out and carefully sewn to the bottom of the sleeve. A loop is cut on one side and stitched - either by machine or by hand. A button is sewn to the other side of the cuff.
That's all - comfortable armbands for creativity are ready!
For my husband's garage
Men love to tinker with their car in the garage or do some carpentry work at home. Therefore, clothes after garage training are often very dirty.
You can partially solve the problem if you sew protective equipment for your husband in the form of an apron with your own hands. For work, take a dense, coarser fabric.
Cut out either a whole canvas or a cut of two squares. The height is approximately 100-107, and the width is 100-109 centimeters. The straps are sewn. Cover the edges with bias tape.
They sew many pockets at the bottom of the hem so that small tools can be stored in them: screwdrivers, tape measures, etc. My husband will really like it: everything will be at hand in an apron.
Japanese for homework
An apron in the Japanese style of a sundress looks very beautiful and looks like an element of clothing. For work, take any suitable fabric - 1.5 - 2 meters.
Sew this way:
- They are trimmed with bias tape or overcast, or folded over a rectangular piece of fabric. The size should be such that when worn, the apron reaches the knees (take measurements in advance). And the fabric wrapped almost completely around the waist.
- Two shoulder straps are sewn from the same fabric. They are sewn on the front, like a sundress, and on the back diagonally, sweeping towards the edges.
In essence, it turns out to be a sundress, but not sewn at the back. It is convenient to work in such aprons. They are long and protect clothing well. In addition, they are also very stylish.
If desired, a long horizontal pocket, single or with compartments, is sewn on the front.
More ideas
Very original aprons are made from ordinary women's large square scarves. They are arranged in a diamond shape, and the top corner is cut off. They are trimmed with bias tape of a suitable color and the strap and ties are made from it.
Now there are a lot of interesting models of this simple, but necessary in everyday use, item of clothing on sale. But if at home you have everything you need for your own tailoring, then why not? Such things are always closer to the body and heart than store-bought ones.