Step-by-step making of papercraft dolphin from paper for beginners
Step 1. Print the blanks on a printer and number all the parts. If there is no numbering on the diagrams, do it yourself, relying on a computer model. This will save time in the future, especially when assembling large structures.
The solid line in the diagram indicates the location of the cut, the dotted line indicates the inner fold (on models without texture), and on textured models the outer fold. Dash-and-dotted is the opposite: with textured ones inward, without texture - outward.
Cut out carefully, leaving margins for gluing, thanks to which the individual parts of the model will fit together.
Step 2. All folds are worked out in detail along the dotted lines. On the outside, glue is applied to the bent strip or double-sided tape is applied. When working with the latter you should be extremely careful. If glue is used, each connection is allowed to dry thoroughly and only then proceed to attaching the next element. Make sure that all joints match perfectly, since the appearance of the finished product depends on this.
When connecting internal elements through a small hole, tweezers are used (relevant in the final stages). Do not forget to insert several spacers inside the structure, because volumetric modeling does not provide for the presence of a frame, and paper, as you know, tends to crumple even under weak force.
In the event that the entire structure is made from whatman paper, but some parts need to be painted in the desired color, use thick gouache.
Step 3. The finished model is pasted onto the canvas (on the wall), placed on a stand, or hung.
Video of the finished 3D model:
Video tutorial on how to make a dolphin from Minecraft for beginners:
Examples of models and developments for them
Small dolphins assembled according to a simple pattern
Unwrapping of a small dolphin.
Killer whale.
Ream to whale/killer whale
Dolphin 3D.
Development of a 3D dolphin (indicating the fields for gluing).
Plasticine dolphin: main stages of modeling
The main color in the proposed craft will be blue. It is from this that we will first roll the ball.
Then we stretch this blank a little, narrowing it on both sides and forming the characteristic outlines of the dolphin, its elongated muzzle. You will get this base for the body of a dolphin.
Next we will add the fins. First we will mold the dorsal fin, it will have the shape of a triangle. We fix this fin on top, and carefully smooth the junction.
See also: Crafts from plasticine: TOP step-by-step works.
In a similar way, that is, in the form of two triangles, we first sculpt the side fins, and then attach them to the dolphin.
Finally, the tail needs to be sculpted and added. The blue plasticine base is ready. In principle, the blank is already quite a ready-made dolphin. But, you can give the craft an even more beautiful and complete look.
For this we need white plasticine. We will use it to form the animal's abdomen. Roll out a sausage from plasticine, the length of which is equal to the distance from the nose to the beginning of the tail. Then flatten it and stick it to the lower part of the body.
All that remains is to make the eyes. To do this, you will need to take a couple of pieces of white and black plasticine. That's it, the plasticine dolphin is completely ready.
Source
Master class on the topic: how to sew a dolphin from felt with your own hands
To work you will need:
- blue and light blue felt
- thin blue thread
- needle
- stuffing material
- two black beads
- scissors
Print or redraw the dolphin pattern. Cut out its details. Using a pattern, we cut out the dolphin parts from felt without seam allowances.
- Part No. 1 – made of blue felt – 1 pc.
- Part No. 2 – blue felt – 1 pc.
- Part No. 3 – blue felt – 2 pcs. in a mirror image.
We will sew a dolphin from felt. Felt is an excellent material for making toys with your own hands. It is not necessary to use this exact blue-blue combination; for work you can use felt in other colors - purple, gray, dark green. The main thing is to choose contrasting colors. If you don't have felt, you can use fleece or fabric.
Choose the size of the dolphin as you wish. The length of my dolphin was 9 cm.
We sew two parts No. 3 of the blue felt back of the dolphin together using an overcast stitch, as shown in the photo:
We sew the muzzle to the resulting back of the dolphin - part No. 2 from the inside with a seam “over the edge”.
We sew the dolphin’s belly from blue felt with an overcast stitch – part No. 1. We leave enough unstitched space on the dolphin’s side to stuff it.
We stuff the dolphin with stuffing material and sew up the hole. As a material for stuffing a dolphin, you can use synthetic polyester or cotton wool.
Sew on the dolphin's eyes using black beads.
This is the final felt dolphin toy:
If you enlarge the dolphin pattern several times, you can sew a pillow with your own hands in the shape of a dolphin, which will perfectly complement the summer interior.
Author - Nadezhda Bogomolova especially for the Samoshveyk website
We sew a gift for a friend with our own hands
We increase the template to the required size (we used a factor of 1.6)
We transfer the Dolphin pattern onto the fabric. Mark the location of the fins. Pay attention to the number of elements : 2 dolphin body parts (blue fabric), 1 abdomen (white), 2 pairs of blue fins and 1 pair of white ones . The tail of the toy pillow also consists of two parts: the upper blue and the lower white.
We sweep away the fins of the dolphin cushion: one fin is completely blue and 2 are blue on one side and white on the other.
Filling the dolphin balancer with solder
Before filling with solder, in the place where the dolphin balancer is attached to the fishing line, I punch a hole in the thin-walled shell, insert the tinned ends of the fastening loop, bend them from the inside to the sides, and wrap the loop around the outside with thread, eliminating the gap between the hole and the loop.
I place the homemade balancer blank into the recess of a wooden block (Fig. 3), insert the tinned shank of the hook into the cavity and secure it, slightly driving the tip into the end of the block.
(Don’t forget to pierce a hole in the wood with a narrow screwdriver so that the fastening loop is recessed into the block before filling the crown with solder)
I lubricate the inside of the homemade balancer shell with flux containing acid, and fill the cavity in the dolphin crown with molten lead, babbitt or other solder. As it cools, I form a bulge along the entire length of the cavity.
After pouring, the outer surface of the dolphin balancer is processed with a file and polished. The blade is painted black with nitro enamel.
(If any of the fishermen do not quite understand the explanations of the author of the invention regarding filling the dolphin balancer with solder, I can offer my method of filling the crowns of sheer lures with solder to help.)
Manufacturing materials
To produce corner sofas equipped with a dolphin mechanism, different materials are used. The frame is made from natural wood, chipboard, MDF. Various fillers are used: padding polyester, latex, spring block and others. The most popular upholstery options are leather, tapestry, cotton, jacquard. Each has its own characteristics that must be taken into account when choosing.
Elegant Chester sofas - configurations, sizes, design features
Frame
High-quality soft sofas are based on durable frames. Hardwoods are used to make them: oak, beech, walnut, ash. Structures made from these materials are characterized by increased strength and long service life. Inexpensive furniture is made from birch and pine, which are less stable and can crack over time. Laminated chipboard and MDF are used to create side panels. The priority is laminated veneer lumber, which retains its original shape longer compared to tile materials.
Experts do not recommend using corner sofas with a frame made of chipboard. The material may contain harmful substances hazardous to human health.
Models with a metal frame are characterized by high performance properties. The structures are durable, strong, and not afraid of fire. The only drawback is the heavy weight, which negatively affects the practicality of the product.
Oak Beech Walnut Ash Birch Pine laminated chipboard MDF Glued laminated timber
Filler
Modern manufacturers use a variety of fillers for upholstered furniture. The most widespread are sofas with the “dolphin” mechanism with the following “filling” options:
The convenience, comfort and safety of furniture depends on the correct choice of filler. It is for this reason that you need to check with the seller what material the “filling” of the sofa you like is made of.
Coconut tow Hollow fiber Latex Furniture foam rubber Sintepon Sintepuh Spring block
Upholstery
The lifespan and practicality of furniture with a dolphin mechanism largely depends on the upholstery. The most popular materials are:
The best models of sofas for the living room in a modern style, selection criteria
The appearance of the Dolphin corner sofa depends on the quality of the upholstery. The texture and design of the coating should fit harmoniously into the interior of the room. When choosing, it is necessary to take into account the regularity of use of furniture, the purpose of the room: children's room, bedroom, living room.
Cotton Tapestry Jacquard Flock Genuine leather Faux leather
Making a cute dolphin from clay
Summer has flown by. It's time to do something that will remind you of this wonderful time. I want to save a piece of the warm sea and sun. A small dolphin, I think, would be suitable for this. If you already have experience working with clay, good. If not, don't worry. The master class is simple, you can make it together with your children. We will need a small lump of clay, a rolling pin, a smoothing iron, a piece of fabric, a pencil, a brush, a piece of paper and inspiration.
Let's make a sketch of our dolphin.
We make it a little wider, since it will narrow during the sculpting process.
Before starting work, lay a thick cloth on the table, fold it in half and preferably put on an apron. Clay is not a completely clean matter. Roll out the layer to approximately 7 mm thick.
We apply our dolphin blank and trace it on top with a pencil, pressing a little so that an imprint remains on the clay. We only outline the carcass. We'll do the fins, tail and everything else later.
Using the sharp end of the trowel, cut along the contour of the workpiece.
Now in each part we push the middle with our thumb to get volume. When making the second half, make sure that it mirrors the first and fits in size. You need to act quickly and carefully so that the clay does not dry out and tears form. This is how the halves turned out.
Before joining the halves, we make notches on the clay with the sharp edge of a trowel and lubricate it with slurry, here it plays the role of glue. Zhizhel is clay diluted with water to the state of sour cream.
Now we connect the halves. First we close the seams, as when making dumplings - one edge to the other with a pigtail, and then smooth it out. The result was a hollow blank.
It's time for the details. Cut out the muzzle, fins and tail. And connect it to the carcass. Don't forget to make notches and lubricate with liquid.
We smooth out the joints, achieving integrity. In the process, the tail and fins were reduced.
After that all that remains is to add the eyes and draw a smile.
Don't forget to make holes. They are necessary so that during firing the product does not tear and the thread can be inserted in the future. It is advisable to first find the center of gravity of the dolphin and make holes there. I have this place near the upper fin.
Now you need to put it in a dry place, without drafts, for three or four days to dry. Afterwards you can go over the uneven areas with sandpaper. We fire it in a muffle furnace to give it strength.
This is what happened in the end.
You can leave it like this, but I decided to decorate it using acrylic paints. First I primed it with white, and then let my imagination lead me.
Thank you for your attention to my master class. Source
Source
Master class Soft toy Dolphin
Continuing the theme of handmade toys, I want to show how you can quickly sew a soft Dolphin toy, which is also a rattle. Based on it, you can sew an entire Underwater Kingdom. To make such a toy you don’t need much experience (for example, I don’t have it either), all the details can be easily drawn, as they say “by eye.”
To make it, we will need: the remains of blue and dark blue fabric, pillow filling and a container from shoe covers or from Kinder Surprise, in which you need to put a few beads or seed beads.
From blue fabric we cut out a belly 23cm long and 8cm wide (the widest part of the width of the belly), the width of the tail and nose is 3cm each. From blue fabric we cut out 2 identical curved parts of the body, 23 cm long and 9 cm wide, tapering towards the tail, the width of the tail and nose is 2.5 cm. Also, from blue fabric we cut out 2 identical parts of the tail 7x6 cm, the narrowing of the tail is 4.5 cm. And 6 parts for three fins 8x6x5.5cm.
We connect the corresponding parts together: 3 fins (6 parts), tail (2 parts), belly (1 part) and torso (2 parts).
From the wrong side we sew each piece separately. We do not sew the sides of the fins and tail that we will sew to the body, and we do not sew the torso and belly in the places where the fins and tail will be sewn.
We stuff the fins and tail with filler and sew the rest of their parts together. Then we sew on the fins, gradually filling the body with filler.
We insert a rattle container into the middle of the body and fill the rest of the body with filler. Sew on the tail.
We embroider the eyes and mouth with black thread. The dolphin is ready.
Source
Step-by-step photo lesson:
First, fold the paper in half so that the ends meet. Let's reveal.
Create the basic “Kite” shape. To do this, bend the side corners to the central fold.
Turn over and bend the corners on the other side.
Fold the sheet in half. Let's expand. We get a horizontal fold.
On the right side, bend the side and bend the middle with your fingers.
This should be done on the left side as well.
Turn it over. Fold the top tip of the craft down to the center fold line.
And then up a little.
Let's go back one stage. We bend the side corners.
We bend the large upper triangle up again, and the small tip down.
Fold the craft in half.
We will make a fin from the side triangle, bending it slightly at an angle.
Turn over and bend the upper fin.
Now we will make the tip of the body, namely the fins. To do this, first bend in one direction, then in the opposite direction.
Let's straighten out the craft. Using scissors, make a cut in the middle to the fold. Bend the fins upward.
We bend the rear fin downwards at a slight angle.
So a wonderful craft is ready - a dolphin made of paper using the origami technique.
Origami animals. Dolphin. Master class with step-by-step photos
There are many models of sea creatures made from paper using the origami technique. In my master classes, I already showed you how to make a crab and a turtle out of paper. In this master class I will tell you how to make a dolphin out of paper . Folding the dolphin is quite simple and does not take long, so you can involve children in the process.
Every child will be pleased to make a beautiful dolphin with their own hands and put it on a shelf in their room. Such a craft will be especially relevant after a holiday at sea, because looking at it, you will remember the beach, the sea, and perhaps the dolphinarium that you visited.
Well, now I’ll show you the whole process of folding this paper figure.
To create a dolphin using the origami technique, we will need a square of blue paper.
Let's start folding. First we make the basic “kite” shape.
Fold the basic kite shape on the opposite side.
Next, we bend such a triangle on each side.
We turn it over and bend our figure in half. Both corners should face to the left.
And now we bend these corners along the intended line.
Further on the left corner we must bend the lower part by about 1/3.
Now we insert the bent strip inside our workpiece.
Then we unbend our work, the folds are ready.
Next we bend the upper corner towards the center of the workpiece.
Origami fish instructions
If you've ever wondered how to make a paper fish with your kids, then you'll find this simple origami craft so much fun! The first step is to fold the paper in half. Then fold one of the corners in the middle of the folded paper. After that, open this part and fold it in the middle so that the two extreme corners are on the outside. Repeat this for the other side. You should end up with a triangular shape folded inwards. Now fold the outer ends into a rectangular fish shape. Cut off the middle part of the bottom triangle - look at the lines to determine the shape. Turn it over and the paper fish is ready! It is so simple!
Photo source: www.kiddiefoodies.com/crafts/simple-origami-for-kids-how-to-make-a-paper-fish
Tropical origami fish
Do you like little tropical fish? If you like it, here is an example of how to fold an origami paper model of an exotic fish. Lay out the double square. Take both sides of the top layer and fold them together until they meet in the middle, then unfold them, then fold the left and right sides inward. Fold the top triangle down. Well, what follows is mostly repetition, we won’t reproduce the entire instructions here, you can read it on the website. Or maybe you won't need it. Just look at the step by step photos below.
Photo source: www.origami-tutorial.com/origami-tropical-fish.html
Light origami fish
This simple origami fish model resembles a tropical fish.
See the master class below in the step-by-step photos.
Photo source: shemi-origami.ru.91-224-23-226.listkom.ru/130-origami-ryba-iz-bumagi.html
Origami koi fish
Learn how to make a traditional origami koi fish in this step-by-step tutorial. To keep you informed, this is what they call decorative brocade carp in Japan. This is a domesticated fish that is bred through selective breeding and is believed by some to bring good luck. This traditional origami koi fish starts with a square base, allowing for a 3D model to be made. The petal folding method is used here. The petal fold is used to transform a square base into a bird base, although it can be used for other shapes as well. Consists of an upper horizontal valley fold, two lower triangular mountain folds and two flat folds at the edges.
Photo source: www.origami-make.org/origami-fish-traditional-koi.php
Below you can also see step-by-step photos of how to fold a koi fish from colored paper.
The same basic origami folds are used here.
Photo source: origamka.ru/origami/zhivotnye/247-rybka-koi-iz-cvetnoy-bumagi.html
Method number 2. Video tutorials
You can, of course, do without reference lines and figures, if you have well-developed spatial thinking, you know how to set proportions, and your hand is full:
Video taken from the YouTube channel “Learning to Draw”
With this drawing technique, in your first attempts, an eraser will become your best friend. Draw without pressure to easily correct inaccuracies.
Video taken from the YouTube channel “Yulia Eroshenko”
An even lighter drawing of an almost cartoonish dolphin.
Origami animals: choose and act
Chanterelles in three versions
From the simplest to the slightly more complex. Even kids can make a wonderful sly fox and enjoy the result of their actions. Older children will also not be bored, since you can complicate the task a little and make the fox in a more complex way.
Read more: origami fox
Paper elephant
There are many ways to make a paper elephant. This one is the simplest, despite the fact that it consists of two parts. Minimum actions, absence of complex and lengthy stages.
Read more: origami elephant
A dog in a simple way for children
There are many variations of origami dogs. This one is perfect for kids. The dog consists of two parts - the head and the body. After simple steps in their creation, the parts are glued together.
Read more: origami dog for children
Dog for school children
This method is more complicated than the previous one. There are a lot of actions, there are important moments that are incomprehensible to small children
It is important to follow the step-by-step explanation exactly, and then everything will definitely work out in the best possible way.
Read more: origami dog
Children's version of the bunny
Children will definitely like this cute bunny. It is made up of two paper squares - a head and a torso separately. Afterwards they need to be glued together. Not a difficult job at all. You can verify this by following the link to the step-by-step review.
Read more: origami bunny
Children's version of the rabbit
The rabbit is not in its entirety, but only its head. Despite this, it looks nice and bright. A good origami option for young children. Often such a rabbit is related to the theme of Easter crafts.
Read more: origami rabbit for children
Origami animals – kitten
Scheme for children. As you can see, many children's origami consists of two parts. This makes the work much easier. For children, this technique is easy and interesting.
Read more: origami kitten
Origami hedgehog
This hedgehog will be made from one square piece of paper. A few simple steps and the job is ready. A review with photos is attached.
Read more: origami hedgehog
Modular hedgehog
Origami with modules is an adult activity; children cannot do it. But this 7-piece hedgehog is very simple, a great option for children.
Read more: origami hedgehog made of 7 modules
Simple mouse
Work for children and beginners. A minimum of simple steps. In just 3-4 folds you will get such a cute character.
Read more: origami mouse for children
Pig – 1st option
A more complex way of folding a pig, especially some of its parts - the snout and tail. Otherwise, everything is simple and clear.
Read more: origami pig
Piglet - option 2
An easy way to create a pig, ideal for children. Even the smallest children can make the head of this paper animal. Torso - optional.
Read more: origami pig
Origami bears in 3 versions
There are different ways to choose from folding bears using the origami technique. The methods are all for children, for children of different ages.
Read more: origami bear
Master class on the application “Inhabitants of the seas and oceans. Dolphin"
Alla Yurievna Kotova
Master class on the application “Inhabitants of the seas and oceans. Dolphin"
I bring to your attention a master class on applique , today on World Whale and Dolphin we will make a composition with a dolphin . For work we will need the following material : blue cardboard for the background of the application , colored paper in dark blue, blue and light blue, two shades of yellow paper, white, felt-tip pens , scissors and glue.
Let's start making the details of our applique . From blue paper of different shades, cut out random wavy lines - these will be waves on the sea .
From dark blue paper we cut out the dolphin and the lower fin .
From white paper we cut out the lower part of the dolphin's , eyes and seagulls.
Take two shades of yellow paper and cut out a sun-circle and rays.
All the parts are cut out, let's start gluing them. We start by gluing the waves, the first strip is the darkest.
The next stripe is a little lighter.
We retreat a little from the second strip and glue the third.
The seascape is ready, now we glue the dolphin and the lower fin .
Add small details: glue the lower part of the dolphin’s body at the bottom - a white stripe and an eye .
At the top, to the right of the dolphin, glue the sun , first a circle with rays, and on top a circle of the sun.
Glue the seagulls and use a black felt-tip pen to draw the pupil of the dolphin .
Our application is ready ! THANK YOU FOR YOUR ATTENTION!
Children's master class “Inhabitants of the seas and oceans” Do you know that catfish are weightless in the blue sea. Do you know that a whale glides easily through the waves. And the sea holds huge ships without difficulty! A. Photo report “Inhabitants of the seas and oceans” Today I want to share with you games and our works on the topic “Inhabitants of the seas and oceans” Jellyfish (Children put their palms together, spread them apart. Photo report on the modeling lesson “Inhabitants of the seas and oceans” in the senior group Photo report of the lesson on modeling in the senior group "Inhabitants of the seas and oceans" Purpose of the lesson: expanding the horizons of children and ideas about the inhabitants. Summary of the drawing lesson in the senior group "Inhabitants of the seas and oceans" Topic: "Inhabitants of the seas and oceans" in the senior group Objectives: continue to introduce children with sea animals, some representatives (whale,. Modeling from plasticine in the middle group on the topic “Inhabitants of the seas and oceans.” Purpose of the classes. Environmental education. Formation of ecological ideas about the inhabitants in middle preschool children.
Source
Craft. DIY cat made of cardboard and colored paper step by step with photo
Cats have lived next to humans for thousands of years. But to this day she remains a largely mysterious creature. At different times, in different countries they treated it differently. In ancient Egypt, the cat was idolized and given various honors. Accidental killing of cats was punishable by a heavy fine. If the cat died, it was mourned and showered with gifts - in the form of dried mice. This was done because the Egyptians believed that in the other world a person or animal continued to live. In Europe in the Middle Ages, cats were persecuted because... They believed that the devil had settled in her. Black cats were especially unlucky: they were believed to bring bad luck into the house. Russian merchants had a tradition of competing with each other not with wallets, but with cats. The winner was the one whose cat was fatter and fatter.
Material: cardboard colored paper scissors simple pencil felt-tip pens ruler glue - pencil
We take A4 colored cardboard (thick colored paper is fine) and cut off a strip 7 centimeters wide from it. The length I got was 30 centimeters (sometimes cardboard is slightly smaller than A4).
We work from the wrong side of the strip (if the paper or cardboard is single-sided). Fold the strip in half and iron the fold line. Unfold the strip.
We connect the right edge of the strip to the middle. Smooth the fold line with your finger. We do the same on the left side of the strip.
Using fold lines, I divided the strip into four equal parts.
We work with the last part, cut it into three equal strips along our large strip. The middle stripe will be the tail.
On the second part on the left, we draw the cat’s paws with a felt-tip pen (if the cardboard is glossy, it’s better to draw with a permanent marker).
I'm making the body of a cat. I spread glue on two small strips (front side): the first and third. I use pencil glue ErichKrause, as it firmly glues the cardboard. I glue the strips to the first part from the inside, making a triangle.
I round the corners of the tail by cutting them off with scissors.
I cut out a head and ears from cardboard.
I cut out the middle of the cat's ears and nose from pink paper.
I glued the middle of the ears, then glued the ears to the head.
I glue the nose. I cut out eyes from white paper (diameter approximately 1.8 centimeters). I draw the pupils of the eyes with a felt-tip pen and glue the eyes.
I draw a mustache and a cat’s mouth with a felt-tip pen. I glue the head to the body. The cat is ready.
Vasya is a cat. And Vasya - me. Dad is also Vasya... Mom laughs cheerfully: - There is KOTOVASIA in the house! As usual, on Saturday - Two Vasilys at work... Household chores - bustle! Where is the third? No cat! Washing, ironing and cleaning - Like a sled, like going down a hill... The kitchen smells like pizza... We need to refresh ourselves! We were invited to lunch... Whether you run or not, THIS always happens: THE CAT comes first! Vasya is a cat. And Vasya - me. Dad is also Vasya... Every time we get THIS CAT! Vladimir Bardanov
We recommend watching:
DIY corrugated cardboard toys. Cat Talking origami faces step by step with photos. Cat How to knit a kitten Soft toy Kitten with your own hands. Patterns. Master class with photos
DIY cat toy
Spectacular pictures with dolphins
For a panel with a mammal, prepare the basic materials:
- cut strips of two colors (for body and water)
- scissors
- glue
- ampoule, awl or special tool for wrapping
Auxiliary items will be useful:
- thick cardboard or fiberboard
- pins
- bobby pins
We will fix the outline on the sheet with pins for gluing the blanks. With the help of hairpins, the place where the strip is glued is clamped in order to fix it more reliably while it sets. We fix the long strip into a droplet.
We fix the outline on the background.
Twist a loose spiral for the tail. All parts are made from a piece cut in half along the long side of A4.
Give it the shape of “eyes”.
The lower fin is an equilateral triangle.
The top one consists of a twist in the form of an isosceles triangle. Glue them to the outline.
We make the nose of a mammal from a strip cut in half.
We cut off the excess and correct the look with our fingers.
We make lines for filling the body and waves like this: take a long strip and an awl. We finish with a loose curl. We retreat from it (to the distance you need).
We begin to twist away from ourselves. To get a different look, change the side of the work, the distance between the curls.
We glue everything into the necessary parts of the product.
Start of production
Let's start making a beautiful origami cat with its face, the most interesting thing is that it can turn out to be anything: mischievous, wise, kind, serious.
Note!
- Origami tank: step-by-step description and simple manufacturing instructions. 125 photos and video master class
- How to make an origami car - step-by-step instructions for assembling a simple car, Cadillac, retro cars. 60 photos of cars using papercraft technique
- How to make an origami owl? The symbol of wisdom made of paper is a three-dimensional owl, modular. Master class on folding origami owls for beginners
- Mark a 15 cm square on each side using a pencil.
- Cut with scissors.
- For symmetry, the central line is extremely important; we form it by folding opposite corners on top of each other, on one side and the other.
- Let's turn the scarf upside down. We fold the corners on the right and left again, making ears. It turns out something like a crown, all three corners are raised up and stick out.
- We bend the middle one - we get a muzzle. Carefully secure all the elements and draw the eyes, nose and mouth of the kitten. There are a lot of cool things in the craft store, like animal eyes that you can use.
Volumetric models
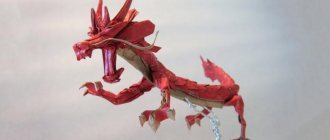
An origami paper dolphin based on Joe Nakashima's design looks original. The model is also based on the basic “Bird” form, but it is much more complex than the previous one. The master tried to present the assembly process in detail in diagrams, so repeating his figure will not be difficult:
Another three-dimensional origami dolphin was designed by Jun Maekawa. The detailed folding process is presented in the video tutorial.
How to make a dolphin from paper and cardboard
The word papercraft itself means craft paper. Beginners should be patient; complex models can take up to 20 hours or more to assemble.
Papercraft dolphin
Before doing volumetric modeling of large structures, install appropriate programs on the computer that allow you to examine in detail and, if necessary, edit ready-made developments. This will simplify the work and allow you to see the gluing lines in 2D format.
Prepare the workplace: place a small sheet of plywood on a flat surface, on which all the details will subsequently be cut out. This approach will avoid damage to the furniture and will help you carefully work out the fold lines. If you are used to working with a stationery knife, when cutting, apply a ruler to the cutting area.
Three-dimensional model on the wall
Materials and tools for work
- A4 paper with a density of 170-200 g/m2 or sheets of Whatman paper (for geometric modeling). To produce modules, sheets of double-sided colored paper of the “intensive” class of the same format, intended for office equipment, are sufficient. Density 70-80 g/m2. Color – light blue (blue) and white. Sets of colored coated paper are suitable for applications. It has a bright, rich palette.
- Developments and diagrams
- Glue or narrow double-sided tape
- Brush
- Needle for applying glue to hard-to-reach places and small parts
- Scissors or utility knife
- Board for cutting blanks
- Ruler for creating clear folds
- Tweezers
Application for children “Funny dolphins”
The work, made from cardboard and colored paper, will not require special skills during the manufacturing process and will not cause difficulties. For preschool children, it is worth preparing dolphin templates in advance; for older children, they will be able to prepare everything they need on their own.
Required materials and tools:
Step-by-step description of the work progress:
It is worth noting that the right combination of colors will allow your work to look special.
Adjusting the tilt of the dolphin balancer
To check the angle of inclination, a fishing line is tied to a homemade balancer. In a suspended position, the “dolphin” balancer is inclined at an angle of 40-60° to the horizontal plane.
To stabilize the wiring, I would abandon the winding ring shown in the image, and tie the balancer to the fishing line using one of the non-tightening knots.
Before catching perch in real fishing conditions, I hang the finished balancer and test it in the bathroom (approximately as shown in the video Trajectories of wiring balancers with side blades).
You can adjust the angle of inclination of the longitudinal axis of a homemade balancer by removing part of the solder from the head or tail end of the bait. The angle of inclination in the transverse plane can be changed by bending the loop to one of the sides of the balancer.
All that remains is to explain how to catch perch while fishing with a horizontal bait like a dolphin balancer.
How to draw dolphin fins
Step 1
Draw a curve ending in a tiny circle on the dolphin's back. It should start approximately in the middle of the body.
Step 2
Draw a curved line from the circle to the back.
Step 3
Attach an upside down "t" to the tail.
Step 4
In the fin area, draw an inverted heart.
Step 5
Draw two small circles below the "T".
Step 6
Outline the shape suggested by the guide lines.
Step 7
Use a curve ending in an oval to find the ideal location for the pectoral fin.
Step 8
Another curve with a circle will create part of the outline for the fin.
Step 9
The fin is slightly wider than its base. Define this width using an additional curve.
Step 10
Now you can outline the entire fin.
Step 11
Origami turtle
Turtles are probably one of the most interesting paper crafts that can be made using the origami technique. Look at this example, it seems that the shell consists of several layers, it may seem that the craft will require a ton of paper, but this is not the case. Just one sheet of paper. How to make a paper turtle with your own hands using the origami technique, see step-by-step photos in the master class. The craft actually looks very cool.
Photo source: shemi-origami.ru.91-224-23-226.listkom.ru/204-origami-cherepaha-svoimi-rukami.html
Origami turtle diagram
This diagram shows how to make a simple origami turtle. Fold the paper in half and open it to the right. Apply the squash and turn the paper over. Open the paper to the left and use the squash again. Fold the sides along the dotted lines and unfold. Then fold from top to bottom along the dotted line and unfold. Lift the top layer of paper along the crease at the top. Fold the petal lengthwise into a basic fold. Make a cut along the top flap to the start of the dotted lines. Then open both sides. Make an outer reverse fold along the dotted lines and fold the top pieces of paper. Fold the sides and bottom, then the bottom back, making a crease. Turn the paper over.
Photo source: origami.me/turtle/
Simple paper turtle
Although this origami turtle looks quite complete, it is surprisingly easy to fold with your own hands. Nice looking turtles usually require complex folding techniques, and simple models, although easier to fold, usually don't look very presentable. This origami turtle strikes with the perfect combination of ease of manufacture and aesthetic appearance.
Photo source: www.origamiway.com/origami-turtle.shtml
How to make an origami turtle
Using this pattern, you can fold a cute origami paper turtle with your own hands. First you will need to use horizontal and vertical Z-folds. Then you will apply the fold pattern to create the structure. To fold this model you will need 28 steps. If you do not have enough experience, use a sheet of paper 20 cm x 20 cm for this model. Simply, the smaller the paper size, the more difficult it is to fold the origami figure. If you are familiar with this model, you may want to try a smaller paper size.
Photo source: www.origami-make.org/origami-turtle.php
DIY paper turtle
This origami sea turtle is an easy project for beginners. Children aged six years and older can fold this model with a little help. To make an origami turtle, you will need one square sheet of paper. You can use paper that is colored on one side and white on the other, or cut any sheet to size. If the paper is only colored on one side, start with the colored side of the paper facing down. How to make a paper turtle with your own hands is shown below in step-by-step photos.
Dolphin using the technique of broken (mosaic) applique
Mosaic applique, also known as broken applique - what is it and how to work with it? We'll talk about this today. As an example, we will consider the broken applique “Dolphin”, which is simple to perform, even for very young children. The work is designed for several days, at the end of each of them you can tell the children about the next stage, so that they maintain constant interest and look forward to continuing the lessons.
Due to the different financial situation of their parents, not all children of three to six years old who attend kindergarten are able to visit the sea by the age of their age. But thanks to the information available on TV, the Internet or children's books, almost everyone is familiar with sea creatures.
And the top spot on their list is, of course, held by such cute, playful and friendly creatures as dolphins. Therefore, drawing them, coloring them, or dealing with their images in some other way is a real pleasure for a child.
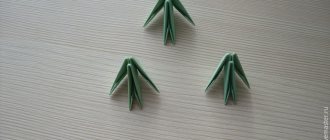
Dolphin made using modular origami technique
To make such an incomparable souvenir from paper, you will need to be patient and have some free time. All this will be required for the manufacture of blanks (triangular modules).
Making triangular modules is easy, following the detailed instructions:
- Fold the sheet in half (lengthwise).
- Bend across to mark the fold line and straighten.
- Fold the edge to the middle.
- Turn the part over and fold the lower parts up:
- Fold the small corners over the large triangle.
- Unfold the corners and the folded bottom.
- Fold the small corners again along the marked lines and lift the lower part.
- Fold in half.
The resulting module has two pockets into which the corners of other modules are inserted. This way you can make any three-dimensional shapes.
To make a dolphin, you need to make 1087 pieces (851 blue and 236 white). After the required number of modules has been prepared, you can begin assembling the origami dolphin in rows, increasing the number of modules in each subsequent row and forming the dolphin’s head (step 1 in the photo diagram). Next we make the tail and fins (step 2). We glue ready-made plastic eyes on the sides, attach the fins and tail. For easy storage of the figurine, you can insert a wooden skewer into the bottom.
The dolphin is now ready to set sail!
Origami dolphin for children
Prepare a square sheet of blue paper, a marker, some white paper, and a glue stick.
Step-by-step instruction:
- Fold the sheet in half diagonally.
- Expand. Fold adjacent sides towards the center line.
- Expand. Fold opposite sides in the same way.
- Unfold the folds and fold the sheet in half diagonally so that the folds from steps 2 and 3 are directed towards the central corner.
- Fold the workpiece along the marked fold lines in the form of an elongated diamond. The protruding triangles will become fins.
- Turn the workpiece over.
- Fold the right corner towards the center.
- Fold the corner to the right, forming a 0.5 cm fold.
- Fold the corner to the left to the previous fold.
- Fold the workpiece lengthwise into the valley.
- Fold one fin in half.
- Turn the workpiece over. Bend the other fin up and smooth it out.
- Turn the workpiece over.
- Curl your tail up.
- Cut the folded part in half.
- Form the folds of the tail.
- Glue a white circle in place of the eye and draw a pupil with a black marker.
At birth, the pod gives the dolphin a specific name, to which it then responds.
Did it work? Yes No
DIY dolphin from plastic bottles
—Categories
- SEWING (478)
- pillows, seats, curtains (116)
- handbags, cosmetic bags (71)
- sewing wisdom (32)
- patchwork (32)
- alterations (19)
- caps, panama hats, hats (10)
- interesting ideas (26)
- clothes (219)
- New Year's (117)
- in the garden or in the vegetable garden (70)
- video (56)
- favorite artists (4)
- isothread (1)
- KNITTING (747)
- knitting: jackets, pullovers, blouses (127)
- motifs, patterns (79)
- Knitting. Children's (76)
- knitting: dress, cardigans, jackets (26)
- crochet napkins (17)
- crochet: jackets, blouses (14)
- knitting magazines (10)
- hats, berets (97)
- crochet: tops, bolero (73)
- knitting: tops, sleeveless vests, bolero (49)
- slippers, socks (68)
- knitting school (41)
- EVERYTHING FOR YOUR DIARY (73)
- lessons on LiR (19)
- frames (19)
- backgrounds (5)
- thanks, comments (29)
- IDEAS FOR THE HOME, FOR THE Cottage (156)
- home economics (27)
- Flowers (41)
- interesting (29)
- COMPUTER FOR KETTLE (60)
- programs (20)
- photoshop (9)
- search engines, website promotion (5)
- online photo editor (5)
- sweets (19)
- BEAUTY, HEALTH (141)
- for yourself beloved (52)
- health recipes, traditional medicine (94)
- CULINARY RECIPES (448)
- fish dishes (31)
- multicooker (4)
- dessert (4)
- blanks for future use (45)
- snacks, salads (96)
- drinks (18)
- holiday dishes (57)
- sauces (6)
- meat dishes (49)
- vegetable dishes (26)
- baked goods (127)
- hot dishes (3)
- scrapbooking (186)
- about spirituality (12)
- HANDCRAFTS (1059)
- candy bouquets (115)
- boxes (50)
- scrapbooking. inscriptions, backgrounds, tags (47)
- embroidery (37)
- coffee crafts (36)
- Kanzashi (30)
- present. wedding (29)
- DIY crafts (28)
- decoupage pictures (24)
- Pergamano (21)
- paper art (6)
- felt crafts (2)
- felting (2)
- paper art (56)
- decoupage (159)
- dolls (77)
- master class (56)
- my crafts (37)
- DIY soap (6)
- DIY gifts (75)
- bead crafts (11)
- dot decouage (55)
- stencils (62)
- ribbon decorations (85)
- gift wrapping (35)
- poems (65)
- photo (4)
- HUMOR (59)
- aphorisms (17)
- my catmatrix (28)
Origami shark
You will need: colored paper, black marker, scissors.
Master Class
- Take a square of construction paper and fold it in half, connecting opposite corners to form a triangle.
- Fold the sides into the center as shown in the image.
- Connect the bottom tip to the top, then press the fold.
- Straighten and make a cut from corner to fold.
- Turn the workpiece over and bend the bottom corner.
- Check the folding is correct: straighten the workpiece and find 2 parallel folds in the center, then fold the corner back.
- Fold the piece in half, following the transverse fold.
- Pick up the tail with your finger and straighten it outward, then bend the sides, folding the tail in half.
- Bend one part of the ponytail to the side and reach the cut corner to the center.
- Turn the blank over and draw the shark's face.
The origami shark is ready! I recommend watching this video!
How to make a PIRANHA fish out of paper
Watch this video on YouTube
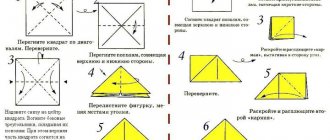
Origami "Dolphin"
To work on folding a dolphin figurine, you will need a very simple set of materials: a square sheet of blue paper and a black marker.
The step-by-step folding of the figurine is shown in the photo:
In order to better understand the scheme, we offer a detailed description of all folding stages:
The figurine is ready! Several of these dolphins of different sizes and shades can be hung on a thread from the cornice. When the window is open, the figures will move, as if floating on the waves.