Master class “Old Forest Man”
Tatyana Ovchinnikova
Master class “Old Forest Man”
Plastic bottles are no longer garbage, but a material for making various crafts. Vases , dishes, designer jewelry and much more from disposable containers
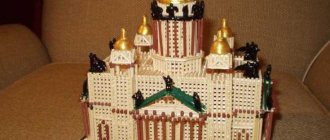
I bring to your attention a master class on making the Old Man forester .
Plastic bottle (volume 2 liters)
.You can take the volume that is convenient for you.
Fabric (burlap, drape, felt, etc.)
Various needs (cones, acorns, leaves, ribbons, eyes, etc.)
We cover the bottle with tights, cut off the excess and tie it in a knot. We thread the wire through the holes made in advance.
We form “handles” and cover them with tights.
We sew sleeves, separately, for mobility.
Legs - slippers, flip flops can be made from fur, the base is cardboard, glued to the base.
Next, we sew a shirt and glue it to the base for reliability.
Glue on the beard and eyes (I used ready-made ones, but you can use buttons)
.
We make hair by cutting the fabric into fringes. Hat made of cardboard, covered with fabric.
We are starting to decorate our Lesovichka, but here they say it’s a matter of taste.
The toy is light and quite stable.
You can also make other toys.
GCD summary for designing from natural material “The Old Little Forester in a Forest Clearing” in the preparatory group GCD summary for designing from natural material “The Old Little Forester in a Forest Clearing” in the preparatory group GCD form: joint.
Summary of a lesson on cognitive development in the middle group "Old Man-Lesovichok" Summary of a lesson on cognitive development in the middle group "Old Man-Lesovichok". Educator: Fukalova T.V. Objectives: 1. Consolidate knowledge of households.
Summary of a lesson on familiarizing children with the outside world with children of the junior group “Lesovichok” Summary of a lesson on introducing children to the world around them with children of the junior group “Lesovichok” Educator: Malakhova A. V. Purpose: Expand.
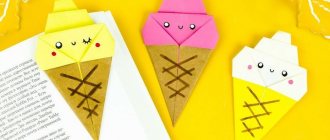
Master class Origami “Ladybug” For older children it is necessary to master the origami technique: it develops the accuracy of finger movements.
Tools for work
In addition to forest raw materials, to perform artistic work you will need auxiliary tools, the most commonly used of which are:
- scissors - must have blunt ends for the safety of children;
- an awl or a large needle - a tool made of durable material is welcome, always with a thread passed through the eye;
- a simple pencil - needed for drawing lines or outlines;
- paints – necessary for the design of the intended toy or decor, preferably gouache;
- brushes - softer for painting products, hard - for glue;
- stack - intended for shaping the surface of clay or plasticine in creativity;
- tongs or pliers – used for screwing in wires and hooks;
- transparent varnish – gives the finished product strength and smoothness.
Accessories that are hazardous to children should only be used under adult supervision or assistance.
It is important that the teacher or parent knows the features of working with devices and, as necessary, acquaints the child with them.
In the process of needlework, several methods are used to attach elements to each other:
- Plasticine is the most accessible and easiest way for children to connect parts. In order for it to be inconspicuous on finished products, you will need to choose a color similar to the material being fastened. In addition, using plasticine it is convenient to “revive” animals by blinding them with eyes, nose and paws.
- Transparent glue “Moment” is a durable option for joining elements when working with pine cones. Glue is applied to the parts to be fastened and pressed tightly against each other for a few seconds. This stage of work is recommended to be performed by adults so that the child does not inhale glue fumes.
Crafts made from pine cones are best held together with Moment glue.
- Thin wire - will be needed when making certain types of crafts - baskets of pine cones, New Year's wreath.
Toothpicks are used less often. The material smeared with glue can serve as a fastener for the body and head.
Variety of crafts “Leshy”
join the discussion
Share with your friends
The spirit of the forest in Slavic mythology is the well-known goblin or, as he is also called, the forest man. He is the protector of the forest kingdom - he maintains order and helps animals in trouble. No one knows exactly what a goblin looks like, since it constantly changes its appearance. Most often he is depicted as an old man with a long shaggy beard and matted hair the color of swamp grass. In some ways it is similar to a person, but the grayish skin color and the absence of eyebrows and eyelashes are striking distinctive features. He has large glowing green eyes.
Often the image of a goblin is used as an idea for autumn crafts. A wide variety of materials are used to implement it. In the article you will find several useful workshops on making a figurine of a forest defender.
Processing pine cones for crafts
When you need open cones during creativity, you should dry them well. Natural preparations can also be collected in the spring after being freed from seeds. It is important to note that open copies do not change their shape.
If it is necessary to use an unopened type of cones in your work, then after cleaning the scales, they are treated with glue. You can use regular PVA glue or wood glue.
Less often, curved shaped raw materials are needed for crafts. To obtain the desired workpiece, it is left in boiling water until it becomes elastic, and then the desired appearance is formed, secured with insulating tape.
The material intended for making figures must be clean and dry. Cones that have been pre-treated should be thoroughly dried.
There are 4 drying methods:
- Outdoors - choose a dry, well-ventilated place, cover the surface with paper and leave for 2-3 weeks.
- In a frying pan - place the raw materials in a cast iron bowl, leave on low heat and, turning occasionally, bring to readiness.
- In the oven - place foil or parchment paper on a baking sheet, distribute the buds not too tightly to each other and keep for 30 minutes at a temperature above 200ºC.
- In a microwave oven , cover the glass surface with napkins, lay out the workpieces and put the appliance on maximum power for 1 minute.
Products made from natural materials
The use of natural materials when creating products with your own hands is always highly appreciated by teachers of educational institutions. It is always more interesting for children to work with such material, because they can collect it themselves in the park or in the forest.
You can make a figurine of a goblin for a kindergarten or school based on any theme of the autumn exhibition.
A simple version of the craft on the theme “Leshy – protector of the forest” can be made from a pine cone. For this you will need:
large fir cone;
dried chestnut peel.
Let's start work.
Take an ash leaf and cut it into narrow strips on both sides. It will serve as the shaggy beard of the future forester.
How to choose the right cones for crafts
When collecting, it is better to give preference to clean material without dried resin and insects. Remaining dirt can be easily removed with a cotton swab dipped in an alcohol solution.
The internal cavity of forest coniferous raw materials is cleaned by soaking it in vinegar essence diluted with boiled water in a 1:1 ratio. After processing, the scales may close, but their shape will remain original.
To create crafts from closed cones, it is recommended to collect material in the autumn and in sunny weather. This is due to the fact that the harvesting material will be well cleaned and dried. October is the best period, when the raw material is moist and the covering scales are tightly closed. Here you can also find cones of non-standard shape.
DIY “Forester's House” craft
This craft was made by Maria Nikolaevna Bykova together with her son Roma (Arkhangelsk region, Mirny). Roma is 2 years 8 months old.
To make such a house we will need the following material:
- shoe box, - 0.5 liter kefir box, - beans, - plasticine, - leaves, - pine cones, - spruce branches, - moss, - pine needles, - larch leaves.
How to make a forester's house with your own hands
Step 1. Making the base of the house. To do this, coat the kefir box on all sides with plasticine. Place beans on plasticine. Let's make a window out of plasticine.
Step 2. Making the roof of the house. We make the roof from leaves. We also glue them onto plasticine.
Step 3. Making a deer.
Take 2 cones. We connect them together so that we get the body and neck of a deer. Then we glue the head from plasticine to the neck, make eyes and a nose. Pine needles make beautiful antlers. We glue matches as legs and tail. The hooves were glued to the box using plasticine.
Step 4. Making a hedgehog. We make the hedgehog's face, eyes and nose. We stick the muzzle to the cone. Let's make needles from spruce branches. We glue them onto the pine cone using plasticine.
Step 5. Assembling the craft.
When the main details are ready, we begin to design the craft. We attach the fir branches to the box using plasticine. We're putting up a house. Spread the moss and sprinkle with larch leaves. We put the hedgehog. The craft is ready.
My first baby forest boy made of plastic. Author's doll by Irina Shaver - Babies
Hello, dear residents and guests of the fairy-tale doll country.
Today I want to show you my first plastic baby. I’ve been wanting to make a little man for a long time, but I wasn’t sure it would turn out well. But, looking at what kind of craftswomen there are on our wonderful..., i.e. On the miraculous site, and on their sweet little kids, I decided: “I was there - I wasn’t!” I’ll sculpt!…” and I sculpted it from what I had)) And I had FIMO Puppen plastic and a great desire. The baby was born mischievous and smiling. It turned out to be 20 cm tall. The body is softly padded from artificial suede, similar to that of reborns - on small hinges. Painted with Jo Sonja acrylic paints and sealed with matte varnish. The polymer eyes became slightly cloudy after baking (although I covered them with cotton wool and foil), so I additionally covered them with varnish and “tears.” I decided not to draw the hairs, but to glue them from silver fox in very small bunches in a circle, and until the glue dried, I distributed them evenly over the head. The “fly agaric” clothes were invented after the baby was put together. Of course, this is my first one and therefore there are some shortcomings that I will take into account in future works (for example, I planned a very small baby, but the proportions turned out to be “mature”). This is what happened, I present it to you for your viewing pleasure. And I look forward to your comments. and this is how we were born)): And here is our “BIRTH CERTIFICATE” Thank you all for visiting us on the page Making dolls with your own hands babiki.ru
What other materials can be used
In addition to pine cones, there are also a lot of natural materials that can be combined with pine cones - bright leaves, chestnuts, pebbles of various shapes, acorns - excellent tools for children's and adult crafts. Combining raw materials of various shapes and textures will allow you to create artistic work of any size.
Cereals, nuts, matches, threads or other handicraft items in art Additional elements will make the work more realistic and creative, breathing life into animal figures. Experts assure that the combination of artificial and natural parts is welcome in any craft.
The second option for making a pumpkin house
This pumpkin house was made for our competition by the family: Nabukhatny Lyubov, Nabukhatny Dmitry and their son Nabukhatny Igor (9 years old), Perm.
To make this pumpkin craft you will need:
Natural materials:
- pumpkin, - bark, - cones, - needles, leaves, grass, - acorn cap, - pebbles, - moss, - thin sticks.
Decorative material:
- wooden button, - lace, - key.
Super glue
to hold all the parts together.
How to make a pumpkin house like this
Step 1. Making a house. After cutting out the bottom of the pumpkin, we cleaned out all the pulp from the inside. Windows and doors were cut out. The roof was made from thin pine bark, gluing the pieces on top of each other. It turned out very similar to a tiled roof. The door was a good piece of thick bark, the handle on the door was an acorn cap. Step 2. Decorating the house. To make the house cozy, you need to decorate it. Lace curtains were glued to the windows. The flower boxes were glued together from cardboard and decorated with pine cone scales. Summer is over, the flowers have faded. Therefore, the boxes now contain fallen leaves and pine needles. “Vine vines” stretch to the window on the second floor; we made them from green marsh grass. The carved bottom of the pumpkin served as decoration for the back wall of the house. With a button in the middle and rays, it reminded us of a mill. A key at the door and steps made of sticks completed this stage of the work. Step 3. Move into the house. The house was installed in a low box. A piece of moss became a clearing in front of the house. The rest of the surface was covered with small pebbles. At the end of the work, we dreamed for a long time about who could live in our house. Maybe a gnome, or a fairy with transparent wings, or a kind old sorceress. In the end, we decided that we ourselves were ready to live in a fairy-tale house. It's a pity that he is too small for our large family.
Craft ideas for kindergarten
Crafts made from pine cones are a good solution for decorating the interior on the eve of the New Year holidays. From the available components, you can make something new and interesting with your own hands at any time. Creating original crafts is an activity for the whole family.
A DIY Christmas tree is the main creation before the New Year.
To make a figure you need:
- cones of various sizes;
- glue gun;
- spray paint;
- cardboard;
- scissors.
At the first stage of mastery, you should form a cone with a base from cardboard. Spray paint on thoroughly cleaned and dried pine cones. If desired, the raw materials can be left in their natural form.
Next, you should select the largest cones and, using a glue gun, starting from the base, glue the lower part of the cone in a circle. Moving to the top, the material is used in ever smaller sizes. As a result, small-sized elements remain for the peak of the cone.
The process of making a Christmas tree is completed by decorating it with sparkles, beads, and ribbons. When decorating, it is important to choose the color scheme tastefully.
DIY crafts from pine cones can be made in any size: as a tabletop souvenir or garden figure. They will engage children in creativity, developing perseverance, diligence and imagination. Even a child can handle the proposed bear design option.
Do-it-yourself forester's house
This house was sent to our competition by the Potapov family (Tatyana Valentinovna Potapova and Andrey Potapov, 4 years old, Irkutsk).
Making the craft will take several evenings. In this case, the child will not get tired and will
they will be interested in participating at all stages.
How to make this forest house with your own hands:
Step 1. First, we took a box of cookies from a candy store. We covered it with scraps of wallpaper in the “autumn tone” and left it to dry.
Step 2. From cones, acorns, and matches they made the inhabitants of the forest - Lesovich and his friend the hedgehog.
Step 3. Lesovichok settled in a house for which a yogurt box came in handy. And the logs on the house were made from dill sticks and secured with double-sided tape. The roof was painted with gouache.
Step 4. The hedgehog settled not far from his friend under the stumps. The stumps are saw cuts from branches that dad helped make.
Step 5. A path leads from the house to the pond. For the path, we painted semolina and glued it with PVA glue. They surrounded it with pebbles and beans. The pond was made of colored paper, the pebbles were plum pits.
Step 6. A small forest and a clearing were made from dry leaves, twigs, moss, dried flowers and rowan berries.