Master class: kangaroo in Tilda style
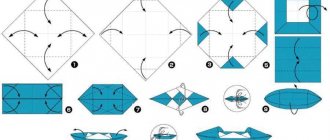
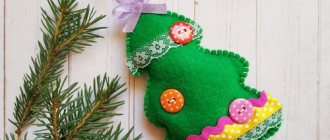
First of all, I want to say that I have not seen a master class on kangaroos on the Internet. And for some reason it is rarely sewn, but it is so cute =) After all, a kangaroo with a baby can be a wonderful gift for a young or expectant mother, become a child’s favorite toy, or simply decorate the interior. Therefore, in preparation for the MK in the studio, I decided to film the process. Perhaps my small master class will be useful to someone or will encourage them to create this wonderful toy. So, let's go! We will need: - Fabric for the body - Fabric for the jacket, pocket and inside of the ears - Filling - Floss for embroidering the nose - Beads for the eyes - Buttons for attaching the paws - Sewing supplies: needles, scissors, marker, safety pins, etc. — Dental floss I used fleece for the body, American cotton for the jacket, pocket and ears. This is the original from the book by T. Finnanger. Pattern (also from the book): Transfer the pattern details onto the fabric, not forgetting about the grain thread. I do this with a disappearing marker. The ears are made up of two parts: the main body fabric and the cotton. Without cutting, we sew the outline of the parts on a machine. I sew using a stitch length of 1.5 mm, it seems to me that the smaller the stitch, the neater the stuffed toy looks. Don't forget to leave small holes through which we will turn out and stuff the toy parts. We cut out the parts and make notches in the bends so that there are no creases when turning and stuffing. Don’t forget to make darts on the head to add volume. We turn out the parts. I do this using a sushi stick. We carefully fold the ears and sew them up with a hidden seam. Without fastening the threads, we tighten the ears. Then we fasten the thread. We received such a pair of cute ears. We do not cut the thread; we will use it to sew the ears to the head. We fill in all the details. The holes through which we stuff the parts are sewn up with a hidden seam. We leave the hole in the mother kangaroo's head unsewn. Using floss thread in two folds we embroider the nose. First I embroider a triangle - the outline of the future nose, then carefully from above, stitch by stitch, straightening the threads, I embroider the nose. Since I sew from fleece, I use beads as eyes. I sew them on, tightening them a little. If you sew from cotton or calico, you can paint the eyes with acrylic paints. Sew on the ears. We hide all the threads, bringing them out through the unsewn hole at the bottom. We do the same with the kangaroo's head. You can embroider his eyebrows, giving him a pitiful look =) We sew the head of the mother kangaroo to the body with a hidden seam. Sew on the legs using button fastening. I think everyone is familiar with him, but just in case, I’m posting a well-known picture to everyone. I sew the limbs using a long thin needle and dental floss. It is quite strong, thin and makes it possible to tighten the parts well. By attaching the leg to the body, we noted its location. We inserted a needle into this point, bringing it out parallel to the other side. Sew into 2 circles, pulling well. We secure the thread and bring it out through the tummy. In general, it is convenient to hide all the threads in the stomach: we will have a pocket sewn there. Our kangaroo can already stand. We cut out and sew down the details of the jacket. Leave a hole at the bottom for turning inside out. I lengthened the main part of the jacket a little, since it did not fit on my plump kangaroo. We turn the jacket inside out, sew up the hole with a hidden seam and press it. We iron the sleeves, hem them and put them on the arms of our kangaroo. We try on the jacket and pin the handles with pins. If everything suits us, we sew on the arms using the same button-thread fastening. We fasten and hide the thread. Sew, turn inside out and press the pocket. We sew the darts. You can add a stitch along the contour of the pocket. We pin the pocket and sew it with a hidden seam. We sew the baby's head and arms with a hidden seam directly to the mother kangaroo above the pocket. Sew a button to the jacket and admire the result! Thank you all for your attention! I will be happy to answer your questions! Your Katyusha.
How to make an original wooden toy with your own hands
To start making cubes, you need to acquire the following components:
- cuttings of bars;
- brushes for painting;
- plastic glasses in which we will mix paints;
- dyes, it is best to take food dyes, as they are non-toxic;
- alcohol for diluting paint;
- disposable gloves to avoid getting dirty;
- unnecessary paper, oilcloth, newspapers to keep the workspace clean.
You can have all this at home, and if you don’t have something, you can buy it in a store or market.
Step-by-step work plan.
After we have prepared the materials and tools for work, we proceed to the following steps:
1. First we make wooden blanks. We take glued laminated timber, measure the desired dimensions of the future cube, and mark them on the timber. Then we cut it to size with a jigsaw, hacksaw, circular saw, whatever is more convenient for you.
What slings can you make yourself?
Any woman, even a novice needlewoman, can make a simple sling for carrying children at home. It won’t take much time to make, but you can save a decent amount of money.
Varieties:
- Scarf. This is a simple carrier in design, which is represented by a large piece of fabric. You can tie it in different ways.
- Model with rings. This is an ideal DIY sling for newborns from 0 to 6 months. When carrying older children, the load will fall on one shoulder, so it makes sense to choose a different model.
- Sling pocket. The model is very easy to use; it comes with a bag slung over the shoulders. The disadvantage of this option is that the harnesses are not adjustable.
This is a simple design that is easy to do yourself
For newborn children (up to six months), only two models can be used: a scarf and a version with rings.
On a note. When making a carrier for newborns, it is important to properly think through the design in order to fix the position of the child’s spine.
Choosing material for a sling
Before starting to make a sling at home, special attention is paid to the type and quality of the fabric. In order not to provoke the development of allergies in a child, choose its natural composition without the addition of synthetic threads:
When choosing fabric, they are guided by the season when they plan to carry the child in a sling:
- For summer time, buy chintz. The finished structure is reinforced with special frames. Without additional sealing, such things are used only for newborn babies with low birth weight.
- To make carriers that will be used during the off-season, purchase calico or denim.
- For winter, the carrier can be made of wool or a mixed material. The sling scarf can be made from thin fleece.
You can make a sling that is thinner for summer and thicker for winter.
To make slings, twill (a mixture of cotton and linen) and knitwear are purchased.
On a note! To prevent the product from shrinking, when using it, wash the piece of material before cutting and sewing.
Kigurumi models
Types of pajamas - kigurumi are divided into animal costumes (raccoon, giraffe, cat, donkey, panda, and so on).
These can be costumes of fictional characters from cartoons, games, fairy tales (dragon, unicorn, various Pokemon, Totoro ).
Advice! Before you start sewing, create a color sketch of the model. Mark all trim elements.
Using one pattern, you can sew a variety of one-piece models, complementing them with various finishing elements.
Kigurumi – Totoro
Initially, Totoro is a very chubby character, so we make very wide pajamas.
Required:
- The fabric is dark gray, 150 cm wide. For children's models, the amount of fabric is equal to the length of the product, for adults 1.5 lengths (the main parts of the product).
- Light gray or white fabric, 150 cm wide - 0.5 m (for the tummy).
- Zip closure.
- Black embroidery floss threads (for mustaches).
- Pink embroidery floss threads (for cheeks).
Pattern:
- Front – 2.
- Back – 1 piece with fold.
- Belly – 2.
- Sleeve – 2.
- Gusset - 1 piece, if large size.
- Hood – 2.
- Hood facing – 1 piece with fold.
- Sleeve cuffs – 2 folded parts.
- Leg cuffs – 2 folded parts.
- Ear 4.
- Tail – 2.
- Spots for the tummy – 8-10.
- Smile – 1 piece with a fold.
- Eyes – 2.
Subsequence:
- We cut out the blanks.
- Sew the spots to the tummy. You can just use a small zigzag stitch.
- We sew the tummy to the front parts.
- Sew the shoulder seams.
- Sew the side seams.
- Sew on the gusset (optional).
- We perform a step seam.
- Sew on the tail.
Advice! It is better to sew the tail to the pajamas the person is wearing so that it is in the right place.
- We sew in the sleeves.
- We sew the cuffs to the sleeves and trouser legs.
- Sew the hood. We sew ears to it.
- We sew the elements of the muzzle to the hood.
- We embroider a mustache.
- We process it with a facing.
- We sew in a zipper.
- Let's try on onesies.
- Kigurumi is a dragon.
Kigurumi with buttons
We will sew this one-piece model with buttons and one-piece sleeves.
Required:
- Green fabric, 150 cm wide. For children's models, the amount of fabric is equal to the length of the product, for adults 1.5 lengths (main parts).
- Fabric of yellow or light green color, 150 cm wide - 0.5 m (for the tummy and tail ridge).
- Red fabric - flaps (for the inside of the hood.)
- 6-8 buttons.
Pattern:
- Front – 2.
- Back – 2.
- Belly – 2.
- Gusset - 1 piece, if large size.
- Hood – 2.
- Hood facing – 1 piece with fold.
- Sleeve cuffs – 2 folded parts.
- Leg cuffs – 2 folded parts.
- Comb – 24.
- Tail – 2.
- Teeth 10-14.
- Eyebrows – 4.
- Eyes – 2.
Subsequence:
- We cut out the blanks.
- We sew the belly to the front panel.
- We sew the parts of the comb together in pairs.
- We sew the comb into the middle seam of the back, tail and hood.
- Sew the shoulder seams.
- Sew the side seams.
- Sew on the gusset (optional).
- We perform a step seam.
- Sew on the tail.
Advice! It is better to sew the tail to the pajamas the person is wearing so that it is in the right place.
- We sew the cuffs to the sleeves and trouser legs.
- Sew the hood. We sew eyes and eyebrows to it.
- We sew the parts of the teeth together in pairs.
- Sew on the teeth.
- We process the hood with facing.
- We make a fastener - a bar on the front of the pajamas.
- Sew on the buttons.
- Let's try on onesies.
Onesie pajamas are a great way to remember your childhood while still being an adult . You can sew identical onesies for everyone in your household and have a pajama party. You will only need a few hours to sew one product, but it will delight you for many years.
Kigurumi: pattern, examples, tips
Kigurumi is a very cute word.
But first of all, what is it? And how to make onesies with your own hands? Patterns, material, photos, tips - we'll tell you everything in this article. So, this is kigurumi. pajamas? Carnival costume? Or is it still a full-fledged piece of outerwear? Probably both. Unless at a costume party in such an outfit you will no longer be able to receive a prize for originality.
Kigurumi have so organically integrated into the lives of young people in big cities that perhaps only a grandmother in the village can be surprised by them. That is why, in order to get something original, you will have to sew it yourself.
Who would you like to be? Maybe you have a spirit animal? Lion, unicorn, giraffe, panda, bunny, fox, owl, cat? The kigurumi pattern is universal. They even sell poop emoji onesies.
Kigurumi, like other warm pajamas and sweatshirts, are made from fleece - soft, breathable, hypoallergenic, light and the most comfortable fabric in the world. It is so pleasant to the touch that it is not surprising that people do not want to part with their suit even on the street.
Fleece material is quite economical, its price is approximately 400-600 rubles per linear meter. But we need to remember that we will need quite a lot of fabric.
In addition to fabric, you need: scissors, thread, buttons, Velcro or zipper, pins, elastic. It is also very advisable to have a sewing machine.
How to sew kigurumi pajamas.
Greetings, dear readers!
Tell me, does your child sleep under a blanket? Yes? Then you are a calm and happy mother. But my daughter doesn’t fall asleep until she takes off the blanket. And here it is, just like cold spring. So you twitch all the time to see if she’s frozen. But then in the store I came across a chic material - velsoft, in cool colors. The decision came immediately - this is what was needed. I need to sew a pajama set.
The Internet can help us - I looked at what is fashionable now and here it is! Kangaroo pajamas!
These pajamas are also called “kigurumi”. This word comes to us from Japan, where kiru (“to wear”) and nuigurumi (“soft toy”). This type of clothing is very popular in the modern land of the rising sun. It is worn by young people who want to break the conventions of traditional clothing.
Kangaroo pajamas are made from soft fabrics: fleece, velor, polyester or velosoft. These materials provide excellent warmth on cold winter evenings and nights without disrupting proper thermoregulation.
True, the hood, in my opinion, interferes with sleep, so it was excluded from the image.
Here are examples of these pajamas, by the way, their cost is about 2,400 rubles, and the material cost 800 rubles per 1 meter. This is quite enough for a child 110-116 cm tall.
This pattern is easy to sew.