Moreover, it is a weapon that can not only be made from improvised means, but can also be used to hit a target at a distance. Of course, the best thing to do is to do it, but it is difficult to do in the wild.
Therefore, it’s best to remember the weapons of our ancestors; I bring to your attention an excerpt from a survival book about homemade darts. These are not the darts used to play darts, but real military weapons that are easy to make yourself.
The dart is designed to hit a “target” at a distance and by throwing it from the hand. Over the millennia of development of Human civilization, many varieties of ultra-light, throwing spears have been invented and tested in hunting and wars.
For a survivalist, the real result is important, and the sooner and simpler the better. Therefore, from all the variety of varieties of darts, we will choose one of the simplest and surprisingly accurate options.
For example, let’s cut a straight twig of wood: willow, walnut, maple, rowan, bird cherry... 120-140 centimeters long and with a butt thickness of one and a half to two centimeters. It is not necessary to sand the twig.
Which of you can throw this twig with your hand 50-60 meters? And how many craftsmen are there that will hit an old stump with the butt of this twig at a distance of thirty meters? Most likely there will be few craftsmen, but using a little trick, you can easily throw this twig at a distance of more than a hundred meters, and at a distance of 20 meters hitting that stump the first time will no longer be a problem.
To do this, you need a lace from ankle boots or another suitable rope, approximately the same thickness and length (about a meter).
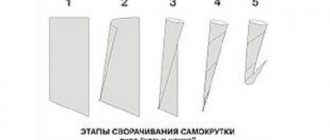
The center of the picture shows how to fasten the lace to a twig. The knot at the end of the lace is clamped through a turn with the same lace, and if the lace is kept under tension, a fairly strong fastening is obtained.
A little higher up it is shown how to wrap part of the lace around your index finger and hold the throwing rod in your hand.
The dart is thrown with such speed and force using a cord that it seems as if it was shot from a good bow. However, there is no need to make a bow for such shooting. But this is still a theory, even if you have a real lace and a real twig in your hands. Practice will come with time and, with great desire, probably very quickly.
And now a little more theory. In order for a dart to fly well, its center of gravity should be located approximately a quarter of the length of the entire dart from the tip (butt, the heaviest part...).
There are two options for throws, for range and for accuracy. When throwing at a distance, it is advisable to hold the dart so that the back part is slightly outweighed. After all, you will have to throw at an angle of 45 degrees to the horizon. And if they throw for accuracy and not far, then the bow needs to be slightly outweighed. Otherwise, you will have to spend extra effort on holding the dart in the desired position during the throw. It seems like a small thing, but it will definitely affect the final result.
There are other nuances. In a real hunt, the “target” can be both above and below. Here, too, it is necessary to take into account, if possible, the distribution of forces and weight. Preliminary training experience is a must. Now we are talking about the simplest way to throw a dart horizontally or from your height at a target on the ground, like in a shooting gallery.
Especially for uniform throwing of darts (twigs) in a shooting range, it is recommended to mark on the darts the place where the knot is attached (with a cut out and shallow notch) and the place where the dart is grabbed with your fingers (usually with a thin, “rough” winding).
On a real hunt, see for yourself whether you need special marks. Everything is to your taste.
By the way, with a twig 120 (cm) long and with a butt thickness of one and a half centimeters, you can kill an adult goose or wood grouse without a tip, by hitting the butt. There can be no doubt at all about the fatal defeat of a neighbor's chicken, wild duck or pheasant (where they are found). And if you equip such a twig, already a dart, with a traveling tip, then with such a dart you can safely hunt roe deer and young wild boars.
You can also use darts to hunt aquatic creatures such as pike, carp and catfish. For short-range hunting, the simplest versions of darts and tips for them are made. Below is a variant of a spear dart with a wooden tip.
For a smoother flight, the tip of the twig is equipped with a feather stabilizer, like on arrows. You can make a classic plumage from split wing feathers or tie on a tuft of tail feathers. In reality, the tail part of the twig is simply not cut off on a dart. The dart turns out to be longer, but easier to manufacture.
Chapter from the book “The Basics of Survival”, Anatoly Shishkin, 2012
Dart! Who didn't love building them as a child? Simple paper ones, with feathers, and generally made from various scrap materials! Let's learn how to collect such a subspecies of darts as long ones. These darts are designed for speed, range and accuracy. These miniature arrows are ideal for a variety of competitions. Due to the fact that the cost of their production is negligible, you will not have any difficulty in assembling many copies needed for various home games.
Undeniable protection or how to set up a target
At the dawn of his darts, even before his first target made of Chinese pressed cardboard, the author of the text already understood that just a target on the wall was categorically wrong. The wall must be somehow protected from local snipers.
Just going to the store and buying it is not an option at all; we don’t live in England. It became clear that we had to somehow paint our own protection on the wall.
And the author of the text was already beginning to think about the size of the protection that would fulfill its task, but a collapse occurred in the form of the purchase of the first target made of Chinese pressed cardboard.
It was not possible to struggle with common sense for more than 7 minutes, and the target was hung on a bare wall. Well, just take a quick look with the whole family: what kind of thing is this - some kind of darts there.
After another 15 minutes, it became clear that the decision to “see what kind of darts this is” was just common sense, because
no matter what size protection was planned for the wall, it still would not cope with its task.
It is completely unclear to the author of the text for what reasons standard protection on a target is made with a diameter of something in the region of 70 cm (with a target diameter of 45 cm). The size of 70 cm is completely illogical in any way. Those who have been throwing for a year already do not need protection on the target in principle.
For those who have just bought a target, the protection meter per meter will be too small, however. And who the standard ~70 cm are aimed at is a mystery shrouded in darkness.
A protection of 70 cm is a completely useless and extremely incomprehensible size of the principle of “average temperature in the hospital” - for some it is absurdly large, for others it is categorically insufficient.
So what is the correct amount of protection, the attentive reader will ask. In our family, we received the answer experimentally after the first 2-3 months of mockery of the wall where the target hung.
The area of irreparable damage caused was measured and at the same time the size of the correct protection for the target was found - it turned out to be 100 by 105 cm. 100 in width and 105 in height. It was decided to make a protective shield of this size.
Moreover, make it beautiful and indestructible, and cover all this terrible destruction with it.
The first shield was a trial and error option
. It was decided that the main area would be made of hardboard (fibreboard) 5 mm thick. Hardboard 5 mm thick is stitched with a dart one at a time. Therefore, the hardboard was screwed onto a frame made of wooden blocks so that there was a gap between the wall and the hardboard.
It all turned out to be long and tedious, because... It was still unclear what method of attaching the target to the shield would be used - accordingly, it was not clear in which places on the hardboard on the back side the bars should be located so that the target fastener would be attached to them, and not to the air behind the hardboard.
Ultimately, the frame made of bars was built so that it was suitable for two different types of steep and expensive overseas fasteners, and the target was eventually hung on the shield using the simplest standard fasteners that come with every normal target.
Hardboard on wooden blocks was wrapped in carpet. The carpet is screwed to the bars. The result is a beautiful, powerful stationary protection. I hung it on the wall and forgot about the nerves from missing the target, and the eye is happy. It cost about a grand for consumables, more than half of which was carpet.
It turned out beautiful, but loud
. There is air between the hardboard and the wall. A sheet of hardboard measuring one meter by one meter with air between itself and the wall, and after a good hit with a dart it makes a good and booming sound. Even a good hardboard carpet can’t save you. They did not redo anything. That's how we live.
About a year later I had to make another shield. His task is different. This is not a stationary shield on the wall, but a mobile shield on a portable stand to provide a warm-up game line at our tournaments. The second shield was made taking into account the mistakes of the first shield and it cost not one piece, but one and a half. And all because of the same carpet - the most expensive component.
It was necessary to put twice as much carpet on this shield for one simple reason. I hung a stationary shield on the wall and nothing is visible from behind it - which means there is no need for a carpet there at the back. But a mobile shield is a completely different shield - they can also look at it from behind. Moreover, a lot of people can do this.
Therefore, it must be completely wrapped in carpet, and have a presentation everywhere, and therefore it is no longer a piece, but one and a half for consumables.
Dart: a little history
Later they came up with the so-called spear thrower called atlatl. This mechanism improved dart throwing. It was in the form of a bar in which a stop was hollowed out for the base of the shaft or a belt loop. Darts thrown by hand could fly no more than twenty of their sizes, and with the help of spear throwers, darts were thrown twice as far, but not as accurately. Because of this, spear throwers were used mainly by steppe peoples, because for them the throwing range was more important.
One of the main characteristics that distinguishes darts from spears (not counting balancing) is the configuration of the tips. For example, weapons for hand-to-hand combat were usually made in such a way that their tips would not get stuck in bodies or shields. Whereas the darts got stuck in the bodies (poison dart) and shields, and this was their advantage, because the darts are relatively heavy, and using shields with darts stuck in them was quite difficult. Getting the darts stuck in the wounds of people and animals was another advantage, so they were deliberately made to have burrs.
In barbarian tribes, only those who did not know how to make good bows had throwing darts. However, later with the improvement of protective equipment, darts again became popular due to their superior penetration and killing power and greater accuracy. How to throw darts correctly was taught from childhood.
In particular, the Greek, Macedonian and Roman light infantry had to use darts. Often a warrior could make a poisoned dart for battle or hunting. Enemy warriors attacked by such darts were more likely to be completely incapacitated. Darts more easily pierced not very strong armor, which was most often made of canvas, leather or even chain mail. The Romans actively used spear throwers.
How to make a dart dart with your own hands at home | Do it yourself!
There are games that both children and adults would like to play. One of them is darts - a relaxing activity at home and at work, in the apartment and in the yard.
Over time, a previously purchased set becomes defective, and lost elements are sometimes impossible to find.
In such a situation, the question arises, how to make a dart with your own hands , saving money and the time needed to go to the store.
In fact, the procedure for making this homemade product is quite simple. Everyone can find the necessary materials and tools within a few minutes. The creative process will not take more than half an hour.
Necessary materials
The first step is preparing materials. These include:
- Dry branch of any tree species;
- Plastic bottle or cardboard;
- A 30-gauge nail, a gypsy needle or 3-4 cm of steel wire with a diameter of 1.5-2.5 mm;
- Plaster, tape or insulating tape;
- Ballpoint pen tip or needle for inflating balls.
Tool
A simple tool with which even a child can darts with his own hands
- Wire cutters;
- Scissors;
- Sandpaper, file or other abrasive material or tool.
Stages of making a dart
Having prepared everything you need, you can get down to business. In the first step, cut a piece 8-10 centimeters long from the branch. We break the gypsy needle into 2 parts or bite off 3-4 cm of steel wire. This element will serve as the front sharp part of the dart. As an option, you can use a small nail (30 or 40 mm), after first biting off the head with wire cutters.
From the needle for inflating the balls, you need to break off the tip through which air is pumped. This item is not useful. You need the part that screws into the pump when inflating.
Before making a complete dart dart , you can sharpen the wire or nail. If using a sewing needle (gypsy), this is not necessary. However, it is advisable to carry out this procedure at the final stage. The reason is that there is less chance of finger piercing.
The next step is screwing the iron into the wooden base. The nail, needle or wire must be inserted exactly into the middle of the end part of the branch. The core of the tree in this case is softer, which makes this stage quite simple.
The inner diameter of the ball needle is smaller than the diameter of the branch. You need to remove the layer of wood in the part of the dart where the tip is already inserted. Having adjusted the size to the required size, we put on the iron tip.
DIY darts
My daughter wanted darts, and I, remembering the years of my former youth, suggested that she make it with her own hands in half an hour. She happily agreed, even on the condition of providing all possible assistance. And we started...
Initial materials for making darts (what any Soviet citizen had in his bins when I was still a boy):
Needles, threads, matches and paper.
We lightly wind 4 matches with threads, insert a regular needle for hand sewing into the end in the center (from a sewing machine, or even small shoe nails will do) and tightly tighten the edge with the needle with threads.
On the reverse side, a small paper square is bent for the fletching of the dart (the edges may or may not be cut off). We also insert it between four matches and tighten the matches with a thread. We have this result:
We secure the edge of the thread by tucking it between the matches. We repeat the process again until we get the required number of darts for the darts.
Be careful with darts!!! The sharpness of sewing needles allows them to pierce any surface, including arms, legs and eyes. The only exceptions, perhaps, are stones, ceramics and metal products.
Test of homemade darts:
All that remains is to make a target, and this is a matter of taste and creative imagination. I didn’t invent anything, I just took ready-made targets from the old Maxim magazine:
All that remains is to place the targets on the wooden garage doors. And the darts are ready! Now every time I need to stay in the garage, my daughter has something to entertain herself with. The photos were taken from a mobile phone, so don’t judge strictly, everything you need is visible. ————— PS
The easiest option, so as not to bother, is to simply choose a thicker tree as a target and train your dart throwing skills, gradually moving on to thinner trees. For those who do not want to cause destructive harm to natural life, you can simply draw a target on the fence.
In my Soviet childhood, I made at least a hundred similar darts, so my hand is still accurate and hits the target from a considerable distance