Ventilation and release of moist air
Warm, moist air must escape somewhere from the cabinet during the heating process.
To do this, a hole (d-100mm) is cut from the top and a plastic pipe is inserted there. If you want to do without plastic and pipes, make not one, but three holes of a smaller diameter (35mm) around the perimeter.
It is only advisable not to leave all these holes open, but to install some kind of protective grille or mesh there to prevent flies and insects.
But still, as operating experience shows, with one hole in the form of a pipe it is possible to maintain a more stable temperature regime than with three.
All dampness, smell and steam will go outside through this hood. During the drying process, do not forget to swap the trays, because the bottom row dries much faster due to the close proximity of the fan heater.
With a large harvest, processing it with a relatively small factory dryer is a very non-trivial and tedious task. And with the help of such a large cabinet you will do it quickly and with pleasure.
Do-it-yourself electric dryer for fruits and vegetables
To do this, you need to make an electric dryer body, buy a fan, a heating element, a temperature sensor (thermostat), a time relay, and two chimney draft regulators.
Fan
For our purposes, household smoke exhausters for boilers are best suited.
Smoke exhausters for domestic boilers
Their distinctive feature is that they can pass through air at temperatures up to 150°C without damaging the electric motor. An ordinary axial fan is not suitable for these purposes. It is not able to work at a temperature of 50°C for a long time. The diameter of smoke exhausters starts from 150 mm. An electric heating element with an open spiral must be placed in the pipe coming from the smoke exhauster.
Electric heating element for dryer
For maximum heat extraction, the heating element must have an open coil. The power is calculated based on the permissible rated power for the house and is equal to 3 kW minus the power of the smoke exhaust fan and household appliances. If this norm is exceeded, the automation will work and turn off the lights in the house.
Electric heater with open coil
When choosing an electric heater, consider its dimensions. It must fit into a pipe that is connected to a smoke exhauster or fan that supplies air to the drying chamber.
Smooth thermostat
Thermostats with smooth temperature control from 0 to 300°C are a standard part of all household electric furnaces. It must be connected in series to the electrical circuit with heating elements and a fan. When the required temperature is reached, it will automatically turn off the heating and fan.
Household thermostat
You can use a thermocouple from ovens.
Where to buy a thermostat? There are several purchasing options:
It is quite possible to purchase a thermostat at a flea market.
Time relay
In order to fully automate a homemade dryer, you need to buy an electronic two-channel time relay with weekly programming.
There are many options for designing and programming time relays and everyone can choose the right one for themselves.
By connecting a fan and heating element to the time relay, you can adjust its operation experimentally. To do this, you need to set the turn-on time of the heating element and fan.
Chimney draft regulator
Draft regulators are installed in stainless steel chimneys. This automatic device consists of a precisely fitted valve on an axle. To ensure that it is always closed or open, a small weight is installed on one side.
Install these two valves in the inlet and outlet openings of the dryer. When the fan is turned off, they will close the inlet and outlet of warm air under the weight of the load.
Traction regulator
The use of these valves will allow you to automate air intake and supply without the use of actuators and expensive controllers.
For particularly advanced handymen, we recommend purchasing a programmable controller. This equipment is more complex, but it allows you to automate all drying processes, connecting humidity sensors, temperature sensors, motors, gate valves and other actuators. They are widely used for lumber drying kilns.
Dryer installation
By following simple rules, you can quickly make a drying chamber. Consider an option based on a plastic box.
Step-by-step assembly process
- Using a jigsaw, cut a couple of holes in the opposite walls of the box.
- We place the hood in the first hole (fastening is done using liquid nails).
- The next hole will be required for the passage of air masses. We cover it with a mesh using an adhesive base.
- We secure the corners, creating a kind of shelf; its ledges will serve as the basis for fixing hooks and fish.
- The corners should be placed parallel to one another on opposite walls. If the height of the box allows, you can build several rows.
- We drill small holes in the corners, maintaining a distance of about 9-10 cm. All pairs of corners are equipped with identical holes.
- Using thick wire we make rods. To do this, we measure the box from one extreme point to the other and add a couple of cm on each side. Cut the required number of rods.
- On the first side, we bend the additional amount of rod, maintaining an angle of 90 degrees. Through the opposite side we string the catch (through the eyes). The second side is bent similarly to the first and inserted into a pre-prepared hole at the corners.
- By turning on the hood and covering the structure with a lid, you can use the dryer for its intended purpose!
A dryer made from wooden blocks is considered the simplest design
Installation
Conventionally, all work can be divided into three stages:
- frame assembly;
- lining the box with mesh;
- making a lid.
First of all, I made blanks from the profile. To do this, I cut it with a grinder as follows: four 1.2-meter-long sections (for corner supports), six meter-long and the same number of seventy-centimeter crossbars. Then, at a distance of 20 cm from the floor, I alternately fastened the blanks together using rivets. In order for the parts to fit better together, the profile at the joints must be adjusted by making small cuts on the side surfaces. As a result, I ended up with a rectangle standing on legs.
The top and middle of the structure were assembled in the same way. I additionally reinforced the bottom of the box with an aluminum corner, which I screwed from the inside. Thanks to this, the dryer acquired additional rigidity. An important nuance: the profile should be mounted so that its outer surfaces form an ideal plane with each other. Subsequently, this will greatly facilitate the process of installing the mesh.
Actually, to implement the second stage, it is advisable to have an assistant. I was lucky in this sense; my wife agreed to help. It was much more convenient for two people to work with the mosquito net: she held it where it was needed, and I secured it. It is better to cut the mesh for each side with a small margin so that you can wrap it a little inward, thereby improving the overlap with the adjacent canvas. The main task in this matter is to close all possible cracks so that flies cannot get to the fish.
Kinds
The simplest device for drying is considered to be a wire stretched under an awning or an ordinary rope for drying clothes. To protect against flies, a net (or gauze cloth) is simply hung on the fish. Hanging roach, crucian carp or bream is allowed either on hooks made of wire, from ordinary paper clips, or by clamping them with clothespins. This method is simple, but it is optimal for one-time harvesting of fish in a suburban area or during a camping trip. When the activity is put on the “conveyor belt”, and good catches are constant, you need to think about a relatively decent design.
Devices for drying fish can be symbolically divided into two large groups:
- mobile transportable (portable);
- stationary.
Each of these samples has its own advantages. The first ones can be used anywhere: from the river bank to the loggia in the apartment. Others can be listed as drying cabinets; in most cases, they are used not only for fish, but also for drying berries, herbs, vegetables, drying meat and other food purposes. You can simply dry the fish in the open air, or you can organize it with forced injection of air masses using a fan. At the same time, the withering procedure occurs much faster, and the product is prepared more proportionally. During the cold period, the drying cabinet can be equipped with electric heating elements, which, in turn, will also allow the fish to be prepared for consumption more quickly.
Factory models
Of the factory modifications, two options can be distinguished. The first is structurally implemented in the form of a tall cabinet made of steel tubes covered with mesh. Similar samples are produced by various companies under the Kedr and Mitek trademarks. Another interesting example is the two-level IdeaFisher ECO-2 installation. This collapsible design is also small in size and easily portable. Moreover, depending on the conditions, it functions both suspended and placed on the floor or table.
Homemade dryers
Among the mass of devices for drying fish, the following homemade designs should be noted:
- frame;
- foldable;
- stationary;
- hanging;
- electric dryer;
- with fan;
- mobile (portable).
First of all, it is necessary to clarify where exactly the drying will take place.
If under a canopy, awning or in the attic of an individual house, there are no difficulties with the dimensions. If in one of the living rooms, on a loggia or balcony of a multi-storey building, then the parameters of the future equipment for the dryer must be planned, starting from the possibility of placing it in these rooms for drying and further maintenance. In addition, it is necessary to take into account the size and quantity of fish caught during the previous fishing trip. Or balance these conditions for future catches. If the area is very small, you need to analyze modifications of folding and hanging dryers.
Types of dryers
There are a huge number of varieties of dryers, which are classified according to:
- models;
- dimensional characteristics;
- spaciousness;
- manufacturing material.
Among the main most popular types it is worth highlighting:
- frame type;
- folding;
- stationary;
- suspension;
- intended for drying fish;
- universal type (can be used not only for drying fish, but also berries, mushrooms, herbs).
Despite the slight differences in designs, they are united by the presence of mesh (gauze) walls that do not disturb the passage of air masses and prevent the deposition of fly larvae on the fish. The presence of a door (for loading and unloading products) makes the placement process very simple.
We make a fish dryer ourselves
To decide on the type of dryer, you should first understand what materials are currently available in the house.
The internal elements of the drying chamber consist of:
- strings;
- hooks
There do not seem to be any difficulties in manufacturing the elements described above. They are usually constructed from clotheslines, wire and strong threads (pre-twisted in 2-3 rows).
The body is considered the most significant and time-consuming part of the camera. It is he who will protect the caught catch from insects. Below are popular options for making dryers from improvised materials. The proposed instructions will allow you to quickly build a camera.
The body is considered the most significant and labor-intensive part of the camera; it is this that will protect the caught catch from insects
Do-it-yourself dehydrator for meat and fish
A dryer for meat and fish can be easily made from a plastic container. For this you will need:
- fan;
- plastic container equipped with a lid;
- steel rods with a cross section of 5 mm or studs with threads, washers and nuts;
- pipe cut or coupling.
The entire process of making a dehydrator for drying fish, meat and drying other products from a plastic container is demonstrated in the video:
It’s easy to assemble a dehydrator for fish, meat, vegetables, fruits and other products from scrap materials: plywood, boxes, a refrigerator. Various working old fans are suitable for blowing. In each case, you will, of course, need to think over a way to secure them, but the economic costs will be reduced. In small installations, you can use a fan from a computer, having previously provided the required supply voltage. If you automate the dryer, then in terms of functionality it will be able to compete with factory analogues. When drying meat and fish, it is imperative to prevent flies from entering the interior of the installation so that they do not spoil the products.
Features of salting and drying fish using a dryer
When preparing the resulting catch, you must remember the recommendations that allow you to properly dry and salt the fish:
- For a piquant taste, it is better to add several dozen black peppercorns and crushed bay leaves to the salt;
- To enhance the taste, some salt is mixed with sugar, the ratio should be 3:1;
- To prevent the fish from spoiling, it is better to gut it before salting or drying;
- Dried fish is very attractive to flies; to prevent their appearance, it is necessary to make special insect traps.
Let's celebrate! By following all the recommendations for drying and salting, you can end up with a delicious fish that you won’t be able to tear yourself away from.
Features of drying devices
To ensure the above conditions and the desired result, a homemade drying unit must meet certain technical requirements:
- the temperature inside it should be maintained at no more than 70°C, this will ensure maximum dehydration, but will not allow overdrying;
- The volume of the chamber should be calculated not only from the number of products intended for preparation, it is necessary to take into account part of the space for free air circulation <;
- the design of the device should allow you to adjust the drying time; if you assemble it yourself, this can be achieved by simply moving the baking sheets closer to the source of heat or air flow.
If necessary and if possible, the device can be equipped with heaters and thermostats, electric fans, and other equipment that will make its use more efficient and comfortable.
Types of fruit dryers
Currently, the consumer can independently produce three types of dryers:
- electrical;
- infrared;
- devices “powered” by the sun.
In the first device, moisture from the fruit will evaporate by exposure to hot air, which will be forcibly heated by the built-in fan. Such devices delight with efficiency, reliability and long service life.
Infrared models' drying method resembles a process involving sunlight. Only the role of the source will be performed by a special heater that transfers thermal energy to the products. Moisture will be removed from the fruits, and they will retain their color and presentable appearance.
Solar dryers are devices in which fruits are dried using a natural method under the influence of sunlight.
Drying chamber with fan
This design is more intended for the city - at least it not only can, but should be located inside the building, since it requires electricity to operate.
You can use any box as a frame, only now with solid walls and the ability to close tightly. You can put it together with your own hands, but it is much more popular to use large (at least 20 liters) plastic containers for something.
The ventilation grille is usually built into the lid of the box, located on top, but a small vent-type exhaust fan is installed in one of the narrow side walls, so that with its efforts the air flow passes through the entire box. The presence of an electric fan allows you to completely eliminate the lack of draft due to the lack of free air circulation in the room, therefore even the dense walls of a plastic box will not interfere with the rapid achievement of results - in most cases, this design dries the fish faster than the classic one with a mesh and fresh street air. At the top of the box there are metal rods with nut threads, which are fastened on the outer sides with appropriate nuts - we will hang fish or other products on them.
At this point, the simplest design of a home drying cabinet could be completed, but some craftsmen offer options for improving the design. So, it’s no secret that for normal drying you need not only a constant flow of air, but also a fairly high temperature
, which in winter is not always achieved even indoors. A good solution to increase the temperature inside the cabinet is to use an electric mat - this product can be purchased at a pet store, as it is necessary for the comfort of most pet reptiles. You can go the other way by providing space inside the box for installing conventional incandescent light bulbs, which also heat up significantly during operation, but they will take up more space and may require numerous holes in the frame.
Both design options are quite effective, proven over years of operation and used by hundreds of thousands of our fellow citizens, as evidenced by positive reviews on various fishing forums. Another thing is that for beginners who decide to try drying fish or mushrooms on their own for the first time, the first pancake comes out lumpy. Out of ignorance, such people often commit poor design, although the reason for the spoilage of products or their very specific taste lies not in the crooked hands of the master, but in a banal failure to comply with the catch preparation technology.
For example, there is no point in drying fresh fish - the finished product will turn out completely tasteless and few people will like it. Before sending it to the drying cabinet, the fish must be salted for at least 10-12 hours, and not any salt can be used for this - only coarse-grained salt is suitable, and iodized and “Extra” are considered completely unsuitable for these purposes.
Another common mistake is to thoroughly wash the fish before salting - although this may seem unhygienic, it should not be done. The fact is that the inhabitants of the depths are already an excellent environment for the proliferation of various microorganisms, and the increased presence of water also contributes to this, at the same time slowing down the drying process.
Homemade products
Let's move on to the most interesting part, we'll tell you how to create a fish dryer with your own hands. It must be said right away that there are a lot of designs of dehydrators. It is impossible to describe all the options for homemade designs in one article, because the imagination of our Kulibins is truly inexhaustible.
Reference! Dehydrator literally translated from Latin is a dehydrator, that is, the same as a dryer.
Frame
Most often, homemade dryers are made in the form of a wooden box covered with a mosquito net. At the same time, one of the popular variants is the one with dimensions: 500x500x500 mm.
Depending on the location conditions, the dryer is manufactured in a vertical or horizontal version
At the first stage of production, you need to prepare the required number of wooden slats, sand them and coat them with a protective compound. The coating should protect the structure from moisture and salts, but at the same time not produce harmful fumes that drying products can absorb.
Then, according to the previously completed drawing, the frame of the future dryer is assembled. Self-tapping screws and metal corners are used for installation.
For a small structure, the cross-sectional size of the slats can be 25x25 millimeters. As the volume of the drying cabinet increases, more powerful bars will be required. Note! The stationary dryer can be mounted directly on the wall.
After the frame is ready, begin tensioning the mesh. In this case, you need to decide how access to the internal space will be achieved. To do this, make a door or sew in a zipper.
Wall-mounted stationary dryer with a hinged door. When using this design, you need to make sure that insects do not fly in while hanging the fish.
A variant of such a homemade product is to use not a tension mesh as a covering, but a structure from modern plastic windows. In this case, you do not need to make a separate door, but use the frame from a ready-made mosquito repellent.
The structure is also based on a wooden frame. At the bottom of the dryer there are trays to collect liquid dripping from the fish.
With fan
Some of the dryers made by our DIYers have fans in their design. Air convection in such dehydrators speeds up the drying process.
Such dehydrators are made from various plastic containers or in the form of closed cabinets through which air is forced.
Let's look at the process of making a simple dryer with a fan; for this we need:
- large-volume plastic container, from 20 liters and above;
- exhaust vent fan;
- ventilation grille;
- metal rods with threads and matching nuts;
- mounts for grille and fan.
We proceed in the following sequence:
- We make a hole in the lid of the container for the ventilation grill and fasten it.
- We fasten the fan in a similar way in one of the side ends of the plastic box.
- In the upper part of the container we make holes for the rods and insert them, tightening them with nuts. This is where we will hang fish and meat.
To dry mushrooms, berries or vegetables, you can install special grates.
If you need to increase the temperature in such a dryer, you can use electric mats. Similar models are sold in pet stores for keeping reptiles.
Advice! You can increase the temperature in the dehydrator by installing regular incandescent light bulbs. In this case, they should be positioned so that drops from food do not fall on them.
Drying methods
In order to dry fish, you can use two main options for this process.
- Natural drying. It requires the presence of clean air in an open space or in a room with good ventilation.
- Artificial drying. It involves the use of one or another equipment that helps maintain the temperature required for the process.
Usually, at home, the natural option is most often used.
To achieve the best result, it is important to follow all the details of this process.
- The fish, which has been washed and soaked, must be strung on a fishing line, for which the head is usually pierced at the location of the eyes. You can use paper clips and hook the fish onto the lip. Large fish should be spaced with a toothpick in the middle of the carcass so that it dries evenly. Very small fish can be dried on a net stretched over a rigid frame.
- In summer, the bundles should be placed in a place or room where there is constant access to fresh air and the fish will be ventilated. You can’t leave it in the sun, because it can deteriorate and fat will drain from it.
- In spring and autumn, the optimal place for drying will be a canopy, where the sun does not reach, but the fish is constantly in the wind. In winter, it is convenient to carry out the procedure on a glazed balcony, in the attic, or even just in the kitchen.
- For natural drying, the air temperature should be between 18 and 20 degrees Celsius.
- When hanging carcasses, it is worth hanging them so that they are at a short distance from each other, without touching.
- When choosing a place to store your catch, you should make sure that there are no objects with a strong smell nearby, otherwise the fish will absorb their aroma.
- If it's a hot day, you shouldn't plan to dry the fish, because such carcasses can taste bitter.
The time until done will depend on the size of the fish and the time of year when the procedure is performed.
- In spring and summer, under optimal weather conditions, you can get the finished result after just a week, and in the case of very small fish, after just two days.
- In winter, when there is frost outside, for complete drying you need to wait from one to one and a half months, during which time the moisture inside will freeze out. In the case of drying in an apartment, the time is reduced to 1-2 weeks.
In an electric dryer
To dry fish in a vegetable dryer, it is important to choose a device in which you can turn off the heat in order to cook the carcass at a temperature not exceeding 30 degrees. Thanks to the presence of a fan in the device, a constant flow of air will be provided, which will make it possible to quickly dry the catch
In this case, the finished product will be received within a few days. But there is only one drawback - the room where the process will take place will be saturated with the smell of fish.
When using an electric dryer, it is also important to monitor the condition of the carcasses by constantly checking them. To understand whether the product is ready, you need:
- evaluate the appearance and structure of the fish - it should have a shine from fat, be dense but elastic;
- inspect the skin, which should remain tight so that it can be easily removed;
- check the scales, on which no salt crystals should be visible.
In the oven
Another option for drying fish at home involves using an oven, with which you can also quickly obtain the desired product. To cook, place the carcasses evenly on the oven rack, and place a sheet of foil under them. The required temperature for cooking is 80 degrees, otherwise the fish will be baked. As with other drying methods, there must also be access to oxygen, for which the door needs to be opened slightly.
After two hours of cooking, the heads of the fish are covered with foil, and everything goes back into the oven for 4-5 hours. When everything is ready, you need to hang each carcass and dry it for a few more days, after which they can be eaten.
On the balcony
Another option for drying fish in an apartment in winter involves placing it on a balcony or loggia. It needs to be hung at a distance, and any container placed under it to allow the liquid to drain. The best option would be a balcony with ventilation, where you can update the flow of fresh air using a special device. If there is none, then you need to keep the window sash ajar. It is best if there is a slight draft in this small room, which will allow the fish to dry faster.
It is best to place carcasses along a wall or across a balcony or loggia. Usually, under such conditions, fish is cooked for several weeks, but the final time will depend on the temperature of the room and the environment, which means it can either increase or decrease.
Assembling drying shelves
So how does such an infrared dryer assemble and work? Here, unlike the option with a fan heater, no thermostat or thermometer is needed. During operation, the film heats up exactly at the temperature that we require (about 45C).
It is this that is optimal in this case for drying plant products. Of course, we should not forget that the enzymes contained in them die at temperatures above 38C. Therefore, at first glance it seems that 45 degrees is a lot.
However, here we are talking about the heating temperature of the film itself. If you put a spacer (baking paper, mesh) between it and the fruit, and this is what experienced housewives recommend doing, then the heating temperature of the products themselves will no longer exceed the permissible 38C.
Drying racks can be made in two ways. The first one, for the lazy ones, is to cut out a shelf of the required size from a board or plywood and put a reflective foil backing on top.
Again, it is not recommended to use chipboard material as a substrate. After heating, you may well end up with a poisoned product rather than a crispy treat.
Roll out the film over all this. To prevent it from moving, it is enough to press it down on top with wooden blocks.
This is a very primitive, cheapest and not particularly aesthetic method. There are much better ones.
For the second option, prepare two blanks. These will be the supporting legs of our dryer.
The width of such a blank should be slightly wider than the film itself. The optimal size is 20*70cm.
Strips are cut from 9mm plywood, from which the shelves themselves will be assembled. The width of the slats is 4cm.
The entire tree is sanded with sandpaper, irregularities and burrs are removed.
The frame of the structure is screwed onto self-tapping screws. In our case there will be five shelves.
The most important “trick”, which simplifies and lightens the entire product as much as possible, are the electrodes.
The film in this dryer is laid not on a wide board, but across strips of electrodes.
In the version with a wooden base, a lot of heat is lost through useless heating of the board. Even reflective foil sometimes doesn't help much.
In this case, due to the emptiness below, the vegetables and fruits on the shelves will warm up on both sides. Firstly, they lie on a warm base and are heated by it, and secondly, the upper bar also gives off its heat a little downwards.
To speed up the drying process, you can cover the entire structure with a blanket and make several holes at the top and bottom for moisture to escape. After a few hours, when the moisture has evaporated, the holes are closed and drying continues.
Make the distance between the shelves 10-15cm. It could be narrowed and the heating increased. However, do not forget about the moments of laying out the pieces on the shelves.
If the framework is too narrow, this will be inconvenient.
Electrodes are used with a diameter of 4 mm. They are inserted into the drilled holes of the plywood side strips in increments of 12-15cm.
Request a call from a specialist
How to dry fish correctly? The process of drying and drying fish consists of several technological transitions, for which conditions for air speed, temperature and air humidity are determined and must be strictly maintained. As fish products dry, the air humidity level should gradually decrease. Forced evaporation of moisture should not be allowed, as this leads to compaction of connective tissues and prevents drying of the deeper layers of tissue. It is necessary to pause the drying process for some time to redistribute moisture in layers of different depths. The ratio of drying periods and breaks is 1:1.
As fish products dry, air humidity should gradually drop from 75% to 50%.
If the humidity is above 75%, drying slows down completely, and if the humidity is below 30 ... 40%, the surface tissues become denser and make it difficult to move moisture from the deep layers to the surface.
When air humidity is above 70%, dried fish quickly deteriorates during storage, therefore control of the humidity level is especially important.
Overheating of air when drying fish can lead to yellowing of fish products and loss of quality.
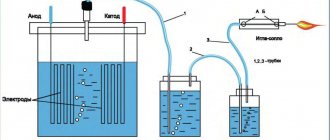
Solar dehydrator with collector
A more complex version of the solar dryer (shown in the photo below) consists of two sections:
- air heating zone consisting of a collector;
- drying zones where products are placed.
The front parts of both zones are covered with transparent material, for example, glass, polycarbonate.
The collector is a box, the bottom of which is covered with a thin sheet of metal painted black. A heat insulator (mineral wool or sawdust) is placed under it to minimize heat loss. Air enters the heating zone through the ventilation holes. Then it goes up through the food shelves and out.
For the device to work effectively, it must be constantly kept with the collector directed towards the sun. If the collectors are installed on three sides, then there is no need for rotation, and such a drying unit will work all day. All cracks are sealed with sealant.
Additional options
You can list design options for drying fish ad infinitum.
Another popular additional option for a drying chamber is a product with an outlet grid.
When making such a dryer you cannot do without:
- hoods (80 cubic meters);
- output grids;
- duralumin corners (you will need a couple of pieces with a length corresponding to the length of the large side of the box);
- bolts (10-12 pieces will be required to fix the corners and hood);
- liquid nails;
- metal rods with a diameter of 3-4 mm - 10 pcs.
Step-by-step installation process
We mark the areas for the holes for the outlet and hood on the smaller sides of the drawer.
Dimensions should not be larger than the landing diameters of the outlet. Holes are cut using a jigsaw.
One of the holes accommodates the hood. You can fix it to the wall panel using 4 bolts.
The second hole is closed with a grille placed on the side border with liquid nails.
Alloy corners are fixed on two opposite sides of the dryer, in the lower and upper areas
Fastening is done with bolts.
6 holes (through) are drilled on the resulting shelves. It is very important to place them evenly on both corners. We construct metal rods from durable stainless wire in the required quantity
We construct metal rods from durable stainless wire in the required quantity.
We install the rods and use the drying chamber for its intended purpose.. Delicious, dried fish is the best addition to beer on a nice pleasant evening with friends
To save money and avoid buying dried fish at the store, you can make it yourself. How? Very simple and inexpensive, you just need to put in a little effort
Delicious, dried fish is the best addition to beer on a nice pleasant evening with friends. To save money and avoid buying dried fish at the store, you can make it yourself. How? Very simple and inexpensive, you just need to put in a little effort.
How to make a box for drying fish with your own hands?
To make a box, we will need some materials, as well as some skills in working with tools.
We will need:
Wooden beams;
Mosquito net;
Stapler;
Wood screws.
1.
First of all, we decide on the dimensions of our future box. We chose the size: 1 meter in height, 1 meter in length and 0.5 meter in width.
2.
We cut the beams to the size we need and sew them together using screws.
3.
To make the box more stable, we will strengthen it with several ribs.
4.
We hook the cables between the side ribs. They immediately perform two functions: they do not allow the frame to stretch, and we will hang fish on them.
5.
Let's start processing the wood. We open it in two layers with Bio-Doctor for bugs.
6.
After the wood has dried, we proceed to opening it with varnish. It should be opened in two layers, with an interval of 5 hours.
7.
After the varnish has dried, we will cover it with a mosquito net using a stapler. We cover it on almost all sides, we don’t cover the front side, that’s where we will have doors.
8.
We make doors in the same way using beams, mosquito nets, and attach them to hinges. They should close the box well.
Assembly options for solar dehydrators
Solar dehydrators are dryers that use solar energy to operate. They are good for drying herbs, fruits or vegetables, even fish. Such designs are more economical, however, they can be used effectively only in hot sunny weather. You can make a very simple design in the form of an ordinary box, or you can make a more “advanced” device equipped with additional equipment.
Simple solar dryer
To make a simple solar dryer for your summer cottage you will need a minimum of materials, tools and time. The assembly of the housing is carried out using a method similar to the manufacture of a dehydrator in the form of a homemade cabinet. The exception is that there is no need to make holes for fans and in the dryer door.
Small slots for ventilation are made in the upper and lower walls of the structure and are equipped with mosquito nets. Another difference is that the bottom surface must be longer than the top, thus achieving an angular position for the door. The drying box must be placed on a stand made of wooden blocks, made like a stool.
The box door must be made of transparent material: glass, plastic, plastic film. It is mounted to the top like a frame.
The box contains slats for baking sheets. Their number is determined by the size of the manufactured box. You should not leave a small distance between the pallets - this has a bad effect on the circulation of air masses.
In the end, all that remains is to select or make suitable pallets. After which you can place the homemade dehydrator in a well-lit place.
Device with collector
A solar dryer with a collector is a more labor-intensive version of the product. The drying box is designed almost the same as a simple dryer. But there are a number of significant differences. This dehydrator consists of 2 parts: an air heating zone (collector) and a food drying zone. The front of both areas should be covered with transparent material.
Holes should be made at the bottom of the heating zone for free air flow. An aluminum plate painted black should be installed on the inner wall of the collector. Air passing along this plate will heat up and flow through an additional hole into the lower part of the drying zone. As it rises, it picks up moisture and exits through the exhaust pipe to the outside.
For a dryer with a collector to work effectively, it must be moved so that the collector is constantly facing the sun. To avoid this, you can improve the dehydrator with additional collector devices on each side.
Modification with fan and thermostat
To make a solar dryer with a fan and thermostat, you should prepare the following materials:
- glass or plastic;
- plywood;
- corners, bars, slats;
- wheels with a diameter of 40-80 mm (for ease of moving the unit);
- aluminum sheet;
- small fan (diameter 120 mm, 12 V);
- thermostat;
- voltage stabilizer with KR142EN8B microcircuit;
- 12 V solar battery;
- mosquito net.
For ease of assembly, you should be guided by the drawing indicating the dimensions of the product parts, which is presented below.
The first step is to assemble the body of the product from beams and plywood and seal it. Then, wheels are mounted on the bottom of the dryer. With their help, the product will easily turn towards the sun. The back door of the dryer is made of transparent material (glass or plastic).
If you follow the dimensions suggested in the drawing, then 7 pallets can be installed in this dryer at a distance of 7 cm from each other. For this purpose, wooden slats are mounted in the body. It is appropriate to make pallets for such a design from mesh material and support slats.
A black painted aluminum sheet is installed on the manifold. A fan is mounted in the upper part of the box and, in accordance with the diagram, an electrical circuit is assembled from a fan, a solar battery, a voltage stabilizer and a thermostat.
When connecting the elements of the electrical circuit, you should be guided by the diagram below.
To increase the performance of the assembled solar-powered dehydrator, it must be placed so that the collector and battery are facing the sun's rays.
Demountable hanging cabinet
In private homes, in most cases they resort to making a box covered on all sides with mosquito netting to protect against insects. Depending on the size, such a structure can be hung on a wall or even be multi-tiered and stand on the ground - then up to several dozen fish can be dried in it at the same time, but the likelihood of access by ground insects increases. The dimensions of the future box are determined only by you, based on your fishing abilities.
For good air access, the box should not have walls - in fact, we are simply talking about a contour frame.
For its manufacture, timber or wooden slats are usually chosen, whose thickness should never be less than 2.5 cm. Moreover, in many cases it makes sense to take thicker material if the structure will have many tiers, or its volume allows you to hang several kilograms at once fish. In order not to make a mistake with the amount of material purchased, you can draw up a drawing in advance.
For beauty, wood is often sanded and then painted, but it makes more sense to do the first procedure before assembling the structure, and the second after assembly. The polished slats are cut so as to make two identical rectangles, which will become opposite walls. They can be connected to each other either by several separate spacers, or by two more equal rectangles. After all this, you need to make another rectangle the size of one of the walls - it will serve as a door. For perfect correctness of all corners, most craftsmen advise using special small metal corners, sold somewhere in the vicinity of the same lumber.
When the frame is ready, if not painted, then at least varnished, because this way the wood, and even in outdoor conditions, will last much longer.
In the upper part of the box, as well as between the struts of the lower tiers, you need to stretch a string or wire on which the fish will be hung. Determine the density of the rows and the vertical distance between the rows based on the size of the catch you can usually boast of. When choosing among twine and different types of wire, focus on the ability to withstand rain and withstand the expected weight of the catch; it is also wise to provide an easy option for replacing sagging or torn pieces.
When this stage has been passed, you can begin covering it with mosquito netting - usually it is simply cut into fragments of the required size and simply nailed to the slats in a taut state. In this way, all sides of the box are finished, except for the one left for the door, and if you plan to hang it tightly on the wall, the opposite side may also be left without a mesh. The door itself is also covered with mesh, after which it is attached with hinges to the “doorway”. The final touch will be to create a “latch” of two or three nails, but here it is worth approaching the task as responsibly as possible so that not the slightest gap remains.
Many, by the way, do not want to make the door themselves, but specifically adjust the dimensions of the box to the size of a standard mosquito net for the window in order to use it as a door. Those who are completely lazy may not assemble any timber frame at all, simply connecting several of these grids together.
Some craftsmen don’t like the fact that when the door is open (at the stage of hanging fish or removing part of the prey), insects can get inside, so instead of doors they sew a zipper into the mesh. This can make the inlet hole much smaller and easier to control, but with this approach the mesh on that side usually deteriorates faster.
What types of dryers for vegetables and fruits are there?
There are several main parameters by which dryers differ from each other:
Airflow type.
Dryers come with vertical and horizontal airflow. Vertical dryers have a round shape, the fan is located at the bottom and directs the air flow upward. Such dryers, as a rule, are cheaper, but have a number of significant disadvantages: uneven drying of products on different levels, less capacity, inconvenient rearrangement of trays, mixing of odors of products from different shelves. Horizontal dehydrators are a little more expensive, but are distinguished by uniform drying, greater capacity, and convenient rearrangement of trays. These dryer models have a rectangular shape; the fan is located on the back wall and evenly blows food on all shelves, so that odors do not mix.
Choose horizontal dehydrators - they are characterized by more uniform drying and ease of use.
Capacity.
Among horizontal dehydrators there are models with 6, 7, 10 and even 20 trays - for any needs. The most popular are dryers with 7 or 10 trays - this capacity is sufficient for home use even in large families or for drying crops. One of the most compact models is the Dream Vitamin DDV-07 dehydrator with 7 trays. And for large volumes of products, there are super-capacity dryers with 20 trays. A 10-tray dehydrator is the golden mean, which is suitable for almost any need - city residents, summer residents, gardeners, large families with children.
Materials.
When choosing a dehydrator, you should pay attention to the material of the trays. To protect products as much as possible from the absorption of toxic substances, we do not recommend models with trays made of ordinary plastic
Dryers with steel racks, such as the Dream Vitamin DDV-10, are preferable. If the durability of the case is an important factor for you, then you can choose a model with a stainless steel case, for example, Dream Pro.
Give preference to dehydrators with steel trays - they are safer and more durable.
Time and temperature settings.
Modern dryers for vegetables and fruits allow you to set the drying time, after which the device will turn off automatically
Another important function is setting the drying temperature. For raw foodists, models with the ability to set the temperature no higher than 40°C are suitable.
This function is provided, for example, in the Dream Vitamin dehydrator. This means that with it you can naturally preserve vegetables, fruits, berries, herbs, and mushrooms for many years, while preserving the nutrients of the food - vitamins, enzymes and microelements.
Plus, the Dream Vitamin control panel contains useful tips for drying different foods.
Fish meat dryer with fan
In order to make a dryer with a fan, you will need the following materials:
- Plastic container with lid. You can use a plastic box for children's toys.
- Hood with outlet grille. Sufficient fan power is 280 cubic meters. Instead of a ventilation hood, you can use a PC cooler.
- Threaded rod on M8 or M6, you can also use metal rods with a diameter of 3 mm.
- Nuts, washers, bolts.
The sequence of work for manufacturing a dehydrator is as follows:
- At the bottom of the drawer, on its short side, you need to mark with a marker the location for installing the ventilation hood. The location for fixing the grille for the hood is also marked; it is best if it is located on the lid. If this is not possible, it is built in on the opposite side of the fan in its upper part. The holes can be cut with a jigsaw, a circular saw of a suitable diameter, or use a drill with a thin drill: holes are drilled around the perimeter of the circle, then the jumpers between them are removed with a regular knife. If you heat the knife blade, the plastic will be cut easier.
- The fan and grille for the hood are installed in the prepared holes and fixed to the walls of the box with fasteners. The grating can be mounted on liquid nails.
- Next, you need to mark the location of the holes for the rod, which will hold the fish or pieces of meat during drying. To do this, masking tape is glued around the perimeter of the box, and markings are applied to it. The holes are drilled with a screwdriver or drill. Another option for attaching the drying rod is using aluminum corners. They are fixed on the long sides of the container with the shelf downwards, fastened with bolts, and through holes for the rod are installed on the shelves of the corners. With the help of such corners, you can make several rows inside the dryer.
- The threaded rod is cut into the required number of rods of the required length using a hacksaw.
- The rods are inserted into the holes and secured with nuts and washers. If you need to dry something large, you can unscrew the nuts and remove the rods.
- The fish is strung on rods through the eyes or attached to hooks and hung on rods. Then the container is closed with a lid, the fan is turned on, and the box is placed in any convenient place for several days.
Fish meat dryer with fan
Such a dehydrator is universal, since it is used not only for drying fish, but it is also a dryer for meat, vegetables or fruits. In addition, if you place thick parchment on the rods, you can dry small products - berries and mushrooms. The container dryer is quite spacious, airtight, and protects food from the penetration of any insects. How quickly food dries will depend on the temperature outside the dehydrator. You can modify such a dryer by installing a special timer adapter to set the operating time, as well as a device that supplies warm air inside.
Homemade dryer from an old refrigerator
A homemade dryer can be made from an old refrigerator. This will make a good dehydrator for fruits and vegetables.
Manufacturing algorithm
The process of manufacturing a drying installation from a refrigerator occurs according to the following scheme.
- Carefully dismantle the compressor, radiator and freezer so as not to damage the tubes and avoid leakage of the working substance (refrigerant).
- Remove the inner lining and insulation, leaving the rubber seal on the door.
- A fan is installed in the place where the compressor was installed.
- A hole is made on top (on the roof) of the refrigerator for a pipe (a two-meter piece with a diameter of 100 mm is enough) or an aluminum corrugation 3 m long, which is secured with glue.
- A hook is attached to the door to securely fix it.
- Attach wooden slats to the side walls of the refrigerator box with self-tapping screws or bolts approximately 10-20 cm apart, so that shelves can then be placed on them.
- If there are any holes left, they are sealed.
- To speed up the drying process, place a hood on the pipe or corrugation.
The final design is shown in the photo below.
Nuances of creating a design
The inner lining and insulation are removed because plastic and foam decompose when heated, releasing harmful substances.
When dismantling the insulation, you should wear gloves and a respirator to protect against glass wool (if it served as insulation).
Since the remaining tin cabinet is not particularly rigid, its degree may need to be increased by installing spacers or a galvanized inner casing.
To blow food, it is allowed to use a regular 18 W hood fan with a diameter of 125 mm, only installed to force air inside. Installing a fan heater will significantly speed up the entire process, increasing the productivity of the installation. Instead, you can attach one or two electric heating elements to the back wall with a total power of up to two kW - then the device will work like an electric dryer. In this case, a second exhaust fan should be installed in the upper part of the box.
The created unit can be used all year round. But if a regular fan is installed, then painting the case black, as well as placing the device in the sun in the warm season, helps to increase the temperature inside, which speeds up the entire process of drying food.
In order for the created dryer to work effectively, it is necessary to ensure good airflow of the product laid on the sheets. This is achieved by leaving a gap of 2 cm between the frame and the door on one side, and the back wall of the box on the other.
When using a refrigerator with conventional fans without installing heating elements, it is enough to remove only the compressor with freezer and radiator. Thus, the grooves for installing shelves on them remain, but if necessary, you need to add more. The following can be used as shelves:
- grates intended for grilling, but with cut off handles;
- metal sheets with holes drilled in them;
- meshes with different cell sizes;
- old mesh refrigerator shelves;
- lattice structures made of wire or wooden slats.
It’s easy to come up with a variety of options for creating shelves for vegetables and other products yourself and make them from scrap materials.
If the compressor is in working order and the cooler circulation system is not damaged, then these spare parts can be useful for creating a freezer with your own hands.
Creating a dryer from a refrigerator takes several hours if you have the necessary parts and tools. The design can be improved in various ways, by equipping it, for example, with temperature sensors and a simple automation system, or by experimenting with the location of the fans. To protect against insects from entering the dryer, the ventilation holes should be covered with a mosquito net or gauze folded in 2 or 3 layers.
Dehydrator from a homemade cabinet
A dehydrator can be made from a homemade cabinet in a manner similar to the previous one. Only instead of a refrigerator there is a plywood cabinet. For this you will need the following materials:
- plywood or chipboard, fiberboard;
- wooden slats;
- metal corners and screws;
- aluminium foil;
- electric heater;
- 2 fans;
It is better to use a fan heater instead of a separate heating element. The other fan will be a regular one, working for exhaust.
The cabinet must be arranged in such a way as to ensure unobstructed air circulation. It is collected in this order.
- Make a frame from bars of the required size.
- The box is sheathed on the sides, top, bottom and back with plywood, fiberboard or chipboard.
- Install a front door made of similar materials with many holes on the hinges, approximately as shown in the photo below.
- The inside of the cabinet is covered with foil.
- Install the shelf holders and the baking trays themselves.
- A fan heater is mounted in the lower rear part, and a regular fan in the upper part.
The fans can be connected in parallel and turned on with a switch. The structure can also be additionally equipped with light bulbs indicating the operation of the installation. The fan heater is equipped with a built-in thermostat. It will automatically turn on the heating element. If necessary, you can turn off one spiral to reduce the power of the installation.
Manufacturing of drying trays
Inside the cabinet, homemade nets are placed on the guides.
They are also assembled from wooden planks connected with construction angles.
Just don’t glue the pieces of wood together!
When heated, the glue will release toxic fumes. Therefore, only corners or a stapler.
It is better to choose a metal mesh made from food-grade stainless steel on which the products will be placed. It will not release any chemicals when heated.
Beekeepers filter honey through this. The only problem is to find it.
Many people advise not to bother and take the reinforcing material that goes under the plaster. It supposedly contains only fiberglass and nothing more.
However, do not forget that there is also a binding element - an epoxy compound. It is also not recommended to use a mosquito net.
It contains plastic and toxic paint. With such trays, after just a few years of abundant absorption of “healthy” dried fruits, oncology will definitely await you.
You shoot the mesh onto the bar with a stapler along the entire perimeter.
Such pallets are made in just a few hours. For the above cabinet sizes, the optimal number of nets inside is 4 pcs.
This is necessary so that warm air can circulate freely from both the back and front.
It is better to place the pallets themselves in such a way that the first is located close to the door, and the second to the back wall, etc.
With such a checkerboard layout, the warm flow will consistently blow tier after tier.
The tray is pushed in or placed on guide bars. They are made either wood or aluminum.
In this case, aluminum releases heat faster after heating. However, the question of its environmental friendliness and toxicity always remains open. Wood is still safer.
Cabinet dryer with fan heater
The first option is to use an old, unnecessary kitchen cabinet for this.
It’s better to assemble it yourself from wooden boards. Materials you will need for this:
- finished wooden cabinet or planks
- temperature sensor with thermometer
- wind blower heater 1-2 kW
- insulating layer of foil material
The cabinet can be assembled to any size you need. Many people do not recommend using composite wood - chipboard, fiberboard, OSB.
They contain too much glue and without sufficient insulation when heated, they can release harmful substances.
But most do not pay attention to this, reassuring themselves that, firstly, such a dryer will operate at a relatively low temperature (up to 40-45 degrees), and secondly, everything inside will be lined with thermal insulation. Because of this, it will be possible to avoid dangerous heating of the wood and direct contact of hot air with it.
You fasten the boards with furniture screws and attach the door to the front.
The optimal size of the cabinet so that it does not interfere with your home and is convenient to carry:
- width 60cm
- depth 40-45cm
- height 70-80cm
To ensure that the door closes tightly and does not let out heat, attach two latches at the top and bottom.
Assembling an infrared dryer
An infrared dryer is suitable for mushrooms, vegetables, nuts and fruits. It’s quite easy to make it yourself. To do this you will need the following materials:
- iron wire with a diameter of 5 to 8 mm;
- a cardboard box, for example, from a vacuum cleaner;
- aluminium foil;
- metal mesh;
- light bulb socket;
- awl;
- screwdriver;
- self-tapping screws;
- socket for a regular light bulb with fasteners;
- thermometer;
- infrared lamp;
- aluminum tape or glue.
The installation is created in the following sequence.
- The insides of the box are covered with aluminum foil using tape or glue.
- Shelves are made from mesh according to the size of the box.
- On any wall near the bottom, make a hole for the supply wire and secure the cartridge with self-tapping screws.
- Screw in the infrared bulb.
- A thermometer is attached to any sidewall.
- Cut the wire into pieces that are approximately 5 mm longer than the width of the box.
- Punch holes in the sides for the rods for the shelving.
- They insert a wire into them and seal its protruding ends with tape on the outside.
- Stack the shelves.
As a result, after all the manipulations, you will get an installation similar to that shown in the photo below.
The lid can be the side parts of the box, or it can be made separately from the same cardboard. If you want to automate the design, you should use a temperature sensor
. Under his control, the light will turn on automatically.
Also in the created design you can use an incandescent lamp (its sufficient power is 60 W) or a heating film
, used to create heated floors. In the latter case, at home, a piece of 50 by 100 cm with a power of 110 W is sufficient. In general, the length of the fragment is selected based on the box used.
When using film you will also need:
- insulation, for example, bitumen, used to create heated floors;
- a set consisting of 2 clamps, two eyelets and the same number of terminal rings, which is intended for connecting power to the film.
PVC tape is laid on top of the bitumen insulation. To connect the film, you will need to solder wires and contacts.
This dryer allows you to reach temperatures of almost 60 degrees
. It can be rolled up and placed on the bottom of a box made using the previously indicated method.
Homemade collapsible dryer made of plastic panels and corners
This option is suitable for plastic lovers. You will need the following materials:
- 2 trimming sandwich panels 250x400;
- corner for connecting panels;
- edge profile;
- frames with mesh based on the principle of removable mosquito nets for plastic windows.
The advantage of this model is mobility, easy assembly, low weight, as well as the small volume it occupies when stored disassembled. To assemble, simply insert the frames into the connecting corners without using adhesives. We will have a side fence for the dryer.
Then we will install the same corners on the lower edges of the frames and place the bottom - a piece of panel - on them.
The next stage is to make a fastening system for holding fish from pieces of plastic corner profile. To do this, install corners vertically on the inside in the corners of the body and place four more on them in a spacer.
Place salted fish strung on wooden skewers or pieces of steel wire on the prepared hanger.
It is better to cover the bottom of the dryer with paper towels to collect the draining brine. We close the top of the structure with a lid assembled from the second piece of the panel and four pieces of the edge profile. The top cover can be non-removable, fastened using glue or a stapler.
Infrared dehydrator
A good dryer for herbs, nuts, mushrooms and fruits can be made using an infrared light bulb. For work you need the following materials and tools:
- wire with a diameter of 5-8 mm;
- small cardboard box;
- foil;
- metal grid;
- lamp holder with fasteners;
- thermometer;
- 60 W infrared lamp;
- screwdriver, knife and awl;
- screws, tape.
The inside of the box is covered with foil and mesh shelves are prepared according to its size. On one of the walls below, a hole is made for the wire and a socket with an infrared lamp is fixed there. A thermometer is attached to one of the inner walls of the box.
Mesh tray holders are made from pieces of wire. To do this, you need to pierce the walls of the box, thread pieces of wire and secure their ends with tape.
You can use a thermometer to monitor the temperature inside the device. It is recommended to dry plant products at a temperature of 40-50 degrees. If the temperature inside the dryer exceeds the norm, you can turn off the light bulb for a while or leave the drawer lid ajar. This product can be made more convenient to use by installing temperature sensors. Which will automatically turn off the lamp when it overheats.