Making a boomerang is just as fun as playing with it. As if by magic, it flies around the circle and returns to its owner. How to make a boomerang at home?
Many guides with drawings and diagrams for making boomerangs have already been written, but I still want to share with you my experience on how to make a boomerang that returns from wood. If you wanted to replenish your hunting arsenal, then I have to disappoint you - real hunting boomerangs used by primitive tribes were non-returning and quite heavy. Those returning were more likely to serve for entertainment, and perhaps to drive birds into nets (although no written evidence has been recorded). The boomerang that I will tell you about today weighs only 80 g, and is hardly capable of harming anyone larger than a fly.
Homemade Forum: X-Shaped boomerangs (simple) return faster - Homemade Forum
Material of manufacture - medium and heavy types of wood, oak, linden, birch, beech, etc. In fact, it is difficult and not advisable to use plywood for this scheme. In the middle of the two blades, grooves are cut on different sides, after which they are glued together with PVA glue or wood glue, in general, with any sufficiently strong glue for wood. For greater strength, they can be connected with small screws. In the English article cited above, it is proposed to make mainly L-shaped boomerangs. In my experience, L-shaped boomerangs are significantly inferior to + (cruciform) ones in absolutely all characteristics. They don't fly that far. They must be thrown at a strictly defined angle with one specific force so that it returns exactly back. The time spent in the air is one and a half times less.
The flight of a boomerang is an amazing sight. With a strong throw, in flight it describes a large loop, flying far upward - forward and returning back. If you throw a stone with exactly the same force, it will not fly even a third of the distance that a good boomerang flies. You can take the boomerang with you on active holidays. You will get a lot of interest from such a vacation. You can use it as a sports equipment when doing physical education and sports, developing arm muscles, coordination of movements, etc.
I recommend launching a boomerang, especially a sports one, only in large open areas, in little windy weather, and when there are no people nearby. If there are buildings nearby, the glass may be broken or the shell may fly onto the roof somewhere. If people walk nearby, they might get a teapot.
Above are diagrams of amateur boomerangs. Sports ones are large in size and weight.
How to make the perfect boomerang:
-Make the blades wider, as this increases the number of rainoldos.
-Lengthen the blades more, this will reduce the inductive drag.
— Concentrate the mass at the ends of the blades, this increases the reserve of rotational energy
- reduce the number of blades, this will reduce the harmful interaction of the blades
If you do all this, you will get up to a 20% increase in flight data.
The result is a diagram of a two-blade straight boomerang, similar to a helicopter propeller. But a two-bladed one will be absolutely unstable, and the use of a stabilization scheme is not justified. The three-blade design meets all requirements. If you give the blades a backward sweep, the induced drag will decrease at high angles of attack; this happens at the moment the flight path changes. And rotational energy will not be lost at supercritical angles of attack. In general, you will get an increase in range and flight time of 3 -8%
Boomerang alignment
We have mastered everything regarding how to make a boomerang, but it still cannot fly as it should. In order for the product to return when thrown, it must be centered. To do this, you need to make a loop of thread and thread a boomerang through it so that the blades point down. When the product is not centered, the longer part of it outweighs, but it needs to hang perfectly evenly. This can be achieved by grinding the material, or by drilling a small hole in the smaller blade and pouring glue into it, inserting a piece of lead. In this way, the workpiece is brought to perfect balance, after which all these ancient weapons are polished.
Cross-shaped boomerang
Material for production: linden, oak, birch or other heavy wood.
Two-bladed version
According to the diagram below, make boomerang blades. Cut grooves in them. Then glue the “wings”, or connect them with screws, making sure that they are balanced.
Three-bladed version
The range and flight time of such a boomerang increase from 3 to 8 percent. If you do not have experience with a boomerang, then it is advisable that the length of the blades in both variants of the scheme does not exceed 25-30 cm.
Why the boomerang is coming back
You can understand how to make a returning boomerang only by studying its geometry. We figured out why it takes so long to fly. Now how does he come back? The thing is that the boomerang blades are different in length, one is longer than the other by a sixth. However, if you hang a boomerang at a corner, you can see that the long blade will be the same in weight as the short one. Thus, when the boomerang rotates, its long blade receives more air resistance than the short one, because of this, with each rotation it moves to the side. Having understood the theory, you can begin to understand how to make a boomerang. Now all that remains is to reproduce everything in the material.
How to launch a boomerang correctly
The boomerang is launched with the right hand, the throw is made at an angle from 10 to 35 degrees. The flight trajectory depends on the angle of the throw. If the launch angle exceeds 45 degrees, the boomerang will shoot up sharply and then also sharply return along an almost vertical trajectory onto your head.
The boomerang throw must be strong enough, and in the final phase of the throw, it is necessary to give the projectile a twisting moment with a sharp movement of the hand.
The flight of a boomerang is highly dependent on the wind; it is better to throw against the wind, then the wind will help the boomerang when returning. For accuracy shots, it is better to use a calm day.
Watch the video of boomerang throws.
Please note that catching a boomerang is done by clapping with both hands! Trying to catch a boomerang with one hand can damage your fingers!
Like a sling, a homemade boomerang requires a lot of practical experience to accurately hit the target. This is not a rifle or a crossbow; a lot depends on weather conditions and the ability to correctly throw a boomerang in these conditions.
Here is a recording of boomerang flights from a quadcopter.
As you can see, with the right skill, the boomerang always returns.
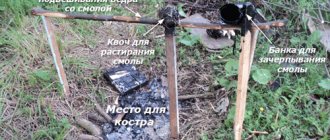
Drying wood to make a boomerang
After the required branch is cut down, its annual rings need to be covered. To do this, use garden pitch, resin, you can even fill it with PVA glue. In general, this is done to prevent moisture from escaping very quickly through the cuts. This way, the wood will dry out gradually and there will be no cracks in its structure. The material should dry for at least six months, but in general, a year would be good. But you can reduce this time to a month. Let the workpiece lie “sealed” for a week, and then you need to remove the bark from it, leaving only rims of a centimeter or two at the ends of the cuts. Then the material must lie for another two weeks in a dry place, after which there is nothing left but to make a boomerang with your own hands and test its aerodynamics.
How to make a boomerang with your own hands
First, you need to transfer the outline of a homemade boomerang onto plywood or the material from which you will make the boomerang and cut it out.
The easiest way to do this is to use a paper template printed on regular office paper - here is an example of what fits on one A4 sheet.
The second part is printed separately and used after tracing the first.
A regular hand jigsaw works well for cutting. Slowly, but efficiently, however, you can also use an electric one - everything is in your hands.
The profile of the boomerang is controlled using counter templates as in the figure below.
However, for simplified models based on those boomerang drawings that have a flat bottom and top, you can do without counter templates - just draw the edges of the profiles, fortunately, the slopes are not complicated.
Processing is carried out using sandpaper, first we use coarse-grained paper, then finer ones. It is better to do this work outside - there is a lot of wood dust from sanding! A grinder will come in handy here; with its help you can make a boomerang in 30 minutes. But doing it manually can take a whole day!
After production, the boomerang is varnished. Yacht varnish has proven itself very well - it holds up well, gives the texture of wood and withstands shock loads quite well. The boomerang is coated with three layers of varnish, allowing time between varnishing procedures.
If you want to apply a design to a boomerang, this is done after the first coating with varnish. Acrylic paints from a regular office supply store work well.
Making a boomerang lift
When the contour is perfect, we begin to form the convex parts so that the product can stay in the air. The picture shows all the thicknesses of the boomerang. You need to do it exactly like there. In order not to make a mistake with the dimensions on each surface area, you need to make patterns. Segments are cut from cardboard to depict the shape and the exact size of the convexity of a particular part of the boomerang. After this, they are cut out to create patterns. By applying them, it is easy to see how much you need to grind.
Now let's look at how to make a boomerang out of paper
This is a great toy for kids, and they can make it themselves. So, let's start in order.
- You need sheet A-4 as tightly as possible. Place it horizontally in front of you and bend it in half away from you. So that the length of the sheet remains unchanged, and the width is doubled. We cut it in half, and in the future we work only with one half.
- We bend it in half lengthwise and carefully smooth out the bend. Then we unfold the sheet and bend its left half towards the central fold, one centimeter, without reaching it. Then also with the right side. The halves should be bent in half, and a central bend should be visible between them. To understand exactly how to make a boomerang out of paper, we use the diagram
- In this position, fold the sheet across all bends exactly in the middle of the sheet. Then on this line we turn the corners to the middle, as when we make an airplane. After this, we unfold the corners and tuck them inward along the bend lines.
- Then you need to unfold this origami until the left and right sides have been folded towards the central bend. Unscrew the right side, in its center the fold lines in the form of a diamond will be visible. Pressing it with your finger, you need to fold it along the bends so that you get a triangle. It should be inside, and the entire structure will be bent in half. Everything is clearly outlined in the diagram.
In ancient times, boomerangs were made mainly for the reason that they flew further than any other object that a person threw, and only closer to our times they began to make them so that they also returned to the hands of the thrower. And they were able to explain that return effect only when they mastered aerodynamics and the first planes flew.