Plastic bottles have firmly taken their place in everyone's life as disposable containers and their use is only in the form of containers, but we can get much more benefits without throwing them away. For most people, a bottle is a useless thing, but with some ingenuity you can find many ways to make your life easier and save money using bottles. can be made from a plastic bottle ; you just need the bottles themselves and a little imagination.
Sprinkler for the garden.
One of the simplest ways to usefully use a bottle in a vegetable garden a garden sprinkler out of it , it couldn’t be easier to make. We attach a plastic container to the garden hose and make several small holes, then tightly seal the hose with the neck. This is how we made a garden watering system.
Tip: For convenience, use a square container or secure a round one with a weighty object.
DIY cute plastic insects
Making crafts from plastic bottles is an easy way to make beautiful little things and decorations. This is an excellent leisure option for those who want to create something beautiful with their own hands together with their children. In addition, from waste material you can make wonderful toys or even durable teaching material for classes to familiarize yourself with the outside world.
Below are the simplest master classes using plastic bottles to create various insects.
Amazing plastic butterflies
Bright butterflies made from plastic bottles with your own hands can decorate both a city apartment and a gazebo in the country. The process of making them is very simple and exciting, and most importantly, you can connect your child to it!
The creativity kit is standard:
- plastic bottle (its color does not matter);
- scissors;
- sheet of cardboard;
- pencil;
- wire;
- acrylic paints;
- beads of different sizes.
Making a butterfly from plastic bottles step by step:
- Cut out the middle part of the bottle.
- On cardboard, draw a template for the future butterfly and cut it out.
- Trace the workpiece, placing it on the plastic, and carefully cut along the contour.
- Attach the wire to the bend line.
- Decorate the wings as you wish and decorate them with beads.
There are a huge variety of design options, here are some of the most interesting ones for your inspiration:
Such different ladybugs
You can create ladybugs from plastic in different ways, as well as from different parts of the bottle itself. We offer you the most popular options.
Option No. 1 – Ladybug made from plastic bottles
You will need:
- 2 plastic bottles 0.5 l (black plastic) and 1 l (red plastic);
- glue or stapler;
- scissors;
- acrylic paints.
Progress:
- A liter bottle will act as a body.
- We cut out the red wings of a ladybug from a larger bottle.
- We paint black dots on the wings.
- We attach the wings to the body with plastic glue or a stapler.
- We decorate the eyes and antennae (you can also use plastic).
Option No. 2 – Ladybug made from plastic spoons
You will need:
- small plastic bottle;
- 2 plastic spoons;
- black and red acrylic paints;
- glue.
Progress:
- We paint the bottle black, and the two spoon handles red with black dots.
- Glue the cuttings to the neck of the bottle.
- We add eyes and a mouth.
Option #3 – God’s Cork Box
You will need:
- cap from a plastic bottle;
- paints.
Progress:
A tiny ladybug can be made from an ordinary lid, simply by decorating it accordingly. It can become both a toy for a baby and a refrigerator magnet. To do this, just attach a magnet or double-sided tape to it.
Now you know that you shouldn’t rush to throw away empty plastic bottles, because you can easily and quickly use them to make cute ladybugs with your baby.
Holder for your mobile phone.
It is not uncommon for the charger wire to be missing from the socket to the place where you can put your mobile phone; everything can be fixed by making a clumsy phone holder . It is necessary to cut the bottle diagonally, take the bottom and cut a round hole in the upper part for the socket. Now the phone will lie in the bottom using a socket.
Tip: It is better to cut the bottle as close to the top as possible, this will allow you to hold the phone more securely.
Pencil case
You will need: 2 half liter plastic bottles, a zipper, a glue gun, a stationery knife.
Master Class
- Take a plastic bottle, step back 4 cm from the bottom and mark it with a marker.
- Cut the bottom of the bottle along the marked line.
- Take the second bottle, move 4 cm away from the neck and mark it with a marker.
- Cut the top of the bottle along the marked line.
- Apply hot glue to the zipper and glue it to the inside edge of one part, then to the second part in the same way.
- Wait until it dries and feel free to use this creative pencil case.
The pencil case made from plastic bottles is ready!
Stand for stationery.
Every time you lose office supplies , you have to look for them, you need to make an easy-to-make stand . In addition to the bottle, you will need a bolt and nut. You need to cut off the top and bottom, then drill a hole in the plug and bottom and connect it with a bolt and nut. It will be convenient to use this since it turns out to be 2 sections. The upper compartment will accommodate pens and pencils, and the lower compartment will hold paper clips, buttons, graters, and you won’t have to take out your pens for small things.
Advice. Tighten the bolt and nut loosely, then the top will be able to rotate.
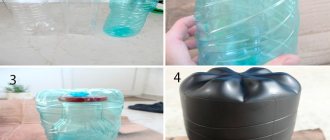
Money box
You will need: 2 liter plastic bottle, stationery knife, glue gun, thick cardboard, marker, pink paint.
Master Class
- Cut off the center part of the bottle.
- Glue the top and bottom of the bottle together.
- Cut a hole for coins.
- Cut out the ears from thick cardboard, then glue them on.
- Paint the piece pink and wait until it dries.
- Make eyes and draw a spot with a marker.
The piggy bank is ready! Also check out the article: piggy banks made from plastic bottles.
Plastic Bottle Craft Ideas Piggy Bank
Canister scoop with handle
empty canister with a manual one; it can be useful if you don’t need it or have become unusable; it will turn into a scoop . It is necessary to mark the canister with a marker as in the photo and cut it.
Tip: For convenience, make the nose of the scoop square.
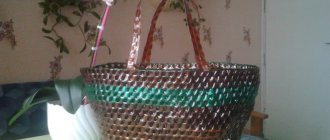
Plastic vases for fresh or artificial flowers
Vases made from plastic bottles are simple and beautiful crafts, the making process of which can even involve a child. The interior is made up of little things! By choosing a material that matches the color and texture, you can make a beautiful vase that will look appropriate in the kitchen, living room or nursery. So, if you try, you can save money, have fun and create a practical thing.
To create an incredibly beautiful vase, we only need a bottle, scissors and a little free time.
- Cut the top of the bottle approximately in the middle, leaving enough space for the fringe to weave.
- Make equal cuts from top to bottom.
- Carefully bend all the resulting strips outward.
- Turn the bottle upside down to make sure the cuts are even on all sides.
- Start folding the strips one by one, as shown in the figure.
- Continue until all the stripes are intertwined.
In addition to the vase, you can also make products from plastic bottles like flower pots. Here are some ideas and examples of their design:
Laminating a glass jar.
We use glass jars for various purposes and have to mark them in all ways, but the inscription on the glass does not stick well, and the glued pieces of paper quickly become unusable, and to laminate them . With an industrial hair dryer, this problem will be solved forever, and the strength of the cookware will increase. If you break it, you won't have to pick up the pieces and cut your hands. Using your imagination, you can decorate the jar well. It’s easy to do, you just need one bottle of suitable size and color and a piece of paper with an inscription or design that we want to attach. However, there is a way to do without an industrial hair dryer.
Method one.
Cut off the top of the bottle and place it on the bottom with the cork facing up, then place the jar with the inscription on the cork, put on gloves and start heating the industrial hairdryer. When the hairdryer is hot, you can begin to gently heat the jar in a circle, without stopping in one place. You need to take a reserve, the plastic will settle both in width and height. When the jar is tightly sealed with plastic, cut off the excess and heat the angular parts again, if all parts have become even, the jar is ready.
Tip: Start heating the plastic from the bottom, gradually rising.
Method two.
Cut off the top of the bottle and place a jar with an inscription glued to the bottom. To heat the plastic in this case, we need a tall pan of water and a stove. The pan should not be full, otherwise water will splash onto the stove. When everything is ready and the water is boiling, we lower the bottle into boiling water and begin to turn it slowly, holding the neck of the glass jar with tongs.
Tip: Holding the jar at an angle will achieve the effect faster.
We make a clamshell with our own hands
This process does not require much effort. Materials are easy to obtain. To make high-quality tackle, you just need to do everything as accurately and accurately as possible.
What you will need
Each of the following three options will require its own set of necessary materials:
- For a cone-shaped tackle, you will need two rings: one larger, the other smaller. For example, the diameter of the first can be 35 cm, and the second - 25 cm. You also need three holders. They can be made, for example, from thick wire. You will need a metal net and a nylon cord to hold the various parts together.
- To make gear from a plastic bottle, you will need two five-liter bottles, scissors for cutting the plastic, a knife for cutting holes and a nylon cord for connecting the parts. An awl will also be useful for those holes where the cord will be threaded.
- For a yater you need strong steel wire, which will be the basis of the tackle, a metal net, scissors for cutting it and a cord for tying the parts to each other.
Manufacturing methods
It should be noted that to fasten the parts you can use not only a nylon cord, but also a wire that is thin and soft enough to be used to bind the parts. However, in this case, it will be more difficult to fold the crayfish compactly when storing it, as well as for transportation.
Cone-shaped
- First you need to prepare two metal rings. The easiest way to make them is to make them from wire, securely tying their ends together.
- Now you need to prepare the holders. There should be three of them. They fasten both rings so that the smaller one is 15 cm above the larger one.
- After this, the structure is covered with a metal mesh on almost all sides so that the smaller ring remains an opening.
- You can attach a cord to pull out the structure when there is a catch in it.
- There are several manufacturing options. Here's one of the most common ones. This will require two five-liter bottles. They need to cut off some parts.
- In one of them we separate the part in which the neck is located.
- The other has the part where the neck is and where its bottom is.
- We insert the second bottom into the first, pierce holes with an awl and tie the two parts with a nylon cord.
- At the part where the neck is, we cut off this part itself. This is necessary in order to widen the hole. Then we attach it with the neck inward.
- We punch holes everywhere so that the tackle can quickly sink into the water. In the middle part we make a rectangular cut that forms a door. We tie the edges with nylon cord. Through this hole we can put bait and get the catch.
- We gave an example of making gear from two such bottles. This can be done from one (shown as an example in the figure) or, say, four of them.
In the form of a yater
First, let's show what it looks like in finished form:
- First you need to make a frame from thick wire. To do this, it is rolled in a circle several times. Then it is pulled apart, attaching the ends so that there are circles around the edges.
- Then we cover it with a metal net to form a pipe.
- We attach the edges with a nylon cord to the turns of thick wire, which makes up the base.
- Now you need to prepare two funnels from the mesh. To do this, we cut out circles from a metal mesh and fasten them together to form cones. We cut holes on the narrow side so that crayfish can fit through them.
- We attach the mesh cones to the edges of the tackle so that the narrow parts face inward. We tie them with a cord.
- Now you need to thread the cord as shown in the figure through two cones and secure it to the outer circles of the wire base. This needs to be done in two places. This attachment is necessary so that the narrow holes do not deviate towards the outside of the vessel and the crayfish cannot crawl away.
- There's only one thing left. Somewhere in the middle part of the letter “P” you need to cut a “door” in order to put bait through this hole or get prey. When the hole is not in use, the mesh must be tied with a cord.
Thread holder.
Are you tired of balls of thread tangling with each other and getting stuck in knots? The solution is simple - we make a device from bottles of any size to hold the threads in one place . At the same time, the balls will rub less, get tangled and get stuck. You can make a holder that can be attached to a chair or armchair. We cut the bottle closer to the neck, leaving a part that needs to be cut in the form of a rectangle to the bottom, after which we make a hole in the resulting tail according to the size of the lid and put it on.
Tip: The device can be hung by making holes on opposite edges and threading a thread through them.
Feeder
You will need: a liter plastic bottle, two wooden spoons, a stationery knife, a marker, rope, birdseed.
Master Class
- Step back 7 cm from the neck of the bottle and mark the location of the future hole with a marker.
- Mark a hole on the opposite side slightly higher than the first one, so that in the future the spoon will be at an angle and the food can pour onto the spoon.
- Step back 5-7 cm and mark the holes for the second spoon with a marker in the same way.
- Cut the marked holes and insert the wooden spoons as shown in the image.
- Wrap a rope around the neck of the bottle.
- Fill the bottle with birdseed.
- Hang the feeder on a tree branch.
The plastic bottle feeder is ready!
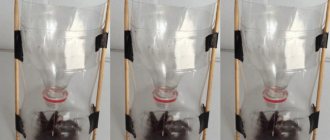
Humidifier.
With the onset of cold weather, all possible types of heaters are turned on in every home, and at the same time the air in the rooms becomes dry , and we begin to experience discomfort. Headaches, skin problems, irritation of the mucous membrane and other inconveniences can be avoided by making a silent, simple, convenient and reliable room humidifier. For this you will need:
- Adhesive tape
- Scissors or knife
- Strip of fabric or lace
- Two liter bottle
- gauze fabric
Tip: By pouring essential oils into a container, we get an air freshener.
Instructions
- We make a 5×10 centimeter slot in the side of the bottle; errors are acceptable.
- Using strips or string, we hang the resulting bottle on the straight upper pipe entering the battery with the hole facing up and secure it tightly with tape so that the bottle does not jump out and spin.
- We fold the gauze several times to form a rectangle 10 centimeters wide and a meter long.
- We place the middle of the folded fabric in the hole, and wrap the ends around the battery pipe.
- Pour water into the resulting container and moisten the wound gauze, this is the maintenance of the device.
Balls for the Christmas tree
Recently, handmade New Year's toys have become very popular. And many crafts can be made from bottles. We decorate the cut off tops with cord, fabric, and ribbons. Inside, through the former neck, we insert a small light bulb - and there you have it - a garland!
Important! Before starting to work with the cut part of the bottle, do not forget to treat the cut edge with a burning surface. This way the edges will melt and will not be sharp.
But you can do without light bulbs - just decorate the tops of the bottles beautifully, tie a ribbon and hang them on the Christmas tree. The interest of the guests is still guaranteed - only you will have such a tree.
Another plus is that these decorations are very easy to make and can be made even with small children. Just make sure that the plastic parts fall into the baby’s hands already processed, so that they are not cut off on a sharp edge. Children's crafts made from plastic bottles will delight your family for a long time.
Helpful information! Crafts made from plastic bottles have become so popular that even experienced gardeners are making beds from plastic bottles to improve their plots.
Mosquito trap
We make a mosquito trap from a two-liter bottle . The trap will attract small insects with the results of fermentation processes, namely carbon dioxide. To make it you will need:
- 1 gram baker's yeast
- two liter bottle
- dark fabric
- 50 grams of sugar
- 200 ml of water with a temperature of no more than 40 degrees
We begin production by cutting it so that the neck, upside down, fits tightly into the bottle and does not reach the water. Now that the container is ready, pour in sugar, yeast and fill it with forty-degree water, it should not be warmer or hotter. If the liquid is too hot, fermentation will not begin due to the death of the yeast bacteria. Pour the water slowly and stir the mixture. Now we insert the neck into the bottle like a funnel. To catch mosquitoes, the trap must be covered with thick fabric that does not allow light to pass through or with paper. Once caught in such a trap, mosquitoes will not escape. Insects will be caught in such a trap for up to a week, after which we will change the mixture.
Tip: After preparing the mixture, place it in a warm place.
Setting up a garden
Crafts for the garden and vegetable garden made from plastic bottles will probably always be relevant. Moreover, it is absolutely not necessary to make useful pots, fences or greenhouses. You can also have decorations. They turn out to be very interesting and unusual.
They are also easy to care for - they are not afraid of rain or snow. Probably only the wind can become the enemy of these lightweight structures. Therefore, no matter what you make from plastic, attach all the parts as firmly as possible!
But first, let’s talk about the useful and common. Probably, before numerous instructions appeared on the Internet on how to make crafts from plastic bottles for the garden, housewives were already using the cut halves to germinate seedlings.
This is probably where the numerous pots and flowerpots that decorate window sills and beds came from.
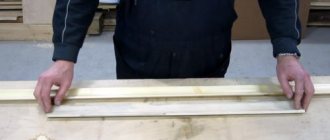
Bottle broom
From several one and a half liter bottles we make a simple and extremely durable broom . This broom is convenient for sweeping floors and fleecy surfaces. The hardness of the broom depends on the number of pieces cut.
Manufacturing.
First, we make preparations. We cut off the neck and bottom, spread the middle into flaps to the middle, no wider than two centimeters. You will need 4 of these, and leave another one with the top and neck. Now we put everything together, and cut off the top from the next bottle, put it on what happened and squeeze it. We take a strong wire and thread it through all the bottles along the edges. We put everything on the handle through the cork and secure it with wire. For reliability, we drive a nail through the neck into the handle.
Tip: Use copper stranded wire.
Secrets of making a bottle from a bottle
It’s not difficult to make a zherlitsa from a plastic bottle with your own hands. To make the design you will need:
- tape or tape;
- scissors or sharp knife;
- rubber;
- thin spring;
- nylon cord or fishing line 3-3.5 m long;
- plastic bottle with a lid with a volume of 1-1.5 l;
- hook;
- a piece of tarpaulin;
- sinker.
The process of making the girder:
- Remove the bright label from the plastic bottle. Wind a fishing line or cord into the middle, tying it with a strong knot at the neck. Under the lid, attach a rubber ring, which additionally secures the fishing line.
- Attach a treble hook to the end of the cord. The sinker can be attached to the fishing line directly in front of the hook or 30-40 cm above.
- Using tape or tape, attach the spring to the side of the bottle. Attach a bright tarpaulin flag to its end. Bend the spring to the bottle and secure the position by threading the fishing line under the elastic band.
Place the live bait on the hook and lower the bait into the pond. When the fish swallows the bait, the line will unwind, releasing the spring with the flag. Take out your catch and attach a new baitfish.
Using a thread, the girder can be attached to a wooden or iron stick, polystyrene foam or board. This will make it easier to remove gear and catch from the water.
To prevent the bottle from getting lost in the algae, paint the bottom red, pink or red. Bright shades will help you find the zherlitsa among coastal bushes and snags.
Water should not leak into the bottle. Fill the place where the lid is screwed with waterproof glue or screw a piece of bandage onto the thread. Check your equipment every 60-80 minutes; in case of even minimal leakage, the vent will completely go under water.
Summer girder for pike fishing
Mug made from a plastic bottle
If we don’t have a mug , you can easily make one from a bottle . First, cut off the top, then use a knife or scissors to cut out a square, retreating 2-3 centimeters from the top cut. We cut it evenly and with the expectation that the width of the remaining jumper will be the handle. Turn the top ring inside out and push through the bottom. Now we have a mug that can help us out in nature.
Tip: Without cutting out a large square, you can fold the middle section and put a cork ring on it.
“The second life of a plastic bottle” (plastic mug or wine glass)
Name the topic of the lesson: (slide 5)
“Mug and wine glass from a plastic bottle”
State the purpose of the lesson:
give a “second life” to a plastic bottle by making an original, useful, beautiful thing.
UUD
Cognitive: set a learning task based on the correlation of what is already known and learned, and what is still unknown. Expressing your thoughts with sufficient completeness and accuracy.
2.Teacher’s story “ The history of the appearance of a plastic bottle” (slide 6,7,8)
Long ago, before the science of chemistry existed, there was alchemy. The practice of alchemy was often prohibited by kings and emperors, so information on alchemy was previously unavailable. Now that we know how important it was for rulers to keep gold in value, we can read what the monk known only as Bartholomew the Englishman wrote in his book On the Properties of Things. Bartholomew lived in the thirteenth century, and in his book he told us about a Roman inventor who made an unbreakable bottle: “But in ancient times there was a man who made glass pliable, so that it could be repaired and hammered, and brought a vessel from such glass and appeared before Emperor Tiberius, and threw the vessel to the ground, but the vessel did not break, but bent and folded. And then the man fixed it, fixed it with a hammer. Then the emperor ordered the inventor’s head to be immediately cut off so that no one would know about his art. For otherwise gold would become no better than clay, and all other metals would lose their value, because truly, if glass vessels were not fragile, they would be valued more than vessels made of gold.” Of course, we cannot know for sure what this ill-fated inventor came up with, but we can say that it was the prototype of a plastic bottle.
In the modern world, no one is surprised by the appearance of a plastic bottle. Such bottles, as a rule, have a larger volume compared to glass ones, and are safer due to their elasticity. The Pepsi plastic bottle first appeared on the US market in 1970. In Russia, plastic bottles gained popularity after Western corporations Coca-Cola and PepsiCo entered the soft drink market. The first plant for the production of lemonade in plastic bottles in the USSR was opened in 1974 in Novorossiysk. The first samples weighed 135 g. Now it weighs 69 grams. These days, millions of bottles are produced and thrown away every year. And every year, waste from plastic bottles is growing, due to the fact that more and more products are being packaged in plastic bottles. The huge amount of garbage on the streets makes us think about the question: what does a plastic bottle bring to a person - benefit or harm? (slide 9)
Self-watering flower pot.
To create a self-watering flower pot, simply first cut off the top of the bottle, then the middle part, so that the top part fits in without touching the bottom. Then we carefully make a hole in the cork and thread a thread through it. The thread should extend 5 centimeters from both sides of the cork. Now that everything is ready, pour water and insert the top part that looks like a funnel. Now we fill in the soil, not forgetting to wet it. The plant will absorb the required amount of liquid, this will simplify plant care.
Tip: You can add fertilizer to the tank.
Sweet trap
This is a very easy to make, but useful item, done in literally five minutes.
It is enough to cut the bottle in half, pour sweet water into the lower part, and turn the upper half of the bottle over and put it in the lower half.
Just don't forget to stop the traffic jam! That's it, the trap for flies and mosquitoes is ready!
Spoon from a bottle
Having arrived in nature, you forgot your cutlery and have nothing to catch it with. To save the situation, a bottle, a knife, and a lighter are enough. Cut out one of the five parts of the bottom and a little of the top in one piece after burning the edges with a lighter. You can use this spoon to eat and prepare food.
Tip: After firing, rinse the device.
Useful plastic items for the garden
How many unique creations can be made from bottles that we throw in the trash every day.
Plastic bottles are an excellent material for creativity that cost almost nothing.
For creative self-expression at your dacha, you just need to collect more soda bottles, stock up on scissors, glue and paint. We tried to collect for you a variety of ideas and options and master classes for creating crafts from plastic bottles step by step.
Comfortable and beautiful ottoman
To make a cool ottoman from plastic bottles with your own hands for the dacha, you will need only 16 (but you can do more) empty soda bottles, closed with caps. Turn them upside down and secure them with tape, 2 pieces at a time. Then connect all the pairs with each other. Attach cardboard circles of the appropriate diameter with tape to the top and bottom.
Wrap an ottoman made from plastic bottles with foam to increase its comfort. Finally, sew a beautiful cover from old clothes. No one will even believe what your new piece of furniture is made of!
Broom for the hostess
Having several plastic bottles and scissors on hand, you can quickly and easily make a broom for an ownerless cutting that has been lying idle for a long time. To do this, you need to cut off the bottom of the bottle and cut the plastic into small strips, 4-5 cm short of the neck. The same should be done with two more bottles. Then cut them lengthwise, connect them and attach them to the cutting.
Such a broom made from plastic bottles, of course, is unlikely to cope with sweeping up litter on the carpet, but it can remove small debris in the yard!
Your own palm tree will be the envy of your neighbors!
Most plastic bottle trees are made using the same process. To work you will need:
- brown and green bottles;
- scissors;
- spray paint cans;
- wire.
So, how to make a palm tree from plastic bottles that will please the eye both in hot summers and snowy winters, while remaining evergreen:
- Cut off the bottoms of brown bottles with scissors.
- Harvesting a palm trunk occurs by inserting one bottle into another and so on until the required height is obtained. In this case, all the elements are strung on a wire that passes through the neck.
- The top of the tree is the neck of a green bottle without a bottom.
- Cut strips of green plastic into equal parts to imitate palm leaves.
- Don't forget to melt the cut areas if you have a curious baby who might cut himself on them.
A palm tree made from plastic bottles is not afraid of rain, snow or wind. By making at least a few of these exotic palm trees, you can greatly transform your flowerbed by introducing tropical notes into its design.
Storing vegetables and fruits.
Not all refrigerators have vegetable compartments and you have to store vegetables in a variety of forms, while the food gets beaten, scratched and rolled all over the refrigerator. For convenience, use five-liter eggplants. Cut off the top part and fill with vegetables or fruits. In this form, the food will not wrinkle and there will be significantly more free space in the refrigerator.
Tip: Store vegetables and fruits in separate containers.
Benefits of crafts made from plastic bottles
Plastic bottles are an affordable material, the scope of which can be significantly expanded if desired. Not only adults, but also children can join in the exciting creative process. Unite all family members behind a common cause!
Many people are aware of the deplorable situation with the ecology of our planet. There is a catastrophic shortage of treatment facilities and processing plants. But plastic products can decompose from 450 to 1000 years! However, only about 90% of them are not recycled at all.
Every self-respecting person is obliged to maintain cleanliness and not litter. And avid gardeners and handicraft housewives approach this issue competently. For them, plastic bottles are by no means garbage, but a very multifunctional item that served as the basis for a hobby.
Craftsmen, by creating beautiful birds and exotic palm trees, thereby take care of the environment. In addition, the main advantages of plastic products are that they are strong and durable. To people who have never done anything like this, it may seem that it is impossible to create a true masterpiece from such waste material. Today we will prove that this is not so!
To make crafts from plastic bottles for beginners, you just need to collect as many colorful containers of different sizes as possible, and then it’s up to your imagination!
From such a simple material you can make unusual decor for your apartment, decoration for the playground, figurines of birds and insects, flowers, vases and even furniture! The creation process is easy and fun!
So where to start?
Separate the yolk from the white using a bottle
In the process of preparing dishes, the white or yolk of an egg is required separately . But they are not easy to separate, the yolk is very fragile and if you puncture it, it will mix with the white. You can cheat with a bottle. Crack the egg onto a plate, squeeze the bottle and bring it to the yolk. By unclenching, we will draw the yolk into it without damaging it. The method is suitable for preparing dishes whose recipe includes a lot of eggs, for example, the common French meringue dessert “Meringue”.
Tip: Rinse the bottle before use.
Catching live bait with a bottle
And there are times when, upon arriving for fishing, it turns out you don’t have fry. Using a plastic bottle you can make an excellent trap for catching live bait.
Catching fry with a bottle is a fairly simple process. To do this, in addition to two plastic bottles, you will need scissors, a large needle, polystyrene foam, a sinker and a rope.
After the trap is ready, place a piece of bread in the bottle and lower it into the water. You can set the trap both from a boat and from the shore.
The fry follows the smell of bread, swims through the narrow entrance to the bottle, and getting out of there is very problematic. After this, the trap is removed from the water, and the fry is used to catch more serious fish. Even a novice fisherman can handle it.
The methods of fishing with a bottle in winter are different from those in summer.
Home rug made from lids
The properties and characteristics of plastic caps make it possible to create mats from them: massage mats, for a children's playroom, for the bathroom and hallway (placed at the front door).
The surface of such an accessory is not afraid of moisture and detergents, and little time and additional materials are required (awl, fishing line, base).
Step-by-step making of crafts from plastic corks with your own hands:
- Prepare the lids for work by thoroughly washing them from dirt.
- As a base, you can take an ordinary fabric rug or a plastic base, or a piece of an old carpet.
- The lids are hemmed onto a soft base using a needle with a large eye and fishing line. For this reason, all lids must first be pierced with an awl.
- For rigid bases, glue is used to secure the lids. Crafts made from plastic bottle caps should be durable enough for everyday use.
The surface of the rug can be coated with acrylic varnish, or it can be left unchanged. The dimensions of the future accessory depend on the number of parts available.
Beautiful coasters for the kitchen
Decorative coasters are often used to protect the tabletop from wet mugs and plates. Having a sufficient number of plastic bottle caps on hand, you can make an original craft for everyday use.
This accessory is not intended for installing hot frying pans and a kettle, but can be successfully used during lunch under plates or a tea set.
Instructions on how to make crafts from plastic bottle caps with your own hands:
- All prepared lids are pierced with an awl. The number of holes depends on the chosen shape of the future stand. Six holes are used to create a round mat.
- The connection of adjacent parts is made using durable metal wire.
It is important to ensure that during creative work the lids are located as close to each other as possible. The remaining cracks can cause rapid damage to the stand or rapid contamination of the surface.
Student desk organizers
There should be order on the pupil's or student's desk. Homemade organizers made from plastic lids will help you maintain organization and order. To work, you will need metal wire, wire cutters, and colored caps.
Instructions on how to make crafts from plastic bottle caps with your own hands:
- The first step is to fold the bottom of the organizer basket. To do this, all the covers are pierced with an awl along the side surfaces of the parts.
- The wire is threaded through the resulting holes, forming adjacent rows of the future basket.
- After completing work on the bottom, I bend the wire upward and then string the lids on.
The weaving is completed by assembling the walls at the selected height by twisting the free ends of the wire at one edge. You can use thicker wire or triple wire to give the organizer extra strength and stability. A basket for storing toys is made using a similar scheme.
Such baskets have many advantages due to easy practical care, sufficient volume, and original design. To work, you will need a large cross-section of wire, a large number of multi-colored caps and wire cutters.
Useful tips for making and coloring crafts
Before you start working on any product made from a PET bottle, we would like to finally give you some useful recommendations:
- To make the craft clean and neat, before starting work, thoroughly rinse the bottles under running water, dry them and remove the stickers from them.
- It is most convenient to cut out elegant details using a template. Draw a pattern onto the cardboard and, placing it on the plastic base, trace it using the point of an awl or a permanent black marker.
- The shape and volume of a plastic element can be given by holding it for some time over the flame of a candle or lighter.
- It is more convenient to paint the plastic before cutting, and at the end all that remains is to correct the nuances of painting.
- Acrylic paints are best suited for painting small crafts, and crafts intended for the garden or vegetable garden can be painted with aerosol or car paint from a spray can.
- To ensure that the finished craft from a plastic bottle retains its original appearance longer, cover it with a layer of colorless acrylic varnish.
That's all! Creative inspiration to you! And don’t forget to share your plastic craft ideas with us!