Every person should keep himself in good physical shape. As the popular proverb says: “A healthy mind in a healthy body.” The press bench is one of the most popular and sought-after exercise equipment, with which you can successfully conduct home workouts at any convenient time. Below we will talk about how to make a press bench with your own hands.
Types of abdominal exercise equipment
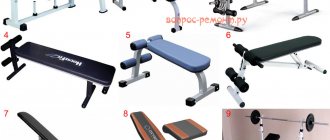
There are several types of abdominal exercise machines.
Typically used in gyms:
- Typical bench for the press. This bench can be positioned at different angles. A larger angle of inclination of the board requires more effort, but at the same time allows you to achieve impressive results. Such a bench is considered the cheapest option and costs around two thousand rubles.
- Boards with adjustable backrest. An excellent option for developing several muscle groups at once: abdomen, waist, buttocks and back. The average cost is about three thousand rubles.
- Benches with a curved back. Training with this bench takes place with an increased level of load. These machines are mainly used by advanced athletes who have been training for several years.
- "Roman" benches for the press. They are considered the most “advanced” type of simulator. Allows you to pump up your abdominal muscles with your legs raised. With constant training you can achieve beautiful relief.
The press bench has virtually no disadvantages. It is worth considering that it is extremely difficult for tall people to choose a board that matches their individual body parameters.
Benefits of using a bench
Having purchased or made a bench yourself, you can begin your first active training.
Advantages of using an ab bench:
- The ability to control your every move.
- With the help of special controls, you can increase or decrease the loads when required.
- Performing exercises on a bench with additional weight is much safer.
- Regular workouts become not only more convenient, but also several times more productive.
- There are many more types of exercises you can perform on a bench press.
Using this type of equipment in your arsenal, you can make progress quite quickly. It won’t take long to get sculpted abs and a pumped up body. Using a bench you can perform many more exercises, including dumbbells and barbells.
RESULT
As you can see, the simplest versions of abdominal exercise equipment are much easier to make than, for example, a barbell and a bench press. True, for this, in addition to desire and time, you need materials, and where to get them you can partially learn from the article “How to make exercise equipment at home.” But perhaps you shouldn’t bother so much, because excellent results are also possible when performing exercises on the floor, horizontal bar or uneven bars, and additional load can be created with the help of weights. For example, dumbbells behind your head or on your chest during crunches on the floor and hanging additional weight from your legs when practicing on the bar or parallel bars, but this will happen over time.
( 1 ratings, average: 5.00 out of 5)
Buy or make it yourself
To perform a bench press at home, you simply cannot do without a bench. There are two options - buy it yourself or make it yourself.
Purchase in store
Buying the necessary equipment at any sports store is not difficult.
Advantages of buying a bench in a store:
- availability. Having purchased a bench, you only need to install it at home in a suitable place;
- time. It will take no more than 2-3 hours to purchase and install the bench.
Despite the obvious advantages, there are several disadvantages that should be noted.
Minuses:
- high cost of equipment. Very often there is an overpayment for the manufacturer's brand;
- inability to select individual parameters for yourself. Basically, bench press benches are produced in a standard configuration - if the athlete is tall, then it will be difficult for him to choose the necessary bench for himself.
When it is not possible to buy the necessary projectile in a store, you can make it yourself.
DIY making
Almost everyone, even a novice master, can make a bench press at home.
Pros:
- you can choose any parameters of the bench based on your physiological characteristics;
- money. Making a bench yourself is less expensive than buying it in a store.
This choice is suitable for those who do not have large finances or do not want to spend a lot of money in the store.
Flaws:
- time. It will not be possible to make a bench in 1-2 hours; you will have to spend about a couple of days on it;
- tools. If you don’t have the necessary tools in your home arsenal, then it’s impossible to make a bench yourself.
In fact, the store-bought and home-made versions are not much different from each other. If you make the simulator yourself, it will be in no way inferior to the store-bought version.
Criterias of choice
Home workouts should be safe first and foremost. You need to be very careful when choosing a bench press in a store.
Particular attention should be paid to the following parameters:
- Quality. The structure must be made of durable material. It is important to pay attention to the reliability of fastening parts and elements. It is not recommended to purchase exercise equipment with narrow racks, otherwise the load may be distributed incorrectly.
- Compact sizes. Fixed benches are reliable and have good stability. But not every person has the opportunity to allocate a permanent place for this simulator. Folding models allow you to correct the situation. When purchasing this type, you should pay attention to the quality of the folding and transformation mechanisms.
- Functionality. Horizontal benches, as a rule, have limited opportunities for exercise. To increase the versatility of the sports equipment, you can supplement it with the following elements: footrest, parallel bars, handrails, stand with safety stops.
The Press and Abdominal Power Bench is a great machine for working with dumbbells and barbells. For comfortable and productive training, it is recommended to choose the length of the bench so that your head does not hang down during exercise.
What types of vultures are there?
- Barbell bar. They come in different forms, and you definitely need at least one at home. A long standard straight bar weighs 20 kg, a short one weighs half as much (it is advisable to have one). The choice between EZ-shaped and W-shaped bars depends on the exercises you choose to perform. A homemade neck is made from a pipe, so it differs from the standard parameters.
- Two dumbbell bars, the ends of which are threaded for a large nut.
- Pancakes. For beginners, provided that the holes for barbells and dumbbells are universal. There are enough of them: 4 five-kilogram pieces, 2 ten-kilogram pieces, 2 twenty-kilogram pieces. This is ideal, since pancakes are more expensive than other equipment. In the worst case, you need identical loads that are hung on the dumbbell and barbell. The weight of the dumbbell is determined based on the ability to perform 8-10 repetitions of each exercise. As practice shows, for beginners, 4 five-kilogram weight plates are enough for dumbbells.
- For a homemade exercise machine - a horizontal bar, the wall or street options are preferable, rather than in the doorway.
- The beams are the same as wall beams, which are easier to install.
- You need to have two separate racks: one for bench presses, one for deadlifts, or one with the ability to choose positions.
- A jump rope that is needed for cardio training.
- Punching bag.
With these homemade exercise machines, you can set up a full-fledged gym at home.
How to make a bench with your own hands
If you have the desire and opportunity to make a bench press yourself, then no obstacles or difficulties should arise. Before you begin the process, you need to choose the correct bench press bench dimensions, but you can use your own parameters.
Drawing
The figure below shows the dimensions of three-legged exercise machines for people of average height. On the left is a multifunctional exercise machine that has a removable desk, as well as hand and foot levers.
On the right is a simple compact one. The height above the floor must be selected individually, based on growth characteristics.
Required tools and materials
Making a bench takes time and patience.
You will need the following materials and tools:
- Profile pipe.
- Welding machine.
- Bulgarian.
- Roulette.
- Steel strip.
- Vise.
- Drill.
If you don’t have the appropriate tools at home, then it’s better to buy a press bench at a sports store.
Frame making
To work, you need to take a pipe with a diameter of about 2 cm with a maximum thickness of the walls. In some cases you will need to use a steel strip.
Step-by-step description of actions:
- Make two sections of pipe, each 83 cm long. These sections will serve to support the rod. On one of the segments, take a measurement of 34 cm and mark it with a simple pencil. Mark the second one in the same way.
- Make a segment of 52 cm. This segment will connect the first two pipes to each other at a height of 34 cm.
- Cut another element 34 cm long. This is the leg on the reverse side.
- Cut the element to 97 cm. Combine the front and rear supports into the overall structure using a weld.
- Make extensions under the legs to evenly distribute the load on the floor surface. Under the back - 30 cm, and under each front - 22 cm. All joints need to be welded.
- Using a steel strip vice, you need to bend 2 identical supports. Outwardly, they should look like the letter J.
At the very end, you need to make several holes in the structure, each of which will have a diameter of 1 cm. The rods will go into these holes. Their exact location is 16 cm from the center of the beam. Using the same principle, you can make a dumbbell rack with your own hands.
Attaching the bench to the frame
Before we move on to attaching the bench to the frame, it needs to be made.
To work you will need:
- sheet steel 2 mm;
- Bulgarian;
- roulette;
- door hinges;
- welding machine;
- cut board;
- knife;
- foam;
- rubberized fabric;
- machine;
- reinforcing rod without ribs.
At the beginning of work, you need to cut 2 steel sheets - 35*16 and 35*94. The first one needs to be fixed with a weld; it should protrude only 1 cm beyond the pipe.
To fix the second one, you should take a steel door-type hinge. Weld the hinges with one plane to the pipe, and the other to the steel plate.
Further:
- On the reverse side, make an indent of 10 cm, attach 2 ribless reinforcement rods 30 cm long.
- Place a sanded edged board or chipboard on top, which will protrude 0.5 cm in each direction.
- Secure all joints between metal and wood using self-tapping screws.
- Place foam rubber on top and cover with rubberized cloth.
The shop is ready. Now you don’t have to be afraid of any unpleasant surprises while doing the exercises. This system can easily support more than 1 ton of weight.
What to remember
The crossover is an almost universal exercise machine (for men and women), with which you can work out most of the muscles in our body.
This simulator does not affect the growth of muscle mass. On the contrary, it only forms the muscle.
Using a crossover, you can perform various variations of exercises for a particular muscle group.
It is important to perform the exercises efficiently, having first carefully studied the information about them or take the advice of a trainer.
This is where I end. See you again on the expanses of my blog!
Improved bench model
The bench can be improved - for example, by adding bars to it. This will provide an opportunity to additionally load the muscles of the chest and triceps.
Materials and tools
In order to install parallel bars onto an existing bench press, you don’t need a lot of tools.
The following materials are needed:
- bars;
- welding machine.
That's all. Installing beams is not as difficult as it seems at first glance.
Assembly work
It will take 20-30 minutes to weld the bars to the bench press.
Necessary:
- Get a welding machine and a special mask to protect your eyes.
- Weld the beams to the bench.
The improved bench model is ready. Now there is an opportunity to diversify your home workouts.
Rules
To achieve maximum effect, you need to work carefully, focusing on ensuring that most of the load in the repetition falls on the back muscles. Pulling the block with your hands is not correct. Every seven minutes take a break for 30 seconds, this is enough. An increase in rest time is undesirable. If you set out to become strong and beautiful in the shortest possible time, then do not hesitate to add push-ups and abs to your break.
Do not forget about the mandatory warm-up before starting the exercise, this will save you from many troubles.
At first, such loads will seem excessive to you, but after just a week or two, your body will adapt and your endurance will increase. Do not forget about the mandatory warm-up before starting the exercise, this will save you from many troubles. The movements in the approach must be correct in several important respects:
1.
The back is straight throughout exercise
2.
The angle of inclination when moving backward is 45 degrees.
3.
No jerking.
If you can't perform the repetition smoothly, reduce the weight. 4.
Try not to overload your knees.
5.
Pay close attention to timing. This is very important for correct muscle development and maximum effect from the exercise.
Making a wooden Roman bench
Even a novice craftsman can make a wooden Roman bench. It will require bars and boards. If boards are not available, then a regular sheet of plywood will do.
This simulator is performed according to the following principle:
- You will need to take a bench of suitable size, which can be made from one wide board with a thickness of 3 to 5 cm.
- You need to purchase two vertical stands. Their cross-section should be about 50x50 mm, and their height should be 1 meter. From the edges of each rack you need to make holes with a diameter of about 3 cm, into which you then need to insert the edges of the crossbar for the legs.
- To make a crossbar for the legs, you should take a round beam 1 meter long and about 3 cm in diameter. The edges of the crossbar must be inserted into the holes.
- You will need a support beam 1 meter long and with a cross section of 50x50. It will connect 2 racks; you need to secure it in the middle.
- The support you will need for the seat. With its help, the backrest is secured to the crossbar. It can be made from timber or boards with a width of 3 cm. The length of the support should be slightly shorter than the seat.
- Stiffening rib. The seat will be more reliable if stiffening ribs are used for reinforcement. From below to the back you need to attach a rib made of thickened material.
- When assembling the structure, you should use ordinary self-tapping screws.
The main disadvantage of this simulator is its bulkiness. It will not be possible to install such a structure in small apartments.
Leg exercises
- Leg abduction in crossover
You need to go to the lower block of the simulator and set the required weight. We stand sideways to the simulator. We put the cuff on the ankle.
We put our feet together. Transfer your body weight to your free leg. We tear the other leg off the floor.
Let's take a deep breath. We move the leg with the cuff to the side. Slowly return the leg to the machine, slightly crossing it with the other leg. We do the same with the other leg.
This is a classic exercise. In fact, there are many variations of this exercise. It can be performed lying on a bench, on all fours, facing and back to the crossover, etc.
I suggest you familiarize yourself with various exercises in this video:
Covering boards and seats
The covering of a homemade exercise machine must be made of two layers so that it wicks sweat away from the skin.
What you will need to create the sheathing:
- Microporous rubber with a thickness of 12 mm.
- Sintepon with a thickness of 8 mm.
- Denim.
- Furniture foam rubber with a thickness of 7 mm.
Rubber fabric should be glued to the base using Moment glue. The remaining layers of sheathing need to be tucked under and secured with an ordinary stapler. The disadvantage of such cladding is that it needs to be changed once a year for reasons of sanitary and hygienic standards.
Homemade kettlebell for the home gym
The simplest version of this equipment is a plastic canister with a comfortable handle. It can be filled with sand, gravel or small coins. You can cast the product yourself, making a metal body and lead “insides”. But you should not create a projectile entirely from lead, since this metal can cause harm to the skin if it comes into contact.
There are a couple more simple ways to make a kettlebell with your own hands:
- We put three strong bags inside each other, fill them with filler, and give the product the desired shape using tape. How it will look, look at the photo below;
- We roll up a small diameter tube into a handle shape. Make a cut in a ball with a dense shell (a basketball would be best), put large bolts and metal scraps inside, and pour in the concrete mixture. We fix the handle in it, connecting its ends to each other. Then we close the incision tightly. The disadvantage of such a weight is that it will be difficult to calculate its exact weight.
Useful tips
A bench press will help every athlete conduct successful workouts at home.
To make your classes more productive, there are some useful tips:
- When performing exercises, technique should be given first place. It is better to sacrifice repetitions and approaches, but do everything strictly according to technique.
- When performing a bench press, you should take 4 seconds to lower the load and 1-2 seconds to lift it. In this way, you can not only increase strength indicators, but also noticeably increase muscle volume.
- If you feel unwell, it is better to postpone the workout to the next day. Training should be carried out in a cheerful and healthy state.
- Rest. It is not recommended to train on a bench for abs and presses around the clock. You need to devote 3-4 days a week to training.
There is nothing complicated in making a bench press. The main thing is to apply strength, energy, find the necessary schemes for work and add a little ingenuity.
Execution technique
In order for the classes to bring maximum benefit, you have to learn the technique of movements. Strengthening your back and improving your silhouette occurs in 3–4 months. The stroke consists of two phases:
- craving;
- return.
Traction
The lower limbs are straightened, the body is tilted back. The back and legs are mainly loaded. Arms are straightened, shoulders relaxed. At the end of the movement, the arms are bent and the shoulders are extended. The body is slightly tilted, the legs are straightened. The handle is pulled towards the abdominal muscles.
Return
Move forward, starting from the hip. The seat of the projectile moves towards the flywheel mechanism, and the trajectory of the upper limbs does not intersect with the trajectory of the lower ones.
Every time before training, do a warm-up to increase blood circulation and prepare the body for further stress.
The normal length of a rowing machine session is 50 minutes
. During this time, the athlete manages to complete three sets of exercises.
Classes begin with 20 minutes, gradually extending them. The load regulator (if provided by the model) is set to the lowest level. The main goal when mastering the installation is to tone the body.
Intense and long-term training is contraindicated during this period. A sign that you can increase the load is the absence of muscle discomfort.
The most common mistakes that result in diseases of the musculoskeletal system:
- when performing movements, the load falls on the knees, which leads to the development of joint disease;
- keep your back bent;
- make sudden movements or suddenly stop the exercise.
Stop training if your health worsens in any way—weakness, dizziness, nausea. Despite the benefits of the rowing simulator, people with certain heart and vascular diseases and cerebrovascular disorders are not allowed to participate in training.
Postponed training until recovery in case of acute bacterial and viral respiratory tract infections, high body temperature, or general malaise. Before starting training, consultation with a doctor is necessary if you have chronic illnesses or are over 35 years old.
